
ASP.NET Core Web API 最佳實踐
作者:hippieZhou
https://www.cnblogs.com/hippieZhou/p/11966373.html
整理:dotnet全棧開發(fā)
01 介紹
當我們編寫一個項目的時候,我們的主要目標是使它能如期運行,并盡可能地滿足所有用戶需求。
但是,你難道不認為創(chuàng)建一個能正常工作的項目還不夠嗎?同時這個項目不應該也是可維護和可讀的嗎?
事實證明,我們需要把更多的關注點放到我們項目的可讀性和可維護性上。這背后的主要原因是我們或許不是這個項目的唯一編寫者。一旦我們完成后,其他人也極有可能會加入到這里面來。
因此,我們應該把關注點放到哪里呢?
在這一份指南中,關于開發(fā) .NET Core Web API 項目,我們將敘述一些我們認為會是最佳實踐的方式。進而讓我們的項目變得更好和更加具有可維護性。
現(xiàn)在,讓我們開始想一些可以應用到 ASP.NET Web API 項目中的一些最佳實踐。
02 Startup類和服務配置
在 Startup 類中,有兩個方法:ConfigureServices 是用于服務注冊,Configure 方法是向應用程序的請求管道中添加中間件。
因此,最好的方式是保持 ConfigureServices 方法簡潔,并且盡可能地具有可讀性。當然,我們需要在該方法內部編寫代碼來注冊服務,但是我們可以通過使用 擴展方法 來讓我們的代碼更加地可讀和可維護。
例如,讓我們看一個注冊 CORS 服務的不好方式:
public void ConfigureServices(IServiceCollection services)
{
    services.AddCors(options =>
    {
        options.AddPolicy("CorsPolicy", builder => builder.AllowAnyOrigin()
            .AllowAnyMethod()
            .AllowAnyHeader()
            .AllowCredentials());
    });
}
盡管這種方式看起來挺好,也能正常地將 CORS 服務注冊成功。但是想象一下,在注冊了十幾個服務之后這個方法體的長度。
這樣一點也不具有可讀性。
一種好的方式是通過在擴展類中創(chuàng)建靜態(tài)方法:
public static class ServiceExtensions {
    public static void ConfigureCors(this IServiceCollection services) {
        services.AddCors(options =>
        {
            options.AddPolicy("CorsPolicy", builder => builder.AllowAnyOrigin()
                .AllowAnyMethod()
                .AllowAnyHeader()
                .AllowCredentials());
        });
    }
}
然后,只需要調用這個擴展方法即可:
public void ConfigureServices(IServiceCollection services) {
    services.ConfigureCors();
}
了解更多關于 .NET Core 的項目配置,請查看:https://code-maze.com/net-core-web-development-part2
03 項目組織
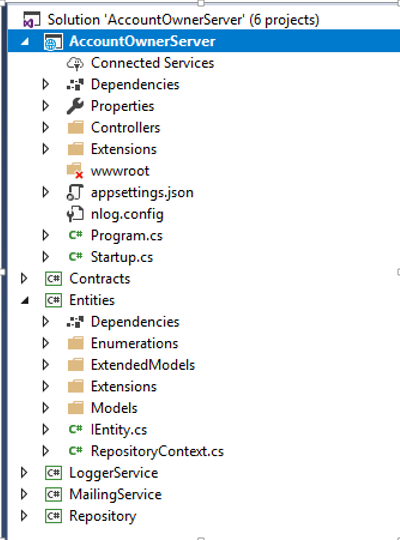
我們應該嘗試將我們的應用程序拆分為多個小項目。通過這種方式,我們可以獲得最佳的項目組織方式,并能將關注點分離(SoC)。我們的實體、契約、訪問數(shù)據(jù)庫操作、記錄信息或者發(fā)送郵件的業(yè)務邏輯應該始終放在單獨的 .NET Core 類庫項目中。
應用程序中的每個小項目都應該包含多個文件夾用來組織業(yè)務邏輯。
這里有個簡單的示例用來展示一個復雜的項目應該如何組織:
04 基于環(huán)境的設置
當我們開發(fā)應用程序時,它處于開發(fā)環(huán)境。但是一旦我們發(fā)布之后,它將處于生產(chǎn)環(huán)境。因此,將每個環(huán)境進行隔離配置往往是一種好的實踐方式。
在 .NET Core 中,這一點很容易實現(xiàn)。
一旦我們創(chuàng)建好了項目,就已經(jīng)有一個 appsettings.json 文件,當我們展開它時會看到 appsettings.Development.json 文件:

此文件中的所有設置將用于開發(fā)環(huán)境。
我們應該添加另一個文件 appsettings.Production.json,將其用于生產(chǎn)環(huán)境:
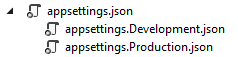
生產(chǎn)文件將位于開發(fā)文件下面。
設置修改后,我們就可以通過不同的 appsettings 文件來加載不同的配置,取決于我們應用程序當前所處環(huán)境,.NET Core 將會給我們提供正確的設置。更多關于這一主題,請查閱:https://docs.microsoft.com/en-us/aspnet/core/fundamentals/environments?view=aspnetcore-3.0
05 數(shù)據(jù)訪問層
在一些不同的示例教程中,我們可能看到 DAL 的實現(xiàn)在主項目中,并且每個控制器中都有實例。我們不建議這么做。
當我們編寫 DAL 時,我們應該將其作為一個獨立的服務來創(chuàng)建。在 .NET Core 項目中,這一點很重要,因為當我們將 DAL 作為一個獨立的服務時,我們就可以將其直接注入到 IOC(控制反轉)容器中。IOC 是 .NET Core 內置功能。通過這種方式,我們可以在任何控制器中通過構造函數(shù)注入的方式來使用。
public class OwnerController: Controller
{
    private readonly IRepository _repository;
    public OwnerController(IRepository repository) {
        _repository = repository;
    }
}
06 控制器
控制器應該始終盡量保持整潔。我們不應該將任何業(yè)務邏輯放置于內。
因此,我們的控制器應該通過構造函數(shù)注入的方式接收服務實例,并組織 HTTP 的操作方法GET、POST、PUT、DELETE、PATCH...
public class OwnerController : Controller
{
    private readonly ILoggerManager _logger;
    private readonly IRepository _repository;
    public OwnerController(ILoggerManager logger, IRepository repository) {
        _logger = logger;
        _repository = repository;
    }

    [HttpGet]
    public IActionResult GetAllOwners() {
    }
    [HttpGet("{id}", Name = "OwnerById")]
    public IActionResult GetOwnerById(Guid id) {
    }
    [HttpGet("{id}/account")]
    public IActionResult GetOwnerWithDetails(Guid id) {
    }
    [HttpPost]
    public IActionResult CreateOwner([FromBody]Owner owner) {
    }
    [HttpPut("{id}")]
    public IActionResult UpdateOwner(Guid id, [FromBody]Owner owner) {
    }
    [HttpDelete("{id}")]
    public IActionResult DeleteOwner(Guid id) {
    }
}
我們的 Action 應該盡量保持簡潔,它們的職責應該包括處理 HTTP 請求,驗證模型,捕捉異常和返回響應。
[HttpPost]
public IActionResult CreateOwner([FromBody]Owner owner) {
    try
    {
        if (owner.IsObjectNull())
        {
            return BadRequest("Owner object is null");
        }
        if (!ModelState.IsValid)
        {
            return BadRequest("Invalid model object");
        }
        _repository.Owner.CreateOwner(owner);
        return CreatedAtRoute("OwnerById", new { id = owner.Id }, owner);
    }
    catch (Exception ex)
    {
        _logger.LogError($"Something went wrong inside the CreateOwner action: { ex} ");
        return StatusCode(500, "Internal server error");
    }
}
在大多數(shù)情況下,我們的 action 應該將 IActonResult 作為返回類型(有時我們希望返回一個特定類型或者是 JsonResult ...)。通過使用這種方式,我們可以很好地使用 .NET Core 中內置方法的返回值和狀態(tài)碼。
使用最多的方法是:
OK => returns the 200 status code NotFound => returns the 404 status code BadRequest => returns the 400 status code NoContent => returns the 204 status code Created, CreatedAtRoute, CreatedAtAction => returns the 201 status code Unauthorized => returns the 401 status code Forbid => returns the 403 status code StatusCode => returns the status code we provide as input
07 處理全局異常
在上面的示例中,我們的 action 內部有一個 try-catch 代碼塊。這一點很重要,我們需要在我們的 action 方法體中處理所有的異常(包括未處理的)。一些開發(fā)者在 action 中使用 try-catch 代碼塊,這種方式明顯沒有任何問題。但我們希望 action 盡量保持簡潔。因此,從我們的 action 中刪除 try-catch ,并將其放在一個集中的地方會是一種更好的方式。.NET Core 給我們提供了一種處理全局異常的方式,只需要稍加修改,就可以使用內置且完善的的中間件。我們需要做的修改就是在 Startup 類中修改 Configure 方法:
public void Configure(IApplicationBuilder app, IWebHostEnvironment env)
{
    app.UseExceptionHandler(config =>
    {
        config.Run(async context =>
        {
            context.Response.StatusCode = 500;
            context.Response.ContentType = "application/json";

            var error = context.Features.Get<IExceptionHandlerFeature>();
            if (error != null)
            {
                var ex = error.Error;
                await context.Response.WriteAsync(new ErrorModel
                {
                    StatusCode = 500,
                    ErrorMessage = ex.Message
                }.ToString());
            }
        });
    });

    app.UseRouting();

    app.UseEndpoints(endpoints =>
    {
        endpoints.MapControllers();
    });
}
我們也可以通過創(chuàng)建自定義的中間件來實現(xiàn)我們的自定義異常處理:
// You may need to install the Microsoft.AspNetCore.Http.Abstractions package into your project
public class CustomExceptionMiddleware
{
    private readonly RequestDelegate _next;
    private readonly ILogger<CustomExceptionMiddleware> _logger;
    public CustomExceptionMiddleware(RequestDelegate next, ILogger<CustomExceptionMiddleware> logger) {
        _next = next;
        _logger = logger;
    }

    public async Task Invoke(HttpContext httpContext) {
        try
        {
            await _next(httpContext);
        }
        catch (Exception ex)
        {
            _logger.LogError("Unhandled exception....", ex);
            await HandleExceptionAsync(httpContext, ex);
        }
    }

    private Task HandleExceptionAsync(HttpContext httpContext, Exception ex) {
        //todo
        return Task.CompletedTask;
    }
}

// Extension method used to add the middleware to the HTTP request pipeline.
public static class CustomExceptionMiddlewareExtensions
{
    public static IApplicationBuilder UseCustomExceptionMiddleware(this IApplicationBuilder builder) {
        return builder.UseMiddleware<CustomExceptionMiddleware>();
    }
}
之后,我們只需要將其注入到應用程序的請求管道中即可:
public void Configure(IApplicationBuilder app, IWebHostEnvironment env) {
    app.UseCustomExceptionMiddleware();
}
08 使用過濾器移除重復代碼
ASP.NET Core 的過濾器可以讓我們在請求管道的特定狀態(tài)之前或之后運行一些代碼。因此如果我們的 action 中有重復驗證的話,可以使用它來簡化驗證操作。
當我們在 action 方法中處理 PUT 或者 POST 請求時,我們需要驗證我們的模型對象是否符合我們的預期。作為結果,這將導致我們的驗證代碼重復,我們希望避免出現(xiàn)這種情況,(基本上,我們應該盡我們所能避免出現(xiàn)任何代碼重復。)我們可以在代碼中通過使用 ActionFilter 來代替我們的驗證代碼:
if (!ModelState.IsValid)
{
    //bad request and logging logic
}
我們可以創(chuàng)建一個過濾器:
public class ModelValidationAttribute : ActionFilterAttribute
{
    public override void OnActionExecuting(ActionExecutingContext context) {
        if (!context.ModelState.IsValid)
        {
            context.Result = new BadRequestObjectResult(context.ModelState);
        }
    }
}
然后在 Startup 類的 ConfigureServices 函數(shù)中將其注入:
services.AddScoped<ModelValidationAttribute>();
現(xiàn)在,我們可以將上述注入的過濾器應用到我們的 action 中。
09 Microsoft.AspNetCore.All 元包
注:如果你使用的是 2.1 和更高版本的 ASP.NET Core。建議使用 Microsoft.AspNetCore.App 包,而不是 Microsoft.AspNetCore.All。這一切都是出于安全原因。此外,如果使用 2.1 版本創(chuàng)建新的 WebAPI 項目,我們將自動獲取 AspNetCore.App 包,而不是 AspNetCore.All。
這個元包包含了所有 AspNetCore 的相關包,EntityFrameworkCore 包,SignalR 包(version 2.1) 和依賴框架運行的支持包。采用這種方式創(chuàng)建一個新項目很方便,因為我們不需要手動安裝一些我們可能使用到的包。
當然,為了能使用 Microsoft.AspNetCore.all 元包,需要確保你的機器安裝了 .NET Core Runtime。
10 路由
在 .NET Core Web API 項目中,我們應該使用屬性路由代替?zhèn)鹘y(tǒng)路由,這是因為屬性路由可以幫助我們匹配路由參數(shù)名稱與 Action 內的實際參數(shù)方法。另一個原因是路由參數(shù)的描述,對我們而言,一個名為 "ownerId" 的參數(shù)要比 "id" 更加具有可讀性。
我們可以使用 [Route] 屬性來在控制器的頂部進行標注:
[Route("api/[controller]")]
public class OwnerController : Controller
{
    [Route("{id}")]
    [HttpGet]
    public IActionResult GetOwnerById(Guid id) {
    }
}
還有另一種方式為控制器和操作創(chuàng)建路由規(guī)則:
`[Route("api/owner")]
public class OwnerController : Controller
{
    [Route("{id}")]
    [HttpGet]
    public IActionResult GetOwnerById(Guid id) {
    }
}
對于這兩種方式哪種會好一些存在分歧,但是我們經(jīng)常建議采用第二種方式。這是我們一直在項目中采用的方式。
當我們談論路由時,我們需要提到路由的命名規(guī)則。我們可以為我們的操作使用描述性名稱,但對于 路由/節(jié)點,我們應該使用 NOUNS 而不是 VERBS。
一個較差的示例:
[Route("api/owner")]
public class OwnerController : Controller
{
    [HttpGet("getAllOwners")]
    public IActionResult GetAllOwners() {
    }
    [HttpGet("getOwnerById/{id}"]
    public IActionResult GetOwnerById(Guid id) {
    }
}
一個較好的示例:
[Route("api/owner")]
public class OwnerController : Controller
{
    [HttpGet]
    public IActionResult GetAllOwners() {
    }
    [HttpGet("{id}"]
    public IActionResult GetOwnerById(Guid id) {
    }
}
更多關于 Restful 實踐的細節(jié)解釋,請查閱:https://code-maze.com/top-rest-api-best-practices/
11 日志
如果我們打算將我們的應用程序發(fā)布到生產(chǎn)環(huán)境,我們應該在合適的位置添加一個日志記錄機制。在生產(chǎn)環(huán)境中記錄日志對于我們梳理應用程序的運行很有幫助。
.NET Core 通過繼承 ILogger 接口實現(xiàn)了它自己的日志記錄。通過借助依賴注入機制,它可以很容易地使用。
public class TestController: Controller
{
    private readonly ILogger _logger;
    public TestController(ILogger<TestController> logger) {
        _logger = logger;
    }
}
然后,在我們的 action 中,我們可以通過使用 _logger 對象借助不同的日志級別來記錄日志。
.NET Core 支持使用于各種日志記錄的 Provider。因此,我們可能會在項目中使用不同的 Provider 來實現(xiàn)我們的日志邏輯。
NLog 是一個很不錯的可以用于我們自定義的日志邏輯類庫,它極具擴展性。支持結構化日志,且易于配置。我們可以將信息記錄到控制臺,文件甚至是數(shù)據(jù)庫中。
想了解更多關于該類庫在 .NET Core 中的應用,請查閱:https://code-maze.com/net-core-web-development-part3
Serilog 也是一個很不錯的類庫,它適用于 .NET Core 內置的日志系統(tǒng)。
這里有一個能提高日志性能的小技巧:字符串拼接建議使用 _logger.LogInformation("{0},{1}", DateTime.Now, "info") 方式來記錄日志,而不是 _logger.LogInformation($"{DateTime.Now},info")。
12 加密
我們不會建議將密碼以明文形式存儲到數(shù)據(jù)庫中。處于安全原因,我們需要對其進行哈希處理。這超出了本指南的內容范圍。互聯(lián)網(wǎng)上有大量哈希算法,其中不乏一些不錯的方法來將密碼進行哈希處理。
但是如果需要為 .NET Core 的應用程序提供易于使用的加密類庫,CryptoHelper 是一個不錯的選擇。
CryptoHelper 是適用于 .NET Core 的獨立密碼哈希庫,它是基于 PBKDF2 來實現(xiàn)的。通過創(chuàng)建 Data Protection 棧來將密碼進行哈希化。這個類庫在 NuGet 上是可用的,并且使用也很簡單:
using CryptoHelper;

// Hash a password
public string HashPassword(string password) {
    return Crypto.HashPassword(password);
}

// Verify the password hash against the given password
public bool VerifyPassword(string hash, string password) {
    return Crypto.VerifyHashedPassword(hash, password);
}
13 內容協(xié)商
默認情況下,.NET Core Web API 會返回 JSON 格式的結果。大多數(shù)情況下,這是我們所希望的。
但是如果客戶希望我們的 Web API 返回其它的響應格式,例如 XML 格式呢?
為了解決這個問題,我們需要進行服務端配置,用于按需格式化我們的響應結果:
public void ConfigureServices(IServiceCollection services)
{
    services.AddControllers().AddXmlDataContractSerializerFormatters();
}
但有時客戶端會請求一個我們 Web API 不支持的格式,因此最好的實踐方式是對于未經(jīng)處理的請求格式統(tǒng)一返回 406 狀態(tài)碼。這種方式也同樣能在 ConfigureServices 方法中進行簡單配置:
public void ConfigureServices(IServiceCollection services)
{
     services.AddControllers(option => option.ReturnHttpNotAcceptable = true).AddXmlDataContractSerializerFormatters();
}
我們也可以創(chuàng)建我們自己的格式化規(guī)則。
這一部分內容是一個很大的主題,如果你希望了解更多,請查閱:https://code-maze.com/content-negotiation-dotnet-core
14 使用 JWT
現(xiàn)如今的 Web 開發(fā)中,JSON Web Tokens (JWT) 變得越來越流行。得益于 .NET Core 內置了對 JWT 的支持,因此實現(xiàn)起來非常容易。JWT 是一個開發(fā)標準,它允許我們以 JSON 格式在服務端和客戶端進行安全的數(shù)據(jù)傳輸。
我們可以在 ConfigureServices 中配置 JWT 認證:
public void ConfigureServices(IServiceCollection services)
{
    services.AddAuthentication(JwtBearerDefaults.AuthenticationScheme)
        .AddJwtBearer(options =>
        {
            options.TokenValidationParameters = new TokenValidationParameters
            {
                ValidateIssuer = true,
                ValidIssuer = _authToken.Issuer,

                ValidateAudience = true,
                ValidAudience = _authToken.Audience,

                ValidateIssuerSigningKey = true,
                IssuerSigningKey = new SymmetricSecurityKey(Encoding.UTF8.GetBytes(_authToken.Key)),

                RequireExpirationTime = true,
                ValidateLifetime = true,

                //others
            };
        });
}
為了能在應用程序中使用它,我們還需要在 Configure 中調用下面一段代碼:
public void Configure(IApplicationBuilder app, IWebHostEnvironment env) {
    app.UseAuthentication();
}

此外,創(chuàng)建 Token 可以使用如下方式:

```csharp
var securityToken = new JwtSecurityToken(
                claims: new Claim[]
                {
                    new Claim(ClaimTypes.NameIdentifier,user.Id),
                    new Claim(ClaimTypes.Email,user.Email)
                },
                issuer: _authToken.Issuer,
                audience: _authToken.Audience,
                notBefore: DateTime.Now,
                expires: DateTime.Now.AddDays(_authToken.Expires),
                signingCredentials: new SigningCredentials(
                    new SymmetricSecurityKey(Encoding.UTF8.GetBytes(_authToken.Key)),
                    SecurityAlgorithms.HmacSha256Signature));

Token = new JwtSecurityTokenHandler().WriteToken(securityToken)
基于 Token 的用戶驗證可以在控制器中使用如下方式:
var auth = await HttpContext.AuthenticateAsync();
var id = auth.Principal.Claims.FirstOrDefault(x => x.Type.Equals(ClaimTypes.NameIdentifier))?.Value;`
我們也可以將 JWT 用于授權部分,只需添加角色聲明到 JWT 配置中即可。
更多關于 .NET Core 中 JWT 認證和授權部分,請查閱:
https://code-maze.com/authentication-aspnetcore-jwt-1
https://code-maze.com/authentication-aspnetcore-jwt-2
總結
讀到這里,可能會有朋友對上述一些最佳實踐不是很認同,因為全篇都沒有談及更切合項目的實踐指南,比如 TDD 、DDD 等。但我個人認為上述所有的最佳實踐是基礎,只有把這些基礎掌握了,才能更好地理解一些更高層次的實踐指南。萬丈高樓平地起,所以你可以把這看作是一篇面向新手的最佳實踐指南。
在這份指南中,我們的主要目的是讓你熟悉關于使用 .NET Core 開發(fā) web API 項目時的一些最佳實踐。這里面的部分內容在其它框架中也同樣適用。因此,熟練掌握它們很有用。
非常感謝你能閱讀這份指南,希望它能對你有所幫助。
Github 更新地址:https://github.com/hippieZhou/ASP.NET-Core-Web-API-Best-Practices-Guide/blob/master/README.md
華為HDZ Summit上線!9套尖端產(chǎn)品沙箱免費開放


副業(yè)剛需:在Github上也能年入百萬?

再見,VIP,臥槽又來一個看片神器!