
如何使用 OpenCV 開發(fā)虛擬鍵盤
點擊下方“AI算法與圖像處理”,一起進步!
重磅干貨,第一時間送達
使用 OpenCV 實現(xiàn)虛擬鍵盤
pip install numpy

pip install opencv-python

pip install cvzone

pip install pynput
使用 OpenCV 為虛擬鍵盤導入庫
import cv2
import cvzone
from cvzone.HandTrackingModule import HandDetector
from time import sleep
import numpy as np
from pynput.keyboard import Controller
cap = cv2.VideoCapture(0, cv2.CAP_DSHOW)
cap.set(3, 1280)
cap.set(4, 720)
detector = HandDetector(detectionCon=0.8)
keyboard_keys = [["Q", "W", "E", "R", "T", "Y", "U", "I", "O", "P"],
                  ["A", "S", "D", "F", "G", "H", "J", "K", "L", ";"],
                  ["Z", "X", "C", "V", "B", "N", "M", ",", ".", "/"]]
final_text = ""
定義繪制函數(shù)
keyboard = Controller()
def draw(img, buttonList):
    for button in buttonList:
        x, y = button.pos
        w, h = button.size
        cvzone.cornerRect(img, (button.pos[0], button.pos[1],
                                                   button.size[0],button.size[0]), 20 ,rt=0)
        cv2.rectangle(img, button.pos, (int(x + w), int(y + h)), (255, 144, 30), cv2.FILLED)
        cv2.putText(img, button.text, (x + 20, y + 65),
                    cv2.FONT_HERSHEY_PLAIN, 4, (0, 0, 0), 4)
    return img
class Button():
    def __init__(self, pos, text, size=[85, 85]):
        self.pos = pos
        self.size = size
        self.text = text
buttonList = []
# mybutton = Button([100, 100], "Q")
for k in range(len(keyboard_keys)):
    for x, key in enumerate(keyboard_keys[k]):
        buttonList.append(Button([100 * x + 25, 100 * k + 50], key))
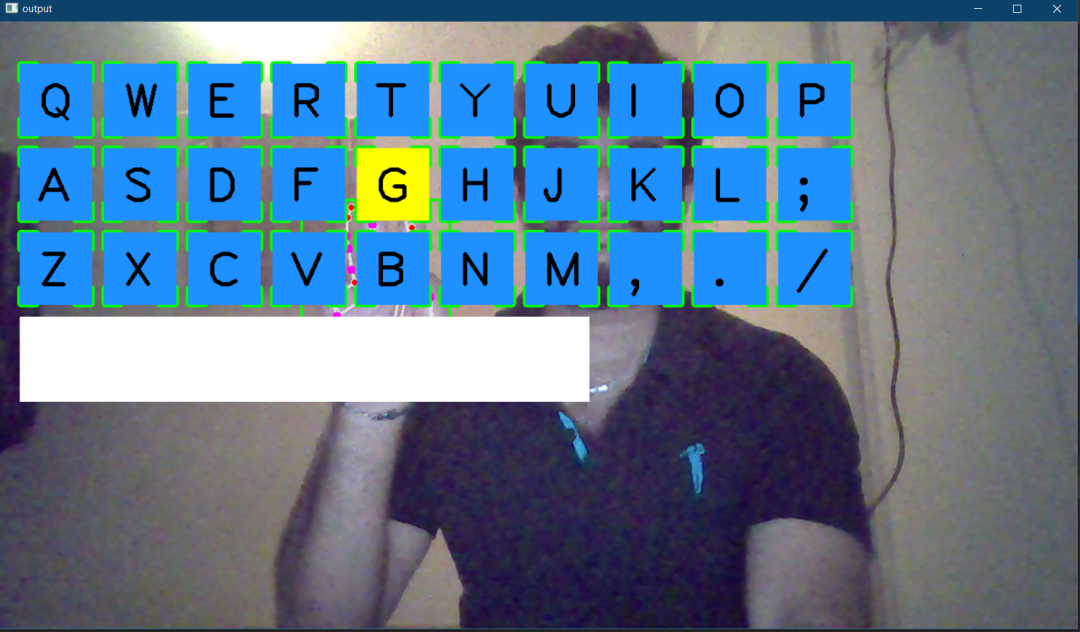
使用 OpenCV 的虛擬鍵盤主程序
while True:
    success, img = cap.read()
    img = detector.findHands(img)
    lmList, bboxInfo = detector.findPosition(img)
    img = draw(img, buttonList)  # change the draw funtion to transparent_layout for transparent keys
    if lmList:
        for button in buttonList:
            x, y = button.pos
            w, h = button.size

if x < lmList[8][0]<x+w and y < lmList[8][1] < y+h:
cv2.rectangle(img, button.pos, (x + w, y + h),
(0, 255, 255), cv2.FILLED)
cv2.putText(img, button.text, (x + 20, y + 65),
cv2.FONT_HERSHEY_PLAIN, 4, (0, 0, 0), 4)
l, _, _ = detector.findDistance(8,12, img, draw=False)
print(l)

if l < 25:
keyboard.press(button.text)
cv2.rectangle(img, button.pos, (x + w, y + h),
(0, 255, 0), cv2.FILLED)
cv2.putText(img, button.text, (x + 20, y + 65),
cv2.FONT_HERSHEY_PLAIN, 4, (0, 0, 0), 4)
final_text += button.text
sleep(0.20)

cv2.rectangle(img, (25,350), (700, 450),
(255, 255, 255), cv2.FILLED)
cv2.putText(img, final_text, (60, 425),
cv2.FONT_HERSHEY_PLAIN, 4, (0, 0, 0), 4)

# cv2.rectangle(img, (100,100), (200,200),
# (100, 255, 0), cv2.FILLED)
# cv2.putText(img, 'Q', (120,180), cv2.FONT_HERSHEY_PLAIN, 5,
# (0, 0, 0), 5)

# img = mybutton.draw(img)
cv2.imshow("output", img)
cv2.waitKey(1)


自定義鍵盤
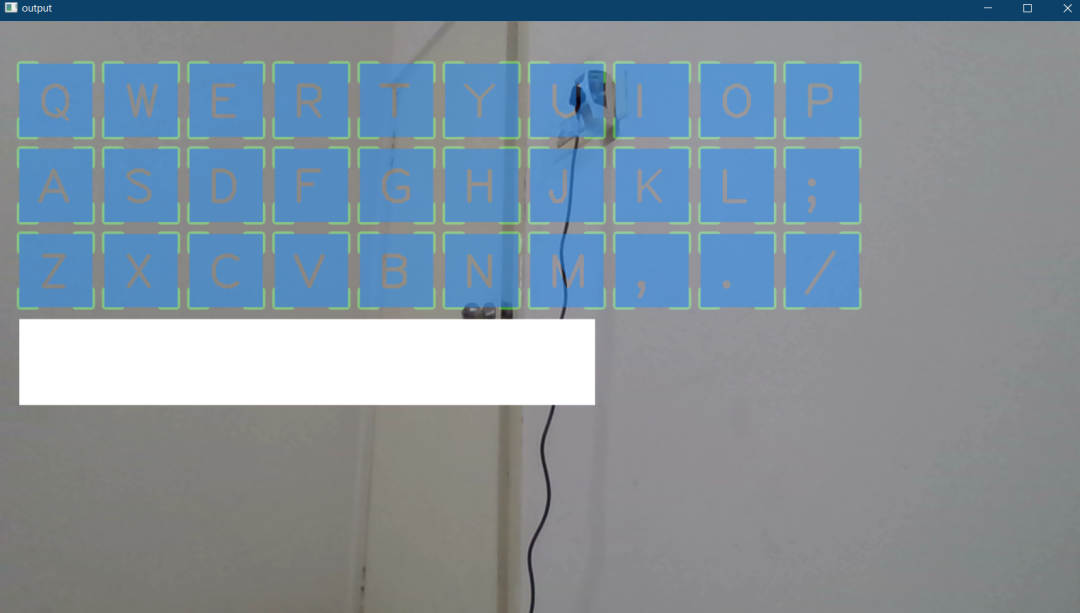
def transparent_layout(img, buttonList):
    imgNew = np.zeros_like(img, np.uint8)
    for button in buttonList:
        x, y = button.pos
        cvzone.cornerRect(imgNew, (button.pos[0], button.pos[1],
                                                   button.size[0],button.size[0]), 20 ,rt=0)
        cv2.rectangle(imgNew, button.pos, (x + button.size[0], y + button.size[1]),
                                   (255, 144, 30), cv2.FILLED)
        cv2.putText(imgNew, button.text, (x + 20, y + 65),
                    cv2.FONT_HERSHEY_PLAIN, 4, (0, 0, 0), 4)
        out = img.copy()
        alpaha = 0.5
        mask = imgNew.astype(bool)
        print(mask.shape)
        out[mask] = cv2.addWeighted(img, alpaha, imgNew, 1-alpaha, 0)[mask]
        return out
使用 OpenCV 的虛擬鍵盤的完整代碼
import cv2
import cvzone
from cvzone.HandTrackingModule import HandDetector
from time import sleep
import numpy as np
from pynput.keyboard import Controller

cap = cv2.VideoCapture(0, cv2.CAP_DSHOW)
cap.set(3, 1280)
cap.set(4, 720)

detector = HandDetector(detectionCon=0.8)
keyboard_keys = [["Q", "W", "E", "R", "T", "Y", "U", "I", "O", "P"],
                  ["A", "S", "D", "F", "G", "H", "J", "K", "L", ";"],
                  ["Z", "X", "C", "V", "B", "N", "M", ",", ".", "/"]]

final_text = ""

keyboard = Controller()


def draw(img, buttonList):
    for button in buttonList:
        x, y = button.pos
        w, h = button.size
        cvzone.cornerRect(img, (button.pos[0], button.pos[1],
                                                   button.size[0],button.size[0]), 20 ,rt=0)
        cv2.rectangle(img, button.pos, (int(x + w), int(y + h)), (255, 144, 30), cv2.FILLED)
        cv2.putText(img, button.text, (x + 20, y + 65),
                    cv2.FONT_HERSHEY_PLAIN, 4, (0, 0, 0), 4)
    return img


def transparent_layout(img, buttonList):
    imgNew = np.zeros_like(img, np.uint8)
    for button in buttonList:
        x, y = button.pos
        cvzone.cornerRect(imgNew, (button.pos[0], button.pos[1],
                                                   button.size[0],button.size[0]), 20 ,rt=0)
        cv2.rectangle(imgNew, button.pos, (x + button.size[0], y + button.size[1]),
                                   (255, 144, 30), cv2.FILLED)
        cv2.putText(imgNew, button.text, (x + 20, y + 65),
                    cv2.FONT_HERSHEY_PLAIN, 4, (0, 0, 0), 4)

    out = img.copy()
    alpaha = 0.5
    mask = imgNew.astype(bool)
    print(mask.shape)
    out[mask] = cv2.addWeighted(img, alpaha, imgNew, 1-alpaha, 0)[mask]
    return out


class Button():
    def __init__(self, pos, text, size=[85, 85]):
        self.pos = pos
        self.size = size
        self.text = text


buttonList = []
# mybutton = Button([100, 100], "Q")
for k in range(len(keyboard_keys)):
    for x, key in enumerate(keyboard_keys[k]):
        buttonList.append(Button([100 * x + 25, 100 * k + 50], key))


while True:
    success, img = cap.read()
    img = detector.findHands(img)
    lmList, bboxInfo = detector.findPosition(img)
    img = draw(img, buttonList)  # change the draw funtion to transparent_layout for transparent keys

    if lmList:
        for button in buttonList:
            x, y = button.pos
            w, h = button.size

            if x < lmList[8][0]<x+w and y < lmList[8][1] < y+h:
                cv2.rectangle(img, button.pos, (x + w, y + h),
                              (0, 255, 255), cv2.FILLED)
                cv2.putText(img, button.text, (x + 20, y + 65),
                            cv2.FONT_HERSHEY_PLAIN, 4, (0, 0, 0), 4)
                l, _, _ = detector.findDistance(8,12, img, draw=False)
                print(l)

                if l < 25:
                    keyboard.press(button.text)
                    cv2.rectangle(img, button.pos, (x + w, y + h),
                                  (0, 255, 0), cv2.FILLED)
                    cv2.putText(img, button.text, (x + 20, y + 65),
                                cv2.FONT_HERSHEY_PLAIN, 4, (0, 0, 0), 4)
                    final_text += button.text
                    sleep(0.20)

    cv2.rectangle(img, (25,350), (700, 450),
                  (255, 255, 255), cv2.FILLED)
    cv2.putText(img, final_text, (60, 425),
                cv2.FONT_HERSHEY_PLAIN, 4, (0, 0, 0), 4)

    # cv2.rectangle(img, (100,100), (200,200),
    #               (100, 255, 0), cv2.FILLED)
    # cv2.putText(img, 'Q', (120,180), cv2.FONT_HERSHEY_PLAIN, 5,
    #             (0, 0, 0), 5)

    # img = mybutton.draw(img)
    cv2.imshow("output", img)
    cv2.waitKey(1)
結論
交流群
歡迎加入公眾號讀者群一起和同行交流,目前有美顏、三維視覺、計算攝影、檢測、分割、識別、醫(yī)學影像、GAN、算法競賽等微信群
個人微信(如果沒有備注不拉群!) 請注明:地區(qū)+學校/企業(yè)+研究方向+昵稱
下載1:何愷明頂會分享
在「AI算法與圖像處理」公眾號后臺回復:何愷明,即可下載。總共有6份PDF,涉及 ResNet、Mask RCNN等經(jīng)典工作的總結分析
下載2:終身受益的編程指南:Google編程風格指南
在「AI算法與圖像處理」公眾號后臺回復:c++,即可下載。歷經(jīng)十年考驗,最權威的編程規(guī)范!
下載3 CVPR2021 在「AI算法與圖像處理」公眾號后臺回復:CVPR,即可下載1467篇CVPR 2020論文 和 CVPR 2021 最新論文
評論
圖片
表情