可能是最詳細的React組件庫搭建總結 關注 共
29329字,需瀏覽
59分鐘
·
2020-06-05 23:31
Table of Contents generated with DocToc
概覽 本文包含以下內容:
prepare: 組件庫前期開發(fā)準備工作。eslint/commit lint/typescript等等;
dev: 使用docz進行開發(fā)調試以及文檔編寫;
build:`umd` /cjs/esm、types、polyfill 以及按需加載;
test: 組件測試;
release: 組件庫發(fā)布流程;
deploy: 使用now部署文檔站點,待補充;
other: 使用plop.js快速創(chuàng)建組件模板。
如果本文幫助到了你請給倉庫 一顆 ??。
如果有錯誤煩請在評論區(qū)指正交流,謝謝。
倉庫地址
準備工作 初始化項目 新建一個happy-ui文件夾,并初始化。
mkdir?happy-uicd ?happy-uicd ?components?&&?touch?index.ts?#?新建源碼文件夾以及入口文件 代碼規(guī)范 此處直接使用@umijs/fabric的配置。
yarn?add?@umijs/fabric?--dev#?因為@umijs/fabric沒有將prettier作為依賴?所以我們需要手動安裝 .eslintrc.js
module .exports?=?{extends :?[require .resolve('@umijs/fabric/dist/eslint' )],.prettierrc.js
const ?fabric?=?require ('@umijs/fabric' );module .exports?=?{.stylelintrc.js
module .exports?=?{extends :?[require .resolve('@umijs/fabric/dist/stylelint' )],想自行配置的同學可以參考以下文章:
Commit Lint 進行pre-commit代碼規(guī)范檢測。
yarn?add?husky?lint-staged?--devpackage.json
"lint-staged" :?{"components/**/*.ts?(x)" :?["prettier?--write" ,"eslint?--fix" ,"git?add" "components/**/*.less" :?["stylelint?--syntax?less?--fix" ,"git?add" "husky" :?{"hooks" :?{"pre-commit" :?"lint-staged" 進行 Commit Message 檢測。
yarn?add?@commitlint/cli?@commitlint/config-conventional?commitizen?cz-conventional-changelog?--dev新增.commitlintrc.js寫入以下內容
module .exports?=?{?extends :?['@commitlint/config-conventional' ]?};package.json 寫入以下內容:
//?..."scripts" :?{"commit" :?"git-cz" ,"husky" :?{"hooks" :?{"commit-msg" :?"commitlint?-E?HUSKY_GIT_PARAMS" ,"pre-commit" :?"lint-staged" "config" :?{"commitizen" :?{"path" :?"cz-conventional-changelog" 后續(xù)使用 yarn commit 替代 git commit生成規(guī)范的 Commit Message,當然為了效率你可以選擇手寫,但是要符合規(guī)范。
TypeScript yarn?add?typescript?--dev新建tsconfig.json并寫入以下內容
{"compilerOptions" :?{"baseUrl" :?"./" ,"target" :?"esnext" ,"module" :?"commonjs" ,"jsx" :?"react" ,"declaration" :?true ,"declarationDir" :?"lib" ,"strict" :?true ,"moduleResolution" :?"node" ,"allowSyntheticDefaultImports" :?true ,"esModuleInterop" :?true ,"resolveJsonModule" :?true "include" :?["components" ,?"global.d.ts" ],"exclude" :?["node_modules" ]測試 在components文件夾下新建alert文件夾,目錄結構如下:
alert alert .tsx ???????????#?源文件index .ts ????????????#?入口文件interface .ts ????????#?類型聲明文件style index .less ??????#?樣式文件index .ts ????????#?樣式文件里為什么存在一個index .ts ?- ?按需加載樣式?管理樣式依賴?后面章節(jié)會提到安裝React相關依賴:
yarn?add?react?react-dom?@types/react?@types/react-dom?--dev?#?開發(fā)時依賴,宿主環(huán)境一定存在 #?運行時依賴,宿主環(huán)境可能不存在?安裝本組件庫時一起安裝 此處依舊安裝了prop-types這個庫,因為無法保證宿主環(huán)境也使用typescript,從而能夠進行靜態(tài)檢查,故使用prop-types保證javascript用戶也能得到友好的運行時報錯信息。
components/alert/interface.ts
export ?type?Kind?=?'info' ?|?'positive' ?|?'negative' ?|?'warning' ;export ?type?KindMap?=?Record;export ?interface?AlertProps?{/** 'info' ?|?'positive' ?|?'negative' ?|?'warning' ; components/alert/alter.tsx
import ?React?from ?'react' ;import ?t?from ?'prop-types' ;import ?{?AlertProps,?KindMap?}?from ?'./interface' ;const ?prefixCls?=?'happy-alert' ;const ?kinds:?KindMap?=?{info :?'#5352ED' ,positive :?'#2ED573' ,negative :?'#FF4757' ,warning :?'#FFA502' ,const ?Alert:?React.FC?=?({?children,?kind?=?'info' ,?...rest?} )?=> ?(<div className ={prefixCls} style ={{ ...rest } div >kind :?t.oneOf(['info' ,?'positive' ,?'negative' ,?'warning' ]),export ?default ?Alert; components/alert/index.ts
import ?Alert?from ?'./alert' ;export ?default ?Alert;export ?*?from ?'./interface' ;components/alert/style/index.less
@popupPrefix:?happy-alert;components/alert/style/index.ts
import ?'./index.less' ;components/index.ts
export ?{?default ?as ?Alert?}?from ?'./alert' ;此處組件參考的docz項目typescript以及less示例。
git 一把梭,可以看到控制臺已經進行鉤子檢測了。
git?add?.#?或?git?commit?-m'feat:?chapter-1?準備工作' 準備工作完成。代碼可以在倉庫的chapter-1分支獲取,若存在與本文內容不符的地方,以master分支以及文章為準。
開發(fā)與調試 本節(jié)解決開發(fā)組件時的預覽以及調試問題,順路解決文檔編寫。
此處選擇docz來輔助預覽調試。
docz基于MDX(Markdown + JSX),可以在 Markdown 中引入 React 組件,使得一邊編寫文檔,一邊預覽調試成為了可能。而且得益于 React 組件生態(tài),我們可以像編寫應用一般編寫文檔,不僅僅是枯燥的文字。docz 也內置了一些組件,比如
安裝 docz 以及自定義配置 yarn?add?docz?--dev#?清空目錄的一個輔助庫 增加 npm scripts 至 package.json。
"scripts" :?{"dev" :?"docz?dev" ,?//?啟動本地開發(fā)環(huán)境"start" :?"npm?run?dev" ,?//?dev命令別名"build:doc" :?"rimraf?doc-site?&&?docz?build" ,?//?后續(xù)會配置打包出來的文件目錄名為doc-site,故每次build前刪除"preview:doc" :?"docz?serve" ?//?預覽文檔站點注意:本節(jié)所有操作都是針對站點應用。打包指代文檔站點打包,而非組件庫。
新建doczrc.js配置文件,并寫入以下內容:
doczrc.js
export ?default ?{files :?'./components/**/*.{md,markdown,mdx}' ,?//?識別的文件后綴 'doc-site' ,?//?打包出來的文件目錄名 'happy-ui' ,?//?站點標題 true ,?//?組件源文件是通過typescript開發(fā),需要打開此選項 由于使用了less作為樣式預處理器,故需要安裝 less 插件。
yarn?add?less?gatsby-plugin-less?--dev新建gatsby-config.js,并寫入以下內容:
gatsby-config.js
module .exports?=?{plugins :?['gatsby-theme-docz' ,?'gatsby-plugin-less' ],編寫文檔 新建components/alert/index.mdx,并寫入以下內容:
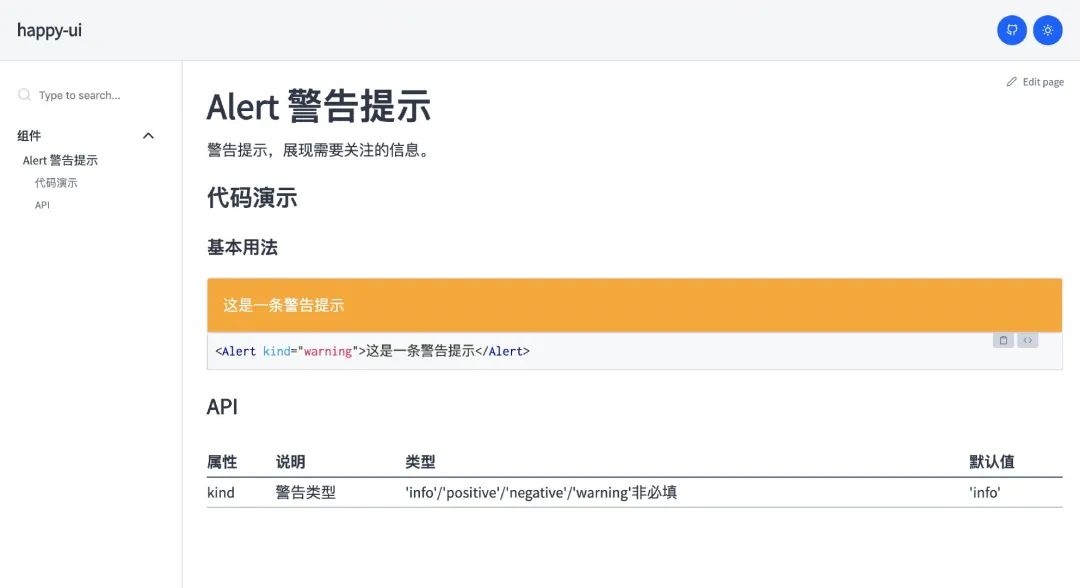
---menu:?組件 #?Alert?警告提示 ##?代碼演示 ###?基本用法 <Playground > <Alert ?kind ="warning" > 這是一條警告提示Alert >Playground >##?API 執(zhí)行腳本命令:
yarn?start?#?or?yarn?dev 可以在localhost:3000看到如下頁面 :
文檔站點
現(xiàn)在可以在index.mdx中愉快地進行文檔編寫和調試了!
倘若本文到了這里就結束(其實也可以結束了(_^▽^_)),那我只是官方文檔的翻譯復讀機罷了,有興趣的同學可以繼續(xù)向下看。
優(yōu)化文檔編寫 如果代碼演示部分的demo較多(比如基本用法、高級用法以及各種用法等等),在組件復雜的情況下(畢竟
那就抽離吧。
在components/alert/文件夾下新建demo文件夾,存放我們在編寫文檔時需要引用的 demo。
components/alert/demo/1-demo-basic.tsx
import ?React?from ?'react' ;import ?Alert?from ?'../alert' ;import ?'../style' ;export ?default ?()?=>?<Alert ?kind ="warning" > Alert >components/alert/index.mdx
-?import?Alert?from?'./alert';?//?引入組件 -?import?'./style';?//?引入組件樣式 +?import?BasicDemo?from?'./demo/1-demo-basic'; -?這是一條警告提示 +? 這樣我們就將 demo 與文檔進行了分隔。預覽如下:
文檔重構
等等,下面顯示的是demo源碼。
其實第一條 PR 已經解決了問題,但是被關閉了,無奈。
不過既然都能引入 React 組件了,在MDX的環(huán)境下自定義一個Playground組件又有何難呢,無非就是渲染組件(MDX 自帶)和展示源碼,簡單開放的東西大家都是喜聞樂見的,就叫HappyBox吧。
優(yōu)化代碼展示 編寫 ``組件 安裝依賴:
yarn?add?react-use ?react-tooltip?react-feather?react-simple-code-editor?prismjs?react-copy-to -clipboard?raw -loader?styled-components?--dev react-use - 2020 年了,當然要用hooks
react-simple-code-editor - 代碼展示區(qū)域
prismjs - 代碼高亮
raw-loader - 將源碼轉成字符串
react-copy-to-clipboard - 讓用戶爸爸們能夠 copy demo 代碼
react-tooltip/react-feather 輔助組件
styled-components 方便在文檔示例中讓用戶看到樣式,也用作文檔組件的樣式處理
這些依賴都是服務于文檔站點應用,和組件庫自身毫無關聯(lián)。
最終效果如下:
最終效果
根目錄下新建doc-comps文件夾,存放文檔中使用的一些工具組件,比如
doc-comps
├──?happy-box style .ts index .tsx index .ts components/doc-comps/happy-box/index.tsx
import ?React?from ?'react' ;import ?Editor?from ?'react-simple-code-editor' ;import ?CopyToClipboard?from ?'react-copy-to-clipboard' ;import ?{?useToggle?}?from ?'react-use' ;import ?ReactTooltip?from ?'react-tooltip' ;import ?IconCopy?from ?'react-feather/dist/icons/clipboard' ;import ?IconCode?from ?'react-feather/dist/icons/code' ;import ?{?highlight,?languages?}?from ?'prismjs/components/prism-core' ;import ?{?StyledContainer,?StyledIconWrapper?}?from ?'./style' ;import ?'prismjs/components/prism-clike' ;import ?'prismjs/components/prism-javascript' ;import ?'prismjs/components/prism-markup' ;require ('prismjs/components/prism-jsx' );code :?string;export ?const ?HappyBox:?React.FC?=?({?code,?title,?desc,?children?} )?=> ?{const ?[isEditVisible,?toggleEditVisible]?=?useToggle(false );return ?(?{children}{title?||?'示例'} ????????
{desc?||?'暫無描述'}
????????
????????
?alert('復制成功')}> 相關配置變更 新建gatsby-node.js,寫入以下內容以開啟alias:
const ?path?=?require ('path' );args ?=>resolve :?{modules :?[path.resolve(__dirname,?'../src' ),?'node_modules' ],alias :?{'happy-ui/lib' :?path.resolve(__dirname,?'../components/' ),'happy-ui/esm' :?path.resolve(__dirname,?'../components/' ),'happy-ui' :?path.resolve(__dirname,?'../components/' ),tsconfig.json 打包時需要忽略demo,避免組件庫打包生成types時包含其中,同時增加paths屬性用于 vscode 自動提示:
tsconfig.json
{+???"paths":?{ +?????"happy-ui":?["components/index.ts"], +?????"happy-ui/esm/*":?["components/*"], +?????"happy-ui/lib/*":?["components/*"] +????}, -?"exclude":?["node_modules"] +?"exclude":?["node_modules",??"**/demo/**"] 新的問題出現(xiàn)了,vscode 的 alias 提示依賴 tsconfig.json,忽略 demo 文件夾后,demo 內的文件模塊類型找不到聲明(paths 失效),所以不能將 demo 在 tsconfig.json 中移除:
{-?"exclude":?["node_modules",??"**/demo/**"] +?"exclude":?["node_modules"] 新建一個 tsconfig.build.json 文件:
tsconfig.build.json
{"extends" :?"./tsconfig.json" ,"exclude" :?["**/demo/**" ,?"node_modules" ]后續(xù)使用 tsc 生成類型聲明文件指定tsconfig.build.json即可。
改造相關文件 components/alert/demo/1-demo-basic.tsx
-?import?Alert?from?'../alert';
+?import?Alert?from?'happy-ui/lib/alert';

-?import?'../style';
+?import?'happy-ui/lib/alert/style';
components/alert/index.mdx
-?import?{?Playground?}?from?'docz'; +?import?{?HappyBox?}?from?'../../doc-comps'; +?import?BasicDemoCode?from?'!raw-loader!./demo/1-demo-basic.tsx'; -? -??? -? +? +?? +? yarn start卡住時嘗試刪除根目錄.docz文件夾,而后重新執(zhí)行命令。
現(xiàn)在可以愉快地開發(fā)組件了。代碼可以在倉庫的chapter-2分支獲取,若存在與本文內容不符的地方,以master分支以及文章為準。
組件庫打包 宿主環(huán)境各不相同,需要將源碼進行相關處理后發(fā)布至 npm。
明確以下目標:
導出類型聲明文件
導出 umd/Commonjs module/ES module 等 3 種形式供使用者引入
支持樣式文件 css 引入,而非只有less
支持按需加載
導出類型聲明文件 既然是使用typescript編寫的組件庫,那么使用者應當享受到類型系統(tǒng)的好處。
我們可以生成類型聲明文件,并在package.json中定義入口,如下:
package.json
{"typings" :?"lib/index.d.ts" ,?//?定義類型入口文件"scripts" :?{"build:types" :?"tsc?-p?tsconfig.build.json?&&?cpr?lib?esm" ?//?執(zhí)行tsc命令生成類型聲明文件值得注意的是:此處使用cpr將lib的聲明文件拷貝了一份,重命名為esm。用于后面存放 ES module 形式的組件。這樣做主要是為了用戶手動按需引入組件時依舊可以有自動提示。
最開始使用的將聲明文件單獨打包成一個types文件夾,這樣只通過'happy-ui'引入才可以有自動提示,但是'happy-ui/esm/xxx'和'happy-ui/lib/xxx'就無法提示。
tsconfig.build.json
{"extends" :?"./tsconfig.json" ,"compilerOptions" :?{?"emitDeclarationOnly" :?true ?},?//?只生成聲明文件"exclude" :?["**/__tests__/**" ,?"**/demo/**" ,?"node_modules" ,?"lib" ,?"esm" ]?//?排除示例、測試以及打包好的文件夾執(zhí)行yarn build:types,可以發(fā)現(xiàn)根目錄下已經生成了lib文件夾(tsconfig.json中定義的declarationDir字段),目錄結構與components文件夾保持一致,如下:
types
├──?alert alert .d .ts index .d .ts interface .d .ts style index .d .ts index .d .ts 這樣使用者引入npm 包時,便能得到自動提示,也能夠復用相關組件的類型定義。
接下來將ts(x)等文件處理成js文件。
需要注意的是,我們需要輸出Commonjs module以及ES module兩種模塊類型的文件(暫不考慮umd),以下使用cjs指代Commonjs module,esm指代ES module。
導出 Commonjs 模塊 其實完全可以使用babel或tsc命令行工具進行代碼編譯處理(實際上很多工具庫就是這樣做的),但考慮到還要處理樣式及其按需加載 ,我們借助 gulp 來串起這個流程。
babel 配置 首先安裝babel及其相關依賴
yarn?add?@babel/core?@babel/preset-env?@babel/preset-react?@babel/preset-typescript?@babel/plugin-proposal-class-properties??@babel/plugin-transform-runtime?--devyarn?add?@babel/runtime-corejs3新建.babelrc.js文件,寫入以下內容:
.babelrc.js
module .exports?=?{presets :?['@babel/env' ,?'@babel/typescript' ,?'@babel/react' ],plugins :?['@babel/proposal-class-properties' ,'@babel/plugin-transform-runtime' ,corejs :?3 ,helpers :?true ,關于@babel/plugin-transform-runtime與@babel/runtime-corejs3:
若helpers選項設置為true,可抽離代碼編譯過程重復生成的 helper 函數(classCallCheck,extends等),減小生成的代碼體積;
若corejs設置為3,可引入不污染全局的按需polyfill,常用于類庫編寫(我更推薦:不引入polyfill,轉而告知使用者需要引入何種polyfill,避免重復引入或產生沖突,后面會詳細提到)。
更多參見官方文檔-@babel/plugin-transform-runtime
配置目標環(huán)境
為了避免轉譯瀏覽器原生支持的語法,新建.browserslistrc文件,根據適配需求,寫入支持瀏覽器范圍,作用于@babel/preset-env。
.browserslistrc
>0.2 %not ?deadnot ?op_mini?all很遺憾的是,@babel/runtime-corejs3無法在按需引入的基礎上根據目標瀏覽器支持程度再次減少polyfill的引入,參見@babel/runtime for target environment 。
這意味著@babel/runtime-corejs3 甚至會在針對現(xiàn)代引擎的情況下注入所有可能的 polyfill:不必要地增加了最終捆綁包的大小。
對于組件庫(代碼量可能很大),個人建議將polyfill的選擇權交還給使用者,在宿主環(huán)境進行polyfill。若使用者具有兼容性要求,自然會使用@babel/preset-env + core-js + .browserslistrc進行全局polyfill,這套組合拳引入了最低目標瀏覽器不支持API的全部 polyfill。
業(yè)務開發(fā)中,將@babel/preset-env的useBuiltIns選項值設置為 usage,同時把node_modules從babel-loader中exclude掉的同學可能想要這個特性:"useBuiltIns: usage" for node_modules without transpiling #9419,在未支持該issue提到的內容之前,還是乖乖地將useBuiltIns設置為entry,或者不要把node_modules從babel-loader中exclude。
所以組件庫不用畫蛇添足,引入多余的polyfill,寫好文檔說明,比什么都重要(就像zent和antd這樣)。
現(xiàn)在@babel/runtime-corejs3更換為@babel/runtime,只進行helper函數抽離。
yarn?remove?@babel/runtime-corejs3.babelrc.js
module .exports?=?{presets :?['@babel/env' ,?'@babel/typescript' ,?'@babel/react' ],plugins :?['@babel/plugin-transform-runtime' ,?'@babel/proposal-class-properties' ],@babel/transform-runtime的helper選項默認為true。
gulp 配置 再來安裝gulp相關依賴
yarn?add?gulp?gulp-babel?--dev新建gulpfile.js,寫入以下內容:
gulpfile.js
const ?gulp?=?require ('gulp' );const ?babel?=?require ('gulp-babel' );const ?paths?=?{dest :?{lib :?'lib' ,?//?commonjs?文件存放的目錄名?-?本塊關注 'esm' ,?//?ES?module?文件存放的目錄名?-?暫時不關心 'dist' ,?//?umd文件存放的目錄名?-?暫時不關心 styles :?'components/**/*.less' ,?//?樣式文件路徑?-?暫時不關心 'components/**/*.{ts,tsx}' ,?'!components/**/demo/*.{ts,tsx}' ],?//?腳本文件路徑 function ?compileCJS ()?const ?{?dest,?scripts?}?=?paths;return ?gulp//?使用gulp-babel處理 //?并行任務?后續(xù)加入樣式處理?可以并行處理 const ?build?=?gulp.parallel(compileCJS);修改package.json
package.json
{-?"main":?"index.js", +?"main":?"lib/index.js", +???"clean":?"rimraf?lib?esm?dist", +???"build":?"npm?run?clean?&&?npm?run?build:types?&&?gulp", 執(zhí)行yarn build,得到如下內容:
lib
├──?alert alert .js index .js interface .js style index .js index .js 觀察編譯后的源碼,可以發(fā)現(xiàn):諸多helper方法已被抽離至@babel/runtime中,模塊導入導出形式也是commonjs規(guī)范。
lib/alert/alert.js
導出 ES module 生成ES module可以更好地進行tree shaking,基于上一步的babel配置,更新以下內容:
配置@babel/preset-env的modules選項為false,關閉模塊轉換;
配置@babel/plugin-transform-runtime的useESModules選項為true,使用ES module形式引入helper函數。
.babelrc.js
module .exports?=?{presets :?['@babel/env' ,modules :?false ,?//?關閉模塊轉換 '@babel/typescript' ,'@babel/react' ,plugins :?['@babel/proposal-class-properties' ,'@babel/plugin-transform-runtime' ,useESModules :?true ,?//?使用esm形式的helper 目標達成,我們再使用環(huán)境變量區(qū)分esm和cjs(執(zhí)行任務時設置對應的環(huán)境變量即可),最終babel配置如下:
.babelrc.js
module .exports?=?{presets :?['@babel/env' ,?'@babel/typescript' ,?'@babel/react' ],plugins :?['@babel/plugin-transform-runtime' ,?'@babel/proposal-class-properties' ],env :?{esm :?{presets :?['@babel/env' ,modules :?false ,plugins :?['@babel/plugin-transform-runtime' ,useESModules :?true ,接下來修改gulp相關配置,抽離compileScripts任務,增加compileESM任務。
gulpfile.js
//?... /** function ?compileScripts (babelEnv,?destDir )?const ?{?scripts?}?=?paths;//?設置環(huán)境變量 return ?gulp//?使用gulp-babel處理 /** function ?compileCJS ()?const ?{?dest?}?=?paths;return ?compileScripts('cjs' ,?dest.lib);/** function ?compileESM ()?const ?{?dest?}?=?paths;return ?compileScripts('esm' ,?dest.esm);//?串行執(zhí)行編譯腳本任務(cjs,esm)?避免環(huán)境變量影響 const ?buildScripts?=?gulp.series(compileCJS,?compileESM);//?整體并行執(zhí)行任務 const ?build?=?gulp.parallel(buildScripts);//?... 執(zhí)行yarn build,可以發(fā)現(xiàn)生成了lib/esm三個文件夾,觀察esm目錄,結構同lib一致,js 文件都是以ES module模塊形式導入導出。
esm/alert/alert.js
別忘了給package.json增加相關入口。
package.json
{+?"module":?"esm/index.js" 處理樣式文件 拷貝 less 文件 我們會將less文件包含在npm包中,用戶可以通過happy-ui/lib/alert/style/index.js的形式按需引入less文件,此處可以直接將 less 文件拷貝至目標文件夾。
在gulpfile.js中新建copyLess任務。
gulpfile.js
//?... /** function ?copyLess ()?return ?gulpconst ?build?=?gulp.parallel(buildScripts,?copyLess);//?... 觀察lib目錄,可以發(fā)現(xiàn) less 文件已被拷貝至alert/style目錄下。
lib
├──?alert alert .js index .js interface .js style index .js index .less ?#?less 文件index .js 可能有些同學已經發(fā)現(xiàn)問題:若使用者沒有使用less預處理器,使用的是sass方案甚至原生css方案,那現(xiàn)有方案就搞不定了。經分析,有以下 3 種預選方案:
告知用戶增加less-loader;
打包出一份完整的 css 文件,進行全量 引入;
單獨提供一份style/css.js文件,引入的是組件 css樣式文件依賴,而非 less 依賴,組件庫底層抹平差異;
使用css in js方案。
方案 1 會導致業(yè)務方使用成本增加。
方案 2 無法進行按需引入。
方案 4 需要詳細聊聊。
css in js除了賦予樣式編寫更多的可能性之外,在編寫第三方組件庫時更是利器。
如果我們寫一個react-use這種hooks工具庫,不涉及到樣式,只需要在package.json中設置sideEffects為false,業(yè)務方使用 webpack 進行打包時,只會打包被使用到的 hooks(優(yōu)先使用 ES module)。
入口文件index.js中導出的但未被使用的其他 hooks 會被tree shaking,第一次使用這個庫的時候我很好奇,為什么沒有按需引入的使用方式,結果打包分析時我傻了,原來人家天生支持按需引入。
可能常用的antd以及lodash都要配一配,導致產生了慣性思維。
回到正題。如果將樣式使用javascript來編寫,在某種維度上講,組件庫和工具庫一致了,配好sideEffects,自動按需引入,美滋滋。
而且每個組件都與自己的樣式綁定,不需要業(yè)務方或組件開發(fā)者去維護樣式依賴 ,什么是樣式依賴,后面會講到。
缺點:
樣式無法單獨緩存;
styled-components 自身體積較大;
復寫組件樣式需要使用屬性選擇器或者使用styled-components,麻煩了點。
需要看取舍了,偷偷說一句styled-components做主題定制也極其方便。
方案 3 是antd使用的這種方案。
在搭建組件庫的過程中,有一個問題困擾了我很久:為什么需要alert/style/index.js引入less文件或alert/style/css.js引入css文件?
答案是管理樣式依賴 。
因為我們的組件是沒有引入樣式文件的,需要用戶去手動引入。
假設存在以下場景:引入js文件,使用者手動引入這個js文件,就能引入對應組件及其依賴組件的樣式。
那么問題又來了,為什么組件不能自己去import './index.less'呢?
可以,不過業(yè)務方要配置less-loader,什么,業(yè)務方不想配,要你import './index.css'??
可以,業(yè)務方爽了,組件開發(fā)方不爽。
所以我們要找一個大家都爽的方案:
開發(fā)方能夠開心的使用預處理器;
業(yè)務方不需要額外的使用成本。
答案就是css in js 單獨提供一份style/css.js文件,引入的是組件 css樣式文件依賴,而非 less 依賴,組件庫底層抹平差異。
之前了解到father可以在打包的時候將index.less轉成index.css,這倒是個好法子,但是一些重復引入的樣式模塊(比如動畫樣式),會被重復打包,不知道有沒有好的解決方案。
生成 css 文件 安裝相關依賴。
yarn?add?gulp-less?gulp-autoprefixer?gulp-cssnano?--dev將less文件生成對應的css文件,在gulpfile.js中增加less2css任務。
//?... /** function ?less2css ()?return ?gulp//?處理less文件 //?根據browserslistrc增加前綴 zindex :?false ,?reduceIdents :?false ?}))?//?壓縮 const ?build?=?gulp.parallel(buildScripts,?copyLess,?less2css);//?... 執(zhí)行yarn build,組件style目錄下已經存在css文件了。
接下來我們需要一個alert/style/css.js來幫用戶引入css文件。
生成 css.js 此處參考antd-tools的實現(xiàn)方式:在處理scripts任務中,截住style/index.js,生成style/css.js,并通過正則將引入的less文件后綴改成css。
安裝相關依賴。
yarn?add?through2?--devgulpfile.js
//?... /** function ?compileScripts (babelEnv,?destDir )?const ?{?scripts?}?=?paths;return ?gulp//?使用gulp-babel處理 function ?z (file,?encoding,?next )?this .push(file.clone());//?找到目標 if ?(file.path.match(/(\/|\\)style(\/|\\)index\.js/ ))?{const ?content?=?file.contents.toString(encoding);//?文件內容處理 /index\.js/ ,?'css.js' );?//?文件重命名 this .push(file);?//?新增該文件 else ?{//?... cssInjection的實現(xiàn):
gulpfile.js
/** function ?cssInjection (content )?return ?content/\/style\/?'/g ,?"/style/css'" )/\/style\/?"/g ,?'/style/css"' )/\.less/g ,?'.css' );再進行打包,可以看見組件style目錄下生成了css.js文件,引入的也是上一步less轉換而來的css文件。
lib/alert
├──?alert .js index .js interface .js style css .js ?#?引入index .css index .css index .js index .less 按需加載 在 package.json 中增加sideEffects屬性,配合ES module達到tree shaking效果(將樣式依賴文件標注為side effects,避免被誤刪除)。
//?..."sideEffects" :?["dist/*" ,"esm/**/style/*" ,"lib/**/style/*" ,"*.less" 使用以下方式引入,可以做到js部分的按需加載,但需要手動引入樣式:
import ?{?Alert?}?from ?'happy-ui' ;import ?'happy-ui/esm/alert/style' ;也可以使用以下方式引入:
import ?Alert?from ?'happy-ui/esm/alert' ;?//?or?import?Alert?from?'happy-ui/lib/alert'; import ?'happy-ui/esm/alert/style' ;?//?or?import?Alert?from?'happy-ui/lib/alert'; 以上引入樣式文件的方式不太優(yōu)雅,直接入口處引入全量 樣式文件又和按需加載的本意相去甚遠。
使用者可以借助babel-plugin-import來進行輔助,減少代碼編寫量(說好的不加入其他使用成本的呢~)。
import ?{?Alert?}?from ?'happy-ui' ;??
import ?Alert?from ?'happy-ui/lib/alert' ;import ?'happy-ui/lib/alert/style' ;生成 umd 沒用上,這一塊標記為 todo 吧。
本節(jié)代碼可以在倉庫的chapter-3分支獲取,若存在與本文內容不符的地方,以master分支以及文章為準。
組件測試 與軟件操作行為越接近的測試,越能給予你信心。
本節(jié)主要講述如何在組件庫中引入jest以及@testing-library/react,而不會深入單元測試的學習。
如果你對下列問題感興趣:
What-單元測試是什么?
Why-為什么要寫單元測試?
How-編寫單元測試的最佳實踐?
那么可以看看以下文章:
Test React apps with React Testing Library:通過一個的例子延伸,闡述了選擇React Testing Library而非Enzyme的理由,并對其進行了一些入門教學;
React Testing Library:@testing-library/react的官方文檔,該庫提供的 API 在某個程度上就是在指引開發(fā)者進行單元測試的最佳實踐;
React Testing Library-examples:@testing-library/react的一些實例,提供了各種常見場景的測試;
React 單元測試策略及落地:如標題所示,值得一看。
相關配置 安裝依賴:
yarn?add?jest?ts-jest?@testing-library/react?@testing-library/jest-dom?identity-obj-proxy?@types/jest?@types/testing-library__react?--devjest: JavaScript 測試框架,專注于簡潔明快;
ts-jest:為TypeScript編寫jest測試用例提供支持;
@testing-library/react:簡單而完整的React DOM測試工具,鼓勵良好的測試實踐;
@testing-library/jest-dom:自定義的jest匹配器(matchers),用于測試DOM的狀態(tài)(即為jest的except方法返回值增加更多專注于DOM的matchers);
identity-obj-proxy:一個工具庫,此處用來mock樣式文件。
新建jest.config.js,并寫入相關配置,更多配置可參考jest 官方文檔-配置,只看幾個常用的就可以。
jest.config.js
module .exports?=?{verbose :?true ,roots :?['/components' ],moduleNameMapper :?{'\\.(css|less|scss)$' :?'identity-obj-proxy' ,'^components$' :?'/components/index.tsx' ,'^components(.*)$' :?'/components/$1' ,testRegex :?'(/test/.*|\\.(test|spec))\\.(ts|tsx|js)$' ,moduleFileExtensions :?['ts' ,?'tsx' ,?'js' ,?'jsx' ],testPathIgnorePatterns :?['/node_modules/' ,?'/lib/' ,?'/esm/' ,?'/dist/' ],preset :?'ts-jest' ,testEnvironment :?'jsdom' ,修改package.json,增加測試相關命令,并且代碼提交前,跑測試用例,如下:
package.json
"scripts":?{+??"test":?"jest",?????????????????????????#?執(zhí)行jest +??"test:watch":?"jest?--watch",???????????#?watch模式下執(zhí)行 +??"test:coverage":?"jest?--coverage",?????#?生成測試覆蓋率報告 +??"test:update":?"jest?--updateSnapshot"??#?更新快照 +???"jest?--bail?--findRelatedTests", 修改gulpfile.js以及tsconfig.json,避免打包時,把測試文件一并處理了。
gulpfile.js
const?paths?=?{-?scripts:?['components/**/*.{ts,tsx}',?'!components/**/demo/*.{ts,tsx}'], +?scripts:?[ +???'components/**/*.{ts,tsx}', +???'!components/**/demo/*.{ts,tsx}', +???'!components/**/__tests__/*.{ts,tsx}', +?], tsconfig.json
{-?"exclude":?["components/**/demo"] +?"exclude":?["components/**/demo",?"components/**/__tests__"] 編寫測試用例
在對應組件的文件夾下新建__tests__文件夾,用于存放測試文件,其內新建index.test.tsx文件,寫入以下測試用例:
components/alert/ tests/index.test.tsx
import ?React?from ?'react' ;import ?{?render?}?from ?'@testing-library/react' ;import ?Alert?from ?'../alert' ;' ,?()?=>?{'should?render?default' ,?()?=>?{const ?{?container?}?=?render(<Alert > defaultAlert >'should?render?alert?with?type' ,?()?=>?{const ?kinds:?any[]?=?['info' ,?'warning' ,?'positive' ,?'negative' ];const ?{?getByText?}?=?render(<> <Alert ?kind ={k} ?key ={k} > Alert >更新一下快照:
yarn?test :update可以看見同級目錄下新增了一個__snapshots__文件夾,里面存放對應測試用例的快照文件。
再執(zhí)行測試用例:
yarn?test 可以發(fā)現(xiàn)我們通過了測試用例。。。額,這里當然能通過,主要是后續(xù)我們進行迭代重構時,都會重新執(zhí)行測試用例,與最近的一次快照進行比對,如果與快照不一致(結構發(fā)生了改變),那么相應的測試用例就無法通過。
對于快照測試,褒貶不一,這個例子也著實簡單得很,甚至連擴展的 jest-dom提供的 matchers 都沒用上。
如何編寫優(yōu)秀的測試用例,我也是一個新手,只能說多看多寫多嘗試,前面推薦的文章很不錯。
本節(jié)代碼可以在倉庫的chapter-4分支獲取,若存在與本文內容不符的地方,以master分支以及文章為準。
標準化發(fā)布流程 本節(jié)主要是講解如何通過一行命令完成以下六點內容:
版本更新
生成 CHANGELOG
推送至 git 倉庫
組件庫打包
發(fā)布至 npm
打 tag 并推送至 git
如果你不想代碼,很好,用np(如果我一開始就知道這個工具,我也不會去寫代碼,我真傻,真的)。
package.json
"scripts":?{+?"release":?"ts-node?./scripts/release.ts" 直接甩代碼吧,實在不復雜。
/*?eslint-disable??import/no-extraneous-dependencies,@typescript-eslint/camelcase,?no-console?*/?{).map(level?=>?({ 初始化組件 每次初始化一個組件就要新建許多文件以及文件夾,復制粘貼也可,不過還可以使用更高級一點的偷懶方式。
常規(guī)思路,新建一個組件模板文件夾,里面包含一個組件所需要的所有文件,同時寫好文件內容。
至于一些動態(tài)內容,譬如組件中英文名稱,選一個你喜歡的模板語言(如 handlebars),用其方式留空{{componentName}}。
package.json
"scripts":?{+?"new":?"ts-node?./scripts/new.ts" 接下來我們在new.ts中編寫相關步驟,無非是:
基于inquirer.js詢問一些基本組件信息
結合信息,渲染模板(填空)至組件文件夾
向 components/index.ts 插入導出語句
你以為我會寫new.ts嗎,不,我不會(雖然我真寫過)。
主要是使用metalsmith進行數據與模板結合,寫腳手架的同學可能比較熟悉。
自從我知道了plop.js這個庫,那么又可以偷懶了(為什么之前沒有人告訴我有這么多好用的工具???)
"scripts":?{-?"new":?"ts-node?./scripts/new.ts", +?"new":?"plop?--plopfile?./scripts/plopfile.ts", 于是上述流程可以大大簡化,不需要寫代碼去詢問,不需要手動渲染模板,我們要做的就是寫好模板,并且配置好問題以及渲染目的地。
詳情可見:
配置文件:scripts/plopfile.ts
模板文件:templates/component
結語 文章很長,也是我個人學習中的總結,如果本文幫助到了你請給倉庫一顆 ?? 和本文一個贊。
如果有錯誤煩請在評論區(qū)指正交流,謝謝。
倉庫地址:https://github.com/worldzhao/react-ui-library-tutorial
推薦閱讀
我的公眾號能帶來什么價值?(文末有送書規(guī)則,一定要看) 每個前端工程師都應該了解的圖片知識(長文建議收藏) 為什么現(xiàn)在面試總是面試造火箭?
瀏覽
91
分享
手機掃一掃分享
分享
手機掃一掃分享

 文檔站點
文檔站點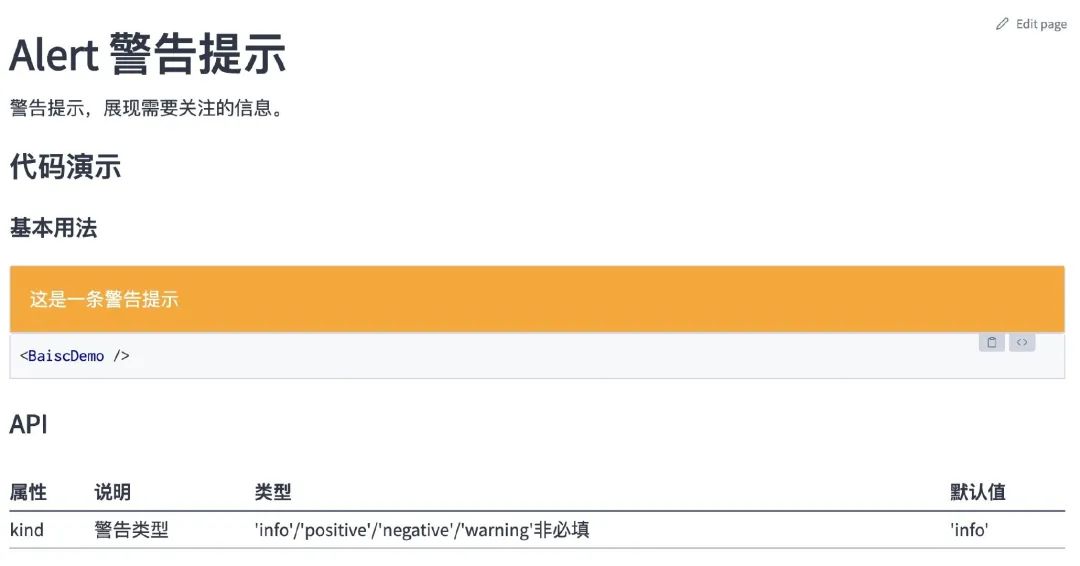 文檔重構
文檔重構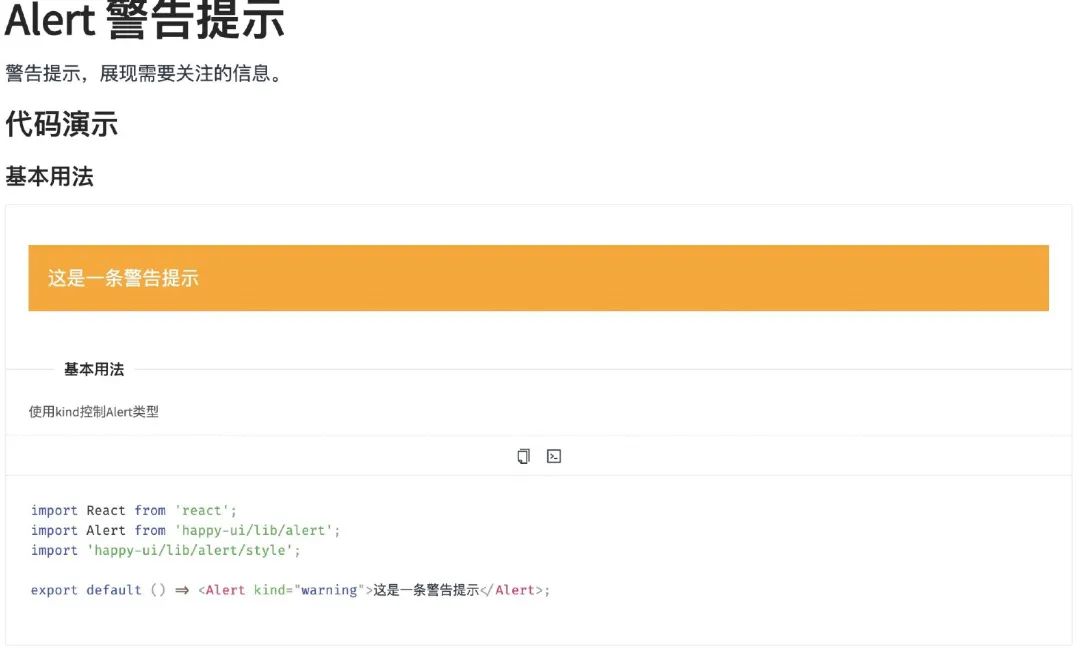 最終效果
最終效果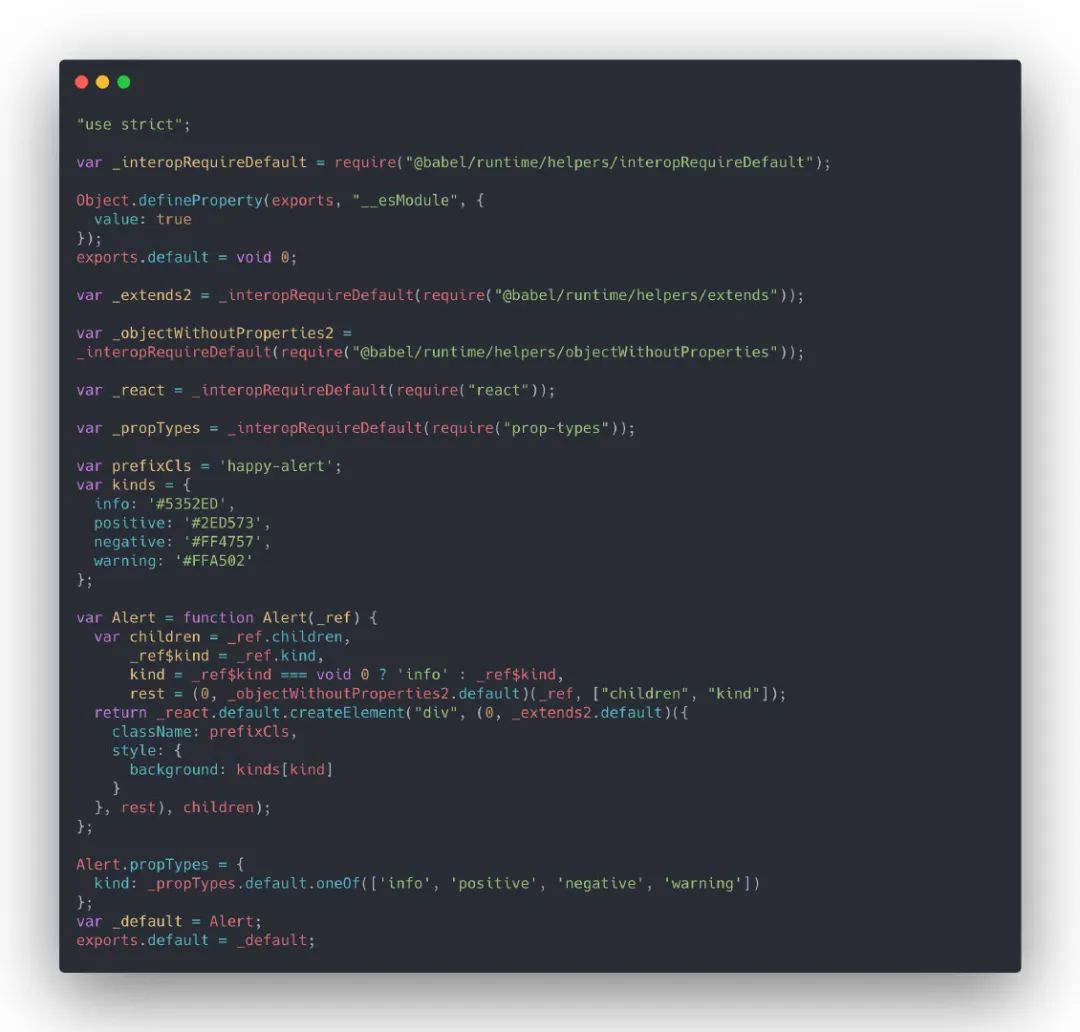 lib/alert/alert.js
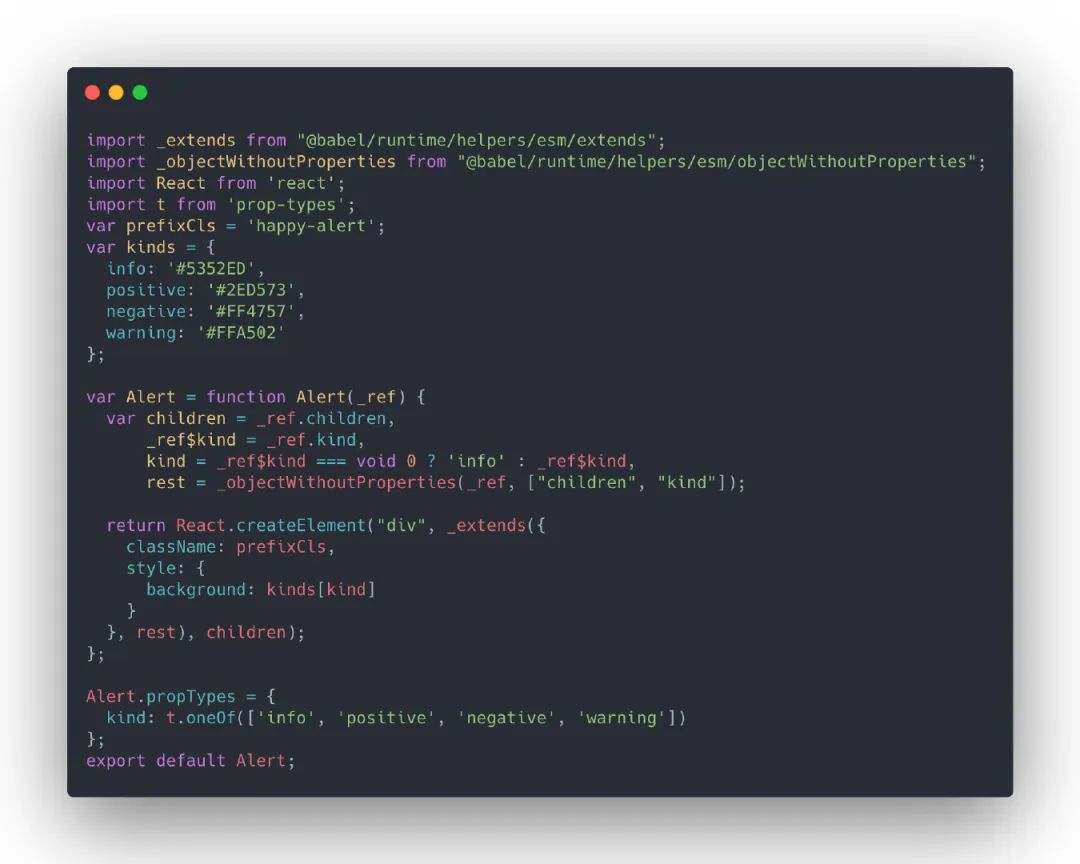 esm/alert/alert.js
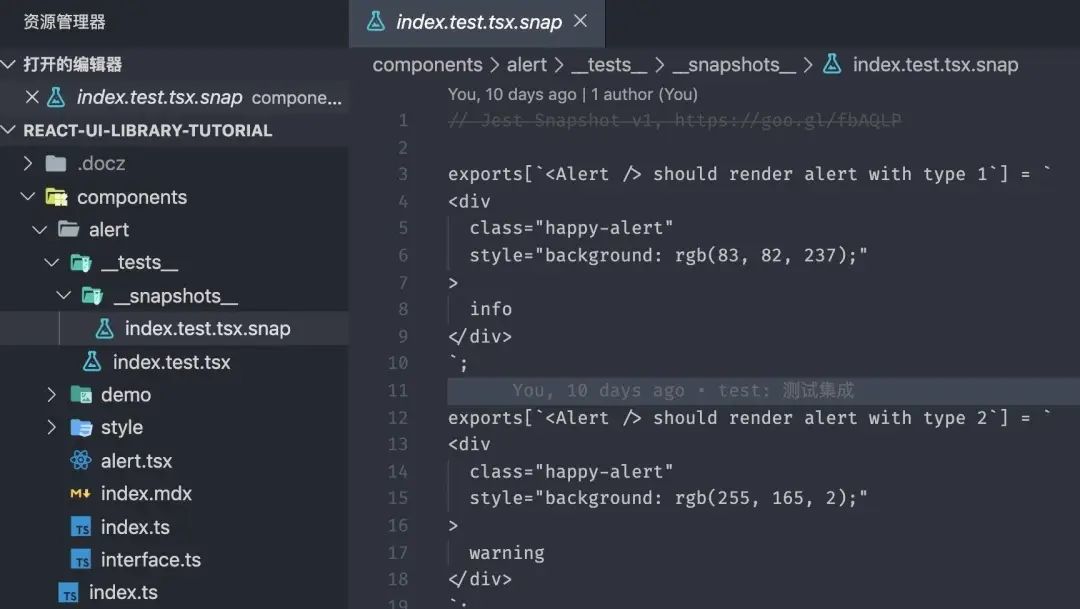 生成的快照文件