
Netty的ChannelPipline傳播源碼解析
有道無術(shù),術(shù)尚可求也!有術(shù)無道,止于術(shù)!
上一章節(jié) ,我們基本講述了Netty對于新連接接入與管道數(shù)據(jù)處理的源碼解析,大家可能發(fā)現(xiàn),在我們前面學(xué)習(xí)中,涉及到了很多的有關(guān)pipeline的操作,在前面介紹這些的時候,我為了保證主線邏輯的清晰,基本都是一概而過,本章節(jié)將對pipeline做一個詳細的講解!
一、基礎(chǔ)鋪墊
1. JAVA中的基本位運算符
| 運算符 | 描述 |
|---|---|
| & | 與 |
| | | 或 |
| ~ | 非 |
| ^ | 異或 |
| << | 左移 |
| >> | 右移 |
2. 位運算解釋與實例
&(與)
| 十進制 | 二進制 |
|---|---|
| 3 | 0 0 1 1 |
| 5 | 0 1 0 1 |
| & 后結(jié)果:1 | 0 0 0 1 |
即:對應(yīng)位都為 1 時,才為 1,否則全為 0。
|(或)
| 十進制 | 二進制 |
|---|---|
| 3 | 0 0 1 1 |
| 5 | 0 1 0 1 |
| | 后結(jié)果 :7 | 0 1 1 1 |
即:對應(yīng)位只要有 1 時,即為 1,否則全為 0。
~(非)
| 十進制 | 二進制 |
|---|---|
| 3 | 0 0 1 1 |
| ~ 后結(jié)果:12 | 1 1 0 0 |
即:對應(yīng)位取反。
異或 ^
| 十進制 | 二進制 |
|---|---|
| 3 | 0 0 1 1 |
| 5 | 0 1 0 1 |
| ^ 后結(jié)果:6 | 0 1 1 0 |
即:只要對應(yīng)為不同即為 1。
3. 配合Netty實例
我們在以往學(xué)習(xí)Netty中見到過類似于以下代碼:
selectionKey.interestOps(interestOps | readInterestOp);
我們重點關(guān)注位運算:interestOps | readInterestOp
該行代碼的意思是位運算計算一個數(shù)字,該數(shù)字包含 | 前后的數(shù)字!
//初始化一個值
int interestOps = 0;
//給當前這個值增加一個可讀事件
interestOps |= OP_READ;
//給當前的值增加一個可寫的事件
interestOps |= OP_WRITE;
//判斷當前的事件是不是包含可讀事件 true
boolean isRead = (interestOps & OP_READ) == OP_READ;
//判斷當前的事件是不是不包含可讀事件 false
boolean isRead = (interestOps & OP_READ) == 0;
//剔除可讀事件
interestOps &= ~OP_READ;
//剔除可寫事件
interestOps &= ~OP_WRITE;
二、源碼解析
1. 創(chuàng)建管道
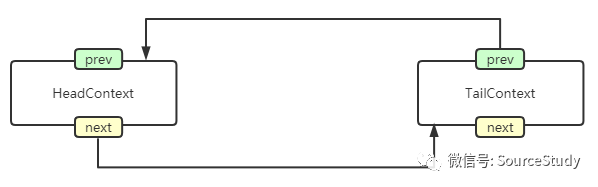
io.netty.channel.DefaultChannelPipeline#DefaultChannelPipeline
protected DefaultChannelPipeline(Channel channel) {
    this.channel = ObjectUtil.checkNotNull(channel, "channel");
    succeededFuture = new SucceededChannelFuture(channel, null);
    voidPromise =  new VoidChannelPromise(channel, true);
	//創(chuàng)建一個管道上下文  尾部節(jié)點
    tail = new TailContext(this);
    //創(chuàng)建一個管道上下文  頭部節(jié)點
    head = new HeadContext(this);
	//頭部節(jié)點的下一個節(jié)點設(shè)置為尾部節(jié)點
    head.next = tail;
    //尾部節(jié)點的上一個節(jié)點設(shè)置為頭部節(jié)點
    tail.prev = head;
}
可以看到,這里初始化管道的時候,管道內(nèi)部存在兩個Handler tail和head節(jié)點,兩個節(jié)點組成雙向鏈表!
2. 向通道內(nèi)添加一個Handler處理器
ch.pipeline().addLast(new ChannelInboundHandlerAdapter() {
    @Override
    public void channelRegistered(ChannelHandlerContext ctx) throws Exception {
        System.out.println("channelRegistered");
        super.channelRegistered(ctx);
    }
});
上述代碼再一個Netty開發(fā)中是很常見的一個代碼,這里向通道內(nèi)添加了一個 ChannelInboundHandlerAdapter,我們進入到addLast方法:
@Override
public final ChannelPipeline addLast(ChannelHandler... handlers) {
    return addLast(null, handlers);
}

//進入到 addLast
@Override
public final ChannelPipeline addLast(EventExecutorGroup executor, ChannelHandler... handlers) {
    ObjectUtil.checkNotNull(handlers, "handlers");

    for (ChannelHandler h: handlers) {
        if (h == null) {
            break;
        }
        addLast(executor, null, h);
    }

    return this;
}

//進入到 addLast(executor, null, h);
@Override
public final ChannelPipeline addLast(EventExecutorGroup group, String name, ChannelHandler handler) {
    final AbstractChannelHandlerContext newCtx;
    synchronized (this) {
        //驗證是否重復(fù)添加改handler
        checkMultiplicity(handler);
		//將handler封裝為上下文對象
        newCtx = newContext(group, filterName(name, handler), handler);
        //將該節(jié)點添加到雙向鏈表中
        addLast0(newCtx);
        ........................忽略其他代碼..............
    }
    ........................忽略其他代碼..............
    return this;
}
這里總共分為兩步:
驗證Handler是否被重復(fù)添加
checkMultiplicity(handler);private static void checkMultiplicity(ChannelHandler handler) {
//驗證是不是 ChannelHandlerAdapter 類型的,如果不是直接忽略
if (handler instanceof ChannelHandlerAdapter) {
ChannelHandlerAdapter h = (ChannelHandlerAdapter) handler;
//如果不是可共享的而且是已經(jīng)添加過的直接報錯
if (!h.isSharable() && h.added) {
throw new ChannelPipelineException(
h.getClass().getName() +
" is not a @Sharable handler, so can't be added or removed multiple times.");
}
//如果是可共享的或者未添加的,將該handler內(nèi)的 added屬性設(shè)置為true證明該handler已經(jīng)被添加
h.added = true;
}
}他是如何判斷是否被添加過的呢?
每一個Handler中都存在一個 added屬性,當這個屬性為true的時候,證明這個Handler已經(jīng)被添加過了,Netty常規(guī)情況下為了考慮線程安全問題,是不允許一個Handler被重復(fù)的使用的!
但是我們有時候會有這樣一個需求,Handler的功能比較類似,而且我們通過代碼手段,避免了線程安全問題,所以又想重復(fù)添加Handler,Netty提供了一個注解
@Sharable注解,當存在該注解的時候,證明這個Handler是可以被復(fù)用的,可以被重復(fù)添加!所以,checkMultiplicity方法通過判斷類是否增加了
@Sharable注解和added屬性是否為空來驗證Handle是否違規(guī)重復(fù)添加了!當驗證通過之后,將added設(shè)置為true,證明這個Handler已經(jīng)被添加過了!
將Handler封裝為包裝對象
newCtx = newContext(group, filterName(name, handler), handler);這里比較難理解的就是這個,我們進入到newContext方法里面:
private AbstractChannelHandlerContext newContext(EventExecutorGroup group, String name, ChannelHandler handler) {
    return new DefaultChannelHandlerContext(this, childExecutor(group), name, handler);
}
進入到 DefaultChannelHandlerContext類的源碼里面:
DefaultChannelHandlerContext(
            DefaultChannelPipeline pipeline, EventExecutor executor, String name, ChannelHandler handler) {
    //調(diào)用父類進行掩碼計算
    super(pipeline, executor, name, handler.getClass());
    //保存一個handler
    this.handler = handler;
}
這里除了會保存一個handler還會調(diào)用父類,我們介入到父類里面:
AbstractChannelHandlerContext(DefaultChannelPipeline pipeline, EventExecutor executor,
                                  String name, Class<? extends ChannelHandler> handlerClass) {
    this.name = ObjectUtil.checkNotNull(name, "name");
    this.pipeline = pipeline;
    this.executor = executor;
    //標識 是in還是out
    this.executionMask = mask(handlerClass);
    // 如果由EventLoop或給定的Executor驅(qū)動的驅(qū)動程序是OrderedEventExecutor的實例,則其順序為。
    ordered = executor == null || executor instanceof OrderedEventExecutor;
}
這里會保存一些屬性,這些屬性都是我們前面講過的,大家自行分析下,我們重點關(guān)注掩碼的計算:
this.executionMask = mask(handlerClass);static int mask(Class<? extends ChannelHandler> clazz) {
//直接再緩存中取出
Map<Class<? extends ChannelHandler>, Integer> cache = MASKS.get();
Integer mask = cache.get(clazz);
//緩存中不存在
if (mask == null) {
mask = mask0(clazz);
cache.put(clazz, mask);
}
return mask;
}先從緩存中取出,如果不存在就調(diào)用 mask0(clazz); 方法計算,然后再放進緩存,我們進入到
mask0(clazz);方法:private static int mask0(Class<? extends ChannelHandler> handlerType) {
int mask = MASK_EXCEPTION_CAUGHT;
try {
if (ChannelInboundHandler.class.isAssignableFrom(handlerType)) {
// 如果是 ChannelInboundHandler 實例,所有 Inbound 事件置為 1
mask |= MASK_ALL_INBOUND;
//判斷是否存在Skip注解 如果催你在這個跳過的注解 就移除這個
if (isSkippable(handlerType, "channelRegistered", ChannelHandlerContext.class)) {
mask &= ~MASK_CHANNEL_REGISTERED;
}
..................忽略類似的代碼.....................
}
if (ChannelOutboundHandler.class.isAssignableFrom(handlerType)) {
mask |= MASK_ALL_OUTBOUND;
if (isSkippable(handlerType, "bind", ChannelHandlerContext.class,
SocketAddress.class, ChannelPromise.class)) {
mask &= ~MASK_BIND;
}
..................忽略類似的代碼.....................
}
} catch (Exception e) {
..................忽略異常的代碼.....................
}
return mask;
}這會區(qū)分兩種情況,一種是
ChannelInboundHandler類型的,一種是ChannelOutboundHandler類型的,二者邏輯相同,我們以ChannelInboundHandler為例:首先,再ChannelHandlerMask類里面定義了很多的預(yù)設(shè)掩碼值:
/**
     * 以下是方法代表的掩碼值
     */
    static final int MASK_EXCEPTION_CAUGHT = 1;
    /**
     * channelRegistered方法的掩碼
     */
    static final int MASK_CHANNEL_REGISTERED = 1 << 1;
    /**
     * channelUnregistered方法的掩碼
     */
    static final int MASK_CHANNEL_UNREGISTERED = 1 << 2;
	/**
	* 后面的以此類推
	*/
    static final int MASK_CHANNEL_ACTIVE = 1 << 3;
    static final int MASK_CHANNEL_INACTIVE = 1 << 4;
    static final int MASK_CHANNEL_READ = 1 << 5;
    static final int MASK_CHANNEL_READ_COMPLETE = 1 << 6;
    static final int MASK_USER_EVENT_TRIGGERED = 1 << 7;
    static final int MASK_CHANNEL_WRITABILITY_CHANGED = 1 << 8;
    /**
     * bind方法的掩碼
     */
    static final int MASK_BIND = 1 << 9;
    /**
     * connect方法的掩碼
     */
    static final int MASK_CONNECT = 1 << 10;
	/**
	* 后面的以此類推
	*/
    static final int MASK_DISCONNECT = 1 << 11;
    static final int MASK_CLOSE = 1 << 12;
    static final int MASK_DEREGISTER = 1 << 13;
    static final int MASK_READ = 1 << 14;
    static final int MASK_WRITE = 1 << 15;
    static final int MASK_FLUSH = 1 << 16;

    /**
     * 包含全部 Inbound方法的掩碼
     */
    private static final int MASK_ALL_INBOUND = MASK_EXCEPTION_CAUGHT | MASK_CHANNEL_REGISTERED |
            MASK_CHANNEL_UNREGISTERED | MASK_CHANNEL_ACTIVE | MASK_CHANNEL_INACTIVE | MASK_CHANNEL_READ |
            MASK_CHANNEL_READ_COMPLETE | MASK_USER_EVENT_TRIGGERED | MASK_CHANNEL_WRITABILITY_CHANGED;

    /**
     * 包含全部 outbound方法的掩碼
     */
    private static final int MASK_ALL_OUTBOUND = MASK_EXCEPTION_CAUGHT | MASK_BIND | MASK_CONNECT | MASK_DISCONNECT |
            MASK_CLOSE | MASK_DEREGISTER | MASK_READ | MASK_WRITE | MASK_FLUSH;
我們回到 mask0方法:
mask |= MASK_ALL_INBOUND;一開始,我們會直接將一個handler的掩碼計算為擁有全部方法的掩碼!
if (isSkippable(handlerType, "channelRegistered", ChannelHandlerContext.class)) {
    mask &= ~MASK_CHANNEL_REGISTERED;
}
判斷該方法是否存在
@Skip注解,如果存在就排除掉這個掩碼!整個邏輯執(zhí)行完畢后,這個掩碼就只會包含handler中沒有被@Sikp注解注解的方法掩碼!
有同學(xué)可能疑問,我在書寫handler的時候并沒有增加
@Sikp注解呀! 我們都知道,實現(xiàn)一個Handler就必定需要繼承ChannelInboundHandlerAdapter或者ChannelOutboundHandlerAdapter, 我們隨便挑一個類進去看: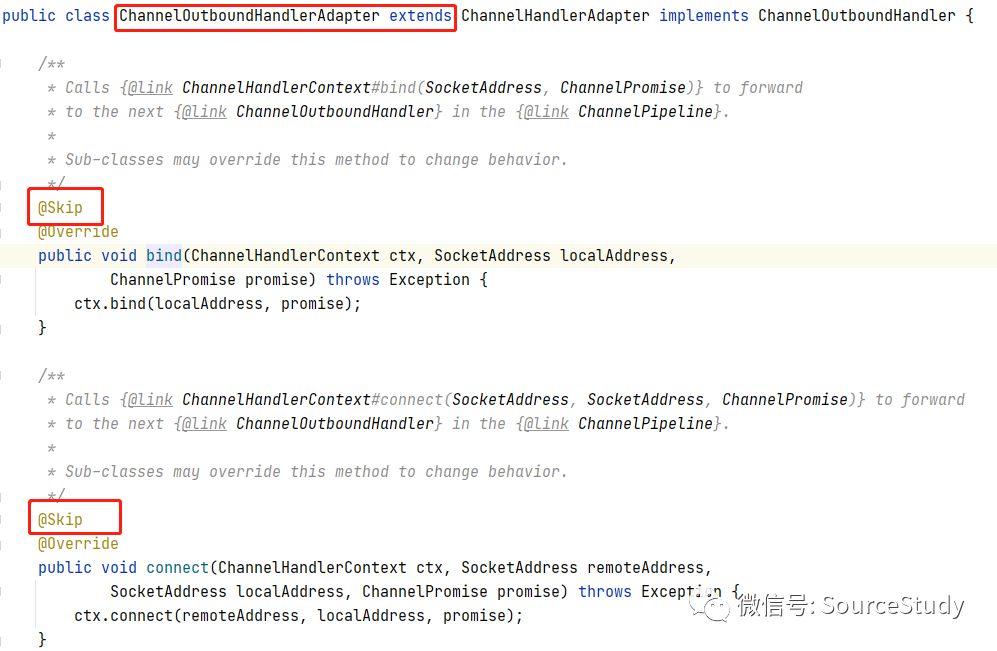
image-20210506002314359 可以看到,這些方法其實都是被默認添加了的,只不過我們重寫之后沒添加!現(xiàn)在我們明白,handler是如何區(qū)分你實現(xiàn)了那些方法的了!
這里會將handler包裝為HandlerContext對象,類似于tailContext和HeadContext一樣,此時上下文對象的結(jié)構(gòu)如下:
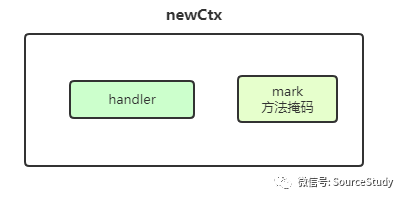
image-20210506002420080 將HandlerContext添加進pipeline中:
addLast0(newCtx);private void addLast0(AbstractChannelHandlerContext newCtx) {
AbstractChannelHandlerContext prev = tail.prev;
newCtx.prev = prev;
newCtx.next = tail;
prev.next = newCtx;
tail.prev = newCtx;
}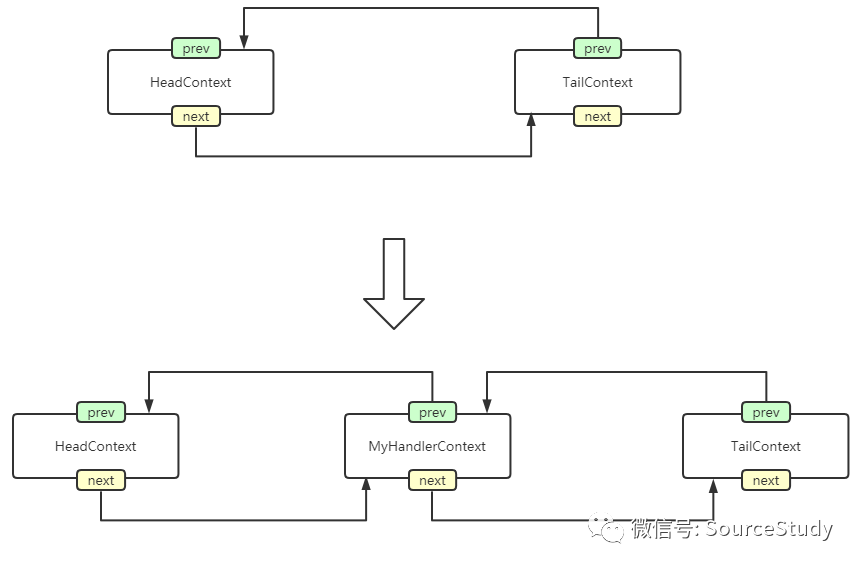
image-20210506000354375
整個過程如上,無非就是指針指向地址的變換,比較簡單,不做深入分析!
3. 刪除一個處理器
ch.pipeline().remove("xxxxxx")
@Override
public final ChannelPipeline remove(ChannelHandler handler) {
    remove(getContextOrDie(handler));
    return this;
}
尋找處理器Handler的上下文
getContextOrDie(handler)private AbstractChannelHandlerContext getContextOrDie(ChannelHandler handler) {
//尋找handler
AbstractChannelHandlerContext ctx = (AbstractChannelHandlerContext) context(handler);
if (ctx == null) {
throw new NoSuchElementException(handler.getClass().getName());
} else {
return ctx;
}
}
//context(handler);
@Override
public final ChannelHandlerContext context(ChannelHandler handler) {
ObjectUtil.checkNotNull(handler, "handler");
AbstractChannelHandlerContext ctx = head.next;
for (;;) {
if (ctx == null) {
return null;
}
//循環(huán)迭代 判斷是否尋找到這個handler
if (ctx.handler() == handler) {
//返回這個handler的上下文對象
return ctx;
}
ctx = ctx.next;
}
}刪除這個處理器
remove(getContextOrDie(handler));private <T extends ChannelHandler> T removeIfExists(ChannelHandlerContext ctx) {
if (ctx == null) {
return null;
}
return (T) remove((AbstractChannelHandlerContext) ctx).handler();
}
//直接進入到 刪除Handler的主要邏輯
//(T) remove((AbstractChannelHandlerContext) ctx).handler();
private AbstractChannelHandlerContext remove(final AbstractChannelHandlerContext ctx) {
//首先刪除的handler不是tail和尾節(jié)點
assert ctx != head && ctx != tail;
synchronized (this) {
//刪除上下文對象
atomicRemoveFromHandlerList(ctx);
................忽略....................
EventExecutor executor = ctx.executor();
if (!executor.inEventLoop()) {
executor.execute(new Runnable() {
@Override
public void run() {
//回調(diào)handlerRemoved方法
callHandlerRemoved0(ctx);
}
});
return ctx;
}
}
callHandlerRemoved0(ctx);
return ctx;
}首先我們關(guān)注
atomicRemoveFromHandlerList(ctx);:private synchronized void atomicRemoveFromHandlerList(AbstractChannelHandlerContext ctx) {
//獲取該節(jié)點的上級節(jié)點
AbstractChannelHandlerContext prev = ctx.prev;
//獲取該節(jié)點的下級節(jié)點
AbstractChannelHandlerContext next = ctx.next;
//重建指針位置
prev.next = next;
next.prev = prev;
}指針位置重建之后,我們回調(diào)handlerRemoved方法
callHandlerRemoved0(ctx);
至此我們就完成了pipeline的創(chuàng)建、添加、刪除的源碼解析!
4. 管道事件傳播
我們前面見到過很多的事件傳播代碼,我們以 channelRegistered 方法的事件回調(diào)為例:
io.netty.channel.AbstractChannel.AbstractUnsafe#register0
//通知管道  傳播channelRegistered事件
// 觸發(fā) channelRegistered 事件
pipeline.fireChannelRegistered();
我們進入到改行代碼的源碼:
@Override
public final ChannelPipeline fireChannelRegistered() {
    //執(zhí)行注冊方法  從head方法
    AbstractChannelHandlerContext.invokeChannelRegistered(head);
    return this;
}
static void invokeChannelRegistered(final AbstractChannelHandlerContext next) {
    EventExecutor executor = next.executor();
    if (executor.inEventLoop()) {
        next.invokeChannelRegistered();
    } else {
        executor.execute(new Runnable() {
            @Override
            public void run() {
                next.invokeChannelRegistered();
            }
        });
    }
}
我們可以看到,這里使用了 next.invokeChannelRegistered();方法 我們依舊按照同步方法進行分析!
private void invokeChannelRegistered() {
    if (invokeHandler()) {
        try {
            //現(xiàn)在調(diào)用的HeadContext的handler
            ((ChannelInboundHandler) handler()).channelRegistered(this);
        } catch (Throwable t) {
            notifyHandlerException(t);
        }
    } else {
        fireChannelRegistered();
    }
}
我們現(xiàn)在進入到了headContext,所以我們進入到: io.netty.channel.DefaultChannelPipeline.HeadContext#channelRegistered:
@Override
public void channelRegistered(ChannelHandlerContext ctx) {
    invokeHandlerAddedIfNeeded();
    //向下傳播事件
    ctx.fireChannelRegistered();
}
這一段代碼除了執(zhí)行Head的invokeHandlerAddedIfNeeded方法之外,還又一次傳播了channelRegistered事件,我們進入到 ctx.fireChannelRegistered();:
@Override
public ChannelHandlerContext fireChannelRegistered() {
    invokeChannelRegistered(findContextInbound(MASK_CHANNEL_REGISTERED));
    return this;
}
我們?nèi)绻胍蛳聜鞑ィ覀兪紫葢?yīng)該找到下一個節(jié)點是誰才能傳播,Netty這里調(diào)用了findContextInbound(MASK_CHANNEL_REGISTERED)查找下一個節(jié)點,我我們先關(guān)注以下參數(shù) MASK_CHANNEL_REGISTERED, 他是channelRegistered方法的掩碼, 我們進入到 findContextInbound方法源碼:
private AbstractChannelHandlerContext findContextInbound(int mask) {
    AbstractChannelHandlerContext ctx = this;
    do {
        //獲取下一個inbun事件
        ctx = ctx.next;
        //只要和掩碼&運算后不為0的都是 inbunt事件
    } while ((ctx.executionMask & mask) == 0);
    return ctx;
}
從當前節(jié)點向下尋找,只要 掩碼計算包含這個方法,就證明該context包含channelRegistered方法,就直接返回!
尋找到了handler之后,就開始調(diào)用了:
invokeChannelRegistered(findContextInbound(MASK_CHANNEL_REGISTERED));
static void invokeChannelRegistered(final AbstractChannelHandlerContext next) {
    EventExecutor executor = next.executor();
    if (executor.inEventLoop()) {
        next.invokeChannelRegistered();
    } else {
        executor.execute(new Runnable() {
            @Override
            public void run() {
                next.invokeChannelRegistered();
            }
        });
    }
}
next.invokeChannelRegistered();
具體邏輯就和上面分析的一致了,調(diào)用該handler的ChannelRegistered方法!
傳播某一個事件,就會使用哪個事件的掩碼,從當前節(jié)點向下尋找,知道對應(yīng)的Handler之后,回調(diào)對應(yīng)的方法!
關(guān)于管道的傳播,你明白了嗎?
提一個問題, 觀察以下兩種傳播方式有何不同:
ctx.fireChannelRegistered();
ctx.pipeline().fireChannelRegistered();
才疏學(xué)淺,如果文章中理解有誤,歡迎大佬們私聊指正!歡迎關(guān)注作者的公眾號,一起進步,一起學(xué)習(xí)!
??「轉(zhuǎn)發(fā)」和「在看」,是對我最大的支持??