
SpringBoot集成Redisson實現延遲隊列
點擊上方藍色字體,選擇“標星公眾號”
優(yōu)質文章,第一時間送達
使用場景
1、下單成功,30分鐘未支付。支付超時,自動取消訂單
2、訂單簽收,簽收后7天未進行評價。訂單超時未評價,系統(tǒng)默認好評
3、下單成功,商家5分鐘未接單,訂單取消
4、配送超時,推送短信提醒
......
對于延時比較長的場景、實時性不高的場景,我們可以采用任務調度的方式定時輪詢處理。如:xxl-job
今天我們采用一種比較簡單、輕量級的方式,使用 Redis 的延遲隊列來進行處理。當然有更好的解決方案,可根據公司的技術選型和業(yè)務體系選擇最優(yōu)方案。如:使用消息中間件Kafka、RabbitMQ 的延遲隊列
先不討論其實現原理,直接實戰(zhàn)上代碼先實現基于 Redis 的延遲隊列
1、引入 Redisson 依賴
<dependency>
    <groupId>org.redisson</groupId>
    <artifactId>redisson-spring-boot-starter</artifactId>
    <version>3.10.5</version>
</dependency>
2、Nacos 配置 Redis 連接
spring:
  redis:
    host: 127.0.0.1
    port: 6379
    password: 123456
    database: 12
    timeout: 3000
3、創(chuàng)建 RedissonConfig 配置
/**
 * Created by LPB on 2020/04/20.
 */
@Configuration
public class RedissonConfig {

 @Value("${spring.redis.host}")
 private String host;
 @Value("${spring.redis.port}")
 private int port;
 @Value("${spring.redis.database}")
 private int database;
 @Value("${spring.redis.password}")
 private String password;

 @Bean
 public RedissonClient redissonClient() {
  Config config = new Config();
  config.useSingleServer()
   .setAddress("redis://" + host + ":" + port)
   .setDatabase(database)
   .setPassword(password);
  return Redisson.create(config);
 }

}
4、封裝 Redis 延遲隊列工具類
/**
 * redis延遲隊列工具
 * Created by LPB on 2021/04/20.
 */
@Slf4j
@Component
public class RedisDelayQueueUtil {

    @Autowired
 private RedissonClient redissonClient;

    /**
     * 添加延遲隊列
     * @param value 隊列值
     * @param delay 延遲時間
     * @param timeUnit 時間單位
     * @param queueCode 隊列鍵
     * @param <T>
     */
    public <T> void addDelayQueue(T value, long delay, TimeUnit timeUnit, String queueCode){
        try {
            RBlockingDeque<Object> blockingDeque = redissonClient.getBlockingDeque(queueCode);
            RDelayedQueue<Object> delayedQueue = redissonClient.getDelayedQueue(blockingDeque);
            delayedQueue.offer(value, delay, timeUnit);
   log.info("(添加延時隊列成功) 隊列鍵:{},隊列值:{},延遲時間:{}", queueCode, value, timeUnit.toSeconds(delay) + "秒");
        } catch (Exception e) {
            log.error("(添加延時隊列失敗) {}", e.getMessage());
            throw new RuntimeException("(添加延時隊列失敗)");
        }
    }

 /**
  * 獲取延遲隊列
  * @param queueCode
  * @param <T>
  * @return
  * @throws InterruptedException
  */
    public <T> T getDelayQueue(String queueCode) throws InterruptedException {
        RBlockingDeque<Map> blockingDeque = redissonClient.getBlockingDeque(queueCode);
        T value  = (T) blockingDeque.take();
        return value;
 }
}
5、創(chuàng)建延遲隊列業(yè)務枚舉
/**
 * 延遲隊列業(yè)務枚舉
 * Created by LPB on 2021/04/20.
 */
@Getter
@NoArgsConstructor
@AllArgsConstructor
public enum RedisDelayQueueEnum {

 ORDER_PAYMENT_TIMEOUT("ORDER_PAYMENT_TIMEOUT","訂單支付超時,自動取消訂單", "orderPaymentTimeout"),
 ORDER_TIMEOUT_NOT_EVALUATED("ORDER_TIMEOUT_NOT_EVALUATED", "訂單超時未評價,系統(tǒng)默認好評", "orderTimeoutNotEvaluated");

 /**
  * 延遲隊列 Redis Key
  */
 private String code;

 /**
  * 中文描述
  */
 private String name;

 /**
  * 延遲隊列具體業(yè)務實現的 Bean
  * 可通過 Spring 的上下文獲取
  */
 private String beanId;

}
6、定義延遲隊列執(zhí)行器
/**
 * 延遲隊列執(zhí)行器
 * Created by LPB on 2021/04/20.
 */
public interface RedisDelayQueueHandle<T> {

 void execute(T t);

}
7、創(chuàng)建枚舉中定義的Bean,并實現延遲隊列執(zhí)行器
OrderPaymentTimeout:訂單支付超時延遲隊列處理類
/**
 * 訂單支付超時處理類
 * Created by LPB on 2021/04/20.
 */
@Component
@Slf4j
public class OrderPaymentTimeout implements RedisDelayQueueHandle<Map> {
 @Override
 public void execute(Map map) {
  log.info("(收到訂單支付超時延遲消息) {}", map);
  // TODO 訂單支付超時,自動取消訂單處理業(yè)務...

 }
}
OrderTimeoutNotEvaluated:訂單超時未評價延遲隊列處理類
/**
 * 訂單超時未評價處理類
 * Created by LPB on 2021/04/20.
 */
@Component
@Slf4j
public class OrderTimeoutNotEvaluated implements RedisDelayQueueHandle<Map> {
 @Override
 public void execute(Map map) {
  log.info("(收到訂單超時未評價延遲消息) {}", map);
  // TODO 訂單超時未評價,系統(tǒng)默認好評處理業(yè)務...

 }
}
8、創(chuàng)建延遲隊列消費線程,項目啟動完成后開啟
/**
 * 啟動延遲隊列
 * Created by LPB on 2021/04/20.
 */
@Slf4j
@Component
public class RedisDelayQueueRunner implements CommandLineRunner {

 @Autowired
 private RedisDelayQueueUtil redisDelayQueueUtil;

 @Override
 public void run(String... args) {
  new Thread(() -> {
   while (true){
    try {
     RedisDelayQueueEnum[] queueEnums = RedisDelayQueueEnum.values();
     for (RedisDelayQueueEnum queueEnum : queueEnums) {
      Object value = redisDelayQueueUtil.getDelayQueue(queueEnum.getCode());
      if (value != null) {
       RedisDelayQueueHandle redisDelayQueueHandle = SpringUtil.getBean(queueEnum.getBeanId());
       redisDelayQueueHandle.execute(value);
      }
     }
    } catch (InterruptedException e) {
     log.error("(Redis延遲隊列異常中斷) {}", e.getMessage());
    }
   }
  }).start();
  log.info("(Redis延遲隊列啟動成功)");
 }
}
以上步驟,Redis 延遲隊列核心代碼已經完成,下面我們寫一個測試接口,用 PostMan 模擬測試一下
9、創(chuàng)建一個測試接口,模擬添加延遲隊列
/**
 * 延遲隊列測試
 * Created by LPB on 2020/04/20.
 */
@RestController
public class RedisDelayQueueController {

 @Autowired
 private RedisDelayQueueUtil redisDelayQueueUtil;

 @PostMapping("/addQueue")
 public void addQueue() {
  Map<String, String> map1 = new HashMap<>();
  map1.put("orderId", "100");
  map1.put("remark", "訂單支付超時,自動取消訂單");

  Map<String, String> map2 = new HashMap<>();
  map2.put("orderId", "200");
  map2.put("remark", "訂單超時未評價,系統(tǒng)默認好評");

  // 添加訂單支付超時,自動取消訂單延遲隊列。為了測試效果,延遲10秒鐘
  redisDelayQueueUtil.addDelayQueue(map1, 10, TimeUnit.SECONDS, RedisDelayQueueEnum.ORDER_PAYMENT_TIMEOUT.getCode());

  // 訂單超時未評價,系統(tǒng)默認好評。為了測試效果,延遲20秒鐘
  redisDelayQueueUtil.addDelayQueue(map2, 20, TimeUnit.SECONDS, RedisDelayQueueEnum.ORDER_TIMEOUT_NOT_EVALUATED.getCode());
 }

}
10、啟動 SpringBoot 項目,用 PostMan 調用接口添加延遲隊列
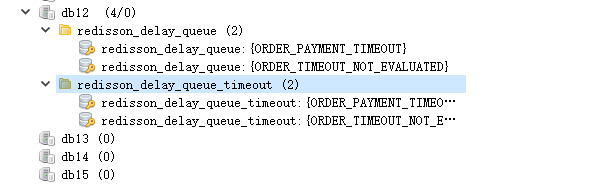
通過 Redis 客戶端可看到兩個延遲隊列已添加成功
查看 IDEA 控制臺日志可看到延遲隊列已消費成功

————————————————
版權聲明:本文為CSDN博主「KK·Liu先生」的原創(chuàng)文章,遵循CC 4.0 BY-SA版權協(xié)議,轉載請附上原文出處鏈接及本聲明。
原文鏈接:
https://blog.csdn.net/qq_40087415/article/details/115940092
粉絲福利:Java從入門到入土學習路線圖
??????

??長按上方微信二維碼 2 秒
感謝點贊支持下哈 