
帶你入門 Python 自動化群控

1. 前言
群控,相信大部分人都不會陌生!印象里是一臺電腦控制多臺設(shè)備完成一系列的操作,更多的人喜歡把它和 Hui 產(chǎn)綁定在一起!
事實上,群控在自動化測試中也被廣泛使用!接下來的幾篇文章,我將帶大家聊聊企業(yè)級自動化中,群控正確的使用姿勢!
本篇先從基礎(chǔ)篇開始,聊聊使用「 Python + adb 」命令如何編寫一套群控腳本
2. 準(zhǔn)備
在本機安裝 Android 開發(fā)環(huán)境,保證 adb 被添加到環(huán)境變量
將準(zhǔn)備好的多臺設(shè)備,使用數(shù)據(jù)線( 或者通過 Hub )連接到電腦上
通過 adb devices 命令查看已經(jīng)連接的所有設(shè)備
# 下面顯示連接了3臺設(shè)備
xag:Test xingag$ adb devices
List of devices attached
822QEDTL225T7    device
ca2b3455        device
DE45d9323SE96   device
3. 實戰(zhàn)
# 獲取當(dāng)前運行應(yīng)用的包名及初始Activity
adb shell dumpsys activity | grep -i run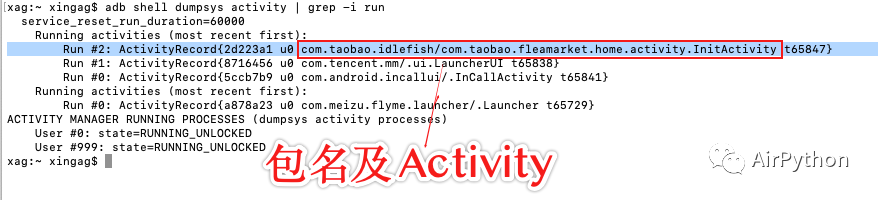
# 所有設(shè)備ID
devices = []

def get_online_devices(self):
    """
    獲取所有在線的設(shè)備
    :return:
    """
    global devices
    try:
        for device_serias_name in exec_cmd("adb devices"):
           # 過濾掉第一條數(shù)據(jù)及不在線的設(shè)備
           if "device" in device_serias_name:
              devices.append(device_serias_name.split("\t")[0])
           devices = devices[1:]
    except Exception as e:
            print(e)

    # 連上的所有設(shè)備及數(shù)量
    return devices
def start_app(self):
    """
    打開App
    :return:
    """
    for device in devices:
        os.popen("adb -s " + device + " shell am start -W {}/{}".format(self.packageName, self.home_activity))
    print('等待加載完成...')
    sleep(10)
# steps_adb.yaml

# 包名和Activity
package_name:  com.taobao.idlefish
home_activity:  com.taobao.fleamarket.home.activity.InitActivity

# 執(zhí)行步驟
steps:
  - save_ui_tree_to_local:
      method:  save_ui_tree_to_local
      args:
  - find_element_and_click:
      id:  com.taobao.idlefish:id/tx_id
  - save_ui_tree_to_local:
      method:  save_ui_tree_to_local
  - input_content:
      content:  Python
  - find_element_and_click:
      id:  com.taobao.idlefish:id/search_button
導(dǎo)出界面的控件樹
解析控件樹 XML 文件,利用正則表達式得到目標(biāo)控件的坐標(biāo)值
計算出控件的中心點坐標(biāo)
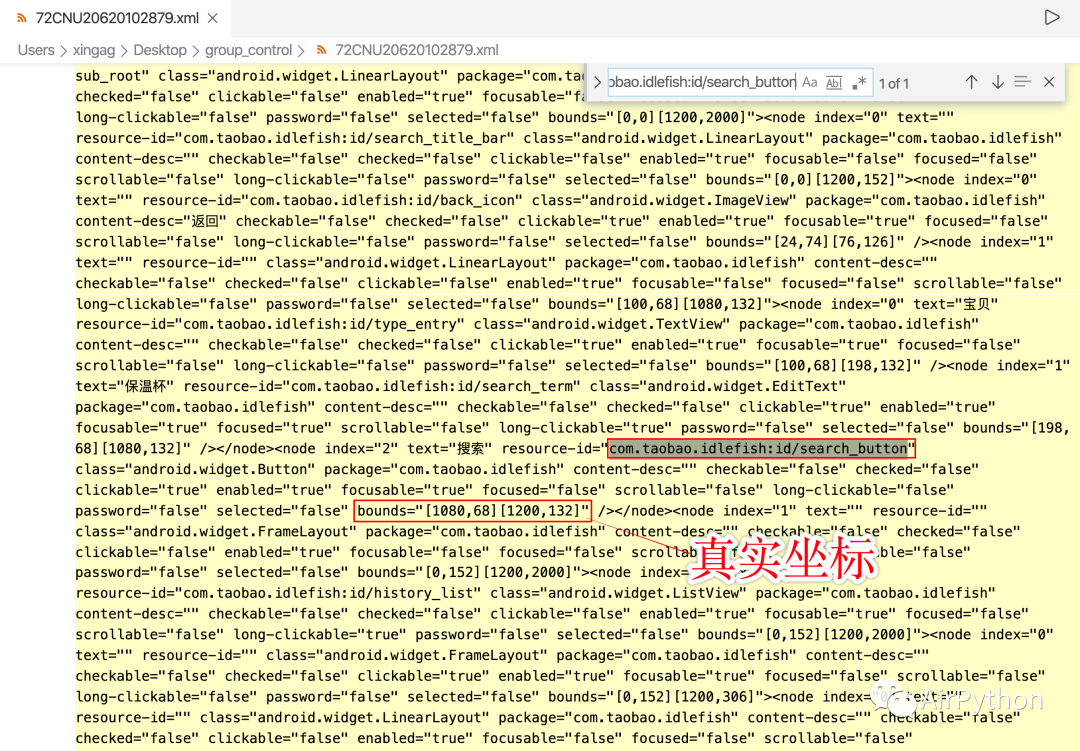
利用控件 ID 獲取元素中心點坐標(biāo)的實現(xiàn)代碼如下:
def get_element_position(element_id, uidump_name):
    """
    通過元素的id,使用ElementTree,解析元素控件樹,查找元素的坐標(biāo)中心點
    :param element_id: 元素id,比如:
    :return: 元素坐標(biāo)
    """

    # 解析XML
    tree = ET.parse('./../%s.xml' % uidump_name)
    root = tree.getroot()

    # 待查找的元素
    result_element = None

    # print('查找數(shù)目', len(root.findall('.//node')))

    # 遍歷查找node元素
    # 通過元素id
    for node_element in root.findall('.//node'):
        if node_element.attrib['resource-id'] == element_id:
            result_element = node_element
            break

    # 如果找不到元素,直接返回空
    if result_element is None:
        print('抱歉!找不到元素!')
        return None

    # 解析數(shù)據(jù)
    coord = re.compile(r"\d+").findall(result_element.attrib['bounds'])

    # 中心點坐標(biāo)
    position_center = int((int(coord[0]) + int(coord[2])) / 2), int((int(coord[1]) + int(coord[3])) / 2)

    return position_center
def save_ui_tree_to_local(dName):
    """
    獲取當(dāng)前Activity控件樹,保存到本地
    文件名固定為:uidump.xml
    :param dName: 設(shè)備id
    :return:
    """

    exec_cmd("adb  -s %s shell uiautomator dump /data/local/tmp/%s.xml" % (dName, dName))

    sleep(2)

    exec_cmd("adb -s %s pull /data/local/tmp/%s.xml ./../" % (dName, dName))
# 執(zhí)行步驟
for step in self.steps:
    # 設(shè)備
    for device in devices:
        pass
# 操作名稱
step_name = list(step)[0]

if step_name == 'save_ui_tree_to_local':
    # 保存UI數(shù)到本地
    method = step.get(step_name).get('method')
    save_ui_tree_to_local(device)
elif step_name == 'find_element_and_click':
    element_id = step.get(step_name).get('id')
    # 獲取元素的坐標(biāo)
    bound_search_input = get_element_position(element_id, device)
    # 點擊元素
    exec_cmd('adb -s %s shell input tap %s %s' % (device, bound_search_input[0], bound_search_input[1]))
elif step_name == 'input_content':
    input_content = step.get(step_name).get('content')
    # 模擬輸入
    exec_cmd('adb -s %s shell input text %s' % (device, input_content))
else:
print('其他操作步驟')def stop_all(self):
"""
關(guān)閉應(yīng)用
:return:
"""
for device in devices:
os.popen("adb -s " + device + " shell am force-stop %s" % self.packageName)4. 最后
本篇僅僅是 Python 自動化群控最簡單的實現(xiàn)方式,后面將和大家討論更加復(fù)雜的實現(xiàn)方式。
我已經(jīng)將文中全部源碼上傳到后臺,關(guān)注公眾號后回復(fù)「 qk 」即可獲得全部源碼
如果你覺得文章還不錯,請大家 點贊、分享、轉(zhuǎn)發(fā)下,因為這將是我持續(xù)輸出更多優(yōu)質(zhì)文章的最強動力!
評論
圖片
表情