
2w字搞懂Spring AOP的前世今生
最近看seata源碼的時候,隨處可見spring aop的api,于是一邊看seata,一邊又把spring aop總結了一下
我們在使用Spring框架的時候,經常需要和Spring的2大特性,IOC和AOP打交道,本篇文章就接著分享一下AOP的底層實現(xiàn),比較基礎的內容本篇文章就不多做介紹了,主要側重于底層api的設計理念
「AOP這種設計理念常見的概念如下」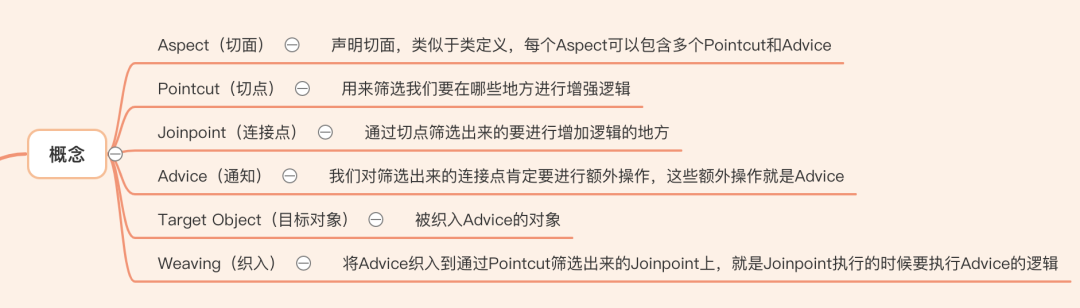
「AOP的主要應用場景如下」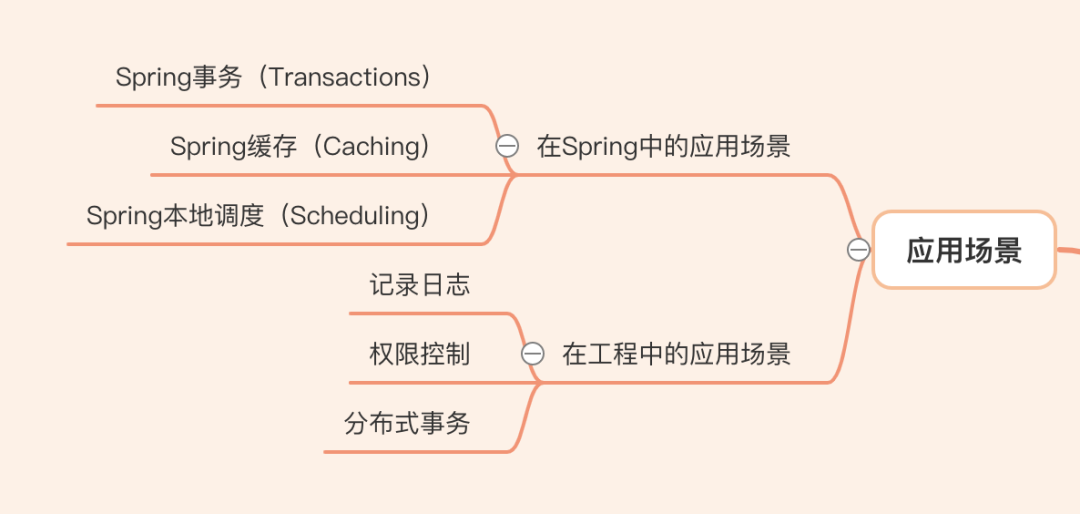 「Spring AOP的實現(xiàn)主要經歷了2代」
第一代:spring1.x版本,自己實現(xiàn)了AOP的功能 第二代:spring2.x版本,Spring集成了AspectJ的實現(xiàn)
Spring AOP一代
「當我們要基于現(xiàn)成的實現(xiàn)增加橫切邏輯時,首先需要找到哪些地方增強,我們就用Pointcut來進行篩選吧」
先寫一個Service方便后面的演示
public interface EchoService {

    String echo(String message);
}
public class DefaultEchoService implements EchoService {

    @Override
    public String echo(String message) {
        return message;
    }
}
Pointcut
Pointcut接口定義如下
public interface Pointcut {

 // 通過類過濾
 ClassFilter getClassFilter();

 // 通過方法過濾
 MethodMatcher getMethodMatcher();

 Pointcut TRUE = TruePointcut.INSTANCE;

}
「當我們想篩選出EchoService的echo方法時,就可以定義如下的Pointcut」
public class EchoPointcut implements Pointcut {

    @Override
    public ClassFilter getClassFilter() {
        return new ClassFilter() {
            @Override
            public boolean matches(Class<?> clazz) {
                return EchoService.class.isAssignableFrom(clazz);
            }
        };
    }

    @Override
    public MethodMatcher getMethodMatcher() {
        return new MethodMatcher() {
            @Override
            public boolean matches(Method method, Class<?> targetClass) {
                return "echo".equals(method.getName()) &&
                        method.getParameterTypes().length == 1 &&
                        Objects.equals(String.class, method.getParameterTypes()[0]);
            }

            @Override
            public boolean isRuntime() {
                return false;
            }

            @Override
            public boolean matches(Method method, Class<?> targetClass, Object... args) {
                return false;
            }
        };
    }
}
看起來還是很麻煩的,因此Spring內置了很多實現(xiàn),一般情況下我們用內置的實現(xiàn)即可,不用自己定義,上面的篩選過程就可以改為如下
// 方法名為 echo 會被攔截
NameMatchMethodPointcut pointcut = new NameMatchMethodPointcut();
pointcut.setMappedName("echo");
Spring提供的部分Pointcut實現(xiàn)如下
Jointpoint
「通過Pointcut篩選出來的要增加橫切邏輯的地方就是Jointpoint。」 在AOP理念中,很多地方可以增加橫切邏輯,如方法執(zhí)行,字段設置等。但是「Spring只支持方法執(zhí)行這一種Joinpoint」,因為這種類型的Jointpoint基本上已經滿足80%的場景了
Joinpoint類型中 「方法調用優(yōu)于方法執(zhí)行」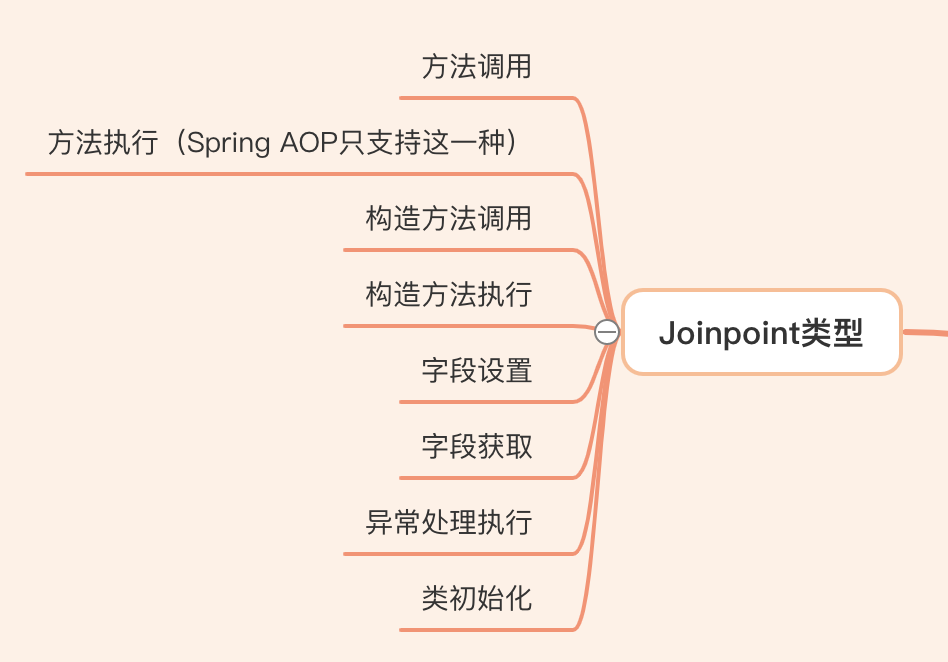 因為Spring中只支持方法執(zhí)行這一種Joinpoint,所以我們可以從Joinpoint實現(xiàn)類中獲取增強的方法信息
Advice
當篩選出Jointpoint時,我們就需要在這些Jointpoint上增加橫切邏輯,這些橫切邏輯被稱為Advice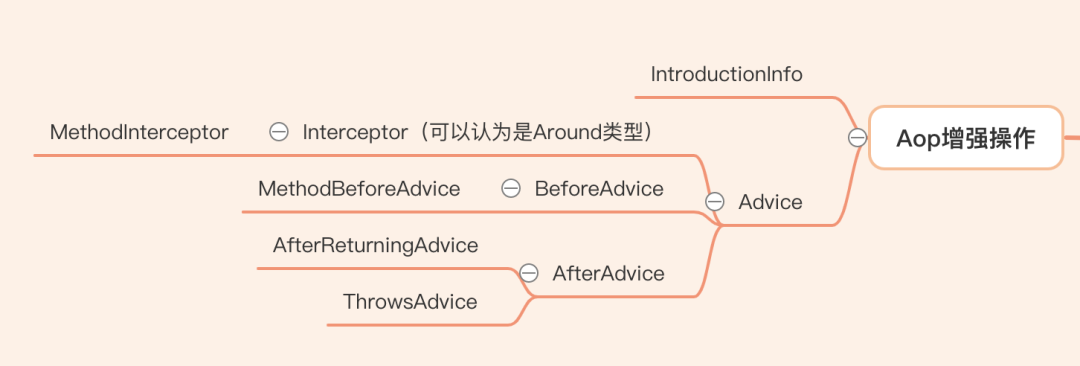 在Spring中實現(xiàn)橫切邏輯的方式有兩類
-
實現(xiàn)Advice接口 -
實現(xiàn)IntroductionInfo接口
實現(xiàn)Advice接口的方式我們最常用,后面會詳細分析。實現(xiàn)IntroductionInfo接口的方式基本不會用,這里演示一下具體的用法,方便理解整個AOP API的設計理念
「IntroductionInfo主要是通過給目標類實現(xiàn)特定接口來增加新功能」
public interface SayName {

    String getName();
}
public class DefaultSayName implements SayName {

    @Override
    public String getName() {
        return "I am service";
    }
}
public static void main(String[] args) {
    SayName sayName = new DefaultSayName();
    EchoService echoService = new DefaultEchoService();
    // IntroductionInfo接口的內置實現(xiàn)
    DelegatingIntroductionInterceptor interceptor =
            new DelegatingIntroductionInterceptor(sayName);
    Advisor advisor = new DefaultIntroductionAdvisor(interceptor, SayName.class);
    ProxyFactory proxyFactory = new ProxyFactory(echoService);
    proxyFactory.addAdvisor(advisor);
    // hello world
    EchoService proxyService = (EchoService) proxyFactory.getProxy();
    System.out.println(proxyService.echo("hello world"));
    // I am service
    SayName proxySayName = (SayName) proxyFactory.getProxy();
    System.out.println(proxySayName.getName());
}
可能你對這個例子中的Advisor和ProxyFactory比較陌生,不知道起了啥作用,不著急,我們后面會詳細分析這2個類的作用
「實現(xiàn)Advice接口的方式,應該是Spring AOP一代中最常見的使用方式了」
「對HashMap的put方法增加執(zhí)行前的橫切邏輯」, 打印放入HashMap的key和value的值
public static void main(String[] args) {
    JdkRegexpMethodPointcut pointcut = new JdkRegexpMethodPointcut();
    pointcut.setPattern(".*put.*");
    DefaultPointcutAdvisor advisor = new DefaultPointcutAdvisor();
    advisor.setPointcut(pointcut);
    advisor.setAdvice(new MethodBeforeAdvice() {
        @Override
        public void before(Method method, Object[] args, Object target) throws Throwable {
            System.out.printf("當前存放的key為 %s,值為 %s", args[0], args[1]);
        }
    });

    ProxyFactory proxyFactory = new ProxyFactory(new HashMap());
    proxyFactory.addAdvisor(advisor);
    Map<String, String> proxyMap = (Map<String, String>) proxyFactory.getProxy();
    // 當前存放的key為 a,值為 a
    proxyMap.put("a", "a");
}
Advisor
前面我們說過在AOP設計理念中,我們用Aspect來聲明切面,每個Aspect可以包含多個Pointcut和Advice。
「在Spring AOP一代中,Aspect對應的實現(xiàn)為Advisor」。即Advisor是Pointcut和Advice的容器,但是一個Advisor只能包含一個Pointcut和Advice
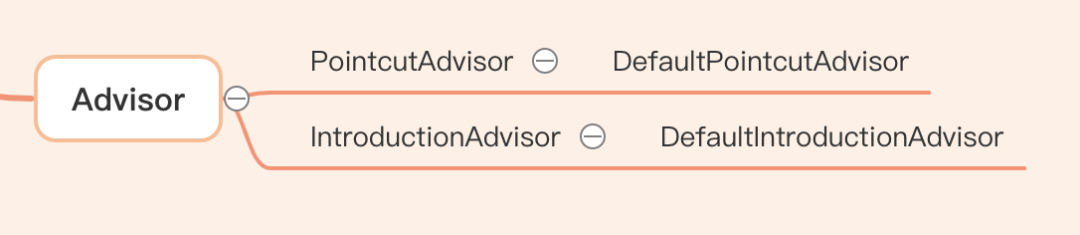 因為Advice的實現(xiàn)方式有兩類,因此對應的Advisor也可以分為兩類
織入
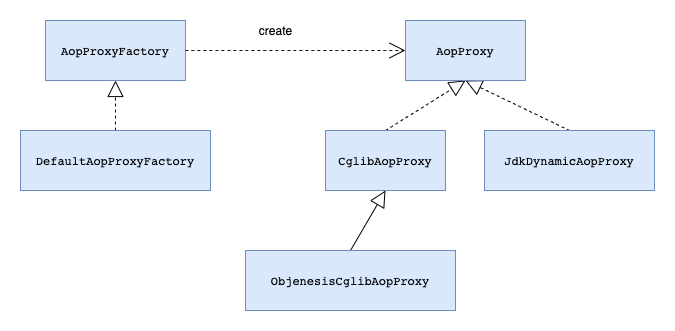
「在Spring中將Advice織入到Jointpoint的過程是通過動態(tài)代理來實現(xiàn)的」。當然織入的方式有很多種,不僅僅只有動態(tài)代理這一種實現(xiàn)
 Spring用了jdk動態(tài)代理和cglib來實現(xiàn)動態(tài)代理。生成代理對象用了工廠模式。從api中就可以很清晰的看出來
 「jdk動態(tài)代理」
public class CostInvocationHandler implements InvocationHandler {

    private Object target;

    public CostInvocationHandler(Object target) {
        this.target = target;
    }

    @Override
    public Object invoke(Object proxy, Method method, Object[] args) throws Throwable {
        long startTime = System.currentTimeMillis();
        Object result = method.invoke(target, args);
        long cost = System.currentTimeMillis() - startTime;
        System.out.println("cost " + cost);
        return result;
    }
}
public static void main(String[] args) {
    ClassLoader classLoader = Thread.currentThread().getContextClassLoader();
    Object proxy = Proxy.newProxyInstance(classLoader,
            new Class[]{EchoService.class},
            new CostInvocationHandler(new DefaultEchoService()));
    EchoService echoService = (EchoService) proxy;
    // cost 0
    // hello world
    System.out.println(echoService.echo("hello world"));
}
「cglib」
public static void main(String[] args) {
    Enhancer enhancer = new Enhancer();
    enhancer.setSuperclass(DefaultEchoService.class);
    enhancer.setInterfaces(new Class[] {EchoService.class});
    enhancer.setCallback(new MethodInterceptor() {
        @Override
        public Object intercept(Object source, Method method, Object[] args, MethodProxy methodProxy) throws Throwable {
            long startTime = System.currentTimeMillis();
            Object result = methodProxy.invokeSuper(source, args);
            long cost = System.currentTimeMillis() - startTime;
            System.out.println("cost " + cost);
            return result;
        }
    });
    EchoService echoService = (EchoService) enhancer.create();
    // cost 29
    // hello world
    System.out.println(echoService.echo("hello world"));
}
Spring AOP的自動動態(tài)代理
上面我們一直通過API的形式來演示,我們當然也可以把這些對象放入Spring容器,讓Spring來管理,并且對Spring容器中的Bean生成代理對象
上面的Demo可以改為如下形式,變化基本不大
「手動配置」
public class ProxyConfig {

    // 創(chuàng)建代理對象
    @Bean
    public EchoService echoService() {
        return new DefaultEchoService();
    }

    // 創(chuàng)建advice
    @Bean
    public CostMethodInterceptor costInterceptor() {
        return new CostMethodInterceptor();
    }

    // 使用pointcut和advice創(chuàng)建advisor
    @Bean
    public Advisor advisor() {
        NameMatchMethodPointcutAdvisor advisor = new NameMatchMethodPointcutAdvisor();
        advisor.setMappedName("echo");
        advisor.setAdvice(costInterceptor());
        return advisor;
    }

    // 創(chuàng)建代理對象
    @Bean("echoProxy")
    public ProxyFactoryBean proxyFactoryBean(EchoService echoService) {
        ProxyFactoryBean proxyFactoryBean = new ProxyFactoryBean();
        proxyFactoryBean.setTarget(echoService);
        proxyFactoryBean.setInterceptorNames("advisor");
        return proxyFactoryBean;
    }
}
public static void main(String[] args) {
    AnnotationConfigApplicationContext context = new AnnotationConfigApplicationContext(ProxyConfig.class);
    // 獲取代理對象
    EchoService echoService = (EchoService) context.getBean("echoProxy");
    // cost 0
    // hello world
    System.out.println(echoService.echo("hello world"));
}
「可以看到我們對每個生成的代理對象都要配置對應的ProxyFactoryBean,然后從容器中獲取代理對象來使用」。當代理對象很少時還能應付,當代理對象很多時,那還不得累到吐血。有沒有什么簡單的辦法呢?
Spring肯定也想到了這個問題,所以他提供了如下一個類DefaultAdvisorAutoProxyCreator來實現(xiàn)自動代理,我們將這個類放入Spring容器即可,如下所示
「自動配置」
public class AutoProxyConfig {

    // 創(chuàng)建代理對象
    @Bean
    public EchoService echoService() {
        return new DefaultEchoService();
    }

    // 創(chuàng)建advice
    @Bean
    public CostMethodInterceptor costInterceptor() {
        return new CostMethodInterceptor();
    }

    // 使用pointcut和advice創(chuàng)建advisor
    @Bean
    public Advisor advisor() {
        NameMatchMethodPointcutAdvisor advisor = new NameMatchMethodPointcutAdvisor();
        advisor.setMappedName("echo");
        advisor.setAdvice(costInterceptor());
        return advisor;
    }

    @Bean
    public DefaultAdvisorAutoProxyCreator autoProxyCreator() {
        return new DefaultAdvisorAutoProxyCreator();
    }
}
public static void main(String[] args) {
    AnnotationConfigApplicationContext context = new AnnotationConfigApplicationContext(AutoProxyConfig.class);
    EchoService echoService = context.getBean(EchoService.class);
    // cost 0
    // hello world
    System.out.println(echoService.echo("hello world"));
}
從容器中獲取的對象直接就是被代理后的對象,非常方便。「Spring AOP提供了很多類來實現(xiàn)自動代理,但他們有一個共同的父類AbstractAutoProxyCreator,看來自動代理的秘密就在這個AbstractAutoProxyCreator類中」
Spring AOP自動動態(tài)代理的實現(xiàn)方式
如果讓你實現(xiàn)對象的自動代理,你會怎么做呢?
當然是通過BeanPostProcessor來干預Bean的聲明周期,聰明!Spring就是這么干的,來驗證一下我們的想法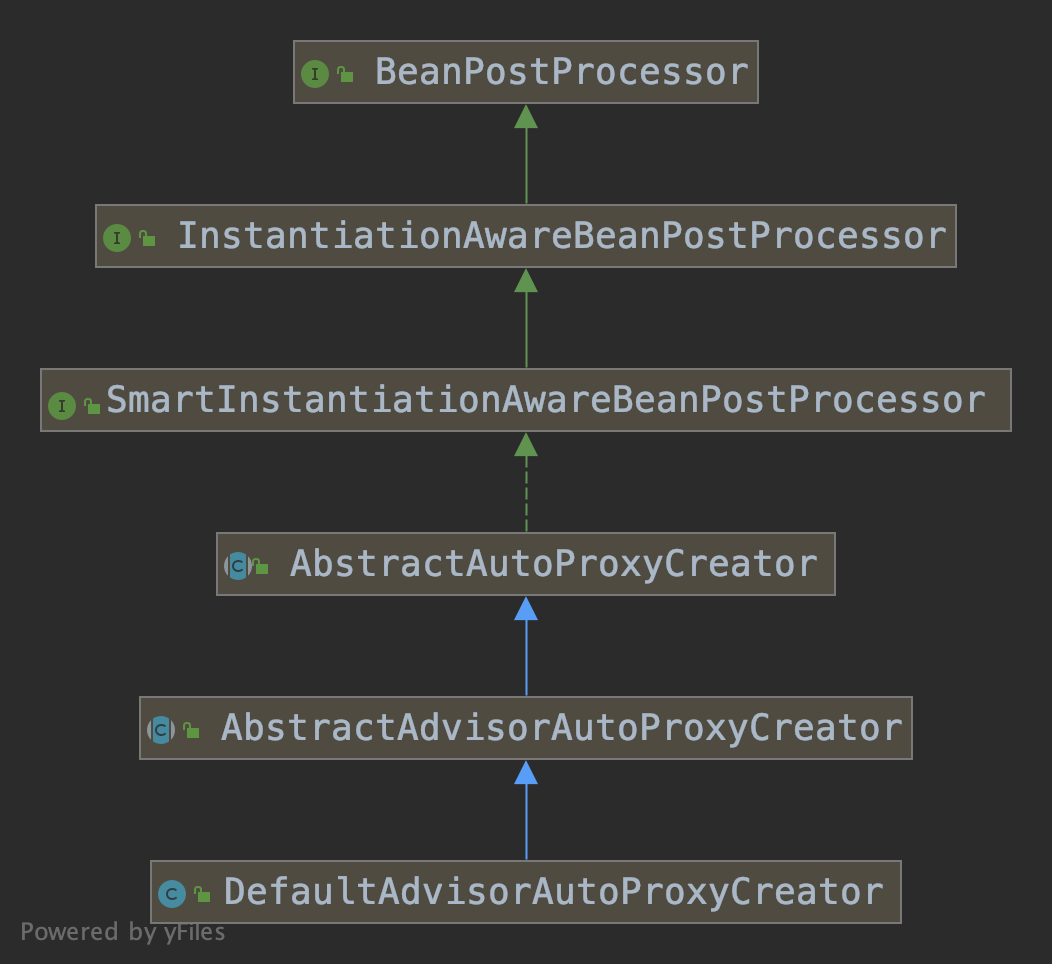 看這個類的繼承關系,基本上就驗證了我們的想法了。我們只要看看他重寫了BeanPostProcessor的哪些方法即可?
「AbstractAutoProxyCreator重寫了如下2個重要的方法」postProcessBeforeInstantiation(Bean實例化前階段執(zhí)行) postProcessAfterInitialization(Bean初始化后階段執(zhí)行)

「postProcessBeforeInstantiation(Bean實例化前階段執(zhí)行)」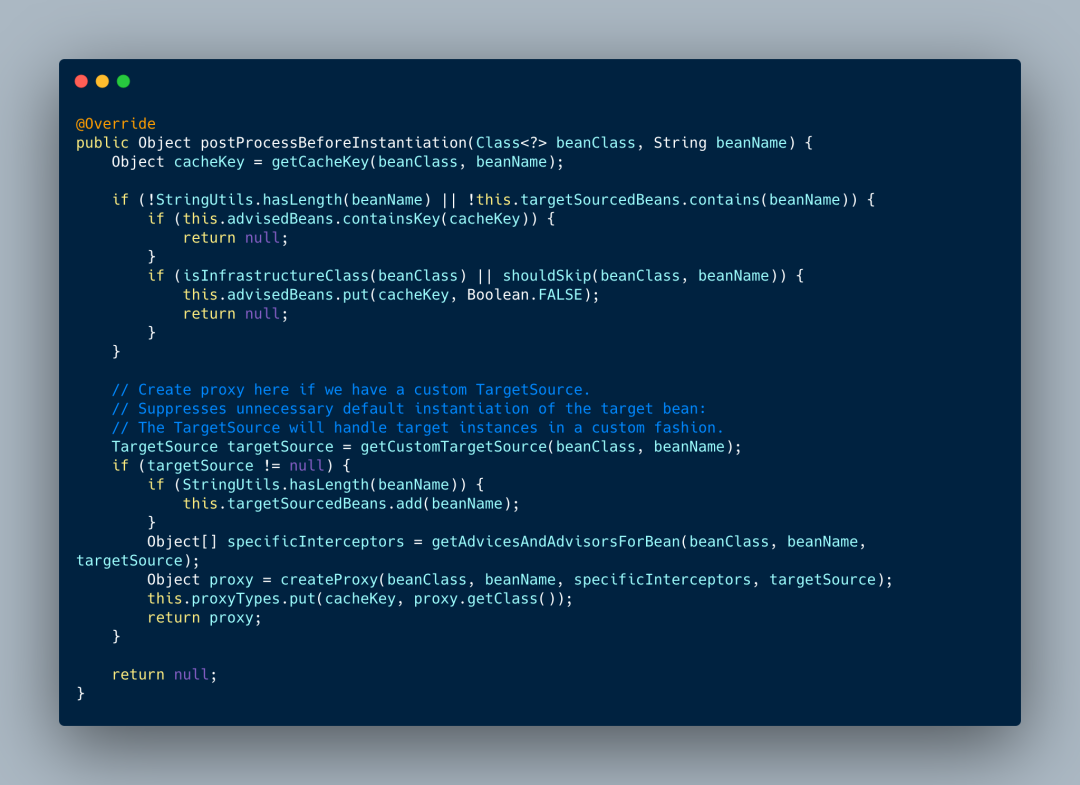 當用戶自定義了TargetSource的實現(xiàn)時,會從TargetSource中獲取目標對象生成代理。但是一般情況下我們很少會自定義TargetSource的實現(xiàn)。所以這部分就不再分析了。直接看postProcessAfterInitialization
「postProcessAfterInitialization(Bean初始化后階段執(zhí)行)」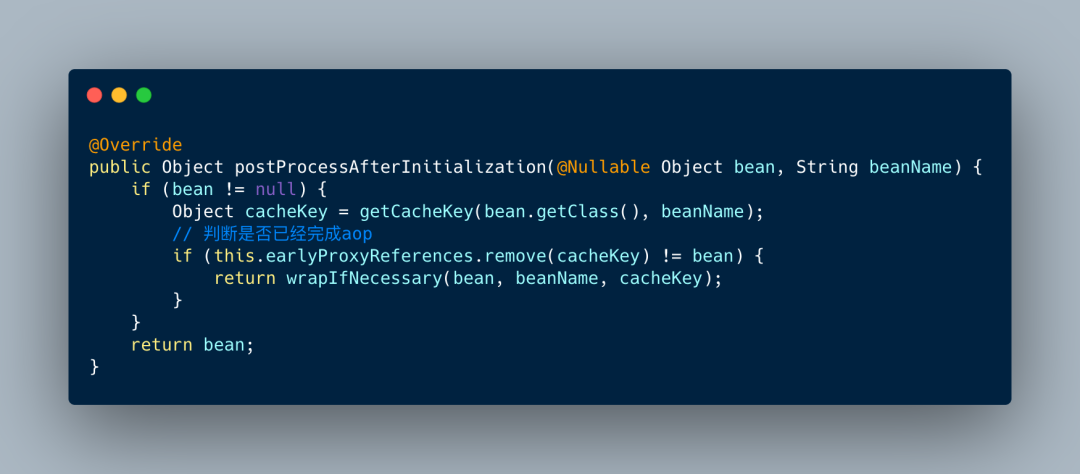 如果沒有經過代理的化就會進入wrapIfNecessary方法
 思路很簡單,就是根據(jù)Bean獲取對應的Advisor,然后創(chuàng)建其代理對象,并返回。
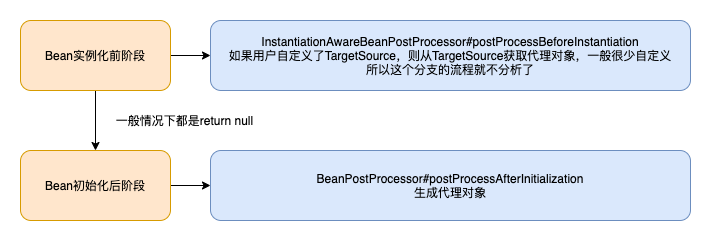 「所以當面試官問你Spring AOP和IOC是如何結合在一起的時候,你是不是知道該如何回答了?」
在Bean生命周期的Bean初始化后階段,如果這個Bean需要增加橫切邏輯,則會在這個階段生成對應的代理對象
Spring AOP二代(集成了AspectJ)
當Spring 2.0發(fā)布以后,Spring AOP增加了新的使用方式,Spring AOP集成了AspectJ。我們最常用的就是這個版本的Spring AOP
主要有如下變化
-
可以用POJO來定義Aspect和Adivce,并提供了一系列相應的注解,如@Aspect和@Around等。而不用像1.x版本中實現(xiàn)相應的接口 -
支持aspectj中的pointcut的表達方式,我們都深有體會哈

演示一下2.0版本中aop的使用方式
定義切面
@Aspect
public class AspectDefine {

    @Pointcut("execution(* com.javashitang.proxy.EchoService.echo(..))")
    public void pointcutName() {}

    @Around("pointcutName()")
    public Object calCost(ProceedingJoinPoint joinPoint) throws Throwable {
        long startTime = System.currentTimeMillis();
        Object result = joinPoint.proceed();
        long cost = System.currentTimeMillis() - startTime;
        System.out.println("cost " + cost);
        return result;
    }

    @Before("pointcutName()")
    public void beforeMethod() {
        System.out.println("beforeMethod");
    }
}
增加配置,注入實現(xiàn)類
@EnableAspectJAutoProxy
public class AspectJConfig {

    @Bean
    public EchoService echoService() {
        return new DefaultEchoService();
    }
}
public static void main(String[] args) {
    AnnotationConfigApplicationContext context =
            new AnnotationConfigApplicationContext(AspectJConfig.class, AspectDefine.class);
    EchoService echoService = context.getBean(EchoService.class);
    // beforeMethod
    // cost 0
    // hello world
    System.out.println(echoService.echo("hello world"));
    context.close();
}
「雖然spring2.0之后spring aop集成了AspectJ,但實際上只是拿AspectJ的“皮大衣“用了一下,因為底層的實現(xiàn)和織入方式還是1.x原先的實現(xiàn)體系」
@EnableAspectJAutoProxy有啥用?
「當我們想使用2.0版本的aop時,必須在配置類上加上@EnableAspectJAutoProxy注解,那么這個注解有啥作用呢?」
@Target(ElementType.TYPE)
@Retention(RetentionPolicy.RUNTIME)
@Documented
@Import(AspectJAutoProxyRegistrar.class)
public @interface EnableAspectJAutoProxy {

 boolean proxyTargetClass() default false;

 boolean exposeProxy() default false;

}
可以看到很重要的一句
@Import(AspectJAutoProxyRegistrar.class)
通過@Import注入bean,「通過@Import注解注入Bean的方式有如下三種」
-
基于Configuration Class -
基于ImportSelector接口 -
基于ImportBeanDefinitionRegistrar接口
 這個代碼主要做了2個事情
-
往容器中注入AnnotationAwareAspectJAutoProxyCreator -
當@EnableAspectJAutoProxy注解中的proxyTargetClass或者exposeProxy屬性為true的時候,將AnnotationAwareAspectJAutoProxyCreator中的proxyTargetClass或者exposeProxy屬性改為true
「proxyTargetClass和exposeProxy保存在AnnotationAwareAspectJAutoProxyCreator類的父類ProxyConfig中,這個類存了一些配置,用來控制代理對象的生成過程」
proxyTargetClass:true使用CGLIB基于類創(chuàng)建代理;false使用java接口創(chuàng)建代理 exposeProxy:true將代理對象保存在AopContext中,否則不保存
第一個屬性比較容易理解,那么第二個屬性有啥作用呢?演示一下
@Service
public class SaveSevice {

    public void method1() {
        System.out.println("method1 executed");
        method2();
    }

    public void method2() {
        System.out.println("method2 executed");
    }
}
@Aspect
public class AspectDefine {

    @Pointcut("execution(* com.javashitang.invalid.SaveSevice.method2(..))")
    public void pointcutName() {}

    @Around("pointcutName()")
    public Object calCost(ProceedingJoinPoint joinPoint) throws Throwable {
        System.out.println("開啟事務");
        return joinPoint.proceed();
    }
}
@EnableAspectJAutoProxy
public class InvalidDemo {

    public static void main(String[] args) {
        AnnotationConfigApplicationContext context =
                new AnnotationConfigApplicationContext(SaveSevice.class,
                        AspectDefine.class, InvalidDemo.class);
        SaveSevice saveSevice = context.getBean(SaveSevice.class);
        saveSevice.method1();
        System.out.println("--");
        saveSevice.method2();
    }
}
結果為
method1 executed
method2 executed
--
開啟事務
method2 executed
「可以看到通過method1調用method2時,aop沒有生效。直接調用method2時,aop才會生效。事務方法自調用失效就是因為這個原因,因為調用的不是代理對象的方法」
解決方法有很多種,例如重新從ApplicationContext中取一下代理對象,然后調用代理對象的方法。另一種就是通過AopContext獲取代理對象,實現(xiàn)原理就是當方法調用時會將代理對象放到ThreadLocal中
@Service
public class SaveSevice {

    public void method1() {
        System.out.println("method1 executed");
        ((SaveSevice) AopContext.currentProxy()).method2();
    }

    public void method2() {
        System.out.println("method2 executed");
    }
}
將exposeProxy屬性改為true
@EnableAspectJAutoProxy(exposeProxy = true)
method1 executed
開啟事務
method2 executed
--
開啟事務
method2 executed
可以看到aop成功生效。「當你使用@Transactional注解,分布式事務框架時一定要注意子調用這個問題,不然很容易造成事務失效」
我們接著聊,往容器中注入AnnotationAwareAspectJAutoProxyCreator,那么這個類有啥作用呢?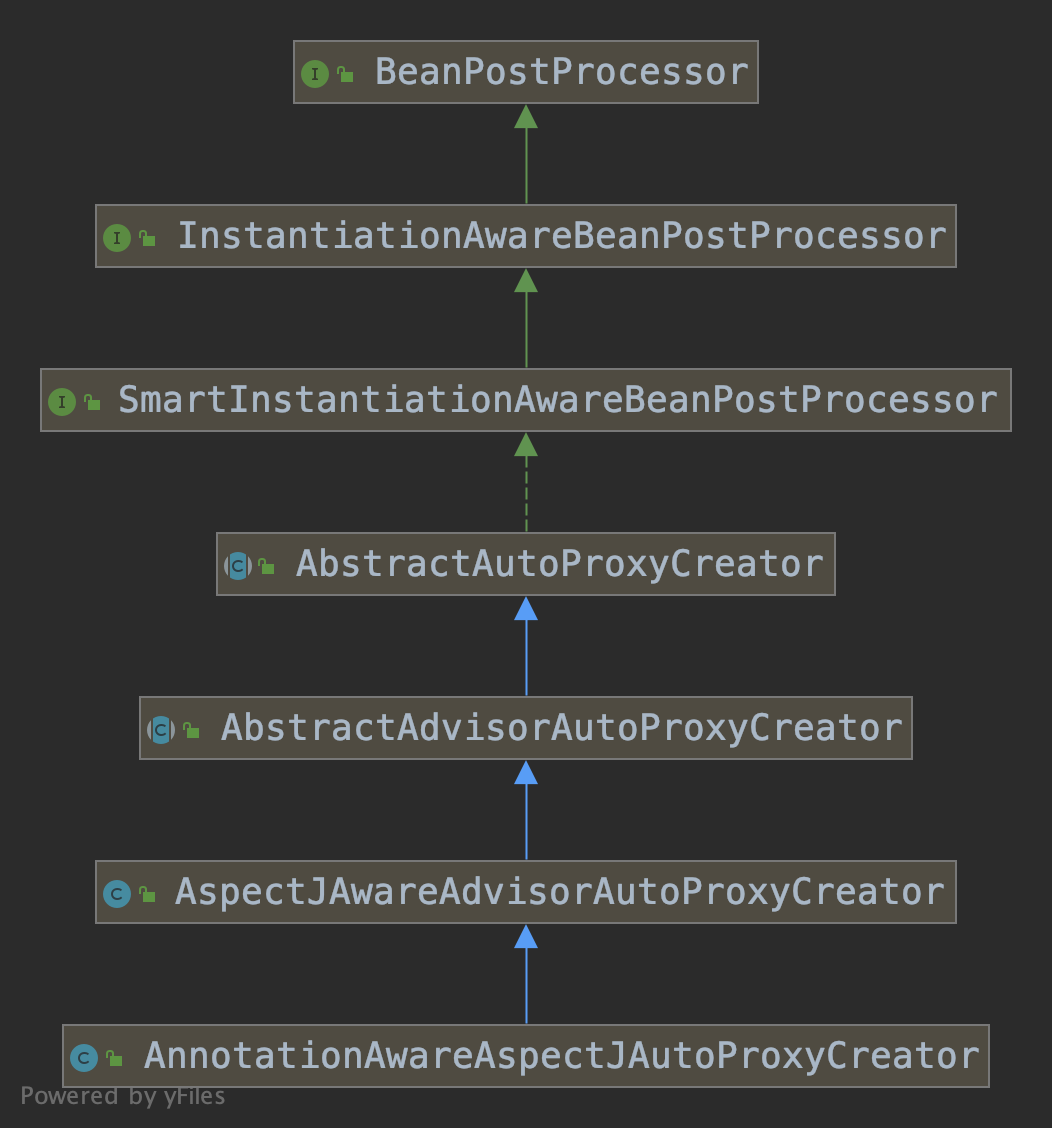 看這繼承關系是不是和我們上面分析的DefaultAdvisorAutoProxyCreator類很相似,這不就是為了開啟自動代理嗎?
忘了自動代理的實現(xiàn)過程了?回頭看看
切點表達式
「Spring AOP用AspectJExpressionPointcut橋接了Aspect的篩選能力」。其實Aspect有很多種類型的切點表達式,但是Spring AOP只支持如下10種,因為Aspect支持很多種類型的JoinPoint,但是Spring AOP只支持方法執(zhí)行這一種JoinPoint,所以其余的表達式就沒有必要了。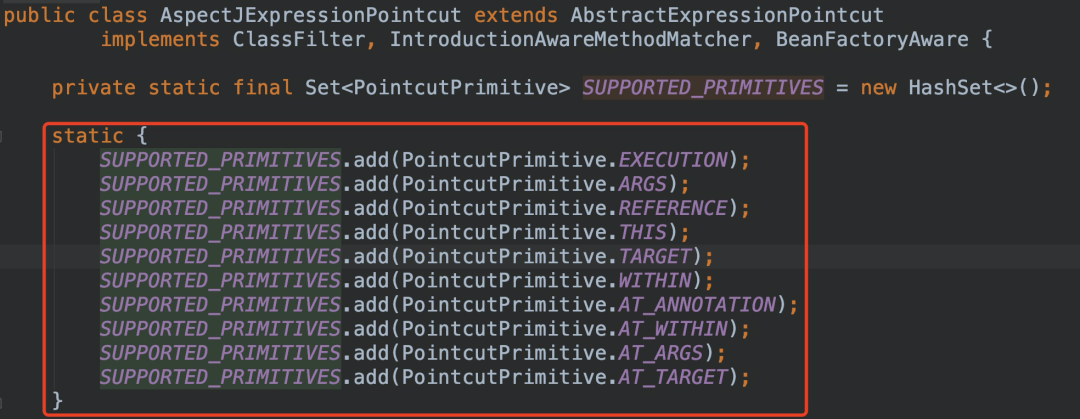 因為AspectJ提供的表達式在我們工作中經常被使用,結合Demo演示一下具體的用法
| 表達式類型 | 解釋 |
|---|---|
| execution | 匹配方法表達式,首選方式 |
| within | 限定類型 |
| this | 代理對象是指定類型 ,所有方法都會被攔截 |
| target | 目標對象是指定類型,所有方法都會被攔截 |
| args | 匹配方法中的參數(shù) |
| @target | 目標對象有指定的注解,所有方法都會被攔截 |
| @args | 方法參數(shù)所屬類型上有指定注解 |
| @within | 調用對象上有指定的注解,所有方法都會被攔截 |
| @annotation | 有指定注解的方法 |
「execution」
匹配方法表達式,首選方式
execution(modifiers-pattern? ret-type-pattern declaring-type-pattern?name-pattern(param-pattern)
                throws-pattern?)
攔截Performance類的perform方法的切點表達式如下 放幾個官方的Demo
// The execution of any public method:
execution(public * *(..))

// The execution of any method with a name that begins with set
execution(* set*(..))

// The execution of any method defined by the AccountService interface
execution(* com.xyz.service.AccountService.*(..))

// The execution of any method defined in the service package:
execution(* com.xyz.service.*.*(..))
「within」限定類型
// 攔截service包中任意類的任意方法
within(com.xyz.service.*)

// 攔截service包及子包中任意類的任意方法
within(com.xyz.service..*)
「this」
代理對象是指定類型,所有方法都會被攔截
舉個例子說明一下
@Configuration
@EnableAspectJAutoProxy
public class ThisDemo {

    public static void main(String[] args) {
        AnnotationConfigApplicationContext context =
                new AnnotationConfigApplicationContext(ThisDemo.class, AspectDefine.class);
        Name name = context.getBean(Name.class);
        name.getName();
        System.out.println(name instanceof Student);
    }


    @Aspect
    public class AspectDefine {
        @Before("this(com.javashitang.aspectjPointcut.thisDemo.ThisDemo.Student)")
        public void before() {
            System.out.println("before");
        }
    }

    @Bean
    public Student student() {
        return new Student();
    }

    public class Student implements Name {

        @Override
        public String getName() {
            return null;
        }
    }

    public interface Name {
        String getName();
    }
}
輸出為
false
有接口時會使用jdk動態(tài)代理,因此代理對象為Proxy,不會攔截
當設置為jdk動態(tài)代理為,代理對象為Student,正常攔截
將注解改為如下形式 @EnableAspectJAutoProxy(proxyTargetClass = true)
輸出為
before
true
「target」目標對象是指定類型,所有方法都會被攔截
// 目標對象為AccountService類型的會被代理
target(com.xyz.service.AccountService)
this 和 target 的不同點「this作用于代理對象,target作用于目標對象」
「args」匹配方法中的參數(shù)
// 匹配只有一個參數(shù),且類型為com.ms.aop.args.demo1.UserModel
@Pointcut("args(com.ms.aop.args.demo1.UserModel)")

// 匹配多個參數(shù)
args(type1,type2,typeN)

// 匹配第一個參數(shù)類型為com.ms.aop.args.demo1.UserModel的所有方法, .. 表示任意個參數(shù)
@Pointcut("args(com.ms.aop.args.demo1.UserModel,..)")
「@target」目標對象有指定的注解,所有方法都會被攔截
// 目標對象中包含com.ms.aop.jtarget.Annotation1注解,調用該目標對象的任意方法都會被攔截
@target(com.ms.aop.jtarget.Annotation1)
「@args」方法參數(shù)所屬類型上有指定注解
// 匹配1個參數(shù),且第1個參數(shù)所屬的類中有Anno1注解
@args(com.ms.aop.jargs.demo1.Anno1)
// 匹配多個參數(shù),且多個參數(shù)所屬的類型上都有指定的注解
@args(com.ms.aop.jargs.demo1.Anno1,com.ms.aop.jargs.demo1.Anno2)
// 匹配多個參數(shù),且第一個參數(shù)所屬的類中有Anno1注解
@args(com.ms.aop.jargs.demo2.Anno1,…)
「@within」
調用對象上有指定的注解,所有方法都會被攔截
// 聲明有com.ms.aop.jwithin.Annotation1注解的類中的所有方法都會被攔截
@within(com.ms.aop.jwithin.Annotation1)
「@target 和 @within 的不同點」@target關注的是被調用的對象,@within關注的是調用的對象
「@annotation」有指定注解的方法
// 被調用方法上有Annotation1注解
@annotation(com.ms.aop.jannotation.demo2.Annotation1)
Adivce之間的順序關系
一個方法被一個aspect類攔截時的執(zhí)行順序如下
@Around->@Before->方法執(zhí)行->@Around->@After->@AfterReturning/@AfterThrowing
當方法正常結束時,執(zhí)行@AfterReturning。方法異常結束時,執(zhí)行@AfterThrowing。兩者不會同時執(zhí)行哈 一個方法被多個aspect類攔截時的執(zhí)行順序如下
 「多個aspect的執(zhí)行順序可以通過@Order注解或者實現(xiàn)Oreder接口來控制」
「Adivce的順序一定要梳理清楚,不然有時候產生的很多魔幻行為你都不知道怎么發(fā)生的」

《對線面試官》系列目前已經連載39篇啦,這是一個講人話面試系列
-
【對線面試官】HTTP -
【對線面試官】Java注解 -
【對線面試官】Java泛型 -
【對線面試官】 Java NIO -
【對線面試官】Java反射 && 動態(tài)代理 -
【對線面試官】多線程基礎 -
【對線面試官】 CAS -
【對線面試官】synchronized -
【對線面試官】AQS&&ReentrantLock -
【對線面試官】線程池 -
【對線面試官】ThreadLocal -
【對線面試官】CountDownLatch和CyclicBarrier -
【對線面試官】為什么需要Java內存模型? -
【對線面試官】深入淺出 Java 內存模型 -
【對線面試官】Java從編譯到執(zhí)行,發(fā)生了什么? -
【對線面試官】雙親委派機制 -
【對線面試官】JVM內存結構 -
【對線面試官】垃圾回收機制 -
【對線面試官】CMS垃圾回收器 -
【對線面試官】G1垃圾收集器 -
【對線面試官】JVM調優(yōu) -
【對線面試官】List -
【對線面試官】Map -
【對線面試官】SpringMVC -
【對線面試官】Spring基礎 -
【對線面試官】SpringBean生命周期 -
【對線面試官】Redis基礎 -
【對線面試官】Redis持久化 -
【對線面試官】Redis主從架構 -
【對線面試官】Redis分片集群 -
【對線面試官】Kafka基礎 -
【對線面試官】使用Kafka會考慮什么問題? -
【對線面試官】MySQL索引 -
【對線面試官】MySQL 事務&&鎖機制&&MVCC -
【對線面試官】MySQL調優(yōu) -
【對線面試官】如何實現(xiàn)冪等和去重? -
【對線面試官】系統(tǒng)需求多變時,如何設計 -
【對線面試官】設計模式 -
...
網(wǎng)盤里有【簡歷模板】、【原創(chuàng)電子書】等內容...如果看不太懂,多半是基礎不夠扎實,建議去網(wǎng)盤領份資料看看!
掃碼關注【對線面試官】