在高德地圖中實現(xiàn)降雨圖層
點擊上方 前端Q,關注公眾號
回復加群,加入前端Q技術(shù)交流
前言
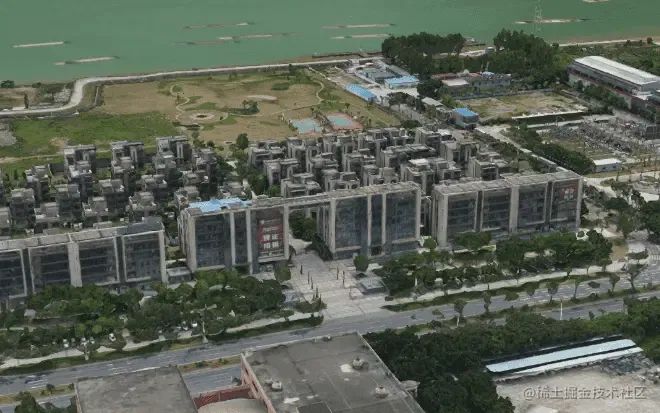
有一天老板跑過來跟我說,我們接到一個水利局的項目,需要做一些天氣效果,比如說降雨、河流汛期、洪澇災害影響啥的,你怎么看。欸,我覺得很有意思,馬上開整。
需求說明
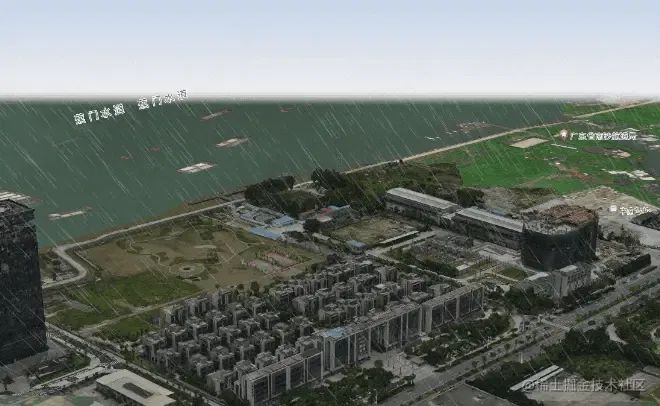
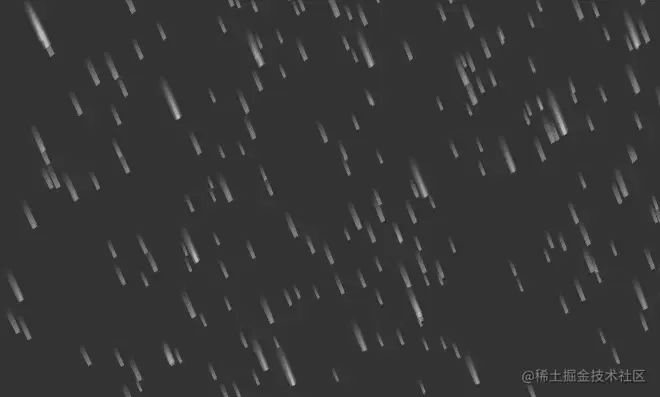
在地圖上實現(xiàn)降雨效果,畫面盡量真實,比如天空、風云的變化與降雨場景契合;
可以結(jié)合當?shù)靥鞖忸A報情況,自動調(diào)節(jié)風速、風向、降雨量等參數(shù)。
需求分析
方案一:全局降雨
在用戶視口面前加一層二維的降雨平面層。
優(yōu)點:只管二維圖層就行了,不需要與地圖同步坐標,實現(xiàn)起來比較簡單,界面是全局的一勞永逸。
缺點:只適合從某些角度觀看,沒法再做更多定制了。
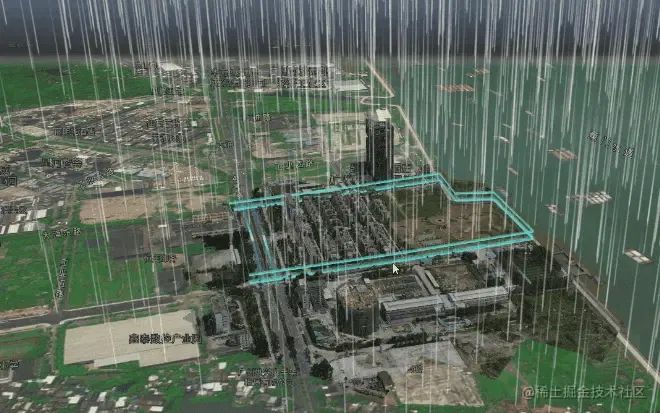
方案二:局部地區(qū)降雨
指定降雨范圍,即一個三維空間,坐標與地圖底圖同步,僅在空間內(nèi)實現(xiàn)降雨。
優(yōu)點:降落的雨滴有遠近關系,比較符合現(xiàn)實場景;可適用各種地圖縮放程度。
缺點:需要考慮的參數(shù)比較多,比如降雨范圍一項就必須考慮這個三維空間是什么形狀,可能是立方體、圓柱體或者多邊形擠壓體;需要外部圖層的配合,比如說下雨了,那么天空盒子的云層、建筑圖層的明度是否跟著調(diào)整。
實現(xiàn)思路
根據(jù)上面利弊權(quán)衡,我選擇了方案二進行開發(fā),并盡量減少輸入?yún)?shù),降雨影響范圍初步定為以地圖中心為坐標中心的立方體,忽略風力影響,雨滴采用自由落體方式運動。
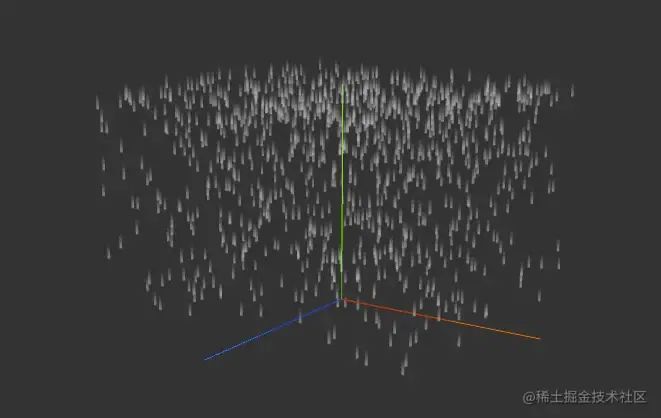
降雨采用自定義著色器的方式實現(xiàn),充分利用GPU并行計算能力,剛好在網(wǎng)上搜到一位大佬寫的three演示代碼[1],改一下坐標軸(threejs空間坐標軸y軸朝上,高德GLCustomLayer空間坐標z軸朝上)就可以直接實現(xiàn)最基礎的效果。這里為了演示方便增加坐標軸和影響范圍的輔助線。
1.創(chuàng)建影響范圍,并在該范圍內(nèi)創(chuàng)建降雨層的幾何體Geometry,該幾何體的構(gòu)成就是在影響范圍內(nèi)隨機位置的1000個平面,這些平面與地圖底面垂直;
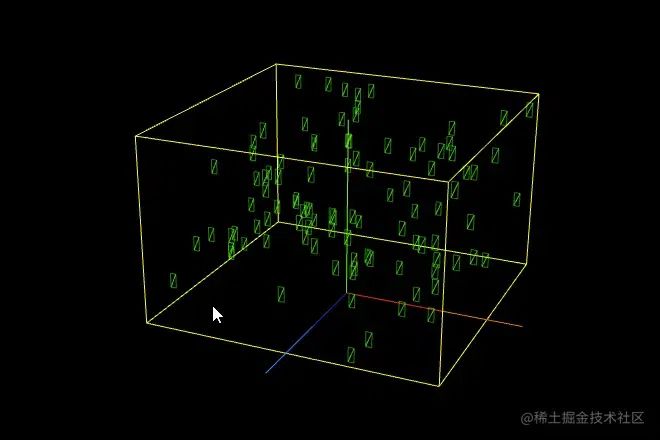
2.創(chuàng)建雨滴材質(zhì),雨滴不受光照影響,這里使用最基礎的MeshBasicMaterial材質(zhì)即可,半透明化且加上一張圖片作為紋理;
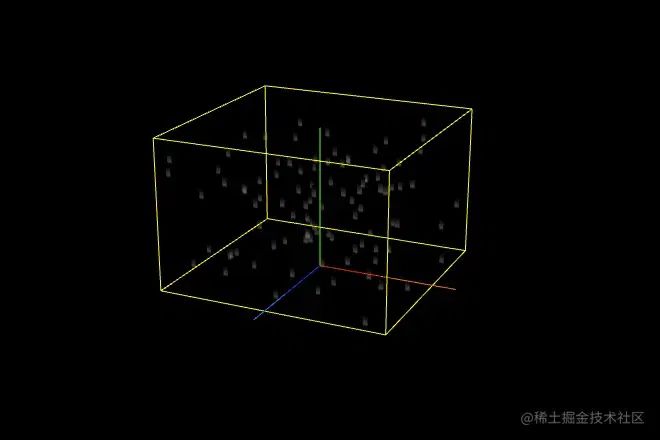
3.為實現(xiàn)雨滴隨著時間軸降落的動畫效果,需要調(diào)整幾何體的形狀尺寸,并對MeshBasicMaterial材質(zhì)進行改造,使其可以根據(jù)當前時間time改變頂點位置;
-
調(diào)整頂點和材質(zhì),使其可以根據(jù)風力風向改變面的傾斜角度和移動軌跡;

-
將圖層疊加到地圖3D場景中
基礎代碼實現(xiàn)
為降低學習難度,本模塊只講解最基礎版本的降雨效果,雨滴做自由落體,忽略風力影響。這里的示例以高德地圖上的空間坐標軸為例,即z軸朝上,three.js默認空間坐標系是y軸朝上。我把three.js示例代碼演示放到文末鏈接中。
1.創(chuàng)建影響范圍,并在該范圍內(nèi)創(chuàng)建降雨層的幾何體Geometry
createGeometry () {
  // 影響范圍:只需要設定好立方體的size [width/2, depth/2, height/2]
  //
  const { count, scale, ratio } = this._conf.particleStyle
 // 立方體的size [width/2, depth/2, height/2]
  const { size } = this._conf.bound
  const box = new THREE.Box3(
    new THREE.Vector3(-size[0], -size[1], 0),
    new THREE.Vector3(size[0], size[1], size[2])
  )

  const geometry = new THREE.BufferGeometry()
  // 設置幾何體的頂點、法線、UV
  const vertices = []
  const normals = []
  const uvs = []
  const indices = []

 // 在影響范圍內(nèi)隨機位置創(chuàng)建粒子
  for (let i = 0; i < count; i++) {
    const pos = new THREE.Vector3()
    pos.x = Math.random() * (box.max.x - box.min.x) + box.min.x
    pos.y = Math.random() * (box.max.y - box.min.y) + box.min.y
    pos.z = Math.random() * (box.max.z - box.min.z) + box.min.z

    const height = (box.max.z - box.min.z) * scale / 15
    const width = height * ratio

  // 創(chuàng)建當前粒子的頂點坐標
    const rect = [
      pos.x + width,
      pos.y,
      pos.z + height / 2,
      pos.x - width,
      pos.y,
      pos.z + height / 2,
      pos.x - width,
      pos.y,
      pos.z - height / 2,
      pos.x + width,
      pos.y,
      pos.z - height / 2
    ]

    vertices.push(...rect)

    normals.push(
      pos.x,
      pos.y,
      pos.z,
      pos.x,
      pos.y,
      pos.z,
      pos.x,
      pos.y,
      pos.z,
      pos.x,
      pos.y,
      pos.z
    )

    uvs.push(1, 1, 0, 1, 0, 0, 1, 0)

    indices.push(
      i * 4 + 0,
      i * 4 + 1,
      i * 4 + 2,
      i * 4 + 0,
      i * 4 + 2,
      i * 4 + 3
    )
  }

  // 所有頂點的位置
  geometry.setAttribute(
    'position',
    new THREE.BufferAttribute(new Float32Array(vertices), 3)
  )
  // 法線信息
  geometry.setAttribute(
    'normal',
    new THREE.BufferAttribute(new Float32Array(normals), 3)
  )
  // 設置UV屬性與頂點順序一致
  geometry.setAttribute(
    'uv',
    new THREE.BufferAttribute(new Float32Array(uvs), 2)
  )
  // 設置基本單元的頂點順序
  geometry.setIndex(new THREE.BufferAttribute(new Uint32Array(indices), 1))

  return geometry
}
2.創(chuàng)建材質(zhì)
createMaterial () {
 // 粒子透明度、貼圖地址
  const { opacity, textureUrl } = this._conf.particleStyle
  // 實例化基礎材質(zhì)
  const material = new THREE.MeshBasicMaterial({
    transparent: true,
    opacity,
    alphaMap: new THREE.TextureLoader().load(textureUrl),
    map: new THREE.TextureLoader().load(textureUrl),
    depthWrite: false,
    side: THREE.DoubleSide
  })

  // 降落起點高度
  const top = this._conf.bound.size[2]

  material.onBeforeCompile = function (shader, renderer) {
    const getFoot = `
          uniform float top; // 天花板高度
          uniform float bottom; // 地面高度
          uniform float time; // 時間軸進度[0,1]
          #include <common>
          float angle(float x, float y){
            return atan(y, x);
          }
          // 讓所有面始終朝向相機
          vec2 getFoot(vec2 camera,vec2 normal,vec2 pos){
              vec2 position;
              //  計算法向量到點的距離
              float distanceLen = distance(pos, normal);
              // 計算相機位置與法向量之間的夾角
              float a = angle(camera.x - normal.x, camera.y - normal.y);
              // 根據(jù)點的位置和法向量的位置調(diào)整90度
              pos.x > normal.x ? a -= 0.785 : a += 0.785;
              // 計算投影值
              position.x = cos(a) * distanceLen;
              position.y = sin(a) * distanceLen;

              return position + normal;
          }
          `
    const begin_vertex = `
          vec2 foot = getFoot(vec2(cameraPosition.x, cameraPosition.y),  vec2(normal.x, normal.y), vec2(position.x, position.y));
          float height = top - bottom;
          // 計算目標當前高度
          float z = normal.z - bottom - height * time;
          // 落地后重新開始,保持運動循環(huán)
          z = z + (z < 0.0 ? height : 0.0);
          // 利用自由落體公式計算目標高度
          float ratio = (1.0 - z / height) * (1.0 - z / height);
          z = height * (1.0 - ratio);
          // 調(diào)整坐標參考值
          z += bottom;
          z += position.z - normal.z;
          // 生成變換矩陣
          vec3 transformed = vec3( foot.x, foot.y, z );
          `
    shader.vertexShader = shader.vertexShader.replace(
      '#include <common>',
      getFoot
    )
    shader.vertexShader = shader.vertexShader.replace(
      '#include <begin_vertex>',
      begin_vertex
    )
  // 設置著色器參數(shù)的初始值
    shader.uniforms.cameraPosition = { value: new THREE.Vector3(0, 0, 0) }
    shader.uniforms.top = { value: top }
    shader.uniforms.bottom = { value: 0 }
    shader.uniforms.time = { value: 0 }
    material.uniforms = shader.uniforms
  }

  this._material = material

  return material
}
3.創(chuàng)建模型
  createScope () {
   const material = this.createMaterial()
   const geometry = this.createGeometry()

   const mesh = new THREE.Mesh(geometry, material)

   this.scene.add(mesh)

   // 便于調(diào)試,顯示輪廓
   // const box1 = new THREE.BoxHelper(mesh, 0xffff00)
   // this.scene.add(box1)
 }
4.更新參數(shù)
// 該對象用于跟蹤時間
_clock = new THREE.Clock()

update () {
  const { _conf, _time, _clock, _material, camera } = this

  //  調(diào)整時間軸進度,_time都值在[0,1]內(nèi)不斷遞增循環(huán)
  //  particleStyle.speed為降落速度倍率,默認值1
  //  _clock.getElapsedTime() 為獲取自時鐘啟動后的秒數(shù)
  this._time = _clock.getElapsedTime() * _conf.particleStyle.speed / 2 % 1

  if (_material.uniforms) {
    // 更新鏡頭位置
    _material.uniforms.cameraPosition.value = camera.position
    // 更新進度
    _material.uniforms.time.value = _time
  }
}

animate (time) {
  if (this.update) {
    this.update(time)
  }
 if (this.map) {
   // 疊加地圖時才需要
      this.map.render()
  }
  requestAnimationFrame(() => {
    this.animate()
  })
}
優(yōu)化調(diào)整
修改場景效果
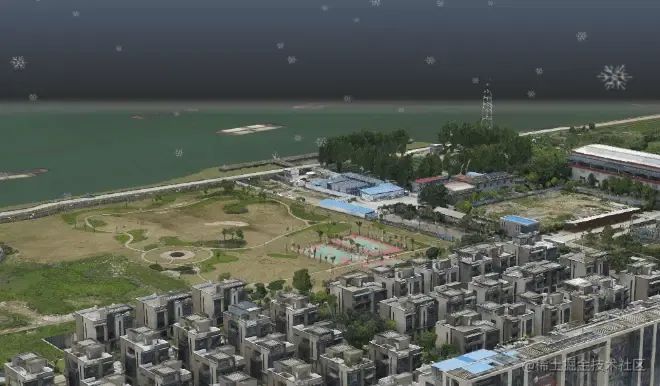
通過對圖層粒子、風力等參數(shù)進行封裝,只需簡單地調(diào)整配置就可以實現(xiàn)額外的天氣效果,比如讓場景下雪也是可以的,廣州下雪這種場景,估計有生之年只能在虛擬世界里看到了。
以下是配置數(shù)據(jù)結(jié)構(gòu),可供參考
const layer = new ParticleLayer({
    map: getMap(),
    center: mapConf.center,
    zooms: [4, 30],
    bound: {
      type: 'cube',
      size: [500, 500, 500]
    },
    particleStyle: {
      textureUrl: './static/texture/snowflake.png', //粒子貼圖
      ratio: 0.9, //粒子寬高比,雨滴是長條形,雪花接近方形
      speed: 0.04, // 直線降落速度倍率,默認值1
      scale: 0.2, // 粒子尺寸倍率,默認1
      opacity: 0.5, // 粒子透明度,默認0.5
      count: 1000 // 粒子數(shù)量,默認值10000
    }
  })
添加風力影響
要實現(xiàn)該效果需要添加2個參數(shù):風向和風力,這兩個參數(shù)決定了粒子在降落過程中水平面上移動的方向和速度。
-
首先調(diào)整一下代碼實際那一節(jié)步驟2運動的相關代碼
const begin_vertex = `
      ...
      // 利用自由落體公式計算目標高度
      float ratio = (1.0 - z / height) * (1.0 - z / height);
      z = height * (1.0 - ratio);
   // 增加了下面這幾行
      float x = foot.x+ 200.0 * ratio; // 粒子最終在x軸的位移距離是200
      float y = foot.y + 200.0 * ratio; // 粒子最終在y軸的位移距離是200
   ...
   // 生成變換矩陣
      vec3 transformed = vec3( foot.x, y, z );
-
如果粒子是長條形的雨滴,那么它在有風力影響的運動時,粒子就不是垂直地面的平面了,而是與地面有一定傾斜角度的平面,如圖所示。
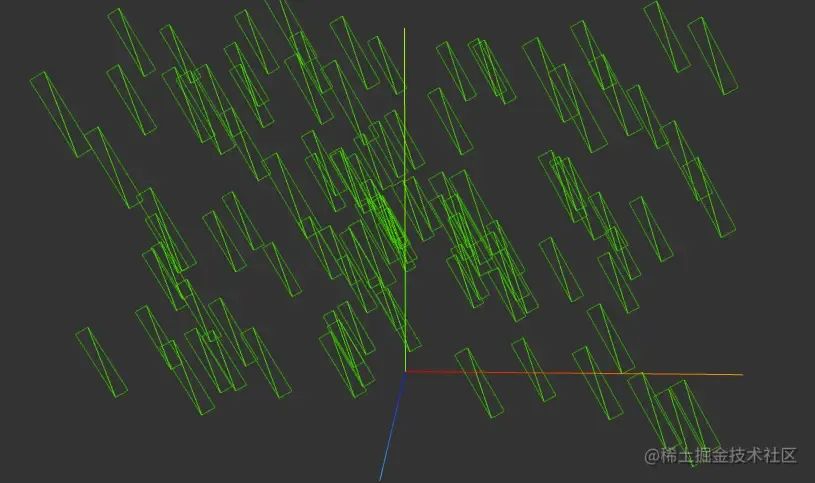
我們調(diào)整調(diào)整一下代碼實際那一節(jié)步驟1的代碼,實現(xiàn)方式就是讓每個粒子平面在創(chuàng)建之后,所有頂點繞著平面的法線中心軸旋轉(zhuǎn)a角度。
本示例旋轉(zhuǎn)軸(x, y, 1)與z軸(0,0,1)平行,這里有個技巧,我們在做平面繞軸旋轉(zhuǎn)的時候先把平面從初始位置orgPos移到坐標原點,繞著z軸旋轉(zhuǎn)后再移回orgPos,會讓計算過程簡單很多。
// 創(chuàng)建當前粒子的頂點坐標
const rect = [
  pos.x + width,
  pos.y,
  pos.z + height / 2,
  pos.x - width,
  pos.y,
  pos.z + height / 2,
  pos.x - width,
  pos.y,
  pos.z - height / 2,
  pos.x + width,
  pos.y,
  pos.z - height / 2
]

// 定義旋轉(zhuǎn)軸
const axis = new THREE.Vector3(0, 0, 1).normalize();
//定義旋轉(zhuǎn)角度
const angle = Math.PI / 6;
// 創(chuàng)建旋轉(zhuǎn)矩陣
const rotationMatrix = new THREE.Matrix4().makeRotationAxis(axis, angle);

for(let index =0; index< rect.length; index +=3 ){
    const vec = new THREE.Vector3(rect[index], rect[index + 1], rect[index + 2]);
    //移動到中心點
    vec.sub(new THREE.Vector3(pos.x, pos.y,pos.z))
    //繞軸旋轉(zhuǎn)
    vec.applyMatrix4(rotationMatrix);
    //移動到原位
    vec.add(new THREE.Vector3(pos.x, pos.y, pos.z))
    rect[index] = vec.x;
    rect[index + 1] = vec.y;
    rect[index + 2] = vec.z;
}
待改進的地方
本示例中有個需要完善的地方,就是加入了風力影響之后,如果繞垂直軸旋轉(zhuǎn)一定的角度,會看到如下圖的異常,雨點的傾斜角度和運動傾斜角度是水平相反的。
問題的原因是材質(zhì)著色器中的“讓所有面始終朝向相機”方法會一直維持粒子的傾斜狀態(tài)不變,解決這個問題應該是調(diào)整這個方法就可以了。然而作為學渣的我還沒摸索出來,果然可視化工程的盡頭全是數(shù)學Orz。
相關鏈接
1.THREE.JS下雨進階版,面只旋轉(zhuǎn)Y軸朝向相機
www.wjceo.com/blog/threej…[2]
2.演示代碼在線DEMO
jsfiddle.net/gyratesky/5…[3]
參考資料
https://www.wjceo.com/blog/threejs2/2019-02-28/185.html
[2]https://www.wjceo.com/blog/threejs2/2019-02-28/185.html
[3]https://jsfiddle.net/gyratesky/5em3rckq/17/
作者:gyratesky

往期推薦


最后
歡迎加我微信,拉你進技術(shù)群,長期交流學習...
歡迎關注「前端Q」,認真學前端,做個專業(yè)的技術(shù)人...