
路人的 SpringMVC 系列來(lái)了!!!
大家好,我是路人,前段時(shí)間把 spring 系列寫(xiě)完之后,就直接寫(xiě) springboot 系列了,但是發(fā)現(xiàn)了一個(gè)問(wèn)題,有不少粉絲問(wèn)我 springmvc 系列哪里看?這些粉絲中可能有些朋友根本沒(méi)有接觸過(guò) springmvc,然后直接被我?guī)肓?springboot,會(huì)突然感覺(jué)很懵逼。
目前大多數(shù)公司都會(huì)使用 Springboot 來(lái)開(kāi)發(fā)微服務(wù),為其他端提供接口,而這些功能都是依靠 springmvc 實(shí)現(xiàn)的,所以為了大家看我的文章能夠順暢一些,還是決定先把 springmvc 系列補(bǔ)上,不管大家是否學(xué)過(guò) springmvc,都希望你們和我一起再過(guò)一遍 springmvc,因?yàn)槊總€(gè)人對(duì) springmvc 的理解也是不一樣的,我會(huì)采用大量案例來(lái)進(jìn)行講解,也會(huì)介紹原理及源碼,希望對(duì)你有所幫助。
1、為什么需要學(xué) springmvc?
工作需要
目前用到 java 的企業(yè),99.99%都會(huì)用到 springmvc,即使沒(méi)有直接使用 springmvc,也會(huì)使用 springboot,而 springboot 中基本上都會(huì)用到 springmvc
面試需要
企業(yè)都在使用 springmvc,所以面試的時(shí)候基本都會(huì)問(wèn)到相關(guān)的問(wèn)題。
更好的學(xué)習(xí) springboot、springcloud
如果想學(xué)好 springboot 和 springcloud,那么必須先掌握 spring、springmvc 這 2 個(gè)技術(shù)。
2、預(yù)備知識(shí)
學(xué)習(xí) springmvc 之前,需要先掌握 2 個(gè)系列的課程:maven 和 spring,還未學(xué)的朋友,先去補(bǔ)補(bǔ)。
3、軟件版本
idea 2020.3.3 jdk1.8 ≥maven3.6.1 spring5.3.6 apache-tomcat-9.0.46
4、本文目標(biāo)
通過(guò) springmvc 實(shí)現(xiàn)一個(gè) helloword,將項(xiàng)目發(fā)布到 tomcat 中,然后在首頁(yè)中發(fā)起一個(gè)請(qǐng)求,請(qǐng)求交給 springmvc 處理,由 springmvc 向客戶端輸出一個(gè) helloword,通過(guò)這個(gè)案例讓大家熟悉下 springmvc 的使用步驟。
5、Helloword 案例
開(kāi)發(fā)步驟
1、創(chuàng)建一個(gè)maven項(xiàng)目
2、在項(xiàng)目中創(chuàng)建一個(gè)maven web模塊
3、maven中添加springmvc相關(guān)依賴
4、web.xml中配置springmvc
5、添加springmvc配置文件
6、寫(xiě)一個(gè)HelloWordController
7、將項(xiàng)目部署到tomcat中
8、瀏覽器中驗(yàn)證效果
下面跟著我一步步來(lái)操作。
step1:創(chuàng)建一個(gè) maven 項(xiàng)目
使用 idea 創(chuàng)建父子項(xiàng)目,打開(kāi) idea->File->New->Project

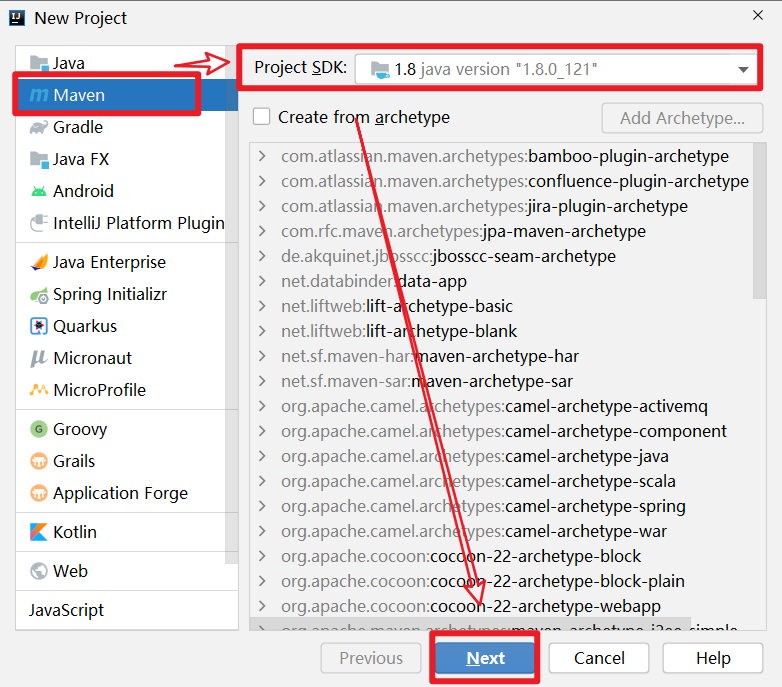
按照下圖輸入對(duì)應(yīng)的信息
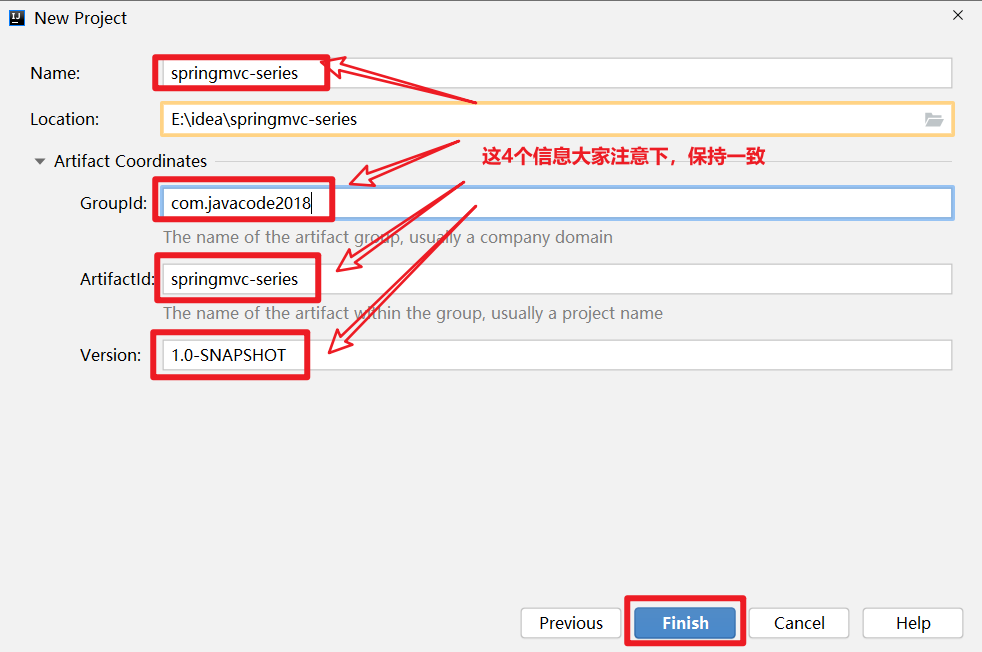
點(diǎn)擊 Finish,項(xiàng)目創(chuàng)建成功,如下圖
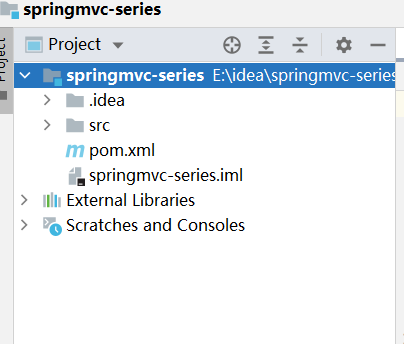
按照下圖中的說(shuō)明,將紅框的部分刪除

將 pom.xml 文件內(nèi)容替換為下面的內(nèi)容
<project xmlns="http://maven.apache.org/POM/4.0.0"
         xmlns:xsi="http://www.w3.org/2001/XMLSchema-instance"
         xsi:schemaLocation="http://maven.apache.org/POM/4.0.0 http://maven.apache.org/xsd/maven-4.0.0.xsd">
    <modelVersion>4.0.0modelVersion>

    <groupId>com.javacode2018groupId>
    <artifactId>springmvc-seriesartifactId>
    <version>1.0-SNAPSHOTversion>
    <packaging>pompackaging>

    <properties>
        <maven.compiler.source>8maven.compiler.source>
        <maven.compiler.target>8maven.compiler.target>
    properties>

project>
此時(shí)項(xiàng)目結(jié)構(gòu)如下圖

如下圖,File->Settings中指定項(xiàng)目 maven 的版本

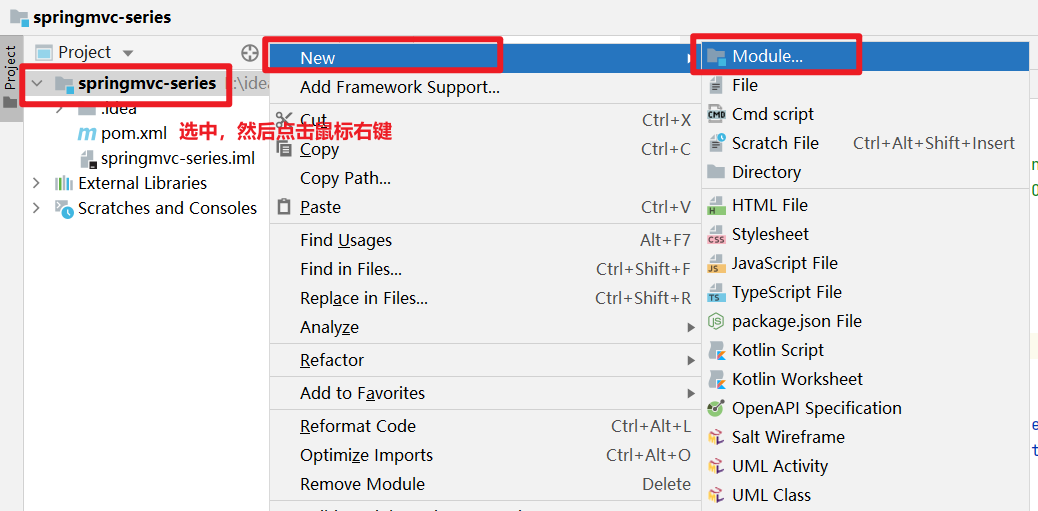
step2、項(xiàng)目中創(chuàng)建一個(gè) maven 模塊
選中項(xiàng)目->點(diǎn)擊鼠標(biāo)右鍵->New->Module,創(chuàng)建一個(gè) maven 模塊
如下圖,通過(guò) maven 的插件來(lái)創(chuàng)建 web 模塊,這個(gè)地方的 maven 插件需要注意下,不要選錯(cuò)了

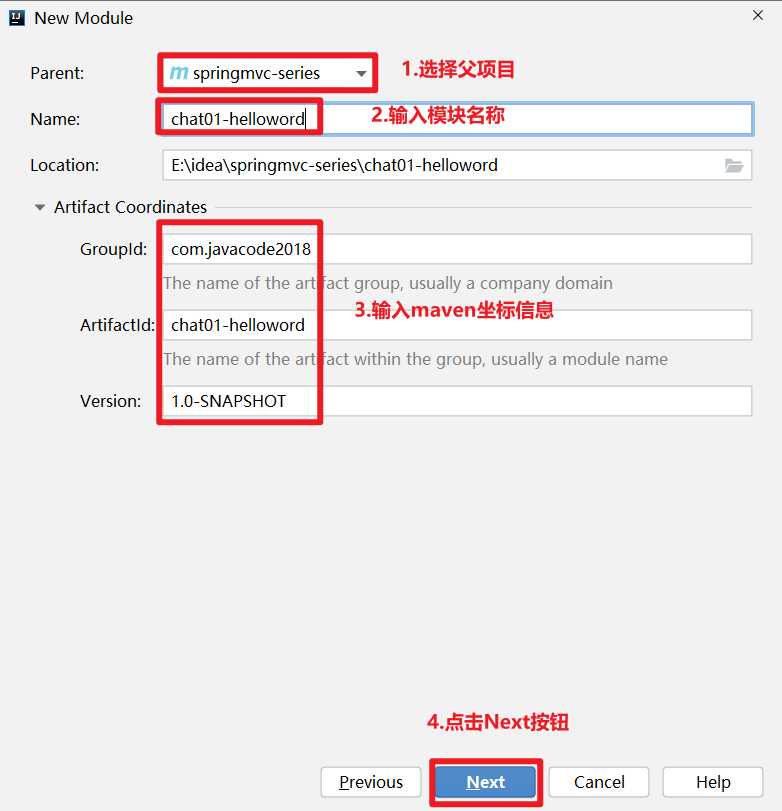
點(diǎn)擊上圖中的 Next,進(jìn)入下面頁(yè)面,輸入模塊的信息,然后點(diǎn)擊 Next
如下圖,繼續(xù)點(diǎn)擊 Finish,完成模塊的創(chuàng)建

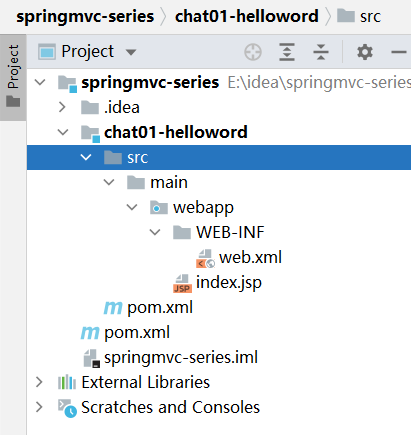
項(xiàng)目結(jié)構(gòu)如下圖
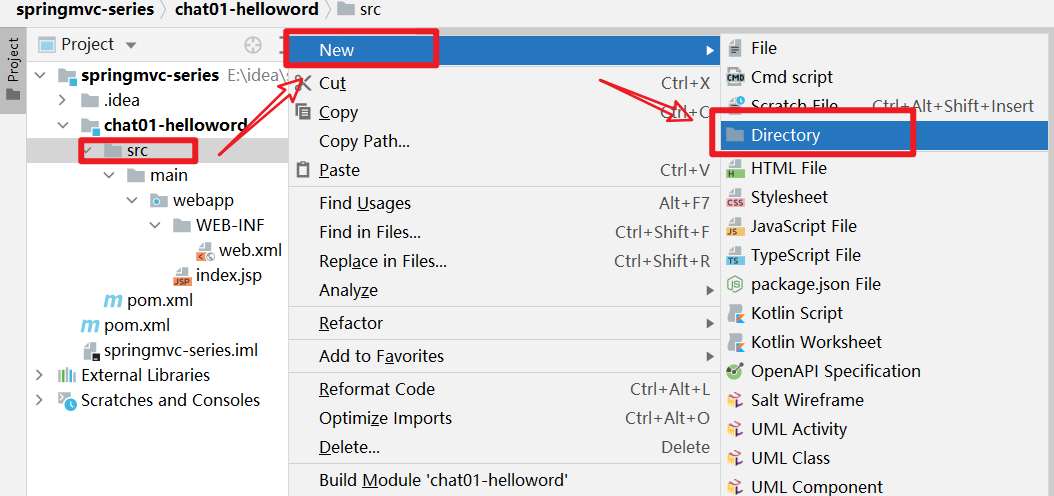
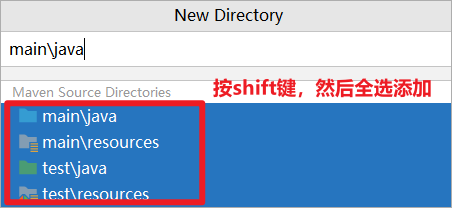
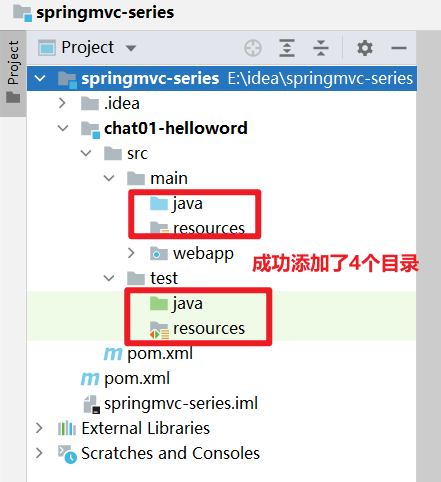
chat01-helloword 模塊中需要添加幾個(gè)文件夾,操作如下圖:
step3、maven 中添加 springmvc 相關(guān)依賴
將下面內(nèi)容替換到 chat01-helloword/pom.xml 中,主要添加了 springmvc 和 servlet 的依賴配置信息。
<project xmlns="http://maven.apache.org/POM/4.0.0" xmlns:xsi="http://www.w3.org/2001/XMLSchema-instance"
         xsi:schemaLocation="http://maven.apache.org/POM/4.0.0 http://maven.apache.org/xsd/maven-4.0.0.xsd">
    <modelVersion>4.0.0modelVersion>

    <groupId>com.javacode2018groupId>
    <artifactId>chat01-hellowordartifactId>
    <version>1.0-SNAPSHOTversion>
    <packaging>warpackaging>

    <name>chat01-helloword Maven Webappname>
    <url>http://www.itsoku.comurl>

    <properties>
        <project.build.sourceEncoding>UTF-8project.build.sourceEncoding>
    properties>

    <dependencies>

        <dependency>
            <groupId>org.springframeworkgroupId>
            <artifactId>spring-webmvcartifactId>
            <version>5.3.6version>
        dependency>


        <dependency>
            <groupId>jakarta.servletgroupId>
            <artifactId>jakarta.servlet-apiartifactId>
            <version>5.0.0-M1version>
            <scope>providedscope>
        dependency>
    dependencies>

    <build>
        <finalName>chat01-hellowordfinalName>
    build>
project>
step4、web.xml 中配置 springmvc
web.xml 版本太低了,我們先升級(jí)下他的版本

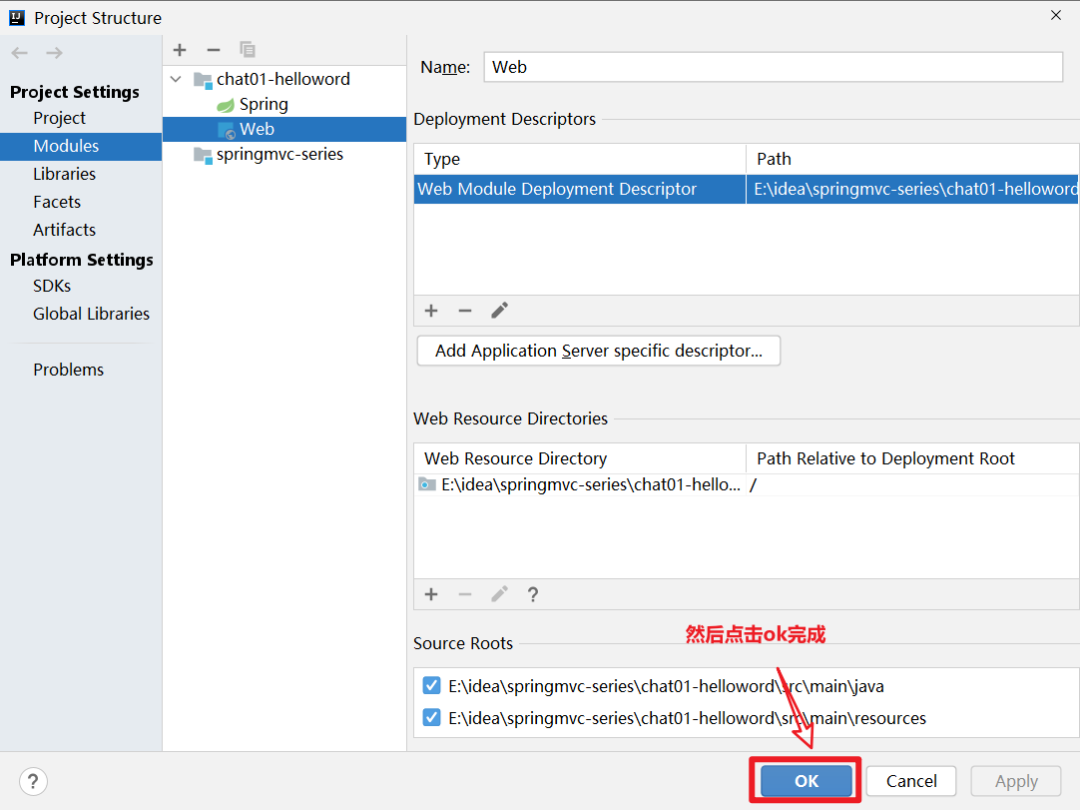
點(diǎn)擊File->Project Structure->Module,進(jìn)入到下面界面

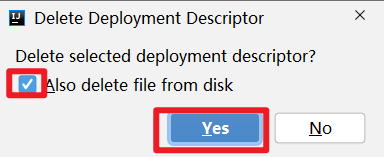
點(diǎn)擊上圖中的-按鈕,如下圖,然后確定刪除
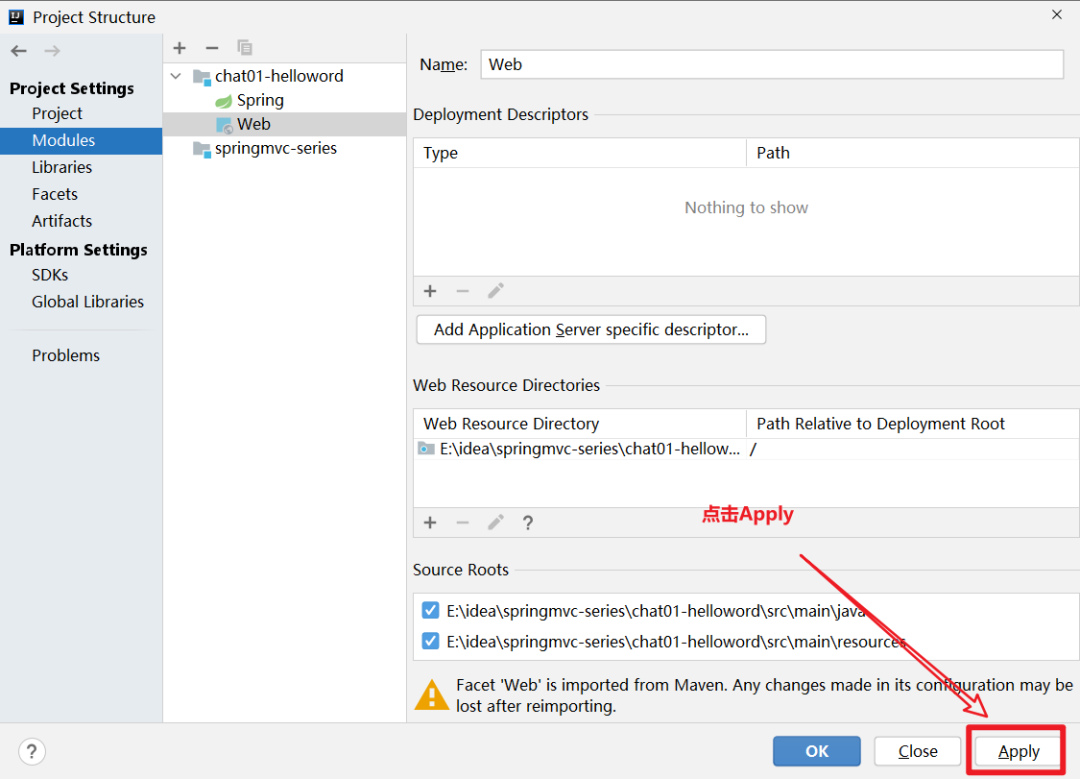
然后按照下面操作,添加新版本的 web.xml 文件

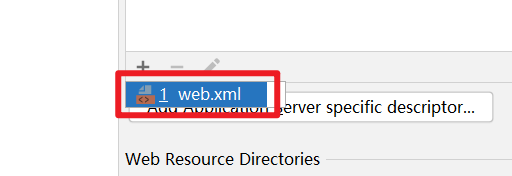

web.xml 版本升級(jí)成功
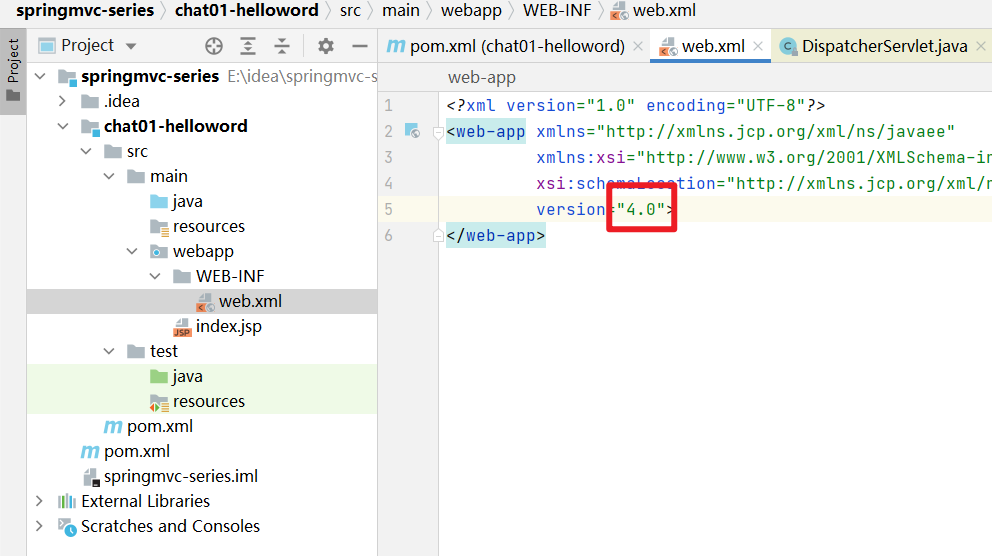
在 web.xml 中添加 springmvc 的配置,可以直接將下面代碼直接替換到 web.xml 中,主要就是配置了 DispatcherServlet 這個(gè) servlet,這個(gè)是 springmvc 的核心配置
<web-app xmlns="http://xmlns.jcp.org/xml/ns/javaee"
         xmlns:xsi="http://www.w3.org/2001/XMLSchema-instance"
         xsi:schemaLocation="http://xmlns.jcp.org/xml/ns/javaee http://xmlns.jcp.org/xml/ns/javaee/web-app_4_0.xsd"
         version="4.0">

    <servlet>
        <servlet-name>springmvcservlet-name>
        <servlet-class>org.springframework.web.servlet.DispatcherServletservlet-class>
        <init-param>

            <param-name>contextConfigLocationparam-name>
            <param-value>classpath:springmvc.xmlparam-value>
        init-param>

        <load-on-startup>0load-on-startup>
    servlet>
    <servlet-mapping>
        <servlet-name>springmvcservlet-name>
        <url-pattern>*.dourl-pattern>
    servlet-mapping>
web-app>
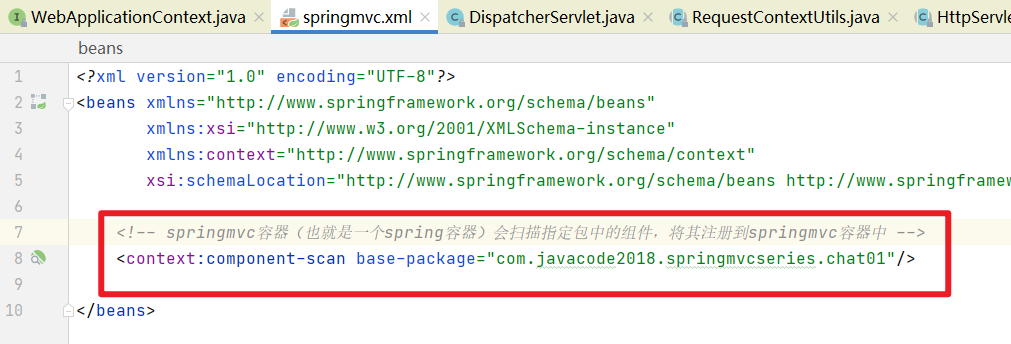
step5、添加 springmvc 配置文件
chat01-helloword->resource->鼠標(biāo)右鍵->New->XXML Configuration File->Spring Config
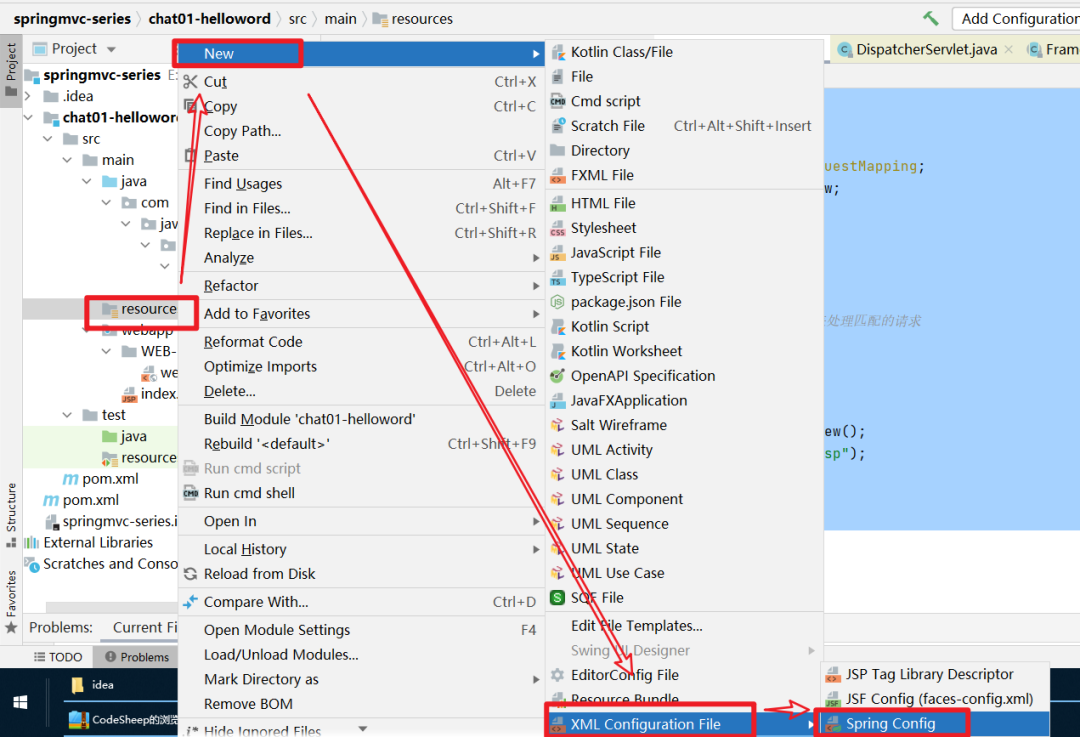
輸入文件名稱:springmvc.xml

文件添加成功
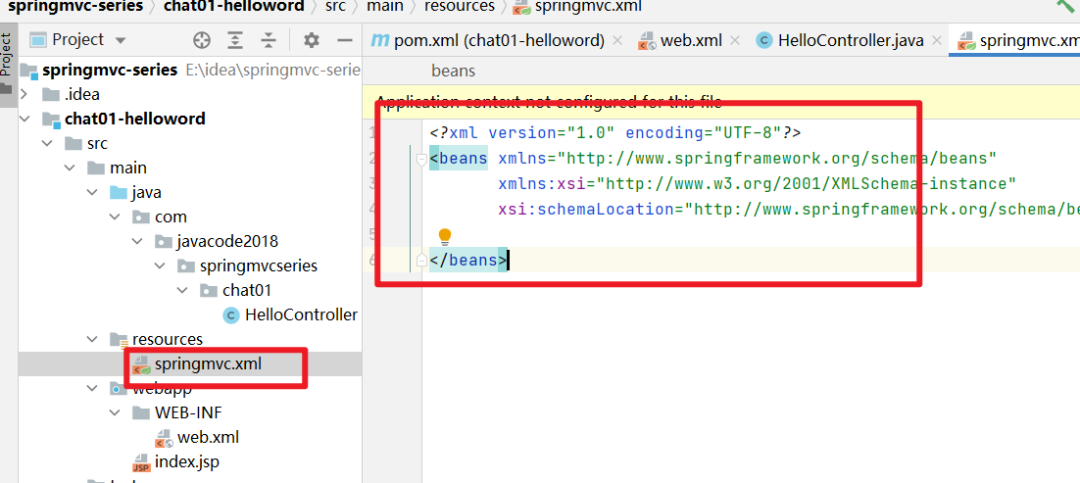
替換下這個(gè)文件的內(nèi)容
<beans xmlns="http://www.springframework.org/schema/beans"
       xmlns:xsi="http://www.w3.org/2001/XMLSchema-instance"
       xmlns:context="http://www.springframework.org/schema/context"
       xsi:schemaLocation="http://www.springframework.org/schema/beans http://www.springframework.org/schema/beans/spring-beans.xsd http://www.springframework.org/schema/context https://www.springframework.org/schema/context/spring-context.xsd">


    <context:component-scan base-package="com.javacode2018.springmvcseries.chat01"/>

beans>
step6、寫(xiě)一個(gè) HelloWordController
這個(gè)類中創(chuàng)建了一個(gè) hello 方法,方法上面添加了一個(gè)@RequestMapping 注解,是 Springmvc 中的一個(gè)注解,value 屬性用來(lái)指定一個(gè) url 列表,springmvc 會(huì)將這些指定的 url 請(qǐng)求轉(zhuǎn)發(fā)給當(dāng)前方法處理。
我們希望訪問(wèn)/hello.do 的時(shí)候,跳轉(zhuǎn)到/WEB-INF/view/hello.jsp 這個(gè)頁(yè)面,這個(gè)頁(yè)面中輸出一段內(nèi)容
package com.javacode2018.springmvcseries.chat01;

import org.springframework.stereotype.Controller;
import org.springframework.web.bind.annotation.RequestMapping;
import org.springframework.web.servlet.ModelAndView;

@Controller
public class HelloController {
    /**
     * @RequestMapping:用來(lái)表示url和方法的映射
     * value屬性用來(lái)指定一個(gè)url列表,springmvc會(huì)將這些指定的url請(qǐng)求轉(zhuǎn)發(fā)給當(dāng)前方法處理
     * @return
     */
    @RequestMapping("/hello.do")
    public ModelAndView hello() {
        ModelAndView modelAndView = new ModelAndView();
        modelAndView.setViewName("/WEB-INF/view/hello.jsp");
        //稍后將這個(gè)信息顯示在hello.jsp中,modelAndView.addObject相當(dāng)于request.setAttribute(name,value)
        modelAndView.addObject("msg","這是第一個(gè)springboot程序!");
        return modelAndView;
    }
}
/WEB-INF/view/中添加 hello.jsp 內(nèi)容如下

<%@ page contentType="text/html;charset=UTF-8" language="java" %>


    hello SpringMVC
修改 index.jsp 的內(nèi)容,如下,主要添加一個(gè)超鏈接,當(dāng)點(diǎn)擊這個(gè)超鏈接的時(shí)候,請(qǐng)求會(huì)發(fā)給 springmvc,然后 springmvc 會(huì)將請(qǐng)求轉(zhuǎn)發(fā)給 HelloController 的 hello 方法,然后通過(guò)這個(gè)方法最后將 hello.jsp 內(nèi)容輸出
<%@ page contentType="text/html;charset=UTF-8" language="java" %>


<div style="text-align: center">
    hello SpringMVC
    msg:${msg}


</div style=
step7、將項(xiàng)目部署到 tomcat 中
這里我們將項(xiàng)目部署到 tomcat10 中,過(guò)程如下:
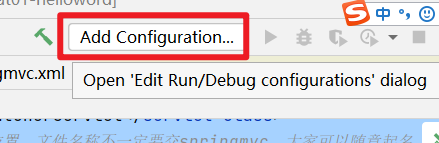
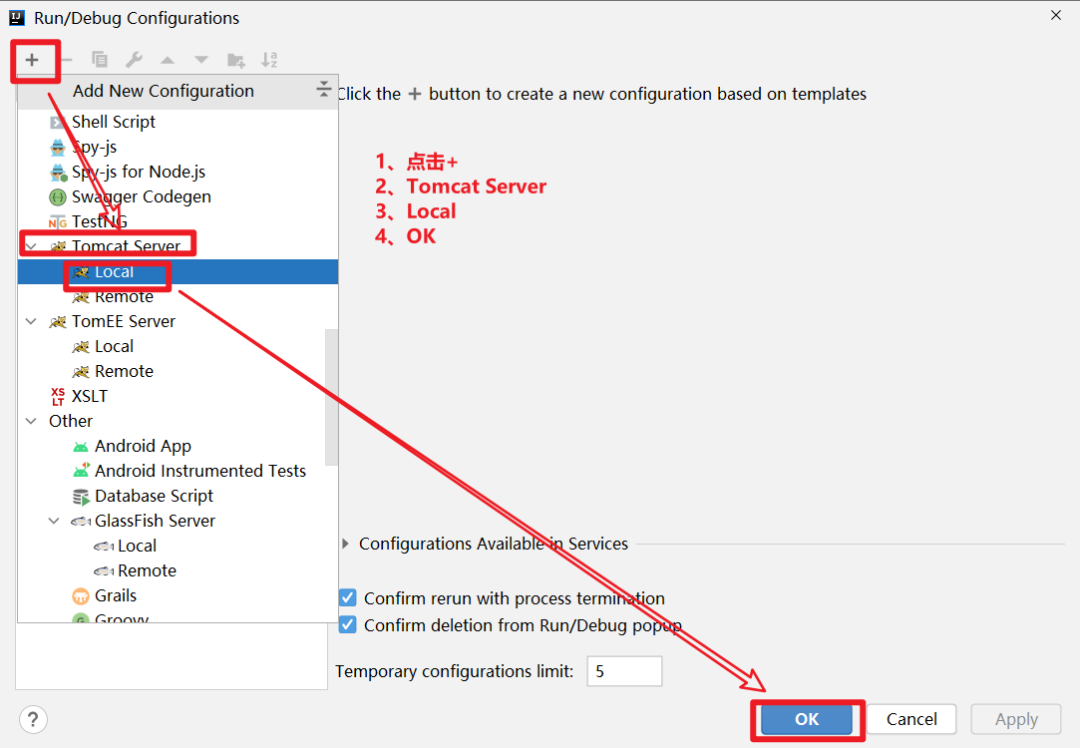
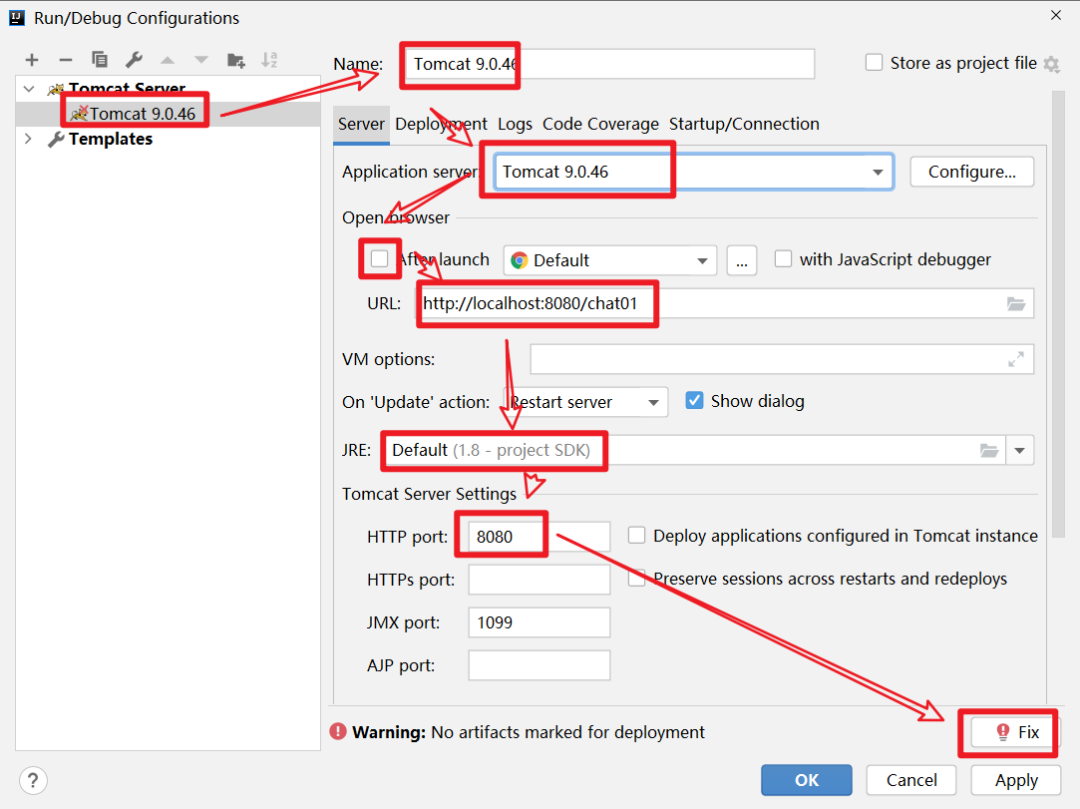
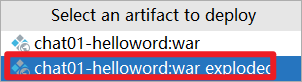
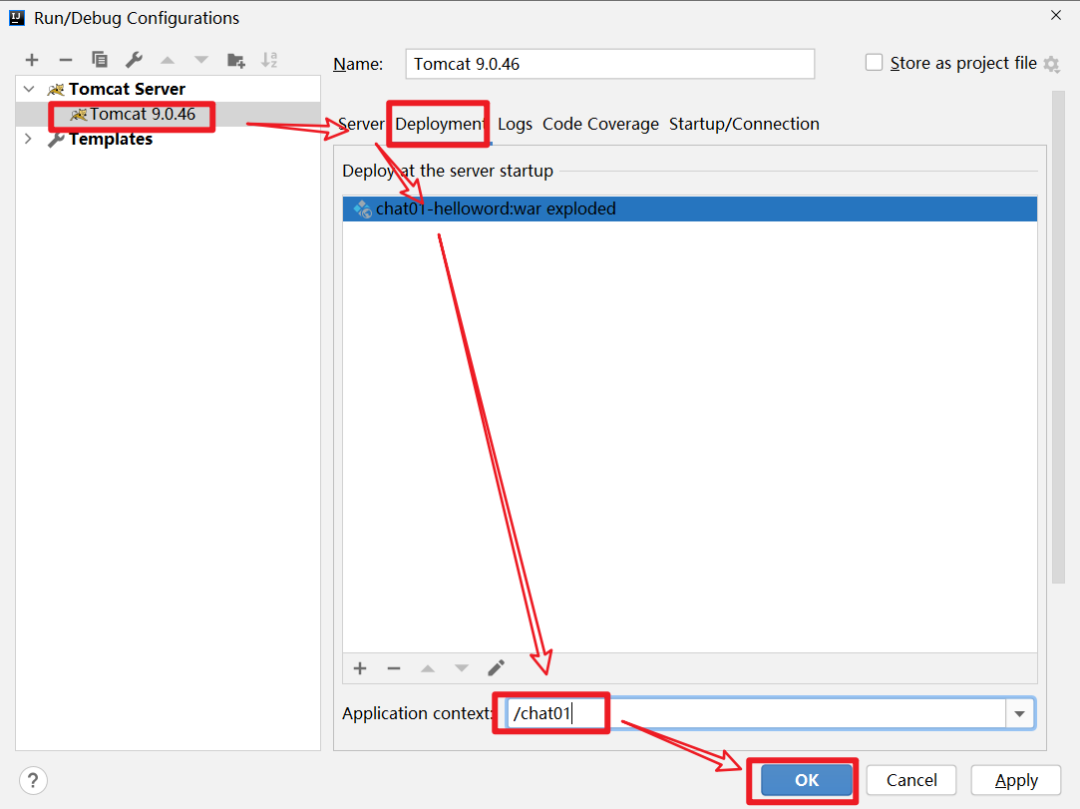
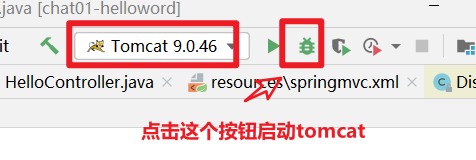
如下圖,啟動(dòng) tomcat
step8、驗(yàn)證效果
訪問(wèn):http://localhost:8080/chat01/
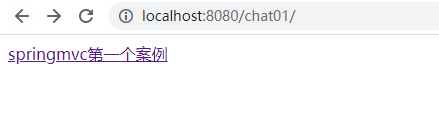
點(diǎn)擊頁(yè)面中的連接,會(huì)跳轉(zhuǎn)到http://localhost:8080/chat01/hello.do,輸出

6、SpringMVC 處理請(qǐng)的過(guò)程
6.1、詳細(xì)的過(guò)程
1、tomcat 啟動(dòng)的時(shí)候,會(huì)初始化 DispatcherServlet,DispatcherServlet 中會(huì)創(chuàng)建一個(gè) springmvc 容器,其實(shí)就是我們熟悉的 spring 容器(ApplicationContext),只不過(guò)這個(gè)容器的類型是(WebApplicationContext),此容器會(huì)加載 web.xml 中 contextConfigLocation 指定的 springmvc 配置文件

2、由于 springmvc.xml 中指定了掃描包的規(guī)則,而 HelloController 符合這個(gè)掃描規(guī)則,所以會(huì)被注冊(cè)到 springmvc 容器中
3、當(dāng)發(fā)起*.do 請(qǐng)求的時(shí)候,請(qǐng)求會(huì)到達(dá) DispatcherServlet 中央處理器,中央處理器會(huì)根據(jù)請(qǐng)求路徑,去 springmvc 容器中找到能夠處理這個(gè)請(qǐng)求的方法,具體由哪個(gè)方法來(lái)處理這個(gè)請(qǐng)求呢?
這里就是通過(guò)@RequestMapping 來(lái)匹配的,這個(gè)注解可以將請(qǐng)求和方法進(jìn)行映射,匹配的請(qǐng)求會(huì)被@RequestMapping 標(biāo)注的方法處理,所以在這個(gè)步驟中 springmvc 容器會(huì)發(fā)現(xiàn) HelloController 這個(gè) bean 的 hello 方法方法可以處理/hello.do 請(qǐng)求
4、DispatcherServlet 中通過(guò)反射來(lái)調(diào)用 helloController 這個(gè) bean 的 hello 方法
5、DispatcherServlet 接收到了 hello 方法的返回值
6、DispatcherServlet 根據(jù) hello 方法的返回值,做跳轉(zhuǎn)操作,相當(dāng)于
request.getRequestDispatcher("/WEB-INF/view/hello.jsp").forward(request,response);
6.2、簡(jiǎn)化過(guò)程
客戶端發(fā)送請(qǐng)求 ---> 到達(dá) tomcat ---> tomcat 發(fā)現(xiàn)是請(qǐng)求是*.do 的請(qǐng)求 ---> tomcat 將請(qǐng)求轉(zhuǎn)發(fā)給中央調(diào)度器 DispatcherServlet ---> 中央調(diào)度器根據(jù) url 將轉(zhuǎn)發(fā)給我們自定義的 controller ---> DispacherServlet 根據(jù) controller 的返回結(jié)果做跳轉(zhuǎn)操作 ---> 將結(jié)果輸出到客戶端
7、總結(jié)
本文主要通過(guò)一個(gè)案例詳細(xì)介紹了 springmvc 開(kāi)發(fā)項(xiàng)目的一個(gè)過(guò)程,大家把案例敲一遍,有問(wèn)題,歡迎留言交流。
8、軟件及代碼位置
軟件地址:
鏈接:https://pan.baidu.com/s/1_Ol-UZkN_6woMBtjcFygvQ
提取碼:e66j
代碼位于碼云上
https://gitee.com/javacode2018/springmvc-series
這里給大家推薦一個(gè)高質(zhì)量的公眾號(hào):Java 充電社,大家關(guān)注下,這個(gè)號(hào)中會(huì)定期發(fā)布一些高質(zhì)量的 java 專題視頻,幫大家充電。