
極簡教程 | Spring Boot整合Elasticsearch實(shí)現(xiàn)數(shù)據(jù)搜索引擎
前面介紹了Elasticsearch的特點(diǎn)和優(yōu)勢,接下來在Spring Boot項(xiàng)目中使用Elasticsearch一步一步地實(shí)現(xiàn)搜索引擎的功能。
一、Spring Boot對Elasticsearch的支持
在沒有Spring Boot之前使用Elasticsearch非常痛苦,需要對Elasticsearch客戶端進(jìn)行一系列的封裝等操作,使用復(fù)雜,配置煩瑣。所幸,Spring Boot提供了對Spring Data Elasticsearch的封裝組件
spring-boot-starter-data-elasticsearch,它讓Spring Boot項(xiàng)目可以非常方便地去操作Elasticsearch中的數(shù)據(jù)。
值得注意的是,Elasticsearch的5.x、6.x、7.x版本之間的差別還是很大的。Spring Data Elasticsearch、Spring Boot與Elasticsearch之間有版本對應(yīng)關(guān)系,不同的版本之間不兼容,Spring Boot 2.1對應(yīng)的是Spring Data Elasticsearch 3.1.2版本。對應(yīng)關(guān)系如表13-1所示。
表13-1 Spring Data Elasticsearch、Spring Boot與Elasticsearch的對應(yīng)關(guān)系
Spring Data Elasticsearch | Spring Boot | Elasticsearch |
3.2.x | 2.2.x | 6.8.4 |
3.1.x | 2.1.x | 6.2.2 |
3.0.x | 2.0.x | 5.5.0 |
2.1.x | 1.5.x | 2.4.0 |
這是官方提供的版本對應(yīng)關(guān)系,建議按照官方的版本對應(yīng)關(guān)系進(jìn)行選擇,以避免不必要的麻煩。
二、Spring Boot操作Elasticsearch的方式
由于Elasticsearch和Spring之間存在版本兼容的問題,導(dǎo)致在Spring Boot項(xiàng)目中操作Elasticsearch的方式有很多種,如Repositories、JestClient、Rest API等。因此有必要梳理一下主流的Spring Boot操作Elasticsearch的方式。目前,Spring推薦使用Elasticsearch的方式,如下圖所示:
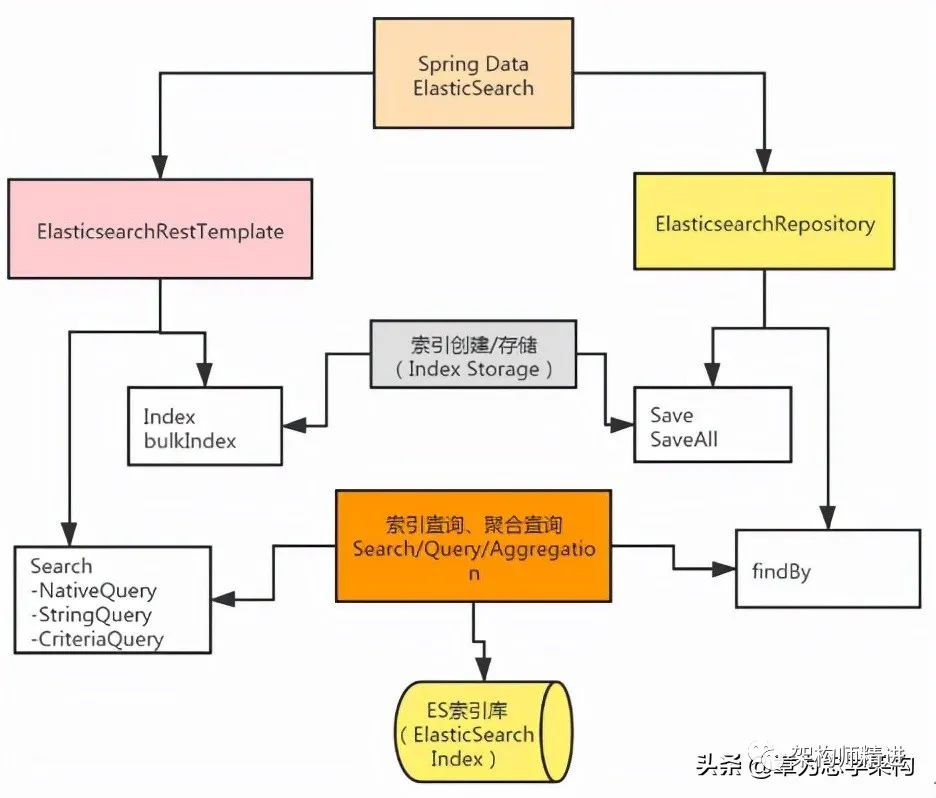
我們看到Spring Boot提供了ElasticSearchRepository和ElasticsearchRestTemplate實(shí)現(xiàn)索引數(shù)據(jù)的增刪改查。
ElasticSearchRepository:繼承自Spring Data中的Repository接口,所以支持以數(shù)據(jù)庫的方式對數(shù)據(jù)進(jìn)行增刪改查的操作,而且支持已命名查詢等數(shù)據(jù)查詢。
ElasticsearchRestTemplate:spring-data-Elasticsearch項(xiàng)目中的一個(gè)類,和其他Spring項(xiàng)目中的Template類似。ElasticsearchRestTemplate是Spring對ES的Rest API進(jìn)行的封裝,提供了大量相關(guān)的類來完成復(fù)雜的查詢功能。
三、在Spring Boot項(xiàng)目中集成Elasticsearch
Spring Boot提供的spring-boot-starter-data-Elasticsearch組件為我們提供了非常便捷的數(shù)據(jù)檢索功能。下面就來演示Spring Boot項(xiàng)目如何集成Elasticsearch。
1. 添加Elasticsearch依賴
首先在pom.xml中添加
spring-boot-starter-data-Elasticsearch組件依賴,代碼如下:
<dependency><groupId>org.springframework.bootgroupId><artifactId>spring-boot-starter-data-ElasticsearchartifactId>dependency>
2. 配置Elasticsearch
在application.properties項(xiàng)目配置文件中添加Elasticsearch服務(wù)器的地址,代碼如下:
spring.Elasticsearch.rest.uris=http://10.2.1.231:9200主要用來配置Elasticsearch服務(wù)地址,多個(gè)地址用逗號分隔。需要注意的是,Spring Data Elasticsearch各版本的配置屬性可能不一樣。本示例中使用的是7.6.2版本。
3. 創(chuàng)建文檔對象
創(chuàng)建實(shí)體對象類Book,然后使用@Document注解定義文檔對象,示例代碼如下:
@Document( indexName = "book" , replicas = 0)public class Book {@Idprivate Long id;@Field(analyzer = "ik_max_word",type = FieldType.Text)private String bookName;@Field(type = FieldType.Keyword)private String author;private float price;private int page;@Field(type = FieldType.Keyword, fielddata = true)private String category;// 省略get、set方法public Book(){}public Book(Long id,String bookName, String author,float price,int page,String category) {this.id = id;this.bookName = bookName;this.author = author;this.price = price;this.page = page;this.category = category;}@Overridepublic String toString() {final StringBuilder sb = new StringBuilder( "{\"Book\":{" );sb.append( "\"id\":" ).append( id );sb.append( ",\"bookName\":\"" ).append( bookName ).append( '\"' );sb.append( ",\"page\":\"" ).append( page ).append( '\"' );sb.append( ",\"price\":\"" ).append( price ).append( '\"' );sb.append( ",\"category\":\"" ).append( category ).append( '\"' );sb.append( ",\"author\":\"" ).append( author ).append( '\"' );sb.append( "}}" );return sb.toString();}}
如上面的示例所示,通過@Document注解將數(shù)據(jù)實(shí)體對象與Elasticsearch中的文檔和屬性一一對應(yīng)。
(1)@Document注解會(huì)對實(shí)體中的所有屬性建立索引:
indexName = "customer":表示創(chuàng)建一個(gè)名為customer的索引。
type="customer":表示在索引中創(chuàng)建一個(gè)名為customer的類別,而在Elasticsearch 7.x版本中取消了類別的概念。
shards = 1:表示只使用一個(gè)分片,默認(rèn)為5。
replicas = 0:表示副本數(shù)量,默認(rèn)為1,0表示不使用副本。
refreshInterval = "-1":表示禁止索引刷新。
(2)@Id作用在成員變量,標(biāo)記一個(gè)字段作為id主鍵。
(3)@Field作用在成員變量,標(biāo)記為文檔的字段,并指定字段映射屬性:
type:字段類型,取值是枚舉:FieldType。
index:是否索引,布爾類型,默認(rèn)是true。
store:是否存儲,布爾類型,默認(rèn)是false。
analyzer:分詞器名稱是ik_max_word。
4. 創(chuàng)建操作的Repository
創(chuàng)建CustomerRepository接口并繼承ElasticsearchRepository,新增兩個(gè)簡單的自定義查詢方法。示例代碼如下:
public interface BookRepository extends ElasticsearchRepository<Book, Integer>{ListfindByBookNameLike(String bookName) ;}
通過上面的示例代碼,我們發(fā)現(xiàn)其使用方式和JPA的語法是一樣的。
5. 驗(yàn)證測試
首先創(chuàng)建BookRepositoryTest單元測試類,在類中注入BookRepository,最后添加一個(gè)數(shù)據(jù)插入測試方法。
@Testpublic?void?testSave()?{??Book?book?=?new?Book();??book.setId(1);??book.setBookName("西游記");??book.setAuthor("吳承恩");??repository.save(book);??Book?newbook=repository.findById(1).orElse(null);??System.out.println(newbook);}
單擊Run Test或在方法上右擊,選擇Run 'testSave',運(yùn)行單元測試方法,查看索引數(shù)據(jù)是否插入成功,運(yùn)行結(jié)果如下圖所示:

輸出結(jié)果表明:索引數(shù)據(jù)保存成功,并且通過id能查詢到保存的索引數(shù)據(jù)信息,說明在Spring Boot中成功集成Elasticsearch。