
vue 和 微信小程序的區(qū)別
點(diǎn)擊上方 Java學(xué)習(xí)之道,選擇 設(shè)為星標(biāo)
作者: 賣女孩的小火柴
來(lái)源: segmentfault.com/a/1190000015684864
寫了vue項(xiàng)目和小程序,發(fā)現(xiàn)二者有許多相同之處,在此想總結(jié)一下二者的共同點(diǎn)和區(qū)別。
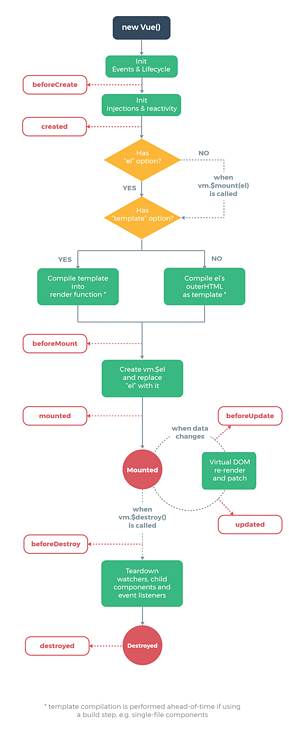
Part1生命周期
先貼兩張圖:
vue生命周期
小程序生命周期
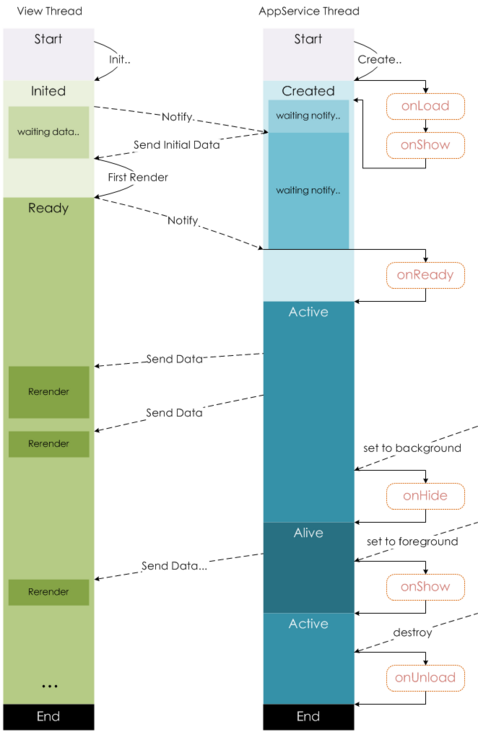 相比之下,
相比之下,小程序的鉤子函數(shù)要簡(jiǎn)單得多。
vue的鉤子函數(shù)在跳轉(zhuǎn)新頁(yè)面時(shí),鉤子函數(shù)都會(huì)觸發(fā),但是小程序的鉤子函數(shù),頁(yè)面不同的跳轉(zhuǎn)方式,觸發(fā)的鉤子并不一樣。
-
onLoad: 頁(yè)面加載 一個(gè)頁(yè)面只會(huì)調(diào)用一次,可以在onLoad中獲取打開當(dāng)前頁(yè)面所調(diào)用的query參數(shù)。 -
onShow: 頁(yè)面顯示 每次打開頁(yè)面都會(huì)調(diào)用一次。 -
onReady: 頁(yè)面初次渲染完成 一個(gè)頁(yè)面只會(huì)調(diào)用一次,代表頁(yè)面已經(jīng)準(zhǔn)備妥當(dāng),可以和視圖層進(jìn)行交互。對(duì)界面的設(shè)置如wx.setNavigationBarTitle請(qǐng)?jiān)?code style="font-size: 14px;padding: 2px 4px;border-radius: 4px;margin-right: 2px;margin-left: 2px;color: rgb(30, 107, 184);background-color: rgba(27, 31, 35, 0.05);font-family: "Operator Mono", Consolas, Monaco, Menlo, monospace;word-break: break-all;">onReady之后設(shè)置。詳見生命周期 -
onHide: 頁(yè)面隱藏 當(dāng)navigateTo或底部tab切換時(shí)調(diào)用。 -
onUnload: 頁(yè)面卸載 當(dāng)redirectTo或navigateBack的時(shí)候調(diào)用。
數(shù)據(jù)請(qǐng)求
在頁(yè)面加載請(qǐng)求數(shù)據(jù)時(shí),兩者鉤子的使用有些類似,vue一般會(huì)在created或者mounted中請(qǐng)求數(shù)據(jù),而在小程序,會(huì)在onLoad或者onShow中請(qǐng)求數(shù)據(jù)。
Part2數(shù)據(jù)綁定
VUE:vue動(dòng)態(tài)綁定一個(gè)變量的值為元素的某個(gè)屬性的時(shí)候,會(huì)在變量前面加上冒號(hào):,例:
<img :src="imgSrc"/>
小程序:綁定某個(gè)變量的值為元素屬性時(shí),會(huì)用兩個(gè)大括號(hào)括起來(lái),如果不加括號(hào),為被認(rèn)為是字符串。例:
<image src="{{imgSrc}}"></image>
Part3列表渲染
直接貼代碼,兩者還是有些相似
<ul id="example-1">
  <li v-for="item in items">
    {{ item.message }}
  </li>
</ul>
var example1 = new Vue({
  el: '#example-1',
  data: {
    items: [
      { message: 'Foo' },
      { message: 'Bar' }
    ]
  }
})
小程序:
Page({
  data: {
    items: [
      { message: 'Foo' },
      { message: 'Bar' }
    ]
  }
})

<text wx:for="{{items}}">{{item}}</text>
Part4顯示與隱藏元素
vue中,使用v-if 和v-show控制元素的顯示和隱藏
小程序中,使用wx-if和hidden控制元素的顯示和隱藏
Part5事件處理
vue:使用v-on:event綁定事件,或者使用@event綁定事件,例如:
<button v-on:click="counter += 1">Add 1</button>
<button v-on:click.stop="counter+=1">Add1</button>  //阻止事件冒泡
小程序中,全用bindtap(bind+event),或者catchtap(catch+event)綁定事件,例如:
<button bindtap="noWork">明天不上班</button>
<button catchtap="noWork">明天不上班</button>  //阻止事件冒泡
Part6數(shù)據(jù)雙向綁定
1.設(shè)置值
在vue中,只需要再表單元素上加上v-model,然后再綁定data中對(duì)應(yīng)的一個(gè)值,當(dāng)表單元素內(nèi)容發(fā)生變化時(shí),data中對(duì)應(yīng)的值也會(huì)相應(yīng)改變,這是vue非常nice的一點(diǎn)。
<div id="app">
    <input v-model="reason" placeholder="填寫理由" class='reason'/>
</div>
new Vue({
  el: '#app',
  data: {
   reason:''
  }
})
但是在小程序中,卻沒有這個(gè)功能。那怎么辦呢?當(dāng)表單內(nèi)容發(fā)生變化時(shí),會(huì)觸發(fā)表單元素上綁定的方法,然后在該方法中,通過this.setData({key:value})來(lái)將表單上的值賦值給data中的對(duì)應(yīng)值。下面是代碼,可以感受一下:
<input bindinput="bindReason" placeholder="填寫理由" class='reason' value='{{reason}}' name="reason" />
Page({
data:{
    reason:''
},
bindReason(e) {
    this.setData({
      reason: e.detail.value
    })
  }
})
當(dāng)頁(yè)面表單元素很多的時(shí)候,更改值就是一件體力活了。和小程序一比較,vue的v-model簡(jiǎn)直爽的不要不要的。
2.取值
vue中,通過this.reason取值
小程序中,通過this.data.reason取值

Part7綁定事件傳參
在vue中,綁定事件傳參挺簡(jiǎn)單,只需要在觸發(fā)事件的方法中,把需要傳遞的數(shù)據(jù)作為形參傳入就可以了,例如:
<button @click="say('明天不上班')"></button>
new Vue({
  el: '#app',
  methods:{
    say(arg){
    consloe.log(arg)
    }
  }
})
在小程序中,不能直接在綁定事件的方法中傳入?yún)?shù),需要將參數(shù)作為屬性值,綁定到元素上的data-屬性上,然后在方法中,通過e.currentTarget.dataset.*的方式獲取,從而完成參數(shù)的傳遞,很麻煩有沒有...
<view class='tr' bindtap='toApprove' data-id="{{item.id}}"></view>
Page({
data:{
    reason:''
},
toApprove(e) {
    let id = e.currentTarget.dataset.id;
  }
})

Part8父子組件通信
1.子組件的使用
在vue中,需要:
-
編寫子組件 -
在需要使用的父組件中通過 import引入 -
在 vue的components中注冊(cè) -
在模板中使用
//子組件 bar.vue
<template>
  <div class="search-box">
    <div @click="say" :title="title" class="icon-dismiss"></div>
  </div>
</template>
<script>
export default{
props:{
    title:{
       type:String,
       default:''
      }
    }
},
methods:{
    say(){
       console.log('明天不上班');
       this.$emit('helloWorld')
    }
}
</script>

// 父組件 foo.vue
<template>
  <div class="container">
    <bar :title="title" @helloWorld="helloWorld"></bar>
  </div>
</template>

<script>
import Bar from './bar.vue'
export default{
data(){
    return{
        title:"我是標(biāo)題"
    }
},
methods:{
    helloWorld(){
        console.log('我接收到子組件傳遞的事件了')
    }
},
components:{
    Bar
}
</script>
在小程序中,需要:
-
編寫子組件 -
在子組件的 json文件中,將該文件聲明為組件
{
  "component": true
}
-
在需要引入的父組件的 json文件中,在usingComponents填寫引入組件的組件名以及路徑
"usingComponents": {
    "tab-bar": "../../components/tabBar/tabBar"
  }
-
在父組件中,直接引入即可
<tab-bar currentpage="index"></tab-bar>
具體代碼:
// 子組件
<!--components/tabBar/tabBar.wxml-->
<view class='tabbar-wrapper'>
  <view class='left-bar {{currentpage==="index"?"active":""}}' bindtap='jumpToIndex'>
    <text class='iconfont icon-shouye'></text>
    <view>首頁(yè)</view>
  </view>
  <view class='right-bar {{currentpage==="setting"?"active":""}}' bindtap='jumpToSetting'>
    <text class='iconfont icon-shezhi'></text>
    <view>設(shè)置</view>
  </view>
</view>
2.父子組件間通信
在vue中
父組件向子組件傳遞數(shù)據(jù),只需要在父組件通過v-bind傳入一個(gè)值,在子組件中,通過props接收,即可完成數(shù)據(jù)的傳遞,示例:
// 父組件 foo.vue
<template>
  <div class="container">
    <bar :title="title"></bar>
  </div>
</template>
<script>
import Bar from './bar.vue'
export default{
data(){
    return{
        title:"我是標(biāo)題"
    }
},
components:{
    Bar
}
</script>

// 子組件bar.vue
<template>
  <div class="search-box">
    <div :title="title" ></div>
  </div>
</template>
<script>
export default{
props:{
    title:{
       type:String,
       default:''
      }
    }
}
</script>
子組件和父組件通信可以通過this.$emit將方法和數(shù)據(jù)傳遞給父組件。
在小程序中
父組件向子組件通信和vue類似,但是小程序沒有通過v-bind,而是直接將值賦值給一個(gè)變量,如下:
<tab-bar currentpage="index"></tab-bar>
此處, “index”就是要向子組件傳遞的值
在子組件properties中,接收傳遞的值
properties: {
    // 彈窗標(biāo)題
    currentpage: {            // 屬性名
      type: String,     // 類型(必填),目前接受的類型包括:String, Number, Boolean, Object, Array, null(表示任意類型)
      value: 'index'     // 屬性初始值(可選),如果未指定則會(huì)根據(jù)類型選擇一個(gè)
    }
  }
子組件向父組件通信和vue也很類似,代碼如下:
//子組件中
methods: {
    // 傳遞給父組件
    cancelBut: function (e) {
      var that = this;
      var myEventDetail = { pickerShow: false, type: 'cancel' } // detail對(duì)象,提供給事件監(jiān)聽函數(shù)
      this.triggerEvent('myevent', myEventDetail) //myevent自定義名稱事件,父組件中使用
    },
}

//父組件中
<bar bind:myevent="toggleToast"></bar>

// 獲取子組件信息
toggleToast(e){
    console.log(e.detail)
}
如果父組件想要調(diào)用子組件的方法
vue會(huì)給子組件添加一個(gè)ref屬性,通過this.$refs.ref的值便可以獲取到該子組件,然后便可以調(diào)用子組件中的任意方法,例如:
//子組件
<bar ref="bar"></bar>
//父組件
this.$ref.bar.子組件的方法
小程序是給子組件添加id或者class,然后通過this.selectComponent找到子組件,然后再調(diào)用子組件的方法,示例:
<!--子組件-->
<bar id="bar"></bar>
// 父組件
this.selectComponent('#id').syaHello()
小程序父組件改變子組件樣式
-
父組件將style傳入子組件 -
父組件傳入變量控制子組件樣式 -
在父組件樣式中,在子組件類名前面加上父組件類名
<view class='share-button-container' bindtap='handleShareBtn'>
   <share-button  product="{{goodProduct}}" type="1" back-color="#fff" fore-color="#9e292f" bind:error="on_error" />
</view>
.share-button-container .button--btn-navigator__hover{
  background: #fff;
}
小程序和vue在這點(diǎn)上太相似了,有木有。。。
- 態(tài)黑色音符") | 更多精彩文章 -
| 更多精彩文章 -

                     ▽加我微信,交個(gè)朋友


                      長(zhǎng)按/掃碼添加↑↑↑

