
【Vue】Vue官方教程筆記——尤雨溪手寫mini-vue
??這周我看了看了尤大神親手寫的mini版Vue3,筆記如下請(qǐng)大家指正。
一、整體工作流程

編譯器將視圖模板編譯為渲染函數(shù) 數(shù)據(jù)響應(yīng)模塊將數(shù)據(jù)對(duì)象初始化為響應(yīng)式數(shù)據(jù)對(duì)象 視圖渲染 RenderPhase :渲染模塊使用渲染函數(shù)根據(jù)初始化數(shù)據(jù)生成虛擬Dom MountPhase :利用虛擬Dom創(chuàng)建視圖頁面Html PatchPhase:數(shù)據(jù)模型一旦變化渲染函數(shù)將再次被調(diào)用生成新的虛擬Dom,然后做Dom Diff更新視圖Html
二、三大模塊的分工
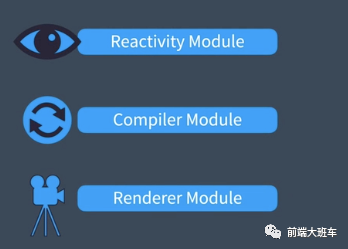
數(shù)據(jù)響應(yīng)式模塊 編譯器 渲染函數(shù)
1. 數(shù)據(jù)響應(yīng)式模塊
提供創(chuàng)建一切數(shù)據(jù)變化都是可以被監(jiān)聽的響應(yīng)式對(duì)象的方法。
2. 編譯模塊
 將html模板編譯為渲染函數(shù)
這個(gè)編譯過程可以在一下兩個(gè)時(shí)刻執(zhí)行
瀏覽器運(yùn)行時(shí) (runtime) Vue項(xiàng)目打包編譯時(shí) (compile time)
3. 渲染函數(shù)
渲染函數(shù)通過以下三個(gè)周期將視圖渲染到頁面上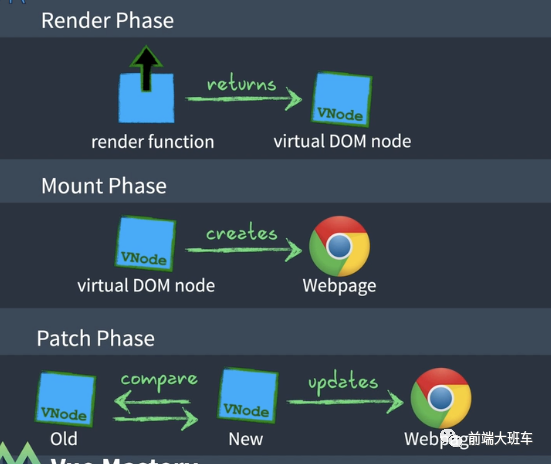
Render Phase Mount Phase Patch Phase
三、MVVM原型(Mock版)
MVVM框架其實(shí)就是在原先的View和Model之間增加了一個(gè)VM層完成以下工作。完成數(shù)據(jù)與視圖的監(jiān)聽。我們這一步先寫一個(gè)Mock版本。其實(shí)就是先針對(duì)固定的視圖和數(shù)據(jù)模型實(shí)現(xiàn)監(jiān)聽。
1. 接口定義
我們MVVM的框架接口和Vue3一模一樣。
初始化需要確定
視圖模板 數(shù)據(jù)模型 模型行為 - 比如我們希望click的時(shí)候數(shù)據(jù)模型的message會(huì)會(huì)倒序排列。
const App = {
  // 視圖
  template: `
<input v-model="message"/>
<button @click='click'>{{message}}</button>
`,
  setup() {
    // 數(shù)據(jù)劫持
    const state = new Proxy(
      {
        message: "Hello Vue 3!!",
      },
      {
        set(target, key, value, receiver) {
          const ret = Reflect.set(target, key, value, receiver);
          // 觸發(fā)函數(shù)響應(yīng)
          effective();
          return ret;
        },
      }
    );

    const click = () => {
      state.message = state.message.split("").reverse().join("");
    };
    return { state, click };
  },
};
const { createApp } = Vue;
createApp(App).mount("#app");
2. 程序骨架
程序執(zhí)行過程大概如圖:

const Vue = {
  createApp(config) {
    // 編譯過程
    const compile = (template) => (content, dom) => {

    };

    // 生成渲染函數(shù)
    const render = compile(config.template);

    return {
      mount: function (container) {
        const dom = document.querySelector(container);

    // 實(shí)現(xiàn)setup函數(shù)
        const setupResult = config.setup();

        // 數(shù)據(jù)響應(yīng)更新視圖
        effective = () => render(setupResult, dom);
        render(setupResult, dom);
      },
    };
  },
};
3. 編譯渲染函數(shù)
MVVM框架中的渲染函數(shù)是會(huì)通過視圖模板的編譯建立的。
// 編譯函數(shù)
// 輸入值為視圖模板
const compile = (template) => {
  //渲染函數(shù)
  return (observed, dom) => {
   // 渲染過程
 }
}
簡(jiǎn)單的說就是對(duì)視圖模板進(jìn)行解析并生成渲染函數(shù)。
大概要處理以下三件事
確定哪些值需要根據(jù)數(shù)據(jù)模型渲染
// <button>{{message}}</button>
// 將數(shù)據(jù)渲染到視圖
button = document.createElement('button')
button.innerText = observed.message
dom.appendChild(button)
綁定模型事件
// <button @click='click'>{{message}}</button>
// 綁定模型事件
button.addEventListener('click', () => {
  return config.methods.click.apply(observed)
})
確定哪些輸入項(xiàng)需要雙向綁定
// <input v-model="message"/>
// 創(chuàng)建keyup事件監(jiān)聽輸入項(xiàng)修改
input.addEventListener('keyup', function () {
  observed.message = this.value
})
完整的代碼
const compile = (template) => (observed, dom) => {

    // 重新渲染
    let input = dom.querySelector('input')
    if (!input) {
        input = document.createElement('input')
        input.setAttribute('value', observed.message)

        input.addEventListener('keyup', function () {
            observed.message = this.value
        })
        dom.appendChild(input)
    }
    let button = dom.querySelector('button')
    if (!button) {
        console.log('create button')
        button = document.createElement('button')
        button.addEventListener('click', () => {
            return config.methods.click.apply(observed)
        })
        dom.appendChild(button)
    }
    button.innerText = observed.message
}
四、數(shù)據(jù)響應(yīng)實(shí)現(xiàn)
Vue普遍走的就是數(shù)據(jù)劫持方式。不同的在于使用DefineProperty還是Proxy。也就是一次一個(gè)屬性劫持還是一次劫持一個(gè)對(duì)象。當(dāng)然后者比前者聽著就明顯有優(yōu)勢(shì)。這也就是Vue3的響應(yīng)式原理。
Proxy/Reflect是在ES2015規(guī)范中加入的,Proxy可以更好的攔截對(duì)象行為,Reflect可以更優(yōu)雅的操縱對(duì)象。優(yōu)勢(shì)在于
針對(duì)整個(gè)對(duì)象定制 而不是對(duì)象的某個(gè)屬性,所以也就不需要對(duì)keys進(jìn)行遍歷。 支持?jǐn)?shù)組,這個(gè)DefineProperty不具備。這樣就省去了重載數(shù)組方法這樣的Hack過程。 Proxy 的第二個(gè)參數(shù)可以有 13 種攔截方法,這比起 Object.defineProperty() 要更加豐富 Proxy 作為新標(biāo)準(zhǔn)受到瀏覽器廠商的重點(diǎn)關(guān)注和性能優(yōu)化,相比之下 Object.defineProperty() 是一個(gè)已有的老方法 可以通過遞歸方便的進(jìn)行對(duì)象嵌套。
說了這么多我們先來一個(gè)小例子
var obj = new Proxy({}, {
    get: function (target, key, receiver) {
        console.log(`getting ${key}!`);
        return Reflect.get(target, key, receiver);
    },
    set: function (target, key, value, receiver) {
        console.log(`setting ${key}!`);
        return Reflect.set(target, key, value, receiver);
    }
})
obj.abc = 132
這樣寫如果你修改obj中的值,就會(huì)打印出來。
也就是說如果對(duì)象被修改就會(huì)得的被響應(yīng)。

當(dāng)然我們需要的響應(yīng)就是重新更新視圖也就是重新運(yùn)行render方法。
首先制造一個(gè)抽象的數(shù)據(jù)響應(yīng)函數(shù)
// 定義響應(yīng)函數(shù)
let effective
observed = new Proxy(config.data(), {
  set(target, key, value, receiver) {
    const ret = Reflect.set(target, key, value, receiver)
    // 觸發(fā)函數(shù)響應(yīng)
    effective()
    return ret
  },
})
在初始化的時(shí)候我們?cè)O(shè)置響應(yīng)動(dòng)作為渲染視圖
const dom = document.querySelector(container)
// 設(shè)置響應(yīng)動(dòng)作為渲染視圖
effective = () => render(observed, dom)
render(observed, dom)
1. 視圖變化的監(jiān)聽
瀏覽器視圖的變化,主要體現(xiàn)在對(duì)輸入項(xiàng)變化的監(jiān)聽上,所以只需要通過綁定監(jiān)聽事件就可以了。
document.querySelector('input').addEventListener('keyup', function () {
  data.message = this.value
})
2. 完整的代碼
<html lang="en">
  <body>
    <div id="app"></div>
    <script>
      const Vue = {
        createApp(config) {
          // 編譯過程
          const compile = (template) => (content, dom) => {
            // 重新渲染
            dom.innerText = "";
            input = document.createElement("input");
            input.addEventListener("keyup", function () {
              content.state.message = this.value;
            });
            input.setAttribute("value", content.state.message);
            dom.appendChild(input);

            let button = dom.querySelector("button");
            button = document.createElement("button");
            button.addEventListener("click", () => {
              return content.click.apply(content.state);
            });
            button.innerText = content.state.message;
            dom.appendChild(button);
          };

          // 生成渲染函數(shù)
          const render = compile(config.template);

          return {
            mount: function (container) {
              const dom = document.querySelector(container);
              const setupResult = config.setup();
              effective = () => render(setupResult, dom);
              render(setupResult, dom);
            },
          };
        },
      };
      // 定義響應(yīng)函數(shù)
      let effective;
      const App = {
        // 視圖
        template: `
                <input v-model="message"/>
                <button @click='click'>{{message}}</button>
            `,
        setup() {
          // 數(shù)據(jù)劫持
          const state = new Proxy(
            {
              message: "Hello Vue 3!!",
            },
            {
              set(target, key, value, receiver) {
                const ret = Reflect.set(target, key, value, receiver);
                // 觸發(fā)函數(shù)響應(yīng)
                effective();
                return ret;
              },
            }
          );

          const click = () => {
            state.message = state.message.split("").reverse().join("");
          };
          return { state, click };
        },
      };
      const { createApp } = Vue;
      createApp(App).mount("#app");
    </script>
  </body>
</html>
五、 視圖渲染過程
Dom => virtual DOM => render functions
1. 什么是Dom 、Document Object Model

HTML在瀏覽器中會(huì)映射為一些列節(jié)點(diǎn),方便我們?nèi)フ{(diào)用。
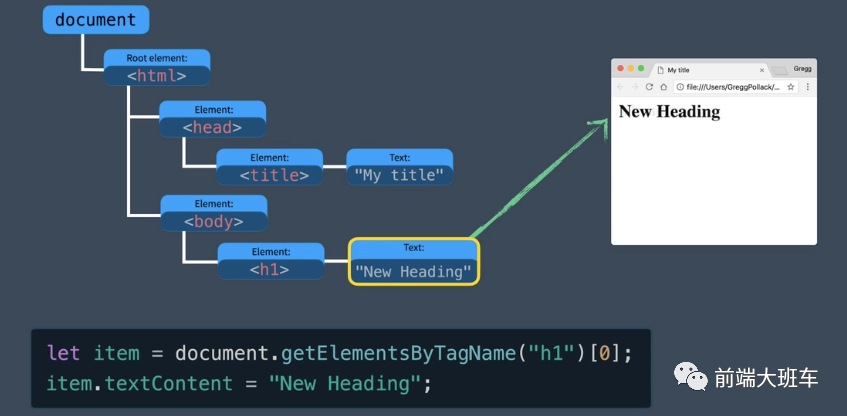
2. 什么是虛擬Dom
Dom中節(jié)點(diǎn)眾多,直接查詢和更新Dom性能較差。
A way of representing the actual DOM with JavaScript Objects. 用JS對(duì)象重新表示實(shí)際的Dom
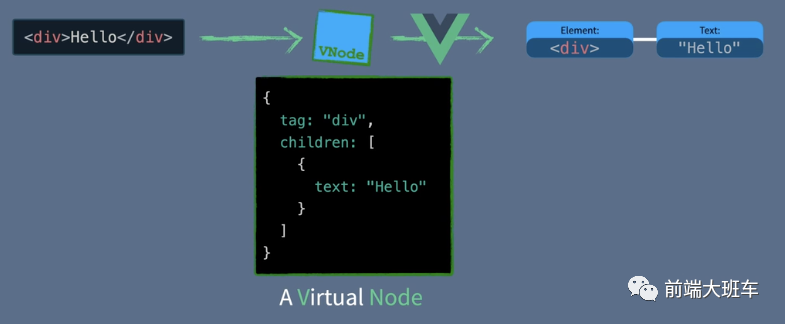
3. 什么是渲染函數(shù)
在Vue中我們通過將視圖模板(template)編譯為渲染函數(shù)(render function)再轉(zhuǎn)化為虛擬Dom
4. 通過DomDiff高效更新視圖

5. 總結(jié)
舉個(gè)栗子?? 虛擬Dom和Dom就像大樓和大樓設(shè)計(jì)圖之間的關(guān)系。 假設(shè)你要在29層添加一個(gè)廚房
? 拆除整個(gè)29層,重新建設(shè)
?先繪制設(shè)計(jì)圖,找出新舊結(jié)構(gòu)不同然后建設(shè)
假設(shè)你要在29層添加一個(gè)廚房
? 拆除整個(gè)29層,重新建設(shè)
?先繪制設(shè)計(jì)圖,找出新舊結(jié)構(gòu)不同然后建設(shè)
六、實(shí)現(xiàn)渲染函數(shù)
在Vue中我們通過將視圖模板(template)編譯為渲染函數(shù)(render function)再轉(zhuǎn)化為虛擬Dom
渲染流程通常會(huì)分為三各部分:
https://vue-next-template-explorer.netlify.app/

RenderPhase :渲染模塊使用渲染函數(shù)根據(jù)初始化數(shù)據(jù)生成虛擬Dom MountPhase :利用虛擬Dom創(chuàng)建視圖頁面Html PatchPhase:數(shù)據(jù)模型一旦變化渲染函數(shù)將再次被調(diào)用生成新的虛擬Dom,然后做Dom Diff更新視圖Html
mount: function (container) {
    const dom = document.querySelector(container);
    const setupResult = config.setup();
    const render = config.render(setupResult);

    let isMounted = false;
    let prevSubTree;
    watchEffect(() => {
      if (!isMounted) {
        dom.innerHTML = "";
        // mount
        isMounted = true;
        const subTree = config.render(setupResult);
        prevSubTree = subTree;
        mountElement(subTree, dom);
      } else {
        // update
        const subTree = config.render(setupResult);
        diff(prevSubTree, subTree);
        prevSubTree = subTree;
      }
    });
  },
1.Render Phase
渲染模塊使用渲染函數(shù)根據(jù)初始化數(shù)據(jù)生成虛擬Dom
render(content) {
  return h("div", null, [
    h("div", null, String(content.state.message)),
    h(
      "button",
      {
        onClick: content.click,
      },
      "click"
    ),
  ]);
},
2. Mount Phase
利用虛擬Dom創(chuàng)建視圖頁面Html
function mountElement(vnode, container) {
  // 渲染成真實(shí)的 dom 節(jié)點(diǎn)
  const el = (vnode.el = createElement(vnode.type));

  // 處理 props
  if (vnode.props) {
    for (const key in vnode.props) {
      const val = vnode.props[key];
      patchProp(vnode.el, key, null, val);
    }
  }

  // 要處理 children
  if (Array.isArray(vnode.children)) {
    vnode.children.forEach((v) => {
      mountElement(v, el);
    });
  } else {
    insert(createText(vnode.children), el);
  }

  // 插入到視圖內(nèi)
  insert(el, container);
}
3. Patch Phase(Dom diff)
數(shù)據(jù)模型一旦變化渲染函數(shù)將再次被調(diào)用生成新的虛擬Dom,然后做Dom Diff更新視圖Html
function patchProp(el, key, prevValue, nextValue) {
  // onClick
  // 1. 如果前面2個(gè)值是 on 的話
  // 2. 就認(rèn)為它是一個(gè)事件
  // 3. on 后面的就是對(duì)應(yīng)的事件名
  if (key.startsWith("on")) {
    const eventName = key.slice(2).toLocaleLowerCase();
    el.addEventListener(eventName, nextValue);
  } else {
    if (nextValue === null) {
      el.removeAttribute(key, nextValue);
    } else {
      el.setAttribute(key, nextValue);
    }
  }
}
通過DomDiff - 高效更新視圖
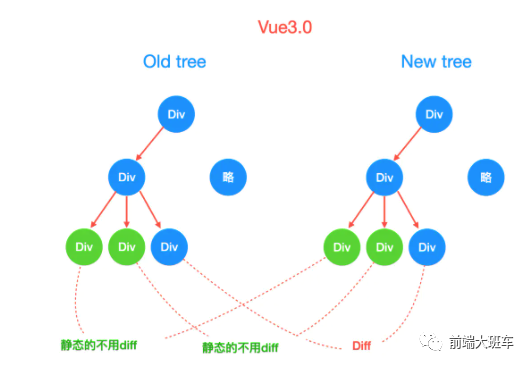
function diff(v1, v2) {
  // 1. 如果 tag 都不一樣的話,直接替換
  // 2. 如果 tag 一樣的話
  //    1. 要檢測(cè) props 哪些有變化
  //    2. 要檢測(cè) children  -》 特別復(fù)雜的
  const { props: oldProps, children: oldChildren = [] } = v1;
  const { props: newProps, children: newChildren = [] } = v2;
  if (v1.tag !== v2.tag) {
    v1.replaceWith(createElement(v2.tag));
  } else {
    const el = (v2.el = v1.el);
    // 對(duì)比 props
    // 1. 新的節(jié)點(diǎn)不等于老節(jié)點(diǎn)的值 -> 直接賦值
    // 2. 把老節(jié)點(diǎn)里面新節(jié)點(diǎn)不存在的 key 都刪除掉
    if (newProps) {
      Object.keys(newProps).forEach((key) => {
        if (newProps[key] !== oldProps[key]) {
          patchProp(el, key, oldProps[key], newProps[key]);
        }
      });

      // 遍歷老節(jié)點(diǎn) -》 新節(jié)點(diǎn)里面沒有的話,那么都刪除掉
      Object.keys(oldProps).forEach((key) => {
        if (!newProps[key]) {
          patchProp(el, key, oldProps[key], null);
        }
      });
    }
    // 對(duì)比 children

    // newChildren -> string
    // oldChildren -> string   oldChildren -> array

    // newChildren -> array
    // oldChildren -> string   oldChildren -> array
    if (typeof newChildren === "string") {
      if (typeof oldChildren === "string") {
        if (newChildren !== oldChildren) {
          setText(el, newChildren);
        }
      } else if (Array.isArray(oldChildren)) {
        // 把之前的元素都替換掉
        v1.el.textContent = newChildren;
      }
    } else if (Array.isArray(newChildren)) {
      if (typeof oldChildren === "string") {
        // 清空之前的數(shù)據(jù)
        n1.el.innerHTML = "";
        // 把所有的 children mount 出來
        newChildren.forEach((vnode) => {
          mountElement(vnode, el);
        });
      } else if (Array.isArray(oldChildren)) {
        // a, b, c, d, e -> new
        // a1,b1,c1,d1 -> old
        // 如果 new 的多的話,那么創(chuàng)建一個(gè)新的

        // a, b, c -> new
        // a1,b1,c1,d1 -> old
        // 如果 old 的多的話,那么把多的都刪除掉
        const length = Math.min(newChildren.length, oldChildren.length);
        for (let i = 0; i < length; i++) {
          const oldVnode = oldChildren[i];
          const newVnode = newChildren[i];
          // 可以十分復(fù)雜
          diff(oldVnode, newVnode);
        }

        if (oldChildren.length > length) {
          // 說明老的節(jié)點(diǎn)多
          // 都刪除掉
          for (let i = length; i < oldChildren.length; i++) {
            remove(oldChildren[i], el);
          }
        } else if (newChildren.length > length) {
          // 說明 new 的節(jié)點(diǎn)多
          // 那么需要?jiǎng)?chuàng)建對(duì)應(yīng)的節(jié)點(diǎn)
          for (let i = length; i < newChildren.length; i++) {
            mountElement(newChildren[i], el);
          }
        }
      }
    }
  }
}
七、編譯器原理
這個(gè)地方尤大神并沒有實(shí)現(xiàn) 后續(xù)然叔會(huì)給大家提供一個(gè)超簡(jiǎn)潔的版本 這個(gè)章節(jié)我們主要看看compile這個(gè)功能。
上文已經(jīng)說過編譯函數(shù)的功能
// 編譯函數(shù)
// 輸入值為視圖模板
const compile = (template) => {
  //渲染函數(shù)
  return (observed, dom) => {
   // 渲染過程
 }
}
簡(jiǎn)單的說就是
輸入:視圖模板 輸出:渲染函數(shù)
細(xì)分起來還可以分為三個(gè)個(gè)小步驟
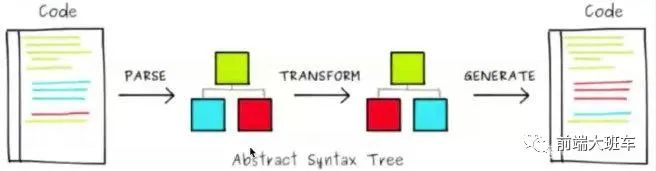
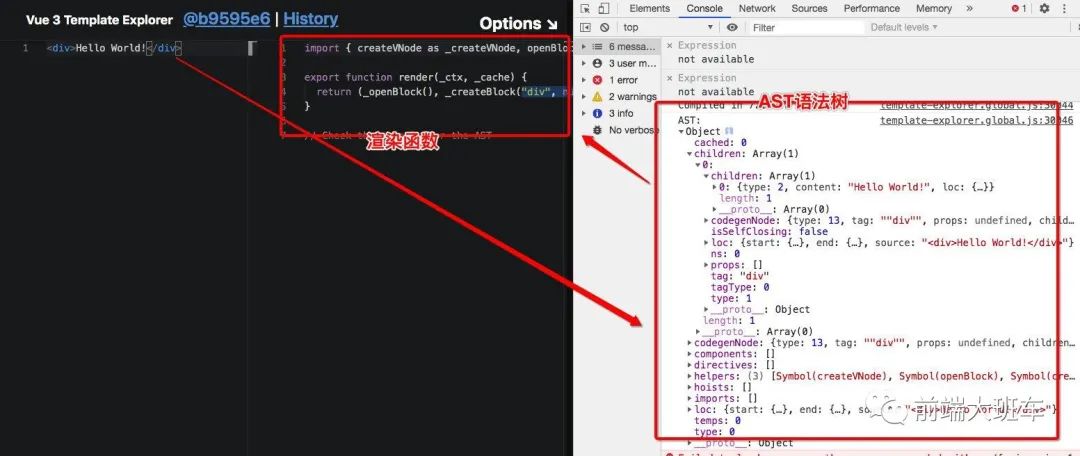
Parse 模板字符串 -> AST(Abstract Syntax Treee)抽象語法樹
Transform 轉(zhuǎn)換標(biāo)記 譬如 v-bind v-if v-for的轉(zhuǎn)換
Generate AST -> 渲染函數(shù)
//  模板字符串 -> AST(Abstract Syntax Treee)抽象語法樹
let ast = parse(template)
// 轉(zhuǎn)換處理 譬如 v-bind v-if v-for的轉(zhuǎn)換
ast = transfer(ast)
// AST -> 渲染函數(shù)
return generator(ast)
我們可以通過在線版的VueTemplateExplorer感受一下
https://vue-next-template-explorer.netlify.com/
編譯函數(shù)解析
1. Parse解析器
解析器的工作原理其實(shí)就是一連串的正則匹配。
比如:
標(biāo)簽屬性的匹配
class="title"
class='title'
class=title
const attr = /([a-zA-Z_:][-a-zA-Z0-9_:.]*)=("([^"]*)"|'([^']*)'|([^\s"'=<>`]+)/

"class=abc".match(attr);
// output
(6) ["class=abc", "class", "abc", undefined, undefined, "abc", index: 0, input: "class=abc", groups: undefined]

"class='abc'".match(attr);
// output
(6) ["class='abc'", "class", "'abc'", undefined, "abc", undefined, index: 0, input: "class='abc'", groups: undefined]
這個(gè)等實(shí)現(xiàn)的時(shí)候再仔細(xì)講。可以參考一下文章。
AST解析器實(shí)戰(zhàn)
那對(duì)于我們的項(xiàng)目來講就可以寫成這個(gè)樣子
// <input v-model="message"/>
// <button @click='click'>{{message}}</button>
// 轉(zhuǎn)換后的AST語法樹
const parse = template => ({
    children: [{
            tag: 'input',
            props: {
                name: 'v-model',
                exp: {
                    content: 'message'
                },
            },
        },
        {
            tag: 'button',
            props: {
                name: '@click',
                exp: {
                    content: 'message'
                },
            },
            content:'{{message}}'
        }
    ],
})
2. Transform轉(zhuǎn)換處理
前一段知識(shí)做的是抽象語法樹,對(duì)于Vue3模板的特別轉(zhuǎn)換就是在這里進(jìn)行。
比如:vFor、vOn
在Vue三種也會(huì)細(xì)致的分為兩個(gè)層級(jí)進(jìn)行處理
compile-core 核心編譯邏輯
AST-Parser
基礎(chǔ)類型解析 v-for 、v-on
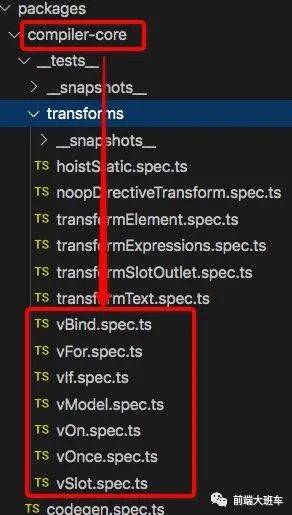
image-20200713183256931 compile-dom 針對(duì)瀏覽器的編譯邏輯
v-html
v-model
v-clock
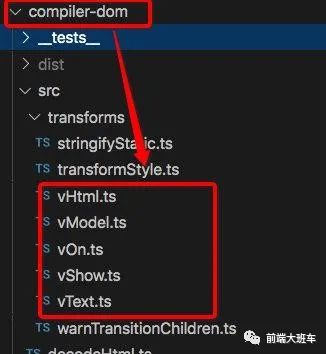
image-20200713183210079
const transfer = ast => ({
    children: [{
            tag: 'input',
            props: {
                name: 'model',
                exp: {
                    content: 'message'
                },
            },
        },
        {
            tag: 'button',
            props: {
                name: 'click',
                exp: {
                    content: 'message'
                },
            },
            children: [{
                content: {
                    content: 'message'
                },
            }]
        }
    ],
})
3. Generate生成渲染器
生成器其實(shí)就是根據(jù)轉(zhuǎn)換后的AST語法樹生成渲染函數(shù)。當(dāng)然針對(duì)相同的語法樹你可以渲染成不同結(jié)果。比如button你希望渲染成 button還是一個(gè)svg的方塊就看你的喜歡了。這個(gè)就叫做自定義渲染器。這里我們先簡(jiǎn)單寫一個(gè)固定的Dom的渲染器占位。到后面實(shí)現(xiàn)的時(shí)候我在展開處理。
const generator = ast => (observed, dom) => {
    // 重新渲染
    let input = dom.querySelector('input')
    if (!input) {
        input = document.createElement('input')
        input.setAttribute('value', observed.message)
        input.addEventListener('keyup', function () {
            observed.message = this.value
        })
        dom.appendChild(input)
    }
    let button = dom.querySelector('button')
    if (!button) {
        console.log('create button')
        button = document.createElement('button')
        button.addEventListener('click', () => {
            return config.methods.click.apply(observed)
        })
        dom.appendChild(button)
    }
    button.innerText = observed.message
}