
Mybatis 的工作原理,寫得太好了!

來源:cnblogs.com/scuury/p/10371246.html
近來想寫一個mybatis的分頁插件,但是在寫插件之前肯定要了解一下mybatis具體的工作原理吧,于是邊參考別人的博客,邊看源碼就開干了。
核心部件:
SqlSession
Executor
StatementHandler
ParameterHandler
ResultSetHandler
TypeHandler
MappedStatement
Configuration
在分析工作原理之前,首先看一下我的mybatis全局配置文件
<?xml version="1.0" encoding="UTF-8" ?>
<!DOCTYPE configuration
PUBLIC "-//mybatis.org//DTD Config 3.0//EN"
"http://mybatis.org/dtd/mybatis-3-config.dtd">
<configuration>

    <environments default="development">
        <environment id="development">

            <transactionManager type="JDBC" />

            <dataSource type="POOLED">
                <property name="driver" value="com.mysql.jdbc.Driver" />
                <property name="url"
                    value="jdbc:mysql://localhost:3306/test?characterEncoding=utf-8" />
                <property name="username" value="root" />
                <property name="password" value="123456" />
            </dataSource>
        </environment>
    </environments>
    <mappers>
       <mapper  resource="sqlMapper/userMapper.xml"/>
    </mappers>
</configuration>
第一步:創(chuàng)建一個sqlSessionFactory
在了解如何創(chuàng)建sqlSessionFactory之前,先看一下mybatis是如何加載全局配置文件,解析xml文件生成Configuration的
public Configuration parse() {
    if (parsed) {
      throw new BuilderException("Each XMLConfigBuilder can>    }
    parsed = true;
    parseConfiguration(parser.evalNode("/configuration"));
    return configuration;
  }
private void parseConfiguration(XNode root) {
    try {
      propertiesElement(root.evalNode("properties")); //issue #117 read properties first
      typeAliasesElement(root.evalNode("typeAliases"));
      pluginElement(root.evalNode("plugins"));
      objectFactoryElement(root.evalNode("objectFactory"));
      objectWrapperFactoryElement(root.evalNode("objectWrapperFactory"));
      settingsElement(root.evalNode("settings"));
      environmentsElement(root.evalNode("environments")); // read it after objectFactory and objectWrapperFactory issue #631
      databaseIdProviderElement(root.evalNode("databaseIdProvider"));
      typeHandlerElement(root.evalNode("typeHandlers"));
      mapperElement(root.evalNode("mappers"));
    } catch (Exception e) {
      throw new BuilderException("Error parsing SQL Mapper Configuration. Cause: " + e, e);
    }
  }
在上面的第二段代碼中有一句
mapperElement(root.evalNode("mappers"));
剛好我們的全局配置文件中有一個mapper的配置,由此可見,mapperElemet()方法是解析mapper映射文件的,具體代碼如下
private void mapperElement(XNode parent) throws Exception {
    if (parent != null) {
      for (XNode child : parent.getChildren()) {
        if ("package".equals(child.getName())) {
          String mapperPackage = child.getStringAttribute("name");
          configuration.addMappers(mapperPackage);
        } else {
          String resource = child.getStringAttribute("resource");
          String url = child.getStringAttribute("url");
          String mapperClass = child.getStringAttribute("class");
          if (resource != null && url == null && mapperClass == null) {//進入該判斷
            ErrorContext.instance().resource(resource);
            InputStream inputStream = Resources.getResourceAsStream(resource);
            XMLMapperBuilder mapperParser = new XMLMapperBuilder(inputStream, configuration, resource, configuration.getSqlFragments());
            mapperParser.parse();
          } else if (resource == null && url != null && mapperClass == null) {
            ErrorContext.instance().resource(url);
            InputStream inputStream = Resources.getUrlAsStream(url);
            XMLMapperBuilder mapperParser = new XMLMapperBuilder(inputStream, configuration, url, configuration.getSqlFragments());
            mapperParser.parse();
          } else if (resource == null && url == null && mapperClass != null) {
            Class<?> mapperInterface = Resources.classForName(mapperClass);
            configuration.addMapper(mapperInterface);
          } else {
            throw new BuilderException("A mapper element may>          }
        }
      }
    }
  }
根據(jù)以上代碼可以分析,在寫mapper映射文件的地址時不僅可以寫成resource,還可以寫成url和mapperClass的形式,由于我們用的是resource,所以直接進入第一個判斷,最后解析mapper映射文件的方法是
private void configurationElement(XNode context) {
    try {
      String namespace = context.getStringAttribute("namespace");
      if (namespace.equals("")) {
          throw new BuilderException("Mapper's namespace cannot be empty");
      }
      builderAssistant.setCurrentNamespace(namespace);
      cacheRefElement(context.evalNode("cache-ref"));
      cacheElement(context.evalNode("cache"));
      parameterMapElement(context.evalNodes("/mapper/parameterMap"));
      resultMapElements(context.evalNodes("/mapper/resultMap"));
      sqlElement(context.evalNodes("/mapper/sql"));
      buildStatementFromContext(context.evalNodes("select|insert|update|delete"));
    } catch (Exception e) {
      throw new BuilderException("Error parsing Mapper XML. Cause: " + e, e);
    }
  }
其中具體解析每一個sql語句節(jié)點的是
buildStatementFromContext(context.evalNodes("select|insert|update|delete"));
進入這個方法一層層深究,最后到這里可以知道MappedStatement是由builderAssistant(即MapperBuildAssistant)創(chuàng)建的。
public void parseStatementNode() {
    ...
    builderAssistant.addMappedStatement(id, sqlSource, statementType, sqlCommandType,
        fetchSize, timeout, parameterMap, parameterTypeClass, resultMap, resultTypeClass,
        resultSetTypeEnum, flushCache, useCache, resultOrdered,
        keyGenerator, keyProperty, keyColumn, databaseId, langDriver, resultSets);
  }
最后進入方法addMappedStatement(),mappedStatement最后以id為鍵保存在了Configuration中的一個map變量mappedStatements中。
public MappedStatement addMappedStatement(
      String id,
      SqlSource sqlSource,
      StatementType statementType,
      SqlCommandType sqlCommandType,
      Integer fetchSize,
      Integer timeout,
      String parameterMap,
      Class<?> parameterType,
      String resultMap,
      Class<?> resultType,
      ResultSetType resultSetType,
      boolean flushCache,
      boolean useCache,
      boolean resultOrdered,
      KeyGenerator keyGenerator,
      String keyProperty,
      String keyColumn,
      String databaseId,
      LanguageDriver lang,
      String resultSets) {

    if (unresolvedCacheRef) throw new IncompleteElementException("Cache-ref not yet resolved");

    id = applyCurrentNamespace(id, false);
    boolean isSelect = sqlCommandType == SqlCommandType.SELECT;

    MappedStatement.Builder statementBuilder = new MappedStatement.Builder(configuration, id, sqlSource, sqlCommandType);
    statementBuilder.resource(resource);
    statementBuilder.fetchSize(fetchSize);
    statementBuilder.statementType(statementType);
    statementBuilder.keyGenerator(keyGenerator);
    statementBuilder.keyProperty(keyProperty);
    statementBuilder.keyColumn(keyColumn);
    statementBuilder.databaseId(databaseId);
    statementBuilder.lang(lang);
    statementBuilder.resultOrdered(resultOrdered);
    statementBuilder.resulSets(resultSets);
    setStatementTimeout(timeout, statementBuilder);

    setStatementParameterMap(parameterMap, parameterType, statementBuilder);
    setStatementResultMap(resultMap, resultType, resultSetType, statementBuilder);
    setStatementCache(isSelect, flushCache, useCache, currentCache, statementBuilder);

    MappedStatement statement = statementBuilder.build();
    configuration.addMappedStatement(statement);
    return statement;
  }
最后回到我們的創(chuàng)建sqlSessionFactory上,之前的一切都是為了生成一個sqlSessionFactory服務(wù)的
public SqlSessionFactory build(InputStream inputStream, String environment, Properties properties) {
    try {
      XMLConfigBuilder parser = new XMLConfigBuilder(inputStream, environment, properties);
      return build(parser.parse());
    } catch (Exception e) {
      throw ExceptionFactory.wrapException("Error building SqlSession.", e);
    } finally {
      ErrorContext.instance().reset();
      try {
        inputStream.close();
      } catch (IOException e) {
        // Intentionally ignore. Prefer previous error.
      }
    }
  }

  public SqlSessionFactory build(Configuration config) {
    return new DefaultSqlSessionFactory(config);
  }
從上面的代碼可以看出最后是通過以Configuration為參數(shù)build()方法生成DefautSqlSessionFactory。
第二步:創(chuàng)建sqlSession
 public SqlSession openSession() {
    return openSessionFromDataSource(configuration.getDefaultExecutorType(), null, false);
  }
private SqlSession openSessionFromDataSource(ExecutorType execType, TransactionIsolationLevel level, boolean autoCommit) {
    Transaction tx = null;
    try {
      final Environment environment = configuration.getEnvironment();
      final TransactionFactory transactionFactory = getTransactionFactoryFromEnvironment(environment);
      tx = transactionFactory.newTransaction(environment.getDataSource(), level, autoCommit);
      final Executor executor = configuration.newExecutor(tx, execType);
      return new DefaultSqlSession(configuration, executor, autoCommit);
    } catch (Exception e) {
      closeTransaction(tx); // may have fetched a connection so lets call close()
      throw ExceptionFactory.wrapException("Error opening session.  Cause: " + e, e);
    } finally {
      ErrorContext.instance().reset();
    }
  }
//返回一個SqlSession,默認使用DefaultSqlSession
 public DefaultSqlSession(Configuration configuration, Executor executor, boolean autoCommit) {
    this.configuration = configuration;
    this.executor = executor;
    this.dirty = false;
    this.autoCommit = autoCommit;
  }
executor在這一步得到創(chuàng)建,具體的使用在下一步。
第三步:執(zhí)行具體的sql請求
在我的代碼里執(zhí)行的是
User user = sqlSession.selectOne("test.findUserById", 1);
具體到里面的方法就是
public <E> List<E> selectList(String statement, Object parameter, RowBounds rowBounds) {
    try {
     //1.根據(jù)Statement Id,在mybatis 配置對象Configuration中查找和配置文件相對應(yīng)的MappedStatement
      MappedStatement ms = configuration.getMappedStatement(statement);
      //2. 將查詢?nèi)蝿?wù)委托給MyBatis 的執(zhí)行器 Executor
      List<E> result = executor.query(ms, wrapCollection(parameter), rowBounds, Executor.NO_RESULT_HANDLER);
      return result;
    } catch (Exception e) {
      throw ExceptionFactory.wrapException("Error querying database.  Cause: " + e, e);
    } finally {
      ErrorContext.instance().reset();
    }
  }
在這里通過statementId拿到了我們在第一步存在map里面的MappedStatement。在這里引用參考博客的一句話:
SqlSession根據(jù)Statement ID, 在mybatis配置對象Configuration中獲取到對應(yīng)的MappedStatement對象,然后調(diào)用mybatis執(zhí)行器來執(zhí)行具體的操作。
再繼續(xù)看query()和queryFromDatabase()這兩個方法
@SuppressWarnings("unchecked")
  public <E> List<E> query(MappedStatement ms, Object parameter, RowBounds rowBounds, ResultHandler resultHandler, CacheKey key, BoundSql boundSql) throws SQLException {
    ErrorContext.instance().resource(ms.getResource()).activity("executing a query").object(ms.getId());
    if (closed) throw new ExecutorException("Executor was closed.");
    if (queryStack == 0 && ms.isFlushCacheRequired()) {
      clearLocalCache();
    }
    List<E> list;
    try {
      queryStack++;
      list = resultHandler == null ? (List<E>) localCache.getObject(key) : null;
      if (list != null) {
        handleLocallyCachedOutputParameters(ms, key, parameter, boundSql);
      } else {
        list = queryFromDatabase(ms, parameter, rowBounds, resultHandler, key, boundSql);
      }
    } finally {
      queryStack--;
    }
    if (queryStack == 0) {
      for (DeferredLoad deferredLoad : deferredLoads) {
        deferredLoad.load();
      }
      deferredLoads.clear(); // issue #601
      if (configuration.getLocalCacheScope() == LocalCacheScope.STATEMENT) {
        clearLocalCache(); // issue #482
      }
    }
    return list;
  }
private <E> List<E> queryFromDatabase(MappedStatement ms, Object parameter, RowBounds rowBounds, ResultHandler resultHandler, CacheKey key, BoundSql boundSql) throws SQLException {
    List<E> list;
    localCache.putObject(key, EXECUTION_PLACEHOLDER);
    try {
      list = doQuery(ms, parameter, rowBounds, resultHandler, boundSql);
    } finally {
      localCache.removeObject(key);
    }
    localCache.putObject(key, list);
    if (ms.getStatementType() == StatementType.CALLABLE) {
      localOutputParameterCache.putObject(key, parameter);
    }
    return list;
  }
在這兩個方法里面會為當前的查詢創(chuàng)建一個緩存key,如果緩存中沒有值,直接從數(shù)據(jù)庫中讀取,執(zhí)行查詢后將得到的list結(jié)果放入緩存之中。
緊接著看doQuery()在SimpleExecutor類中重寫的方法
public <E> List<E> doQuery(MappedStatement ms, Object parameter, RowBounds rowBounds, ResultHandler resultHandler, BoundSql boundSql) throws SQLException {
    Statement stmt = null;
    try {
      Configuration configuration = ms.getConfiguration();
      StatementHandler handler = configuration.newStatementHandler(wrapper, ms, parameter, rowBounds, resultHandler, boundSql);
      stmt = prepareStatement(handler, ms.getStatementLog());
      return handler.<E>query(stmt, resultHandler);
    } finally {
      closeStatement(stmt);
    }
  }
Statement連接對象就是在這里創(chuàng)建的,因此Executor的作用之一就是創(chuàng)建Statement了,創(chuàng)建完后又把Statement丟給StatementHandler返回List查詢結(jié)果。
接下來再看一下這里的兩個方法prepareStatement()和query()的具體實現(xiàn)
private Statement prepareStatement(StatementHandler handler, Log statementLog) throws SQLException {
    Statement stmt;
    Connection connection = getConnection(statementLog);
    stmt = handler.prepare(connection);
    handler.parameterize(stmt);
    return stmt;
  }
public <E> List<E> query(Statement statement, ResultHandler resultHandler) throws SQLException {
    PreparedStatement ps = (PreparedStatement) statement;
    ps.execute();
    return resultSetHandler.<E> handleResultSets(ps);
  }
prepareStatement()是創(chuàng)建Statement的具體實現(xiàn)方法,調(diào)用parameterize()對創(chuàng)建的Statement對象設(shè)置參數(shù),即為我們設(shè)為占位符的地方賦上指定的參數(shù),parameterize()方法再深入進去就是調(diào)用ParameterHandler的setParameters()方法具體賦值了。
這里的query()是調(diào)用了ResultSetHandler的handleResultSets(Statement) 方法。作用就是把ResultSet結(jié)果集對象轉(zhuǎn)換成List類型的集合。
總結(jié)以上步驟就是:
根據(jù)具體傳入的參數(shù),動態(tài)地生成需要執(zhí)行的SQL語句,用BoundSql對象表示
為當前的查詢創(chuàng)建一個緩存Key
緩存中沒有值,直接從數(shù)據(jù)庫中讀取數(shù)據(jù)
執(zhí)行查詢,返回List 結(jié)果,然后 將查詢的結(jié)果放入緩存之中
根據(jù)既有的參數(shù),創(chuàng)建StatementHandler對象來執(zhí)行查詢操作
將創(chuàng)建Statement傳遞給StatementHandler對象,調(diào)用parameterize()方法賦值
調(diào)用StatementHandler.query()方法,返回List結(jié)果集
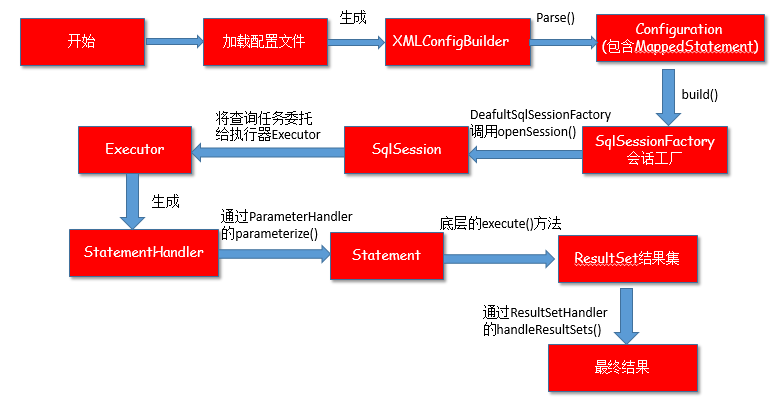
總結(jié)
以上三個步驟所有流程大體可以用一張圖來總結(jié)
參考
https://blog.csdn.net/luanlouis/article/details/40422941
https://blog.csdn.net/a412451848/article/details/82723754
(完)
喜歡就三連呀
關(guān)注 Stephen,一起學(xué)習(xí),一起成長。