
ELK學(xué)習(xí)筆記一[環(huán)境安裝問題解決]
說明
本文將演示如何在Mac系統(tǒng)中,安裝ELK環(huán)境(elasticsearch、logstash、kibana)。在Mac上安裝ELK非常簡單,直接使用brew命令安裝即可。同時網(wǎng)絡(luò)上存在非常多的文章。但是99%的文章,都沒有提出其中遇到的問題或者沒提及到需要注意的事項。本文將重點介紹這些細節(jié)。
同時希望你在閱讀本文的時候,耐心閱讀。即使不能幫助你遇到的問題,但是可以大致給你一個解決思路。
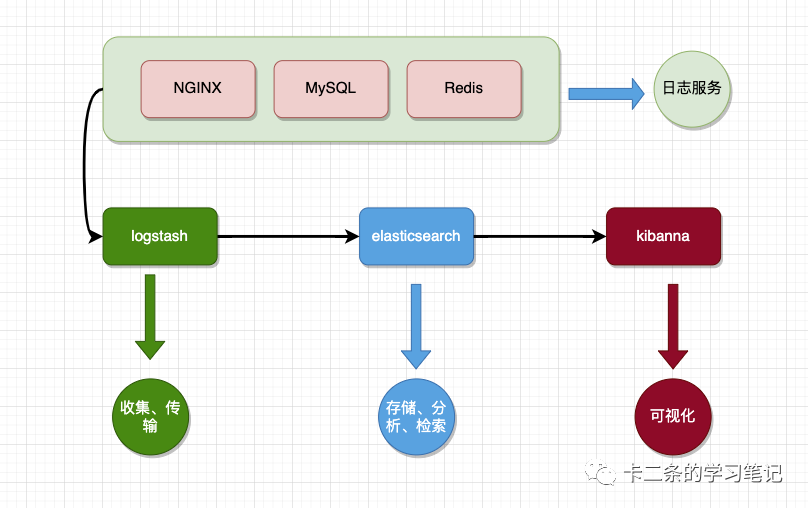
ELK邏輯圖
提前準備
由于brew默認使用的源非常慢,推薦使用該倉庫的配置。Gitee地址。
開始安裝
假設(shè)你已經(jīng)做好了所有的準備工作。本文就開始從安裝環(huán)境開始講起了。
版本檢測
在使用ELK時,一定要注意版本的一致性,否則安裝好之后會出現(xiàn)服務(wù)之間版本不兼容問題。如果你不是很清楚的情況,你可以使用下面的鏈接,來確保版本是否一致。強烈推薦版本號保持一致。例如你的elasticsearch安裝的版本是7.10.2,推薦你在安裝logstash時也選擇一樣的版本號7.10.2。官網(wǎng)版本號總結(jié)。在本文的演示中,我安裝的版本是7.10.2。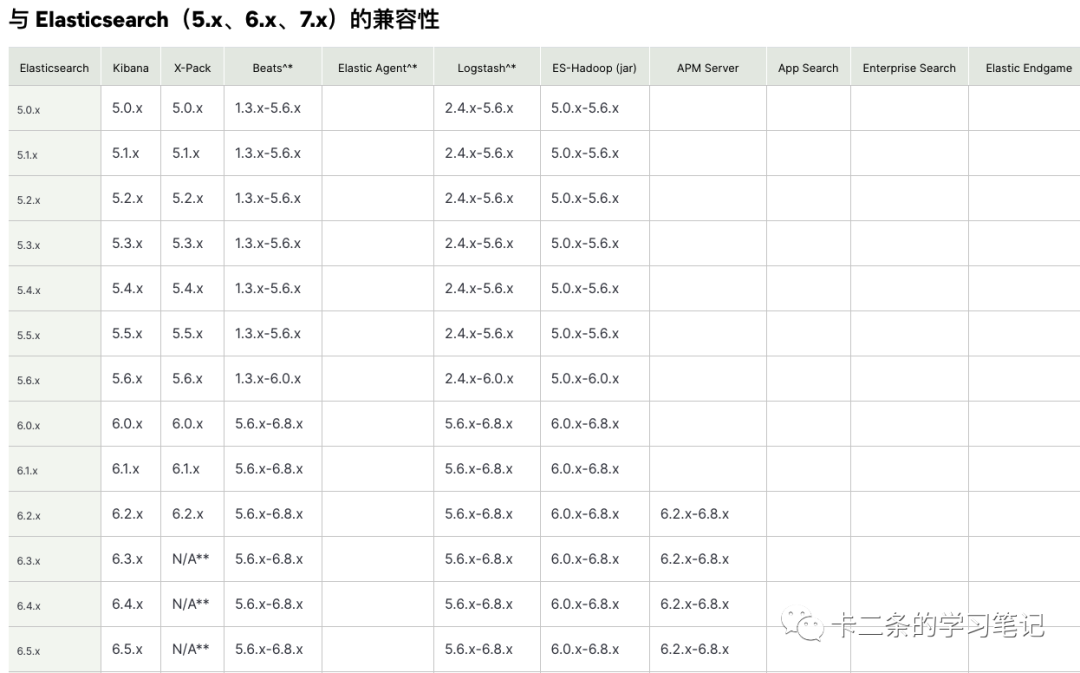
brew版本檢測
我們檢測brew源的elasticsearch版本號,安裝的其他服務(wù)就以該服務(wù)為基準,選擇對應(yīng)的版本號。通過使用brew info elasticsearch命令,我們可以查看到elasticsearch的版本號,以及對應(yīng)的依賴(下面?的部分就是對應(yīng)的依賴包),如果你查詢到是? ,你使用brew install gradle@6命令安裝即可,其他的依賴包同樣按照此方式安裝即可。
?olddog@192??~brew?info?elasticsearch
elasticsearch:?stable?7.10.2?(bottled)
Distributed?search?&?analytics?engine
https://www.elastic.co/products/elasticsearch
Deprecated?because?it?is?switching?to?an?incompatible?license.?Check?out?`opensearch`?instead!
/usr/local/Cellar/elasticsearch/7.10.2?(156?files,?113.5MB)?*
??Poured?from?bottle?on?2022-02-20?at?15:46:47
From:?https://mirrors.ustc.edu.cn/homebrew-core.git/Formula/elasticsearch.rb
License:?Apache-2.0
==>?Dependencies
Build:?gradle@6??
Required:?openjdk??
==>?Caveats
Data:????/usr/local/var/lib/elasticsearch/
Logs:????/usr/local/var/log/elasticsearch/elasticsearch_kert.log
Plugins:?/usr/local/var/elasticsearch/plugins/
Config:??/usr/local/etc/elasticsearch/
To?have?launchd?start?elasticsearch?now?and?restart?at?login:
??brew?services?start?elasticsearch
Or,?if?you?don't?want/need?a?background?service?you?can?just?run:
??elasticsearch
==>?Analytics
install:?2,484?(30?days),?6,719?(90?days),?34,351?(365?days)
install-on-request:?2,477?(30?days),?6,702?(90?days),?34,273?(365?days)
build-error:?344?(30?days)
安裝elasticsearch
確認好安裝的版本是7.10.2,那我們就可以開始安裝。
//?安裝elasticsearch
brew?install?elasticsearch

//?啟動服務(wù)
brew?services?start?elasticsearch
安裝好之后,相關(guān)的數(shù)據(jù)目錄以及配置目錄都會顯示出來,大致如下:
Data:????/usr/local/var/lib/elasticsearch/
Logs:????/usr/local/var/log/elasticsearch/elasticsearch_kert.log
Plugins:?/usr/local/var/elasticsearch/plugins/
Config:??/usr/local/etc/elasticsearch/
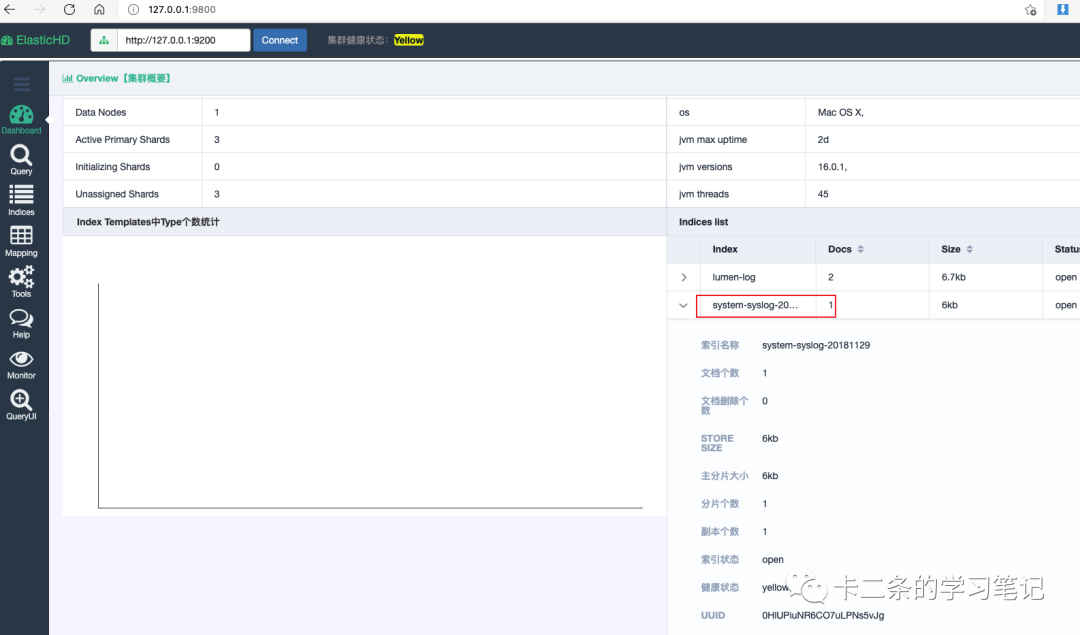
安裝好之后,我們本地服務(wù)就啟動正常了。直接訪問http://127.0.0.1:9200/,出現(xiàn)下面的信息,表示我們的elasticsearch,完全安裝成功。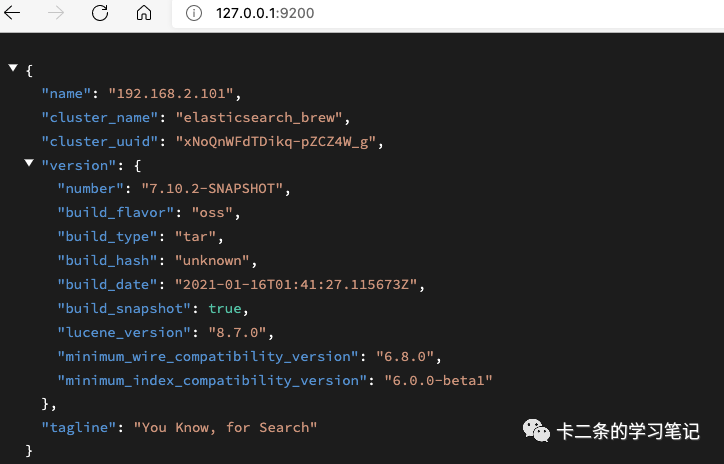 同時,我們也可以使用一個開源軟件查看。這里就不講怎么使用了,軟件地址。在安裝好之后,我們先執(zhí)行一下這個命令,向elasticsearch中些一條數(shù)據(jù)。
url?-H?"Content-Type:?application/json"?-XPOST?'http://127.0.0.1:9200/system-syslog-20181129/system-syslog'?-d?'{"first_name":"yuan","last_name":"mu","age":88,"about":"I?love?to?wo?qu","interests":["sport","huangya"]}'
》?{"_index":"system-syslog-20181129","_type":"system-syslog","_id":"sF0mHX8BBJXzIcLuz4gM","_version":1,"result":"created","_shards":{"total":2,"successful":1,"failed":0},"_seq_no":0,"_primary_term":1}
kibanna版本檢測
下面的信息和elasticsearch其實都一樣的,對 ? 和 ? 的對應(yīng)的依賴包,如果是提示? 使用brew安裝就可以了。下面的命令,我們可以看到版本號和elasticsearch的版本號是一致的,都是7.10.2,因此我們直接安裝就可以了。
olddog@192??brew?info?kibana
kibana:?stable?7.10.2?(bottled),?HEAD
Analytics?and?search?dashboard?for?Elasticsearch
https://www.elastic.co/products/kibana
Deprecated?because?it?is?switching?to?an?incompatible?license!
/usr/local/Cellar/kibana/7.10.2?(29,154?files,?300.8MB)?*
??Poured?from?bottle?on?2022-02-20?at?18:22:35
From:?https://mirrors.ustc.edu.cn/homebrew-core.git/Formula/kibana.rb
License:?Apache-2.0
==>?Dependencies
Build:[email protected]??,?yarn??
Required:?node@10??
==>?Options
--HEAD
安裝kibanna
//?安裝服務(wù)
brew?install?kibana

//?啟動服務(wù)
brew?services?start?kibana
安裝好之后,相關(guān)的數(shù)據(jù)目錄以及配置目錄都會顯示出來,對應(yīng)的目錄都在/usr/local/Cellar/kibana/7.10.2下面。可以通過http://127.0.0.1:5601/app/home,看到下面的預(yù)覽圖,說明我們已經(jīng)安裝成功。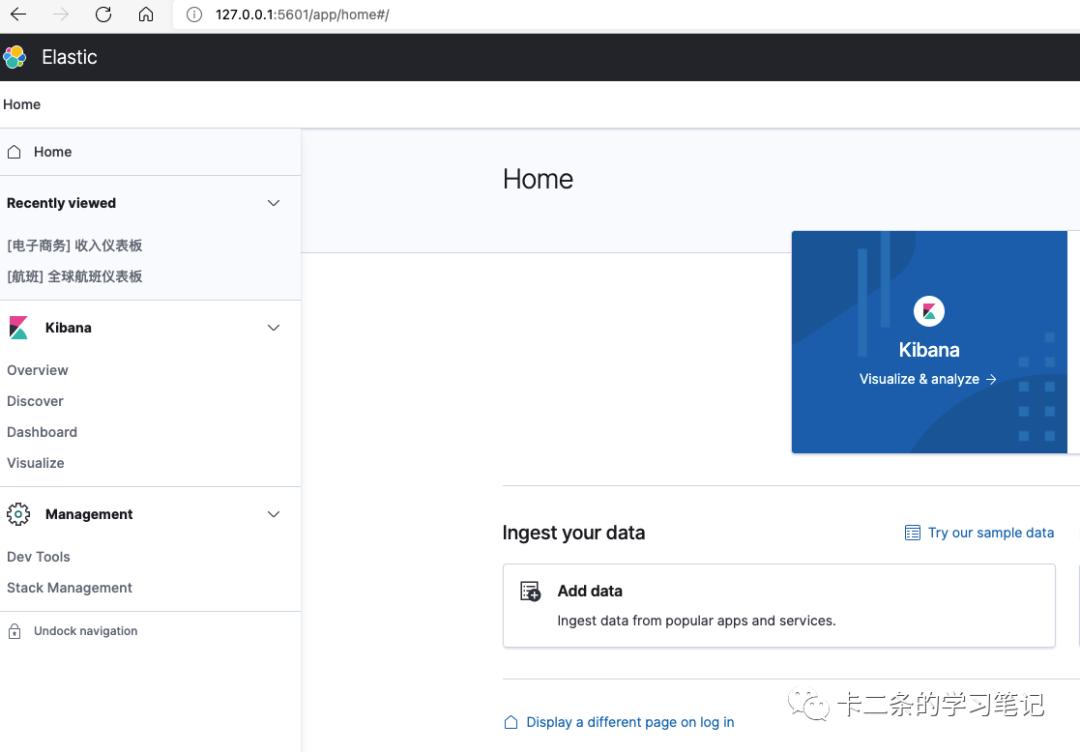
logstash版本檢測
同樣是用上面提到的命令檢測一下服務(wù)版本。
olddog@192???brew?info?logstash
logstash:?stable?7.13.1?(bottled),?HEAD
Tool?for?managing?events?and?logs
https://www.elastic.co/products/logstash
Not?installed
From:?https://mirrors.ustc.edu.cn/homebrew-core.git/Formula/logstash.rb
License:?Apache-2.0
==>?Dependencies
Required:?openjdk@11??
==>?Options
我們可以看到對應(yīng)的版本是7.13.1,并且官方文檔也提到elasticsearch的版本7.10.2是支持logstash對應(yīng)的版本號6.8.x-7.17.x。
實際情況在使用brew安裝后,是沒法使用的。一直提示版本不兼容,無法建立連接。大致如下的錯誤信息:
Elasticsearch?setup?did?not?complete?normally,?please?review?previously?logged?errors
Unable?to?connect?to?Elasticsearch?at?http://localhost:9200
因此該服務(wù),我們就推薦使用源碼安裝。其實,上面的兩個服務(wù)也可以通過源碼安裝,只不過麻煩一點。
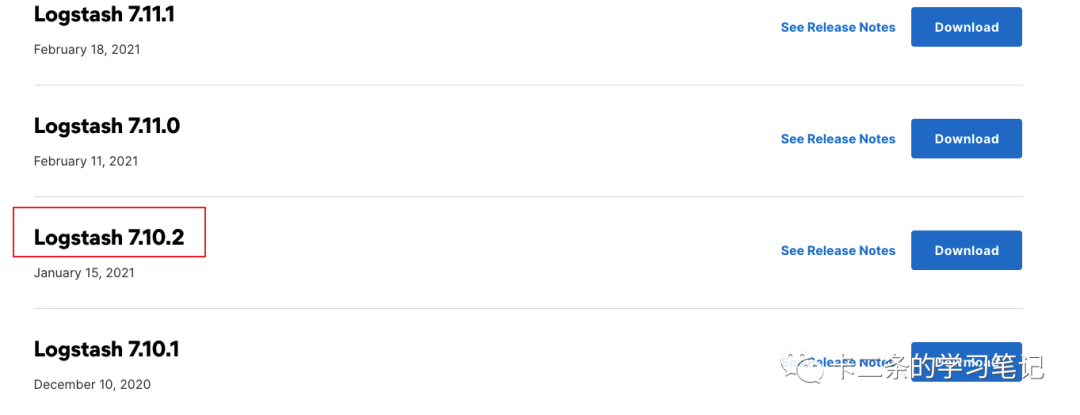
下載源碼
默認官網(wǎng)打開,是顯示最新的版本,你可以自己選擇對應(yīng)的版本號。注意下圖畫框的部分。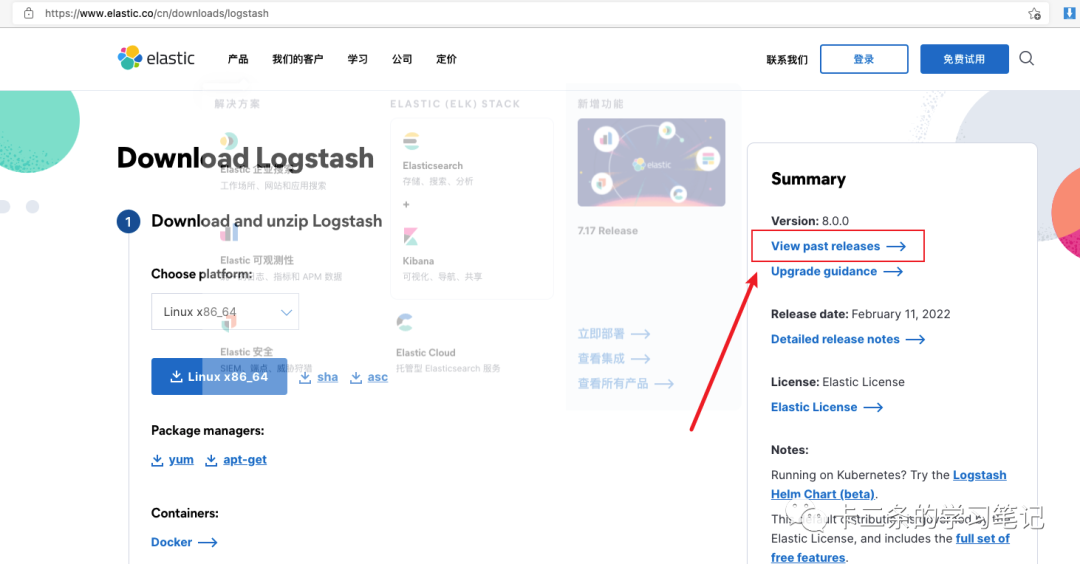
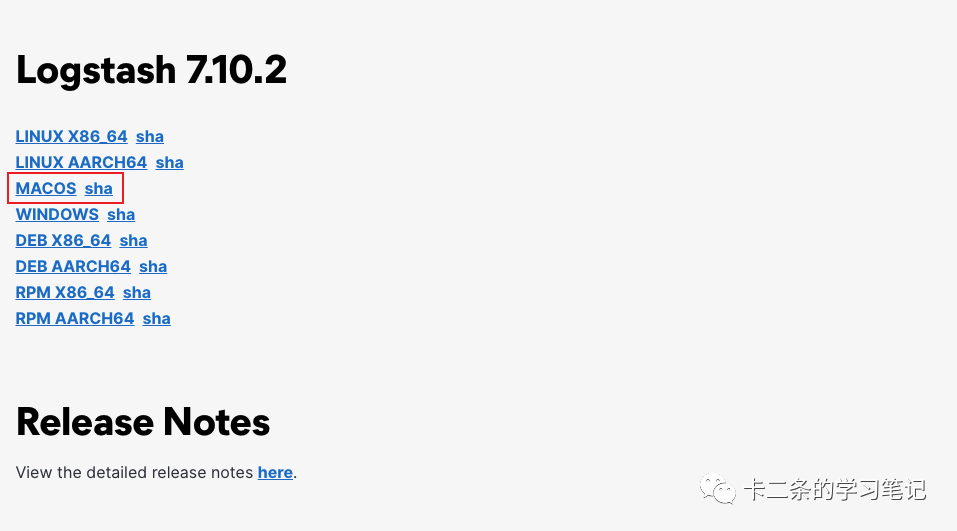 這里得到的是一個.sha512的文件,是一種加密文件,但不是源碼安裝文件。可以直接使用該鏈接下載
https://artifacts.elastic.co/downloads/logstash/logstash-oss-7.10.2-darwin-x86_64.tar.gz,仔細的你會發(fā)現(xiàn),7-10-2其實就是版本號,如果你安裝的不是該版本,直接替換一下就好了。
//?解壓
tar?-zxvf?logstash-7.10.2-darwin-x86_64.tar.gz

進入可執(zhí)行目錄,下面的文件就是可執(zhí)行文件
cd?/Users/xx/Downloads/logstash-7.10.2/bin?&&?ll
-rw-r--r--???1?kert??staff???221??1?13??2021?benchmark.bat
-rwxr-xr-x???1?kert??staff???152??1?13??2021?benchmark.sh
-rwxr-xr-x???1?kert??staff???377??1?13??2021?cpdump
-rwxr-xr-x???1?kert??staff??1025??1?13??2021?dependencies-report
-rw-r--r--???1?kert??staff???225??1?13??2021?ingest-convert.bat
-rwxr-xr-x???1?kert??staff???155??1?13??2021?ingest-convert.sh
-rwxr-xr-x???1?kert??staff??2287??1?13??2021?logstash
-rwxr-xr-x???1?kert??staff???357??1?13??2021?logstash-keystore
-rw-r--r--???1?kert??staff???257??1?13??2021?logstash-keystore.bat
-rwxr-xr-x???1?kert??staff???358??1?13??2021?logstash-plugin
-rw-r--r--???1?kert??staff???260??1?13??2021?logstash-plugin.bat
-rw-r--r--???1?kert??staff??2442??1?13??2021?logstash.bat
-rwxr-xr-x???1?kert??staff??5876??1?13??2021?logstash.lib.sh
-rwxr-xr-x???1?kert??staff??1124??1?13??2021?pqcheck
-rw-r--r--???1?kert??staff???475??1?13??2021?pqcheck.bat
-rwxr-xr-x???1?kert??staff??1125??1?13??2021?pqrepair
-rw-r--r--???1?kert??staff???476??1?13??2021?pqrepair.bat
-rwxr-xr-x???1?kert??staff???623??1?13??2021?ruby
-rw-r--r--???1?kert??staff??1768??1?13??2021?setup.bat
任意創(chuàng)建一個.conf文件, 我這里名字就叫log.conf。我這里以Laravel日志為例,向log.conf寫入如下的內(nèi)容:
input?{
???file?{
??????path?=>?["你laravel日志目錄/laravel.log"]
????}
??}
output?{
???elasticsearch?{
??????hosts?=>?["http://127.0.0.1:9200"]
??????index?=>?"lumen-log"
???}
}
然后執(zhí)行logstash log.conf就可以了,正常的情況下會看到這樣的內(nèi)容:
[2022-02-22T00:32:17,071][INFO?][logstash.javapipeline????][main]?Pipeline?started?{"pipeline.id"=>"main"}
[2022-02-22T00:32:17,151][INFO?][filewatch.observingtail??][main][7dda28e49683b585e296fde30e6578464882b8bfd26fca79cbad0d53581f074c]?START,?creating?Discoverer,?Watch?with?file?and?sincedb?collections
[2022-02-22T00:32:17,165][INFO?][logstash.agent???????????]?Pipelines?running?{:count=>1,?:running_pipelines=>[:main],?:non_running_pipelines=>[]}
[2022-02-22T00:32:17,582][INFO?][logstash.agent???????????]?Successfully?started?Logstash?API?endpoint?{:port=>9600}
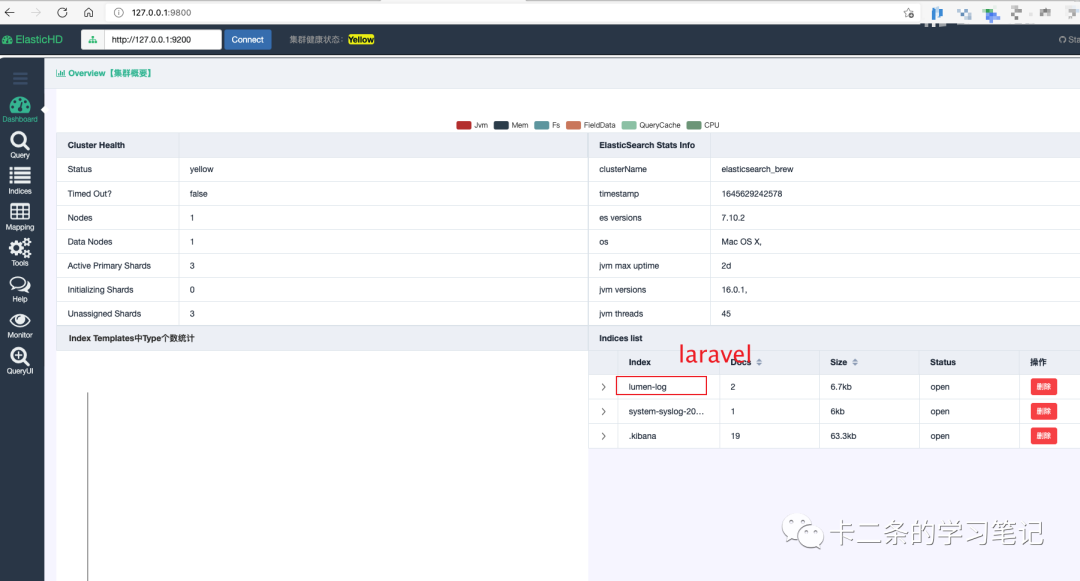
執(zhí)行完之后,過一會elasticsearch,里面應(yīng)該就有數(shù)據(jù)了。我們依舊使用ElasticHD進行查看。
總結(jié)
上面的步驟就演示完,如何安裝ELK。其實都很簡單。最重要的是要注意版本號一致。