
簡單實現(xiàn)一個Virtual DOM
前言
之前寫過一篇文章為什么使用v-for時必須添加唯一的key?[1],但是解釋的不是很深刻,其實真正的原因還需要從Virtual DOM的實現(xiàn)上解釋;本篇文章從簡單實現(xiàn)一個Virtual DOM入手,去解釋一下Virtual DOM的實現(xiàn)思想;
源碼地址:github[2]
思路
1.定義一個類,用來創(chuàng)建 DOM 元素(element.js);
2.比較新舊 DOM 樹的差異(diff.js);
3.將差異的部分渲染到DOM樹即只渲染變化了的部分(patch.js)
virtural-dom的模型
一個DOM標簽所需的基本元素
標簽名 節(jié)點屬性,包含樣式,屬性,事件 子節(jié)點 標識id
{
    // 標簽名
    tagName: 'div',
    // 屬性
    properties: {
        // 樣式
        style: {},
    },
    // 子節(jié)點
    children: [],
    // 唯一標識
    key: 1,
}
過程
一. 用javascript對象表示DOM結(jié)構(gòu)
為了實現(xiàn)這個需求,下面使用element.js。
原理:
1.根據(jù) tagName 使用 document.createElement創(chuàng)建元素
2.根據(jù) props 使用 setAttribute給元素設(shè)置屬性
3.根據(jù) innerHtml 使用 document.createTextNode 渲染文本節(jié)點
4.根據(jù)是否有 children (子元素) 去遞歸渲染
5.最后使用appendChild將創(chuàng)建的元素插入到頁面中
然后代碼和使用方式如下
element.js
class Element {
    constructor(tagName, ...args) {
        this.tagName = tagName;
        // 判斷下面還有沒有子元素
        if(Array.isArray(args[0])) {
            this.props = {};
            this.children = args[0];
        } else {
            this.props = args[0];
            this.children = args[1];
        }
        this.key = this.props.key || void 0;
    }
    render() {
        // 創(chuàng)建一個元素
        const $dom = document.createElement(this.tagName);
        // 給元素加上所有的屬性
        for(const proKey in this.props) {
            $dom.setAttribute(proKey, this.props[proKey]);
        }
        // 如果存在子節(jié)點
        if(this.children) {
            this.children.forEach(child => {
                // 如果子元素還包含子元素,則遞歸
                if(child instanceof Element) {
                    $dom.appendChild(child.render());
                } else {
                    $dom.appendChild(document.createTextNode(child))
                }
            });
        }
        return $dom;
    }
};
export default Element;
const tree = new Element('div', {classname: 'div'}, [
new Element('h1', {style: 'color: red;'},['Hello, This is my Vdom library']),
new Element('ul', [
new Element('li', ['1111']),
new Element('li', ['2222']),
])
]);
const $dom = tree.render();
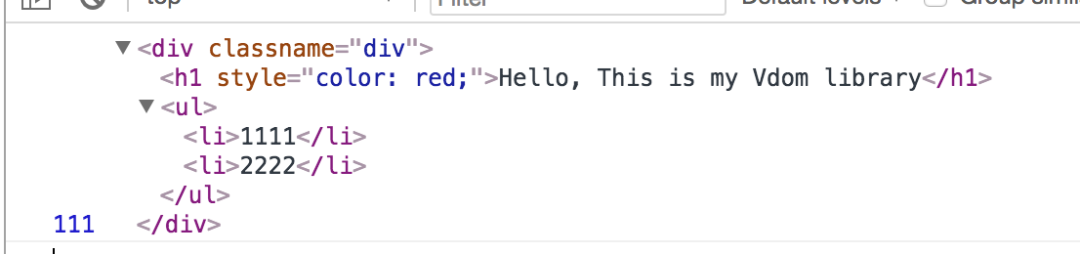
console.log(111, $dom);
這跟vue的render方法很相似
return h('div', {
        style: {
            background: '#fff',
        },
        class: {
            'content': true,
        },
        on: {
            click: () => {

            },
            mouseenter: () => {

            },
            mouseleave: () => {

            },
        },
    }, [
        h('p', {}, '文本')
    ])
vue中也是把template解析成render模板進行渲染的;
二. 比較新舊 DOM樹的差異
差異類型
對DOM的操作也就是對節(jié)點的增刪改查操作,當前定義了如下幾種類型
patch.NODE_DELETE = 'NODE_DELETE'; // 節(jié)點被刪除
patch.NODE_TEXT_MODIFY = 'NODE_TEXT_MODIFY'; // 文本節(jié)點被更改
patch.NODE_REPLACE = 'NODE_REPLACE'; // 節(jié)點被替代
patch.NODE_ADD = 'NODE_ADD'; // 添加節(jié)點
patch.NODE_ATTRIBUTE_MODIFY = 'NODE_ATTRIBUTE_MODIFY'; // 更新屬性
patch.NODE_ATTRIBUTE_ADD = 'NODE_ATTRIBUTE_ADD'; // 添加屬性
patch.NODE_ATTRIBUTE_DELETE = 'NODE_ATTRIBUTE_DELETE'; // 刪除屬性
深度優(yōu)先遍歷,記錄差異
首先簡單解釋一下什么是深度優(yōu)先遍歷和廣度優(yōu)先遍歷:
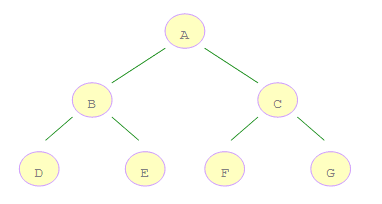
對于一顆二叉樹,深度優(yōu)先搜索(Depth First Search)是沿著樹的深度遍歷樹的節(jié)點,盡可能深的搜索樹的分支。以上面二叉樹為例,深度優(yōu)先搜索的順序為:ABDECFG。怎么實現(xiàn)這個順序呢 ?深度優(yōu)先搜索二叉樹是先訪問根結(jié)點,然后遍歷左子樹接著是遍歷右子樹,因此我們可以利用堆棧的先進后出的特點,現(xiàn)將右子樹壓棧,再將左子樹壓棧,這樣左子樹就位于棧頂,可以保證結(jié)點的左子樹先與右子樹被遍歷。
廣度優(yōu)先搜索(Breadth First Search),又叫寬度優(yōu)先搜索或橫向優(yōu)先搜索,是從根結(jié)點開始沿著樹的寬度搜索遍歷,上面二叉樹的遍歷順序為:ABCDEFG.
接下來簡單說一下比較的過程
1.比較屬性的變化
遍歷舊的屬性,找到被刪除和修改的情況
新屬性中不存在,舊屬性存在,屬性被刪除 新舊屬性中都存在,但是值不同: 屬性值被修改 遍歷新元素的屬性,找到添加的屬性
2.比較子元素的變化
3.比較innerHTML的變化
使用pathes 來存儲差異
完整代碼如下 diff.js
import patch from './patch';
function diff(oldTree, newTree) {
    const patches = {};
    const index = {
        value: 0,
    }
    dfsWalk(oldTree, newTree, index, patches);
    return patches;
}
// 比較屬性的變化
function diffProps(oldProps, newProps, index, currentIndexPatches) {
    // 遍歷舊的屬性,找到被刪除和修改的情況
    for (const propKey in oldProps) {
        // 新屬性中不存在,舊屬性存在,屬性被刪除
        if (!newProps.hasOwnProperty(propKey)) {
            currentIndexPatches.push({
                type: patch.NODE_ATTRIBUTE_DELETE,
                key: propKey,
            })
        } else if (newProps[propKey] !== oldProps[propKey]) {
            // 新舊屬性中都存在,但是值不同: 屬性被修改
            currentIndexPatches.push({
                type: patch.NODE_ATTRIBUTE_MODIFY,
                key: propKey,
                alue: newProps[propKey],
            })
        }
    }

    // 遍歷新元素,找到添加的部分
    for (const propKey in newProps) {
        // 舊屬性中不存在,新屬性中存在: 添加屬性
        if (!oldProps.hasOwnProperty(propKey)) {
            currentIndexPatches.push({
                type: patch.NODE_ATTRIBUTE_ADD,
                key: propKey,
                value: newProps[propKey]
            })
        }
    }
}
// 順序比較子元素的變化
function diffChildren(oldChildren, newChildren, index, currentIndexPatches, patches) {
    const currentIndex = index.value;
    if (oldChildren.length < newChildren.length) {
        // 有元素被添加
        let i = 0;
        for (; i < oldChildren.length; i++) {

            index.value++;
            dfsWalk(oldChildren[i], newChildren[i], index, patches)
        }
        for (; i < newChildren.length; i++) {
            currentIndexPatches.push({
                type: patch.NODE_ADD,
                value: newChildren[i]
            })
        }
    } else {
        // 對比新舊子元素的變化
        for(let i = 0; i< oldChildren.length; i++) {
            index.value++;
            dfsWalk(oldChildren[i], newChildren[i], index, patches)
        }
    }
}
// 比較innerHTML的變化
function dfsWalk(oldNode, newNode, index, patches) {
    const currentIndex = index.value;
    const currentIndexPatches = [];
    if(newNode === undefined) {
        // 節(jié)點被移除
        currentIndexPatches.push({
            type: patch.NODE_DELETE,
        })
    } else if(typeof oldNode === 'string' && typeof newNode === 'string') {
        // 文本節(jié)點被修改
        if(oldNode !== newNode) {
            currentIndexPatches.push({
                type: patch.NODE_TEXT_MODIFY,
                value: newNode,
            })
        }
    } else if(oldNode.tagName === newNode.tagName && oldNode.key === newNode.key) {
        // 同時根據(jù)tagName和key來進行對比
        diffProps(oldNode.props, newNode.props, index, currentIndexPatches);
        diffChildren(oldNode.children, newNode.children, index, currentIndexPatches, patches);
    } else {
        currentIndexPatches.push({
            type: patch.NODE_REPLACE,
            value: newNode,
        })
    }
    if(currentIndexPatches.length > 0) {
        patches[currentIndex] = currentIndexPatches;
    }
}

export default diff;
需要注意的是,因為tagName是重復(fù)的,不能用這個進行對比,所以需要給子節(jié)點加上唯一的標識key,列表對比的時候,使用key進行對比,這樣才能復(fù)用老的DOM樹上的節(jié)點;
為了實現(xiàn)深度優(yōu)先遍歷,記錄差異,這里使用列表計算法
求最小的插入,刪除操作的組合;這個問題抽象出來其實是字符串的最小編輯距離問題(Edition Distance[3]),最常見的解決算法是 Levenshtein Distance[4],通過動態(tài)規(guī)劃求解。我們需要優(yōu)化一下最常見的操作;具體的實現(xiàn)算法也很多;
當前實現(xiàn)的簡單 Virtual DOM, 并沒有實現(xiàn)如果是數(shù)組,會優(yōu)先使用key去做對比; 下面大致從Vue虛擬DOM的Diff算法實現(xiàn)的角度去解釋一下之前的一篇文章為什么使用v-for時必須添加唯一的key?[5]
vue和react的虛擬DOM的Diff算法大致相同,其核心是基于兩個簡單的假設(shè):
兩個相同的組件產(chǎn)生類似的DOM結(jié)構(gòu),不同的組件產(chǎn)生不同的DOM結(jié)構(gòu)。 同一層級的一組節(jié)點,他們可以通過唯一的id進行區(qū)分。基于以上這兩點假設(shè),使得虛擬DOM的Diff算法的復(fù)雜度從O(n^3)降到了O(n)。
引用React’s diff algorithm[6]中的例子:
 當某一層有很多相同的節(jié)點時,也就是列表節(jié)點時,Diff算法的更新過程默認情況下也是遵循以上原則。比如以下這個情況:
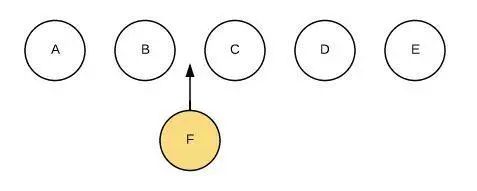 我們希望可以在B和C之間加一個F,Diff算法默認執(zhí)行起來是這樣的:
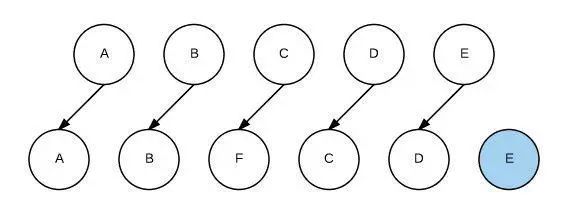 即把C更新成F,D更新成C,E更新成D,最后再插入E,是不是很沒有效率?
所以我們需要使用key來給每個節(jié)點做一個唯一標識,Diff算法就可以正確的識別此節(jié)點,找到正確的位置區(qū)插入新的節(jié)點。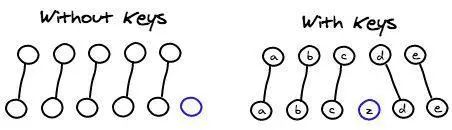
所以一句話,key的作用主要是為了高效的更新虛擬DOM。另外vue中在使用相同標簽名元素的過渡切換時,也會使用到key屬性,其目的也是為了讓vue可以區(qū)分它們,否則vue只會替換其內(nèi)部屬性而不會觸發(fā)過渡效果。
三.將差異的部分渲染到DOM樹即只渲染變化了的部分
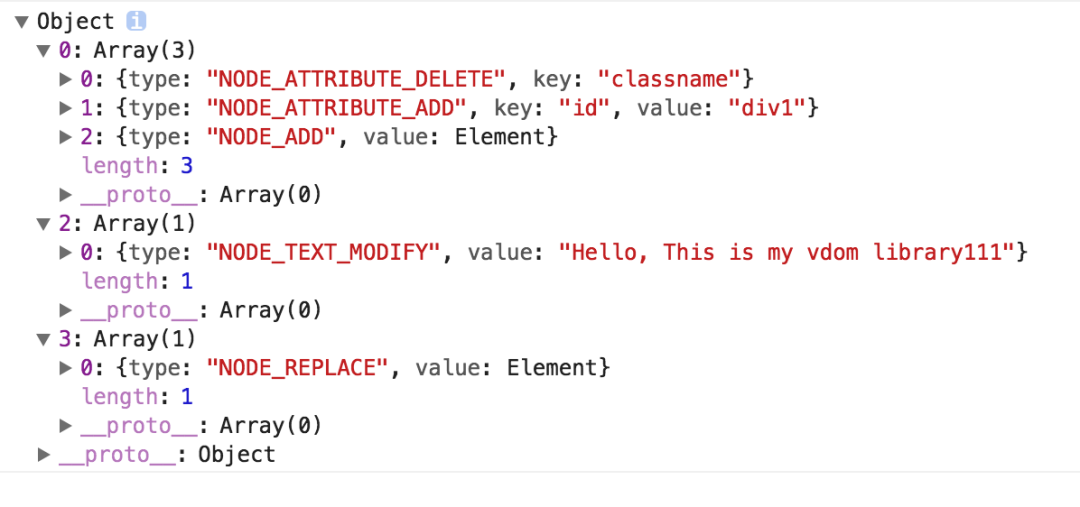
通過深度優(yōu)先遍歷,記錄差異 patches,最后需要根據(jù)patches進行DOM操作; paches記錄了差異的類型;大致數(shù)據(jù)結(jié)構(gòu)如下:
實現(xiàn)該過程的完整代碼如下:
patch.js
function patch($dom, patches) {
    const index = {
        value: 0,
    }
    dfsWalk($dom, index, patches);
}
patch.NODE_DELETE = 'NODE_DELETE'; // 節(jié)點被刪除
patch.NODE_TEXT_MODIFY = 'NODE_TEXT_MODIFY'; // 文本節(jié)點被更改
patch.NODE_REPLACE = 'NODE_REPLACE'; // 節(jié)點被替代
patch.NODE_ADD = 'NODE_ADD'; // 添加節(jié)點
patch.NODE_ATTRIBUTE_MODIFY = 'NODE_ATTRIBUTE_MODIFY'; // 更新屬性
patch.NODE_ATTRIBUTE_ADD = 'NODE_ATTRIBUTE_ADD'; // 添加屬性
patch.NODE_ATTRIBUTE_DELETE = 'NODE_ATTRIBUTE_DELETE'; // 刪除屬性

// 根據(jù)不同類型的差異對當前節(jié)點進行 DOM 操作:
function dfsWalk($node, index, patches, isEnd = false) {
    if (patches[index.value]) {
        patches[index.value].forEach(p => {
            switch (p.type) {
                case patch.NODE_ATTRIBUTE_MODIFY:
                    {
                        $node.setAttribute(p.key, p.value);
                        break;
                    }
                case patch.NODE_ATTRIBUTE_DELETE:
                    {
                        $node.removeAttribute(p.key, p.value);
                        break;
                    }
                case patch.NODE_ATTRIBUTE_ADD:
                    {
                        $node.setAttribute(p.key, p.value);
                        break;
                    }
                case patch.NODE_ADD:
                    {
                        $node.appendChild(p.value.render());
                        break;
                    }
                case patch.NODE_TEXT_MODIFY:
                    {
                        $node.textContent = p.value;
                        break;
                    }
                case patch.NODE_REPLACE:
                    {
                        $node.replaceWith(p.value.render());
                        break;
                    }
                case patch.NODE_DELETE:
                    {
                        $node.remove();
                        break;
                    }
                default:
                    {
                        console.log(p);
                    }

            }

        });
    }
    if (isEnd) {
        return;
    }
    if ($node.children.length > 0) {
        for (let i = 0; i < $node.children.length; i++) {
            index.value++;
            dfsWalk($node.children[i], index, patches);
        }
    } else {
        index.value++;
        dfsWalk($node, index, patches, true);
    }
};

export default patch;
最后測試一下
// 1.構(gòu)建虛擬DOM
const tree = new Element('div', {classname: 'div'}, [
    new Element('h1', {style: 'color: red;'},['Hello, This is my Vdom library']),
    new Element('ul', [
        new Element('li', ['1111']),
        new Element('li', ['2222']),
    ])
]);
// 2.通過虛擬DOM構(gòu)建真正的DOM
const $dom = tree.render();
const $app = document.querySelector('#app');
$app.replaceWith($dom);
// 3.生成新的虛擬DOM
const newTree = new Element('div', {id: 'div1'}, [
    new Element('h1', {style: 'color: red;'}, ['Hello, This is my vdom library111']),
    new Element('p', {style: 'color: blue;'}, ['extra text']),
    new Element('ul', [
        new Element('li', ['1111']),
        new Element('li', ['5555']),
        new Element('li', ['333']),
    ])
]);
// 4.比較新舊虛擬DOM樹的差異
const patches = diff(tree, newTree);
// 5.根據(jù)變化了的部分去更新DOM
patch($dom, patches);
總結(jié)
1.關(guān)鍵的幾個文件就是:element.js[7], diff.js[8], patch.js[9];
2.github上有很多Virtual DOM實現(xiàn)的例子,博主也是參考了一下其他人的實現(xiàn),感興趣的可以去搜索看一下,或者自己實現(xiàn)一個
參考
深度剖析:如何實現(xiàn)一個 Virtual DOM 算法[10] Vue2.0 v-for 中 :key 到底有什么用?[11] React’s diff algorithm[12] react源碼解析[13]
參考資料
為什么使用v-for時必須添加唯一的key?: https://juejin.im/post/5aae19aa6fb9a028d4445d1a
[2]github: https://github.com/funnycoderstar/simple-virtual-dom
[3]Edition Distance: https://en.wikipedia.org/wiki/Edit_distance
[4]Levenshtein Distance: https://en.wikipedia.org/wiki/Levenshtein_distance
[5]為什么使用v-for時必須添加唯一的key?: https://juejin.im/post/5aae19aa6fb9a028d4445d1a
[6]Permanent Link to React’s diff algorithm: https://calendar.perfplanet.com/2013/diff/
[7]element.js: https://github.com/funnycoderstar/simple-virtual-dom/blob/master/lib/element.js
[8]diff.js: https://github.com/funnycoderstar/simple-virtual-dom/blob/master/lib/diff.js
[9]patch.js: https://github.com/funnycoderstar/simple-virtual-dom/blob/master/lib/patch.js
[10]深度剖析:如何實現(xiàn)一個 Virtual DOM 算法: https://github.com/livoras/blog/issues/13
[11]Vue2.0 v-for 中 :key 到底有什么用?: https://www.zhihu.com/question/61064119/answer/183717717
[12]Permanent Link to React’s diff algorithm: https://calendar.perfplanet.com/2013/diff/
[13]react源碼解析: https://zhuanlan.zhihu.com/p/28697362