
Spring Boot 使用 Swagger3 生成 API 接口文檔
本文已同步至:https://cunyu1943.github.io
前言
在之前的文章中,我們已經(jīng)講了如何利用 Spring Boot 來(lái)集成 Swagger2,詳情可戳:Spring Boot 集成 Swagger2,構(gòu)建強(qiáng)大的 API 文檔[1]。但其實(shí) Swagger2 中主流的 2.9.2 自 2018 年發(fā)布后就已經(jīng)好久沒(méi)更新了,而在時(shí)隔兩年之后的 2020 年,Swagger3 終于發(fā)布了。
相比于之前的 Swagger2,Swagger3 無(wú)疑新添了更多的特點(diǎn),而相對(duì)集中地,主要集中在如下幾點(diǎn)。
支持 OpenApi 3.0.3 兼容 Swagger2 的注釋,而且進(jìn)一步豐富了 open API 3.0 的規(guī)范 支持 Webflux
既然 Swagger3 有了這么多的改變,那用法是不是還和 Swagger2 一樣呢?答案是:不一樣。
不過(guò)雖然兩者的使用方式不一樣,但是總體流程還是差不多了,只不過(guò)有些步驟有所小變動(dòng)而已,只要你掌握了 Swagger2 的使用方法,那使用 Swagger3 起來(lái)就是需要注意小改動(dòng)就行了。那接下來(lái),我們就來(lái)看看,如何利用 Spring Boot 來(lái)集成 Swagger3,對(duì)我們的 Swagger2 進(jìn)行一次升級(jí)!
Spring Boot 集成 Swagger
創(chuàng)建 Spring Boot 項(xiàng)目
同樣的,開始之前,我們需要?jiǎng)?chuàng)建一個(gè)簡(jiǎn)單的 Spring Boot 項(xiàng)目,這里不展開講了,如果你對(duì)此還有所疑惑,可以先去熟悉下,這里建議參考我之前寫過(guò)的一篇文章:創(chuàng)建 Spring Boot 項(xiàng)目的 3 種方式[2]。
項(xiàng)目創(chuàng)建成功之后,總體結(jié)構(gòu)如下:
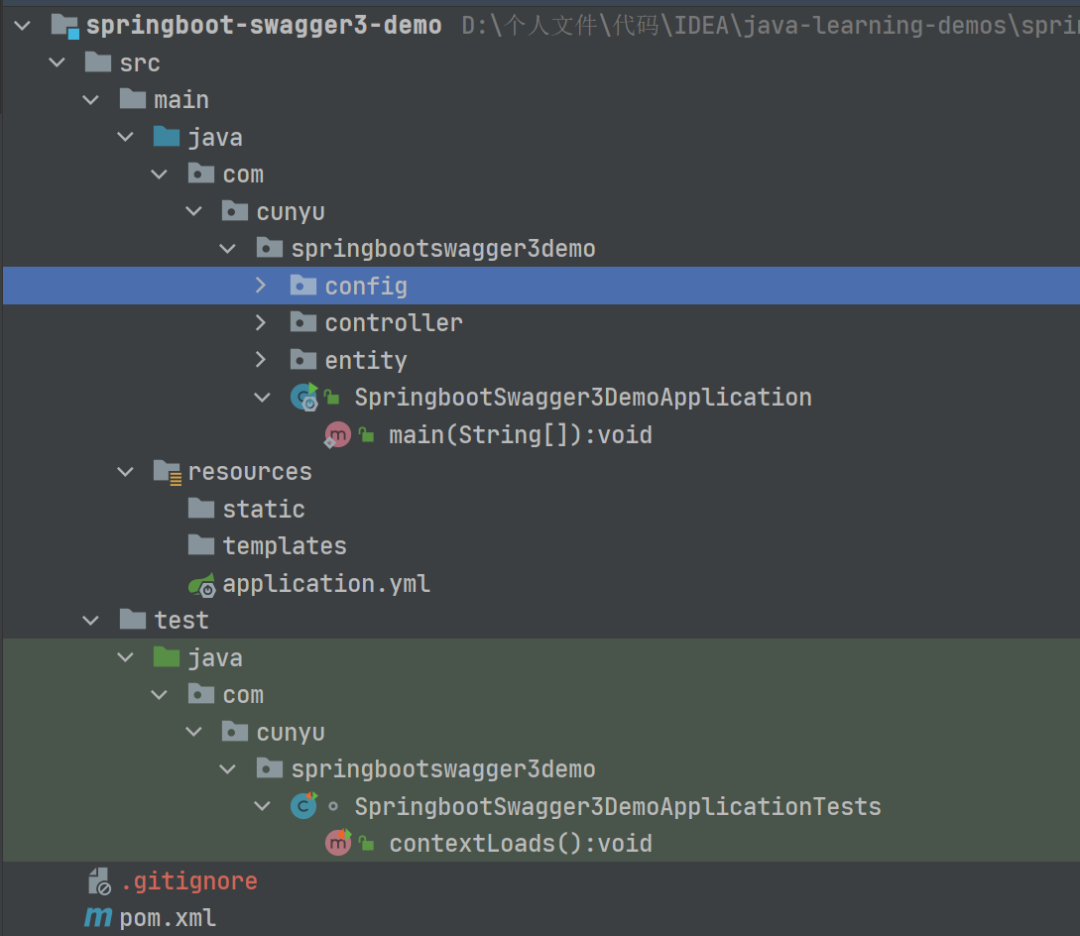
這里的 config、controller、entity 模塊是我后續(xù)加入的,所以不用理會(huì),也就是說(shuō)你創(chuàng)建好之后的項(xiàng)目是不包含這三個(gè)部分的,關(guān)于他們的用途,文章后續(xù)內(nèi)容我會(huì)講到。
引入依賴
創(chuàng)建項(xiàng)目后,在 pom.xml 文件中引入 Swagger3 的相關(guān)依賴。回憶一下,我們集成 Swagger2 時(shí),引入的依賴如下:
<dependency>
????<groupId>io.springfoxgroupId>
????<artifactId>springfox-swagger2artifactId>
????<version>2.9.2version>
dependency>

<dependency>
????<groupId>io.springfoxgroupId>
????<artifactId>springfox-swagger-uiartifactId>
????<version>2.9.2version>
dependency>
而在 Swagger3 中,我們不需要再引入兩個(gè)不同的依賴了,我們只需要引入一個(gè)依賴就足夠,具體引入的依賴如下:
<dependency>
????<groupId>io.springfoxgroupId>
????<artifactId>springfox-boot-starterartifactId>
????<version>3.0.0version>
dependency>
而這部分,Swagger2 和 Swagger3 就有所不同了,Swagger2 需要添加兩項(xiàng)不同依賴,而 Swagger3 只用添加一項(xiàng)依賴就可以了。
構(gòu)建 Swagger 配置類
為了統(tǒng)一管理 Swagger,這里還是推薦給 Swagger3 添加一個(gè)配置類。當(dāng)然這里也可以根據(jù)自己的需求,可要可不要,但總體來(lái)說(shuō)還是建議配置。
另外,在之前集成 Swagger2 的文章中,忘記了給大家說(shuō)一點(diǎn)。平常在工作中,Swagger 的使用僅限于在開發(fā)環(huán)境,而在生產(chǎn)環(huán)境中,我們是要將其移除的。這里為了靈活管理,推薦大家在項(xiàng)目配置文件 application.yml 中添加關(guān)于 Swagger 開關(guān)的配置,比如這里我添加的配置如下,true 則代表開啟 Swagger,false 則表示關(guān)閉 Swagger。
swagger:
??enabled:?true
配置完成之后,我們就需要在 Swagger 配置類中獲取 Swagger 開關(guān)的值了,關(guān)于具體用法就可以看下邊配置代碼。
package?com.cunyu.springbootswagger3demo.config;

import?org.springframework.beans.factory.annotation.Value;
import?org.springframework.context.annotation.Bean;
import?org.springframework.context.annotation.Configuration;
import?springfox.documentation.builders.ApiInfoBuilder;
import?springfox.documentation.builders.PathSelectors;
import?springfox.documentation.builders.RequestHandlerSelectors;
import?springfox.documentation.oas.annotations.EnableOpenApi;
import?springfox.documentation.service.ApiInfo;
import?springfox.documentation.service.Contact;
import?springfox.documentation.spi.DocumentationType;
import?springfox.documentation.spring.web.plugins.Docket;

import?java.util.ArrayList;

/**
?*?Created?with?IntelliJ?IDEA.
?*
?*?@author?:?村雨遙
?*?@version?:?1.0
?*?@project?:?springboot-swagger3-demo
?*?@package?:?com.cunyu.springbootswagger3demo.config
?*?@className?:?SwaggerConfig
?*?@createTime?:?2022/1/6?14:19
?*?@email?:[email protected]
?*?@微信?:?cunyu1024
?*?@公眾號(hào)?:?村雨遙
?*?@網(wǎng)站?:?https://cunyu1943.github.io
?*?@description?:
?*/

@Configuration
@EnableOpenApi
public?class?SwaggerConfig?{
????/**
?????*?用于讀取配置文件?application.properties?中?swagger?屬性是否開啟
?????*/
????@Value("${swagger.enabled}")
????Boolean?swaggerEnabled;

????@Bean
????public?Docket?docket()?{
????????return?new?Docket(DocumentationType.OAS_30)
????????????????.apiInfo(apiInfo())
????????????????//?是否開啟swagger
????????????????.enable(swaggerEnabled)
????????????????.select()
????????????????//?過(guò)濾條件,掃描指定路徑下的文件
????????????????.apis(RequestHandlerSelectors.basePackage("com.cunyu.springbootswagger3demo.controller"))
????????????????//?指定路徑處理,PathSelectors.any()代表不過(guò)濾任何路徑
????????????????//.paths(PathSelectors.any())
????????????????.build();
????}

????private?ApiInfo?apiInfo()?{
????????/*作者信息*/
????????Contact?contact?=?new?Contact("村雨遙",?"https://cunyu1943.github.io",?"[email protected]");
????????return?new?ApiInfo(
????????????????"Spring?Boot?集成?Swagger3?測(cè)試",
????????????????"Spring?Boot?集成?Swagger3?測(cè)試接口文檔",
????????????????"v1.0",
????????????????"https://cunyu1943.github.io",
????????????????contact,
????????????????"Apache?2.0",
????????????????"http://www.apache.org/licenses/LICENSE-2.0",
????????????????new?ArrayList()
????????);
????}
}
這里的配置和 Swagger2 大同小異,這里最大的區(qū)別在于加入了從配置文件中獲取 Swagger 開關(guān)的屬性。這里也可以選擇添加到 Swagger2 的配置類中,同樣通過(guò)配置文件來(lái)控制是否開啟 Swagger2。此外,還有就是 DocumentationType 屬性的不同了,Swagger2 中我們使用的是 SWAGGER_2,而在 Swagger3 中,我們使用的則是 OAS_30。其實(shí)點(diǎn)進(jìn)去 DocumentationType 的源碼我們就可以發(fā)現(xiàn),Swagger 已經(jīng)是給我們定義好的,你用的是哪一個(gè)版本的 Swagger,那我們使用的屬性值應(yīng)該選擇對(duì)應(yīng)版本。三個(gè)版本的屬性值對(duì)應(yīng)如下:
public?static?final?DocumentationType?SWAGGER_12?=?new?DocumentationType("swagger",?"1.2");
public?static?final?DocumentationType?SWAGGER_2?=?new?DocumentationType("swagger",?"2.0");
public?static?final?DocumentationType?OAS_30?=?new?DocumentationType("openApi",?"3.0");
編寫實(shí)體類
完成上面的步驟之后,我們的 Swagger 就配置好了,接下來(lái)我們就添加一個(gè)接口來(lái)看看 Swagger3 和 Swagger2 的不同。
新建實(shí)體類
這里我以一個(gè)用戶類為實(shí)例,帶有 name、age 兩個(gè)屬性,也就是本文一開始項(xiàng)目結(jié)構(gòu)截圖中 entity 包下的內(nèi)容。
package?com.cunyu.springbootswagger3demo.entity;

import?io.swagger.annotations.ApiModel;
import?io.swagger.annotations.ApiModelProperty;
import?lombok.AllArgsConstructor;
import?lombok.Data;
import?lombok.NoArgsConstructor;

/**
?*?Created?with?IntelliJ?IDEA.
?*
?*?@author?:?村雨遙
?*?@version?:?1.0
?*?@project?:?springboot-swagger3-demo
?*?@package?:?com.cunyu.springbootswagger3demo.entity
?*?@className?:?User
?*?@createTime?:?2022/1/6?11:17
?*?@email?:[email protected]
?*?@微信?:?cunyu1024
?*?@公眾號(hào)?:?村雨遙
?*?@網(wǎng)站?:?https://cunyu1943.github.io
?*?@description?:
?*/

@Data
@AllArgsConstructor
@NoArgsConstructor
@ApiModel("用戶實(shí)體類")
public?class?User?{
????@ApiModelProperty(value?=?"姓名",?required?=?true,?example?=?"村雨遙")
????private?String?name;

????@ApiModelProperty(value?=?"年齡",?required?=?true,?example?=?"20")
????private?Integer?age;
}
新建接口
這里寫了兩個(gè)接口,一個(gè)是直接傳參,另一種是通過(guò)利用創(chuàng)建的 User 實(shí)體類來(lái)傳輸,也就是項(xiàng)目結(jié)構(gòu)中 controller 包中的內(nèi)容。
package?com.cunyu.springbootswagger3demo.controller;

import?com.cunyu.springbootswagger3demo.entity.User;
import?io.swagger.annotations.Api;
import?io.swagger.annotations.ApiOperation;
import?io.swagger.annotations.ApiParam;
import?org.springframework.web.bind.annotation.PostMapping;
import?org.springframework.web.bind.annotation.RequestBody;
import?org.springframework.web.bind.annotation.RequestMapping;
import?org.springframework.web.bind.annotation.RestController;

/**
?*?Created?with?IntelliJ?IDEA.
?*
?*?@author?:?村雨遙
?*?@version?:?1.0
?*?@project?:?springboot-swagger3-demo
?*?@package?:?com.cunyu.springbootswagger3demo.controller
?*?@className?:?UserController
?*?@createTime?:?2022/1/6?11:02
?*?@email?:[email protected]
?*?@微信?:?cunyu1024
?*?@公眾號(hào)?:?村雨遙
?*?@網(wǎng)站?:?https://cunyu1943.github.io
?*?@description?:
?*/

@Api(tags?=?"測(cè)試")
@RestController
@RequestMapping("/user")
public?class?UserController?{

????@ApiOperation("測(cè)試接口1")
????@PostMapping("/show1")
????public?String?show1(@ApiParam(value?=?"姓名",?required?=?true,?example?=?"村雨遙")?@RequestBody?String?name)?{
????????return?"hello,"?+?name?+?",welcome to springboot swagger3!";
????}

????@ApiOperation("測(cè)試接口2")
????@PostMapping("/show2")
????public?String?show2(@ApiParam(value?=?"用戶對(duì)象",?required?=?true)?@RequestBody?User?user)?{
????????return?"hello,"?+?user.getName()?+?",welcome to springboot swagger3!";
????}
}
查看并測(cè)試接口
啟動(dòng)我們的項(xiàng)目,然后在瀏覽器中訪問(wèn)如下地址,就可以訪問(wèn)項(xiàng)目的接口文檔了。
http://localhost:8080/swagger-ui/index.html
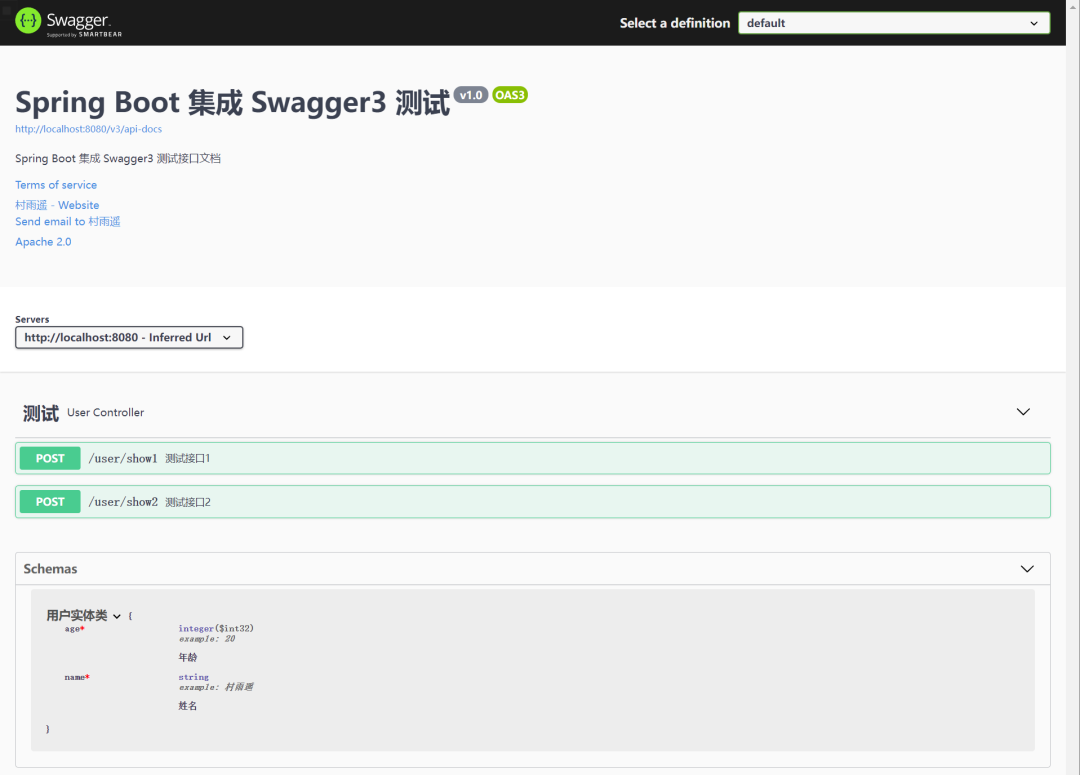
訪問(wèn)上面的地址后,如果出現(xiàn)下面的界面,則說(shuō)明集成 Swagger3 就成功了。
這里也要注意一點(diǎn),Swagger2 中的接口訪問(wèn)地址是:
http://localhost:8080/swagger-ui.html
這里 Swagger2 和 Swagger3 是不同的,這里大家一定要注意,否則可能你繼續(xù)拿著 Swagger2 接口訪問(wèn)地址來(lái)放到 Swagger3 項(xiàng)目中不適用。
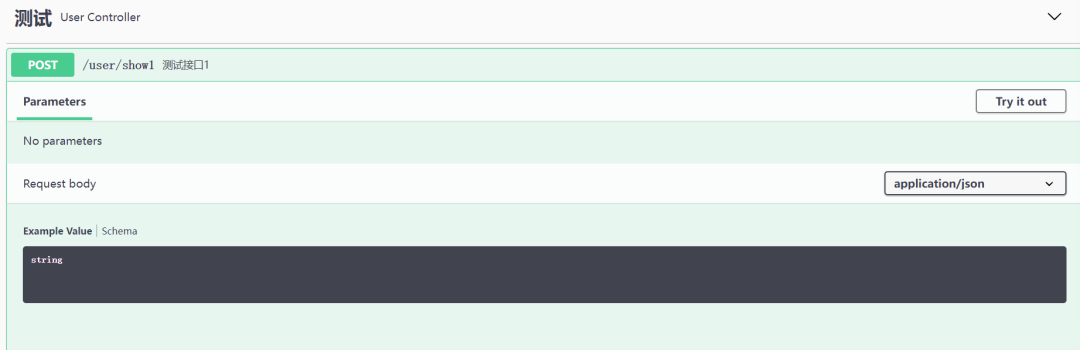
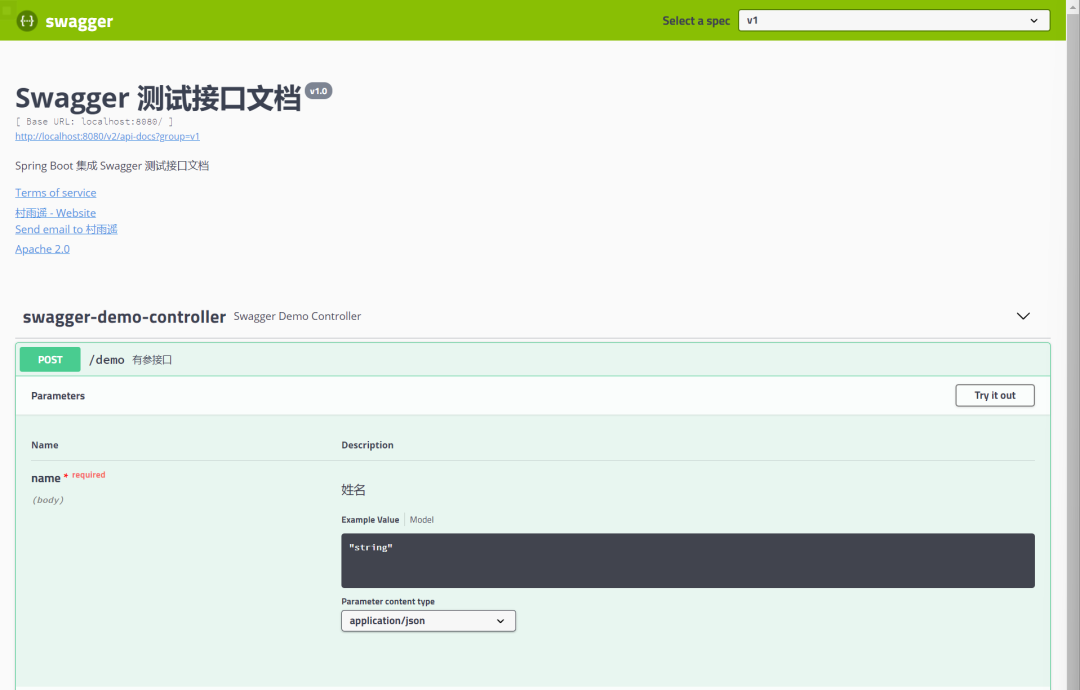
點(diǎn)開具體接口,我們以直接傳參的接口來(lái)對(duì)比 Swagger3 和 Swagger2 的區(qū)別。第一張圖是在 Swagger3 中,第二張圖是在 Swagger2 中。這里可以發(fā)現(xiàn),我們都是傳的一個(gè) name 屬性,Swagger2 中會(huì)把我們接口中參數(shù)部分 Parameters 直接標(biāo)識(shí)出來(lái),而 Swagger3 中則不會(huì),這里需要注意。
Swagger2 中接口代碼
@ApiOperation(value?=?"有參接口")
@PostMapping("demo")
public?String?demo(@ApiParam(value?=?"姓名",?required?=?true,?example?=?"村雨遙")?@RequestBody?String?name)?{
????return?"hello,"?+?name;
}
Swagger3 中接口代碼
@ApiOperation("測(cè)試接口1")
@PostMapping("/show1")
public?String?show1(@ApiParam(value?=?"姓名",?required?=?true,?example?=?"村雨遙")?@RequestBody?String?name)?{
????return?"hello,"?+?name?+?",welcome to springboot swagger3!";
}
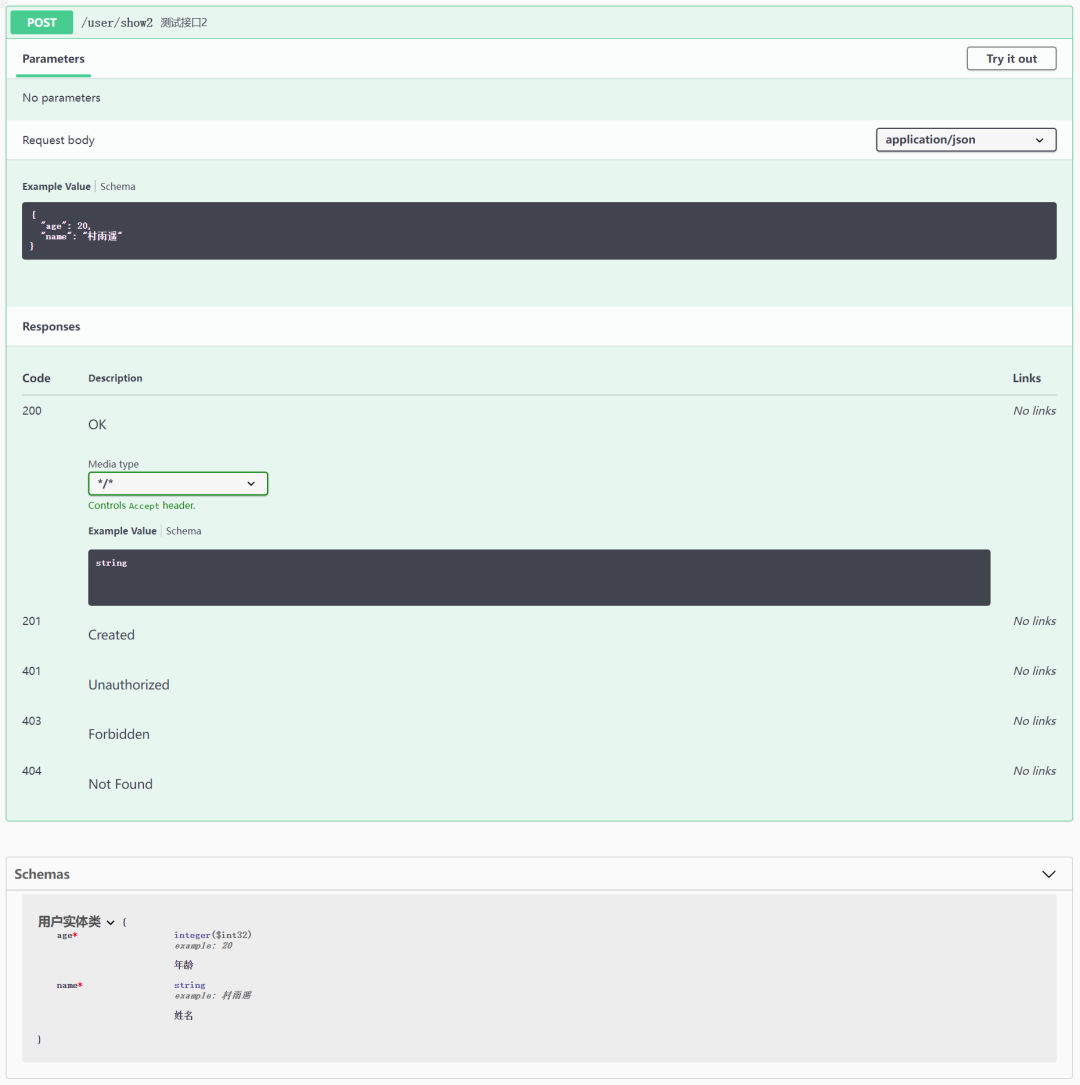
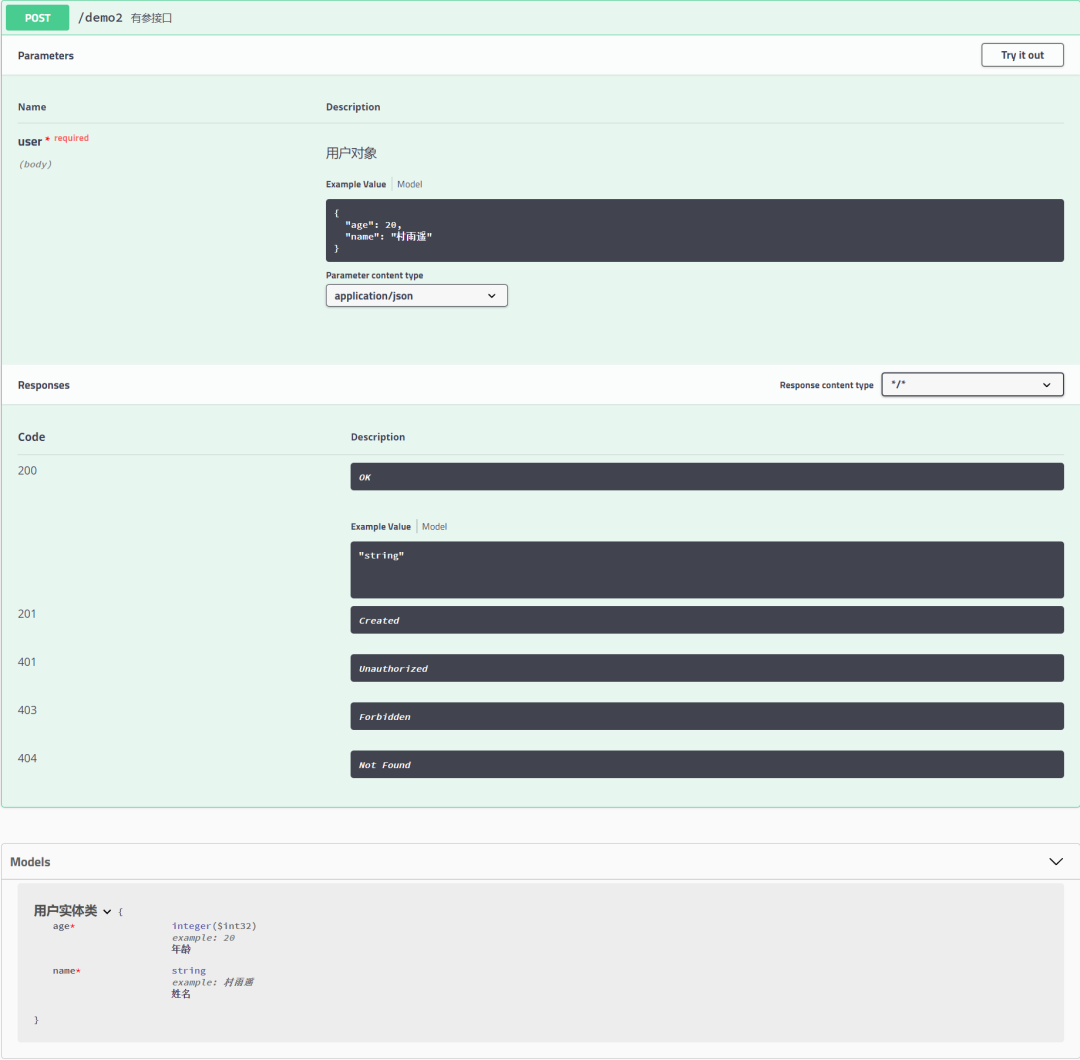
此外,我們來(lái)看 Swagger3 中的另一個(gè)接口,這里我們傳遞的是一個(gè)用戶對(duì)象,接口中它將我們?cè)O(shè)置的默認(rèn)值給傳了過(guò)來(lái)。下圖中第一張圖為 Swagger3 中的截圖,第二張圖為 Swagger2 中的截圖。同樣的,Swagger2 中的參數(shù)會(huì)在 Parameters 模塊標(biāo)識(shí)出來(lái),而 Swagger3 則不會(huì)標(biāo)識(shí)。
還有一點(diǎn)值得注意的是,Swagger 中如果傳遞的部分是對(duì)象,那么 Swagger2 會(huì)在 Models 部分進(jìn)行標(biāo)識(shí),而 Swagger3 中則是變成了 Schemas 部分,這也算是一個(gè)小變動(dòng)吧。
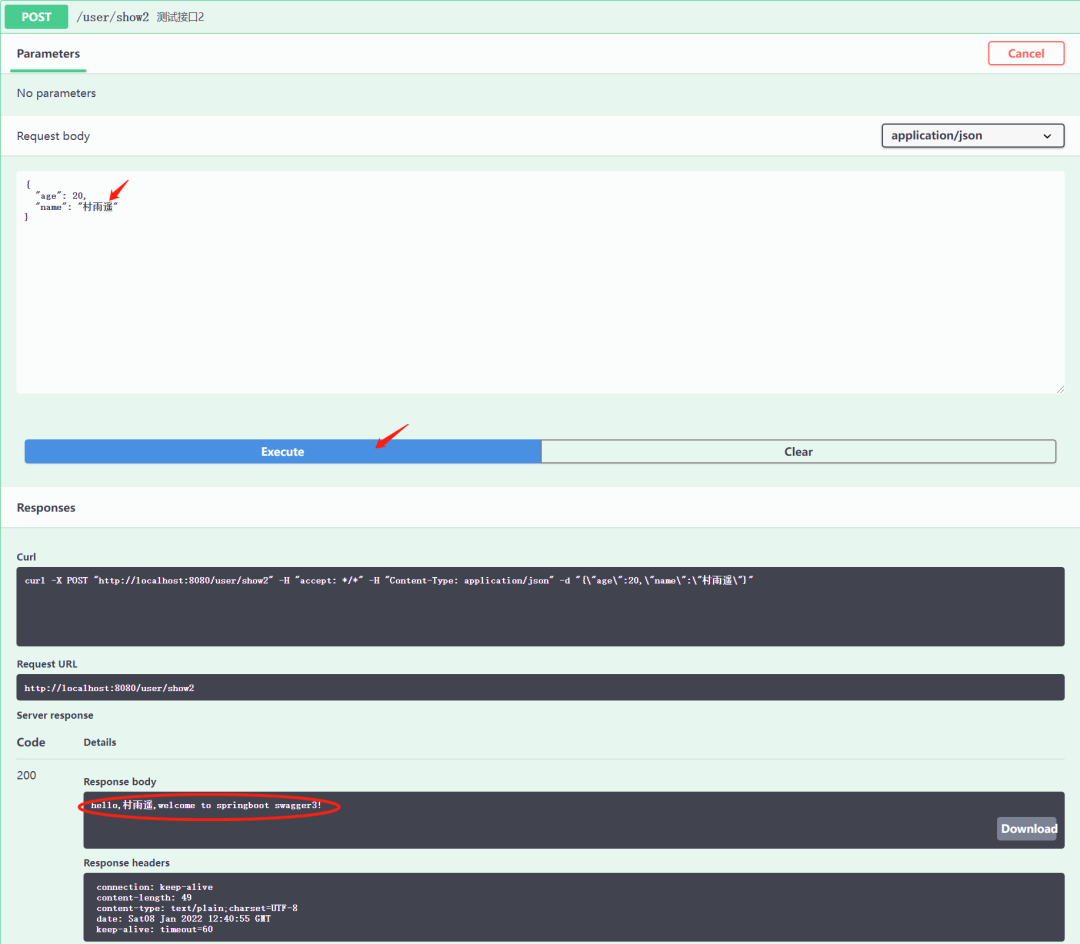
最后,我們同樣來(lái)進(jìn)行測(cè)試,測(cè)試方法同 Swagger2,點(diǎn)擊接口右上方的 Try it out,然后編輯參數(shù)的值,編輯完成后點(diǎn)擊下方的 Execute 即可查看接口調(diào)用結(jié)果。
Swagger2 VS Swagger3
經(jīng)過(guò)上面的步驟,我們就完成了 Spring Boot 集成 Swagger3 的實(shí)例測(cè)試了,而經(jīng)過(guò)對(duì)比,也總結(jié)出了 Swagger2 和 Swagger3 的區(qū)別主要體現(xiàn)在如下幾個(gè)方面:
所需依賴不同,Swagger2 需要添加兩個(gè)依賴,而 Swagger3 則只需要添加一個(gè)依賴; 啟用 Swagger 的注解不同,不知道大家有沒(méi)有發(fā)現(xiàn),無(wú)論是 Swagger2 還是 Swagger3 中的配置類,其實(shí)都是有一個(gè)注解用來(lái)啟用 Swagger 的,不同之處在于 Swagger2 中用的是 @EnableSwagger2,而 Swagger3 中則用的是@EnableOpenApi;文檔摘要信息(Docket)文件類型不同,可以發(fā)現(xiàn)在 Swagger 的配置類中,Swagger2 用的是 SWAGGER_2,而 Swagger3 中則用的是OAS_3;Swagger UI 訪問(wèn)地址不同,在 Swagger2 中,如果我們要訪問(wèn)文檔地址,需要訪問(wèn) http://localhost:8080/swagger-ui.html,而在 Swagger3 中,則是訪問(wèn)http://localhost:8080/swagger-ui/index.html;
總結(jié)
以上就是本文的所有內(nèi)容了,主要介紹了如何使用 Spring Boot 集成 Swagger3,并在此過(guò)程中對(duì)比了 Swagger2 和 Swagger3 的一些區(qū)別。總體來(lái)講,Swagger2 向 Swagger3 的升級(jí)還是比較平滑的。如果你已經(jīng)掌握熟練使用 Swagger2,那么向 Swagger3 過(guò)度也很簡(jiǎn)單,只需要注意上一部分中的一些主要區(qū)別就可以了。其他的用于描述接口的注解,還是可以按照 Swagger2 的方式使用,畢竟 Swagger3 向下兼容了 Swagger2。
代碼示例
最后,關(guān)于本文示例的代碼,我已經(jīng)上傳至 Github,需要的小伙伴可以自取:
?? 傳送門:https://github.com/cunyu1943/java-learning-demos
如果您覺(jué)得本文不錯(cuò),歡迎 Star 支持,您的關(guān)注就是我堅(jiān)持不斷更新的動(dòng)力!
參考資料
Spring Boot 集成 Swagger2,構(gòu)建強(qiáng)大的 API 文檔: https://blog.csdn.net/github_39655029/article/details/122336225
[2]創(chuàng)建 Spring Boot 項(xiàng)目的 3 種方式: https://cunyu1943.blog.csdn.net/article/details/119618308