
前端推薦!支持輔助線的開源圖片編輯器

教師節(jié)快樂呀
關(guān)注并將「趣談前端」設(shè)為星標(biāo)
每天定時(shí)分享技術(shù)干貨/優(yōu)秀開源/技術(shù)思維
今天和大家分享一款國內(nèi)大佬開發(fā)的圖片編輯器 fast-image-editor。文章將從如何使用到技術(shù)分析, 詳細(xì)和大家介紹一下這款可視化工具的實(shí)現(xiàn), 我相信大家可以從這篇文章的實(shí)現(xiàn)方案中受益匪淺。如果你覺得這個(gè)項(xiàng)目對你有幫助, 也可以在 github 上點(diǎn)個(gè) star, 支持一下作者。(文末會附上github地址)
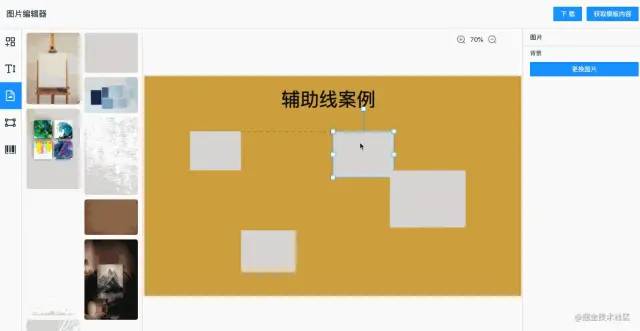
案例演示
快速啟動
我們可以按照以下方式來獲取并啟動項(xiàng)目:
git clone [email protected]:jiechud/fast-image-editor.git
yarn install || npm install
yarn dev 啟動服務(wù)
打開瀏覽器訪問
功能特性
目前已支持的功能有:
layout布局 文字編輯組件 圖片編輯組件 畫布放大縮小 畫布右鍵菜單 圖片下載 背景圖支持 畫布參考線 模版庫 導(dǎo)出圖片json
技術(shù)實(shí)現(xiàn)
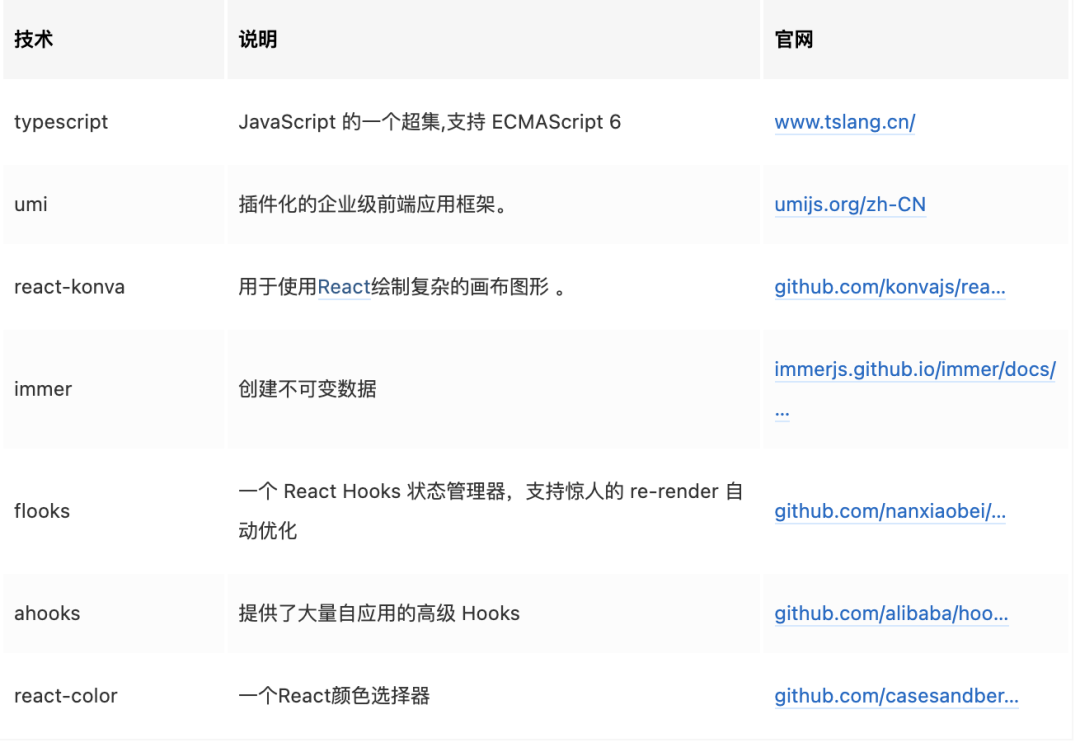
項(xiàng)目采用 React umi 開發(fā)框架,采用 typescript 編寫,圖片編輯功能用的是 react-konva,考慮后期可能核心的編輯功能整體做成一個(gè)組件,所以沒有 umi 里提供的 useModel 去做狀態(tài)處理,采用的是flooks。技術(shù)棧如下:
大部分工具類的軟件都有輔助線,方便拖拽元素的時(shí)候?qū)R,能讓我們快速的做出漂亮的圖片。輔助線實(shí)現(xiàn)過程稍微有些復(fù)雜,我們一步步說下實(shí)現(xiàn)過程。
原理講解
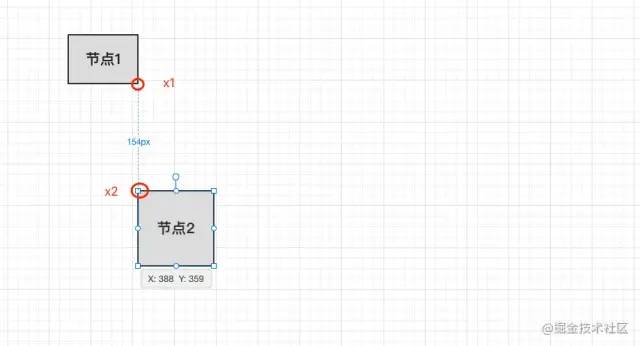
左側(cè)輔助線出現(xiàn)時(shí)機(jī):
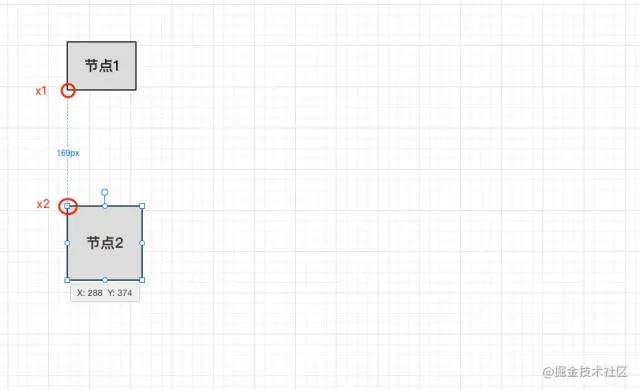
我們以節(jié)點(diǎn)2為移動的元素,通過上面的圖觀察我們可以看出,當(dāng)左側(cè)輔助線出現(xiàn)的時(shí)候,節(jié)點(diǎn)1的x坐標(biāo)和節(jié)點(diǎn)2的x坐標(biāo)相等的時(shí)候輔助線就會出現(xiàn),我們移動節(jié)點(diǎn)2的時(shí)候動態(tài)去判斷。
右側(cè)輔助線出現(xiàn)時(shí)機(jī):
我們以節(jié)點(diǎn)2為移動的元素,通過上面的圖觀察我們可以看出,當(dāng)右側(cè)輔助線出現(xiàn)的時(shí)候,節(jié)點(diǎn)1的x+width(坐標(biāo)x+節(jié)點(diǎn)的寬度)和節(jié)點(diǎn)2的x坐標(biāo)相等的時(shí)候輔助線就會出現(xiàn),我們移動節(jié)點(diǎn)2的時(shí)候動態(tài)去判斷。
輔助線規(guī)則
左側(cè)輔助線 x1(x) = x2(x) 右側(cè)輔助線 x1(x+width) = x2(x) 水平中間輔助線 x1(x+width/2) = x2(x+ width / 2) 頂部輔助線 x1(y) = x2(y) 底部輔助線 x1(y+height) = x(y) 垂直中間輔助線 x1(y+height/2) = x2(+height/2)
上面的公式我們以節(jié)點(diǎn)2為拖動的元素,節(jié)點(diǎn)1為目標(biāo)元素。當(dāng)我們以節(jié)點(diǎn)1為拖動元素,節(jié)點(diǎn)2為目標(biāo)元素,公式會有變化,大家可以自行嘗試一下。
代碼實(shí)現(xiàn)
上面我們分析出了一個(gè)節(jié)點(diǎn)的對比規(guī)則,畫布上可能會有很多節(jié)點(diǎn),讓當(dāng)前移動的節(jié)點(diǎn)去和剩下的元素去做比較。然后通過 Knova 的 layer 下的 children 獲取所有元素,并記錄位置,代碼如下:
// 獲取單個(gè)節(jié)點(diǎn)的位置信息
export const getLocationItem = (shapeObject: Konva.Shape) => {
  const id = shapeObject.id();
  const width = shapeObject.width();
  const height = shapeObject.height();
  const x = shapeObject.x();
  const y = shapeObject.y();

  const locationItem: LocationItem = {
    id,
    w: width,
    h: height,
    x, // x坐標(biāo)
    y, // y坐標(biāo)
    l: x, // 左側(cè)方向
    r: x + width, // 右側(cè)方向
    t: y,  // 頂部方向
    b: y + height, // 底部方向
    lc: x + (width / 2), // 水平居中
    tc: y + (height / 2) // 垂直居中
  }
  return locationItem;
  // console.log('locationItem=>', locationItem);
}

// 設(shè)置所有節(jié)點(diǎn)的信息
export const setLocationItems = (layer: Konva.Layer) => {
  locationItems = [];
  layer.children?.forEach(item => {
    if (item.className !== 'Transformer') {
      locationItems.push(getLocationItem(item));
    }
  });
}
在拖動節(jié)點(diǎn)的時(shí)候,調(diào)用detectionToLine方法根據(jù)計(jì)算規(guī)則畫線:
/**
 * 拖動節(jié)點(diǎn),shape代表當(dāng)前拖動的節(jié)點(diǎn)
 */
export const detectionToLine = (layer: Konva.Layer, shape: Konva.Shape) => {
  const locationItem = getLocationItem(shape); // 當(dāng)前節(jié)點(diǎn)的位置信息
  // 過濾當(dāng)前節(jié)點(diǎn),和剩下的節(jié)點(diǎn)做比較
  const compareLocations = locationItems.filter((item: LocationItem) => item.id !== locationItem.id);
  removeLines(layer); // 移除之前劃過的線
  compareLocations.forEach((item: LocationItem) => {
    if ((Math.abs(locationItem.x - item.x) <= threshold)) { // 處理左側(cè)方向
      shape.setPosition({ x: item.x, y: locationItem.y })
      addLine(layer, locationItem, item, DIRECTION.left)
    }
    if ((Math.abs(locationItem.x - item.r) <= threshold)) { // 處理右側(cè)
      shape.setPosition({ x: item.r, y: locationItem.y })
      addLine(layer, locationItem, item, DIRECTION.right);
    }

    if ((Math.abs(locationItem.lc - item.lc) <= threshold)) { // 處理水平居中
      shape.setPosition({ x: item.lc - (locationItem.w / 2), y: locationItem.y })
      addLine(layer, locationItem, item, DIRECTION.leftCenter);
    }

    // 拖動節(jié)點(diǎn)和目標(biāo)節(jié)點(diǎn)互換的判斷條件
    if ((Math.abs(locationItem.r - item.x) <= threshold)) {
      shape.setPosition({ x: item.l - locationItem.w, y: locationItem.t })
      addLine(layer,item,locationItem, DIRECTION.right)
    }
    if ((Math.abs(locationItem.r - item.r) <= threshold)) { // 右側(cè)相等
      shape.setPosition({ x: item.r - locationItem.w, y: locationItem.t })
      addLine(layer,item,locationItem, DIRECTION.right)
    }


    if ((Math.abs(locationItem.y - item.y) <= threshold)) { // 處理垂直方向頂部
      shape.setPosition({ x: locationItem.x, y: item.y })
      addLine(layer, locationItem, item, DIRECTION.top);
    }

    if ((Math.abs(locationItem.y - item.b) <= threshold)) { // 處理底部
      shape.setPosition({ x: locationItem.x, y: item.b })
      addLine(layer, locationItem, item, DIRECTION.bottom);
    }

    if ((Math.abs(locationItem.tc - item.tc) <= threshold)) { // 處理垂直頂部居中
      shape.setPosition({ x: locationItem.x, y: item.tc - (locationItem.h /2 ) })
      addLine(layer, locationItem, item, DIRECTION.topCenter);
    }

     // 拖動節(jié)點(diǎn)和目標(biāo)節(jié)點(diǎn)互換的判斷條件
    if ((Math.abs(locationItem.b - item.t) <= threshold)) { // 處理垂底部方向
      shape.setPosition({ x: locationItem.l, y: item.t - locationItem.h })
      addLine(layer,item,locationItem, DIRECTION.bottom)
    }

    if ((Math.abs(locationItem.b - item.b) <= threshold)) { // 右側(cè)相等
      shape.setPosition({ x: locationItem.l, y: item.b - locationItem.h })
      addLine(layer,item,locationItem, DIRECTION.bottom)
    }
  });
}
達(dá)到閾值,添加輔助線
我們可以看到在對比的時(shí)候有這樣的代碼:
Math.abs(locationItem.b - item.b) <= threshold)
這塊主要是用來判斷兩個(gè)節(jié)點(diǎn)之間的距離小于設(shè)定的閾值,觸發(fā)添加輔助線。
還有一段設(shè)置當(dāng)前節(jié)點(diǎn)位置的代碼,如下:
shape.setPosition({ x: locationItem.l, y: item.t - locationItem.h })
這塊的主要作用是輔助線出現(xiàn)的是,節(jié)點(diǎn)移動的位置不超過閾值,節(jié)點(diǎn)不會動。
添加輔助線
添加輔助線會傳入拖動的元素和目標(biāo)元素,以及哪個(gè)方向要出現(xiàn)輔助線。
addLine(layer, locationItem, item, DIRECTION.left)
根據(jù)拖動的元素和目標(biāo)元素以及方向計(jì)算出輔助線出現(xiàn)的位置:
/**
 *
 * @param sourceItem 拖動的圖形
 * @param targetItem 目標(biāo)圖形
 * @param targetItem 方向
 */
const getPoints = (sourceItem: LocationItem, targetItem: LocationItem, direction: DIRECTION) => {

  let minItem: LocationItem, maxItem: LocationItem;
  let points: any = [];

  let po = {
    [DIRECTION.left]: [
      [targetItem.l, sourceItem.b, targetItem.l, targetItem.t],
      [targetItem.l, targetItem.b, targetItem.l, sourceItem.t]
    ],
    [DIRECTION.right]: [
      [targetItem.r, sourceItem.b, targetItem.r, targetItem.t],
      [targetItem.r, targetItem.b, targetItem.r, sourceItem.t]
    ],
    [DIRECTION.leftCenter]: [
      [targetItem.lc, sourceItem.b, targetItem.lc, targetItem.t],
      [targetItem.lc, targetItem.b, targetItem.lc, sourceItem.t]
    ],
    [DIRECTION.top]: [
      [sourceItem.r, targetItem.t, targetItem.l, targetItem.t],
      [targetItem.r, targetItem.t, sourceItem.l, targetItem.t]
    ],
    [DIRECTION.bottom]: [
      [sourceItem.r, targetItem.b, targetItem.l, targetItem.b],
      [targetItem.r, targetItem.b, sourceItem.l, targetItem.b]
    ],
    [DIRECTION.topCenter]: [
      [sourceItem.r, targetItem.tc, targetItem.l, targetItem.tc],
      [targetItem.r, targetItem.tc, sourceItem.l, targetItem.tc]
    ]
  }

  switch (direction) {
    case DIRECTION.left:
      return sourceItem.y < targetItem.y ? po[DIRECTION.left][0] : po[DIRECTION.left][1];

    case DIRECTION.right:
      // 目標(biāo)圖形是否在上邊
      return sourceItem.y < targetItem.y ? po[DIRECTION.right][0] : po[DIRECTION.right][1];

    case DIRECTION.leftCenter:
      return sourceItem.y < targetItem.y ? po[DIRECTION.leftCenter][0] : po[DIRECTION.leftCenter][1];

    case DIRECTION.top:
      return sourceItem.x < targetItem.x ? po[DIRECTION.top][0] : po[DIRECTION.top][1];

    case DIRECTION.bottom:
      return sourceItem.x < targetItem.x ? po[DIRECTION.bottom][0] : po[DIRECTION.bottom][1];

    case DIRECTION.topCenter:
      return sourceItem.x < targetItem.x ? po[DIRECTION.topCenter][0] : po[DIRECTION.topCenter][1];
    default:
      break;
  }
  return points;
}
添加輔助線方法,比較簡單:
export const addLine = (layer: Konva.Layer, sourceItem: LocationItem, targetItem: LocationItem, direction: DIRECTION) => {
// 計(jì)算出輔助線的位置新新
  const points = getPoints(sourceItem, targetItem, direction);
  var greenLine = new Konva.Line({
    points: points,
    stroke: 'green',
    strokeWidth: 1,
    lineJoin: 'round',
    dash: [10, 10]
  })
  // greenLine.direction = direction

  lines.push(greenLine);
  layer.add(greenLine);
  layer.draw();
}
好啦, 今天的內(nèi)容就到這里了, 如果覺得文章對你有幫助, 記得點(diǎn)贊 + 再看, 讓更多的朋友從中受益~
github: https://github.com/jiechud/fast-image-editor
作者: 杰出D

創(chuàng)作不易,加個(gè)點(diǎn)贊、在看 支持一下哦!