
解析 Token to Token Vision Transformer
介紹
Vision Transformer!的提出讓我們看到了Transformer模型在圖像方向的潛力,但其有一些缺點,如需要超大型數(shù)據(jù)集(JFT)預訓練,才能達到現(xiàn)在CNN的精度。本文分析了ViT的一些不合理之處:
直接將圖片分塊展開成一維向量不利于對圖片結(jié)構(gòu)信息(如邊緣,線條)建模 冗余的Attention模塊限制了特征表達,并帶來運算負擔
基于上述兩點,本文提出Tokens to Token Transformer,采用類似CNN中卷積劃窗的方式,將相鄰的tokens局部聚合起來,有助于建模局部特征。另外還設計了一種deep narrow(個人理解是 深+窄 的網(wǎng)絡結(jié)構(gòu))結(jié)構(gòu),減少了運算量,并獲得性能上的提升。
特征可視化分析
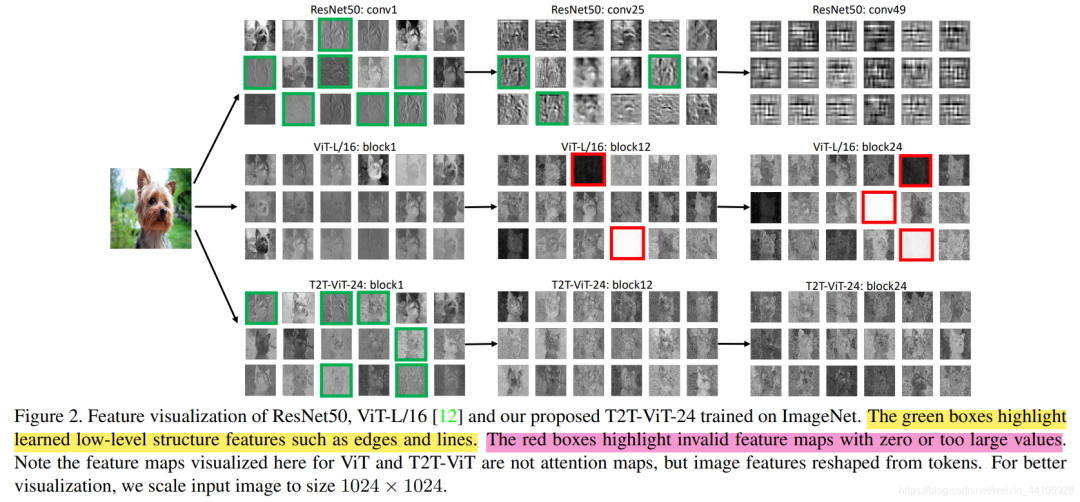
本文先分析了Resnet50,Vision Transformer,T2T Transformer的特征可視化。其中綠框標注的是淺層特征,如邊緣,線條。紅框標注的是一些零值或過大值。
我們先從熟悉的CNN看起,在比較淺的層中,網(wǎng)絡學習到的更多是結(jié)構(gòu)信息,比如對這只小狗邊緣的刻畫。隨著層數(shù)加深,通道數(shù)變深,特征也越來越抽象(conv50我反正是看不出是什么)。
再來看ViT,他每層都能很好的建模全局信息,即使是很深的層當中,也沒有所謂非常抽象的東西。但它對結(jié)構(gòu)信息捕捉的很少,(個人認為是沒有類似CNN卷積核劃窗的操作,導致對局部信息捕捉不夠?)。除此之外,在一些特征圖出現(xiàn)了極值,如全白和全黑的特征,對于最終預測可能是沒有貢獻的。
最后看下T2T,通過Token to Token結(jié)構(gòu)(下文會講),它在淺層的時候也能建模出結(jié)構(gòu)信息,同時也避免了極值的出現(xiàn)。
Token To Token結(jié)構(gòu)
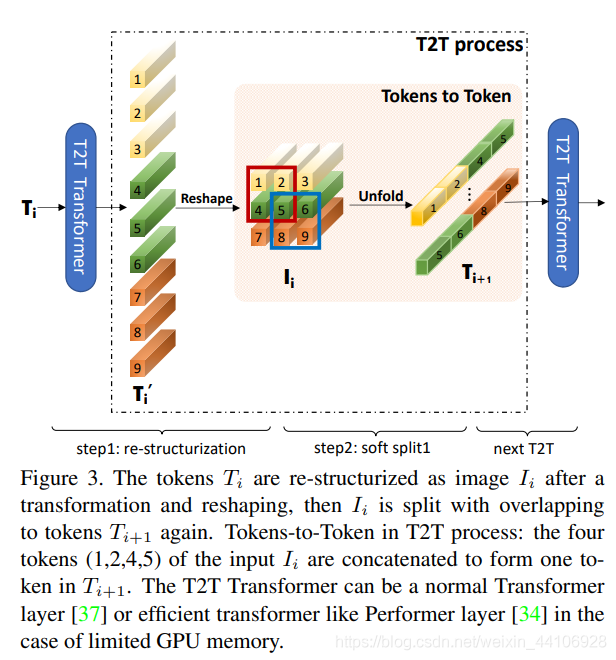
Vision Transformer是將二維圖片展平成一維向量(也叫token),然后送入到Transoformer結(jié)構(gòu)里。而T2T為了捕捉局部信息,它將所有的token通過reshape操作,恢復成二維,然后利用一個unfold一個劃窗操作,屬于一個窗口的tokens,會連接成一個更長的token,然后送入到Transformer中。
這樣會逐漸減少token的數(shù)量,但隨之而來token的長度會增加很多(因為多個tokens連接在一個token),因此后續(xù)模型也降低了維度數(shù)目,以平衡計算量。
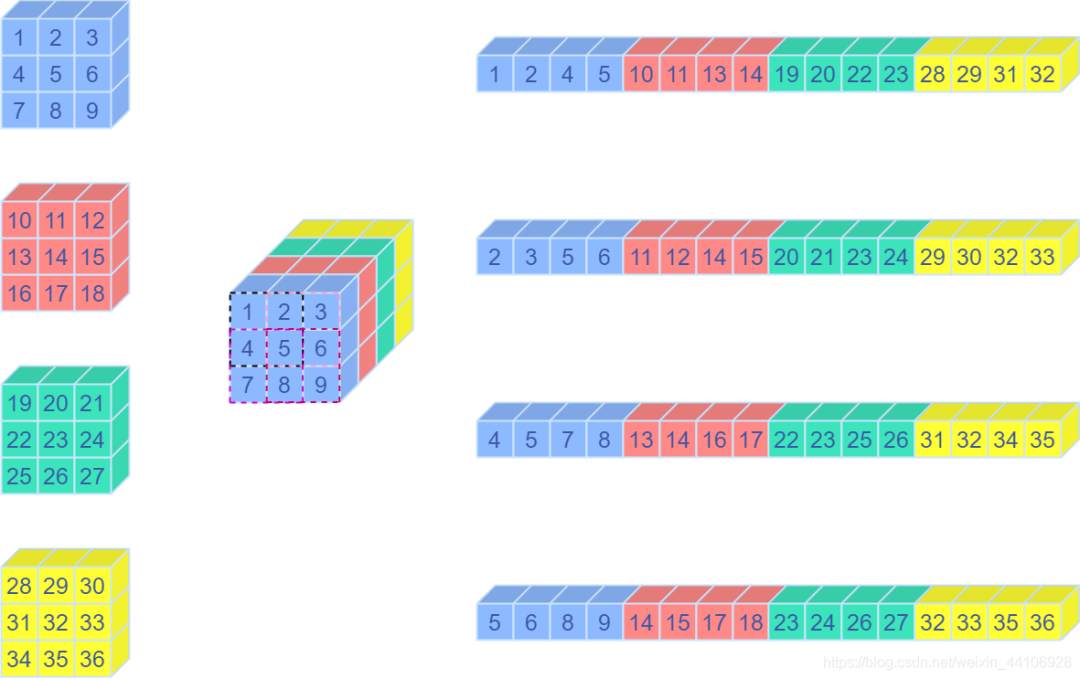
關于Unfold操作
Unfold操作其實就是卷積中用到的img2col方法,將一個卷積窗口的向量,重排成一個列向量。
下面是一段測試代碼
import torch
import numpy as np

np_input = np.array([[[[1, 2, 3],
                       [4, 5, 6],
                       [7, 8, 9]],
                     [[10, 11, 12],
                      [13, 14, 15],
                      [16, 17, 18]],
                     [[19, 20, 21],
                      [22, 23, 24],
                      [25, 26, 27]],
                     [[28, 29, 30],
                      [31, 32, 33],
                      [34, 35, 36]]]]).astype(np.float32)

torch_input = torch.Tensor(np_input)

unfold = torch.nn.Unfold(kernel_size=2, padding=0, stride=1)
unfolded = unfold(torch_input)

print(unfolded)

# 輸出為
tensor([[[ 1.,  2.,  4.,  5.],
         [ 2.,  3.,  5.,  6.],
         [ 4.,  5.,  7.,  8.],
         [ 5.,  6.,  8.,  9.],
         [10., 11., 13., 14.],
         [11., 12., 14., 15.],
         [13., 14., 16., 17.],
         [14., 15., 17., 18.],
         [19., 20., 22., 23.],
         [20., 21., 23., 24.],
         [22., 23., 25., 26.],
         [23., 24., 26., 27.],
         [28., 29., 31., 32.],
         [29., 30., 32., 33.],
         [31., 32., 34., 35.],
         [32., 33., 35., 36.]]])
這是對應的示意圖
整體架構(gòu)
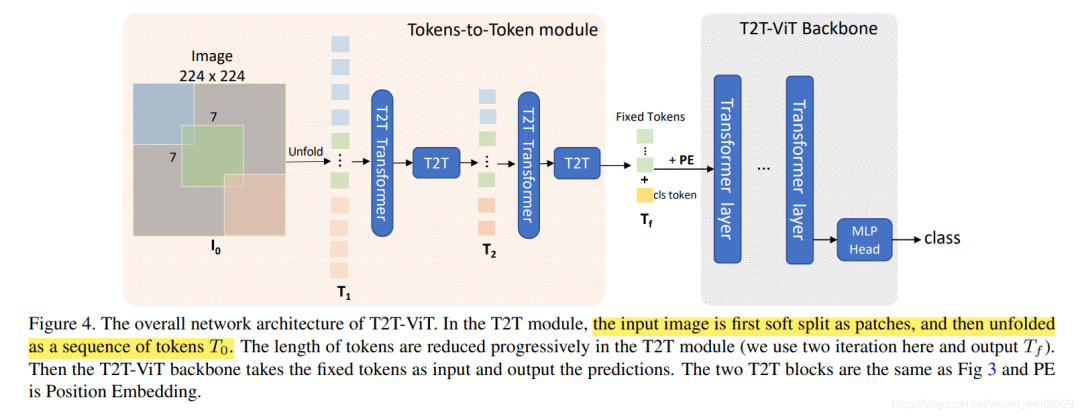
T2T架構(gòu)如上圖所示,先經(jīng)過2次Tokens to Token操作,最后給token加入用于圖像分類的cls token,并給上位置編碼(position embedding),送入到Backbone當中。
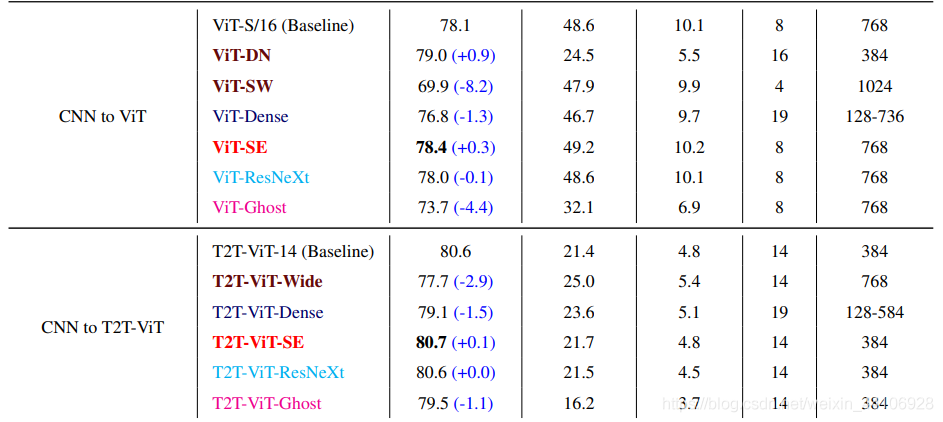
Backbone設計探索
現(xiàn)今CNN探索出了很多結(jié)構(gòu),比如Resnet殘差結(jié)構(gòu),DenseNet密集連接,GhostNet生成冗余特征,SE注意力模塊,ResNext多頭分組卷積等。作者基于這些思想進行了一系列模型設計,實驗,最終結(jié)論如下
更深更窄(Deep Narrow)的ViT結(jié)構(gòu)比更淺更寬(Shallow Wide )的性能更好 DenseNet的密集concat結(jié)構(gòu)均使ViT和T2T-ViT性能下降 SE注意力模塊均能提升ViT和T2T-ViT的性能 ResNext結(jié)構(gòu)對于ViT和T2T-ViT的性能提升很微弱 GhostNet結(jié)構(gòu)可以進一步壓縮模型大小,但同樣會損失一定性能 基于上述實驗,作者選擇了Deep Narrow的結(jié)構(gòu)形式
代碼解讀
Token Transformer
class Token_transformer(nn.Module):

    def __init__(self, dim, in_dim, num_heads, mlp_ratio=1., qkv_bias=False, qk_scale=None, drop=0., attn_drop=0.,
                 drop_path=0., act_layer=nn.GELU, norm_layer=nn.LayerNorm):
        super().__init__()
        self.norm1 = norm_layer(dim)
        self.attn = Attention(
            dim, in_dim=in_dim, num_heads=num_heads, qkv_bias=qkv_bias, qk_scale=qk_scale, attn_drop=attn_drop, proj_drop=drop)
        self.drop_path = DropPath(drop_path) if drop_path > 0. else nn.Identity()
        self.norm2 = norm_layer(in_dim)
        self.mlp = Mlp(in_features=in_dim, hidden_features=int(in_dim*mlp_ratio), out_features=in_dim, act_layer=act_layer, drop=drop)

    def forward(self, x):
        x = self.attn(self.norm1(x))
        x = x + self.drop_path(self.mlp(self.norm2(x)))
        return x
整體結(jié)構(gòu)很簡單,輸入經(jīng)過一次LayerNorm,然后輸入到Attention多頭注意力模塊。輸出再次經(jīng)過LayerNorm,最后設置一定比例的Dropout
T2T Module
class T2T_module(nn.Module):
    """
    Tokens-to-Token encoding module
    """

    def __init__(self, img_size=224, tokens_type='performer', in_chans=3, embed_dim=768, token_dim=64):
        super().__init__()

        if tokens_type == 'transformer':
            print('adopt transformer encoder for tokens-to-token')
            self.soft_split0 = nn.Unfold(kernel_size=(7, 7), stride=(4, 4), padding=(2, 2))
            self.soft_split1 = nn.Unfold(kernel_size=(3, 3), stride=(2, 2), padding=(1, 1))
            self.soft_split2 = nn.Unfold(kernel_size=(3, 3), stride=(2, 2), padding=(1, 1))

            self.attention1 = Token_transformer(dim=in_chans * 7 * 7, in_dim=token_dim, num_heads=1, mlp_ratio=1.0)
            self.attention2 = Token_transformer(dim=token_dim * 3 * 3, in_dim=token_dim, num_heads=1, mlp_ratio=1.0)
            self.project = nn.Linear(token_dim * 3 * 3, embed_dim)

        elif tokens_type == 'performer':
            ...
        elif tokens_type == 'convolution':  # just for comparison with conolution, not our model
            # for this tokens type, you need change forward as three convolution operation
            ...
        self.num_patches = (img_size // (4 * 2 * 2)) * (
                    img_size // (4 * 2 * 2))  # there are 3 sfot split, stride are 4,2,2 seperately
    def forward(self, x):
        # step0: soft split
        x = self.soft_split0(x).transpose(1, 2)

        # iteration1: restricturization/reconstruction
        x = self.attention1(x)
        B, new_HW, C = x.shape
        x = x.transpose(1, 2).reshape(B, C, int(np.sqrt(new_HW)), int(np.sqrt(new_HW)))
        # iteration1: soft split
        x = self.soft_split1(x).transpose(1, 2)

        # iteration2: restricturization/reconstruction
        x = self.attention2(x)
        B, new_HW, C = x.shape
        x = x.transpose(1, 2).reshape(B, C, int(np.sqrt(new_HW)), int(np.sqrt(new_HW)))
        # iteration2: soft split
        x = self.soft_split2(x).transpose(1, 2)

        # final tokens
        x = self.project(x)

        return x
首先設置三個劃窗大小分別為7x7, 3x3, 3x3的Unfold操作,和兩個Token Transformer模塊。
假設輸入數(shù)據(jù)格式是
在forward中,先進行一次soft_split操作,數(shù)據(jù)變?yōu)?/p>
然后進行一次transpose操作,將通道維調(diào)整到最后一維度
送入到Attention模塊后,再把通道維調(diào)整回來
最后reshape成4維數(shù)據(jù)
再重復上述類似的步驟,最后經(jīng)過一個全連接層,調(diào)整通道數(shù)到合適的Embedding dim。
T2T ViT
這是整體結(jié)構(gòu)的代碼
class T2T_ViT(nn.Module):
    def __init__(self, img_size=224, tokens_type='performer', in_chans=3, num_classes=1000, embed_dim=768, depth=12,
                 num_heads=12, mlp_ratio=4., qkv_bias=False, qk_scale=None, drop_rate=0., attn_drop_rate=0.,
                 drop_path_rate=0., norm_layer=nn.LayerNorm):
        super().__init__()
        self.num_classes = num_classes
        self.num_features = self.embed_dim = embed_dim  # num_features for consistency with other models

        self.tokens_to_token = T2T_module(
            img_size=img_size, tokens_type=tokens_type, in_chans=in_chans, embed_dim=embed_dim)
        num_patches = self.tokens_to_token.num_patches

        self.cls_token = nn.Parameter(torch.zeros(1, 1, embed_dim))
        self.pos_embed = nn.Parameter(data=get_sinusoid_encoding(n_position=num_patches + 1, d_hid=embed_dim),
                                      requires_grad=False)
        self.pos_drop = nn.Dropout(p=drop_rate)

        dpr = [x.item() for x in torch.linspace(0, drop_path_rate, depth)]  # stochastic depth decay rule
        self.blocks = nn.ModuleList([
            Block(
                dim=embed_dim, num_heads=num_heads, mlp_ratio=mlp_ratio, qkv_bias=qkv_bias, qk_scale=qk_scale,
                drop=drop_rate, attn_drop=attn_drop_rate, drop_path=dpr[i], norm_layer=norm_layer)
            for i in range(depth)])
        self.norm = norm_layer(embed_dim)

        # Classifier head
        self.head = nn.Linear(embed_dim, num_classes) if num_classes > 0 else nn.Identity()

        trunc_normal_(self.cls_token, std=.02)
        self.apply(self._init_weights)

    ...忽略一些其他的方法

    def forward_features(self, x):
        B = x.shape[0]
        x = self.tokens_to_token(x)

        cls_tokens = self.cls_token.expand(B, -1, -1)
        x = torch.cat((cls_tokens, x), dim=1)
        x = x + self.pos_embed
        x = self.pos_drop(x)

        for blk in self.blocks:
            x = blk(x)

        x = self.norm(x)
        return x[:, 0]

    def forward(self, x):
        x = self.forward_features(x)
        x = self.head(x)
        return x
整個架構(gòu)是將輸入數(shù)據(jù)通過T2Tmodule,然后設立一個分類的token(cls_tokens),將其concat到x中,并加入position embedding(這里是用一個可學習參數(shù)作為位置編碼)。處理好后,輸入到一個個疊起來的Transformer Block,最后取第一個token(也就是cls_tokens),輸入到分類層,得到最終結(jié)果。
總結(jié)
依圖科技近期也開源了相關代碼 yitu-opensource/ T2T-ViT,大家有興趣的話可以試驗下代碼。
個人感覺這篇論文還是偏工程化的,通過分析初版Vision Transformer的缺點,提出T2T結(jié)構(gòu),并且在BackBone上,以CNN的視角重新探索,將CNN的優(yōu)點結(jié)合起來,最終效果也是十分不錯的,期待后續(xù)CNN結(jié)合Transformer的相關工作。
歡迎關注GiantPandaCV, 在這里你將看到獨家的深度學習分享,堅持原創(chuàng),每天分享我們學習到的新鮮知識。( ? ?ω?? )?
有對文章相關的問題,或者想要加入交流群,歡迎添加BBuf微信:
為了方便讀者獲取資料以及我們公眾號的作者發(fā)布一些Github工程的更新,我們成立了一個QQ群,二維碼如下,感興趣可以加入。