
如何用Next.js搭建全棧前端知識庫項目?
點擊關(guān)注公眾號,技術(shù)干貨及時送達
最近在做一個全棧項目,前端知識非常瑣碎,所以想把前端知識點匯總到一起,無論是以后想查詢某個知識點,還是學習到新的知識,都可以快速的查詢和記錄
全部代碼已開源到GitHub;先贊后看,年入百萬!
技術(shù)棧使用React的Next.js框架和Tailwind CSS,大綱如下
為什么是Next.js
?Next.js是一個基于React的服務(wù)端渲染框架。這是一個用于 生產(chǎn)環(huán)境的 React 框架
?
Next.js 提供了許多優(yōu)點和功能:
-
「服務(wù)端渲染 (SSR) 和預(yù)渲染 (SSG)」 :Next.js 支持服務(wù)端渲染和預(yù)渲染,這意味著頁面在服務(wù)器端生成,而不是在客戶端。這有助于提高網(wǎng)頁的加載速度和搜索引擎優(yōu)化(SEO),同時也提供更好的首次渲染體驗。
-
「快速加載時間」:由于 Next.js 支持預(yù)渲染和服務(wù)端渲染,用戶可以更快地看到頁面內(nèi)容,因為大部分工作在服務(wù)器端完成,減少了客戶端加載所需的時間。
-
「熱模塊替換 (HMR)」 :Next.js 支持熱模塊替換,這意味著在進行開發(fā)時,您可以在保持應(yīng)用程序運行的同時修改代碼,并立即看到變化,無需刷新頁面。
-
「簡單的部署」:Next.js 的默認配置使得應(yīng)用程序的部署非常簡單。您可以使用 Vercel、Netlify 等平臺將應(yīng)用程序快速部署到云端,或者將其部署到自己的服務(wù)器上。
-
「豐富的生態(tài)系統(tǒng)」:Next.js 是一個非常受歡迎的框架,擁有龐大的社區(qū)和豐富的插件,擴展和工具支持。這使得開發(fā)人員能夠輕松解決常見問題,并快速構(gòu)建復(fù)雜的 web 應(yīng)用程序。
-
「自動優(yōu)化」:Next.js 內(nèi)置了許多優(yōu)化功能,包括自動壓縮和緩存等,這些功能有助于提高應(yīng)用程序的性能和用戶體驗。
-
「支持多種數(shù)據(jù)獲取方法」:Next.js 提供了多種數(shù)據(jù)獲取方式,如
getServerSideProps和getStaticProps,使得獲取數(shù)據(jù)變得簡單和靈活。

初始化項目
?使用的node版本 是 16.x
?
創(chuàng)建項目
npx create-next-app frontend-knowledge
沒有使用TS,也沒有用src目錄
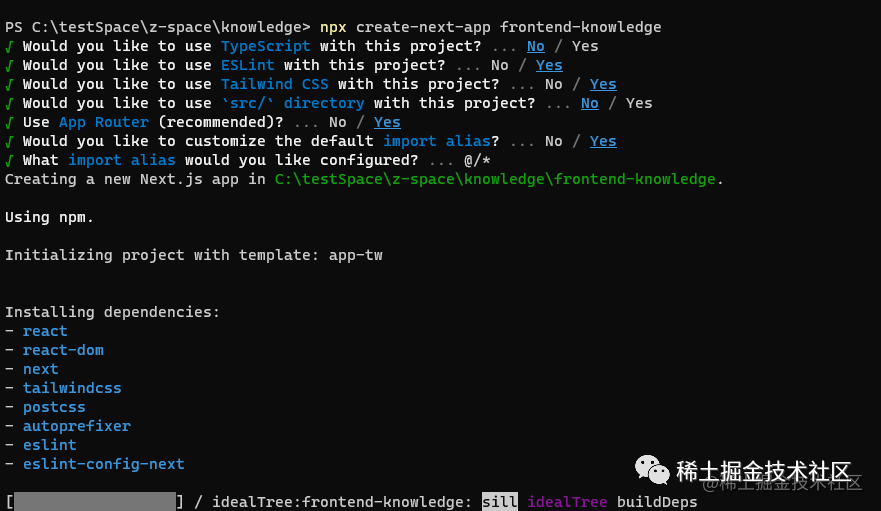
Next的Tailwind CSS內(nèi)置 postcss、 autoprefixer
Tailwind CSS使用教程可以看這篇文章??Tailwind css 在項目中的使用與問題
項目結(jié)構(gòu)目錄
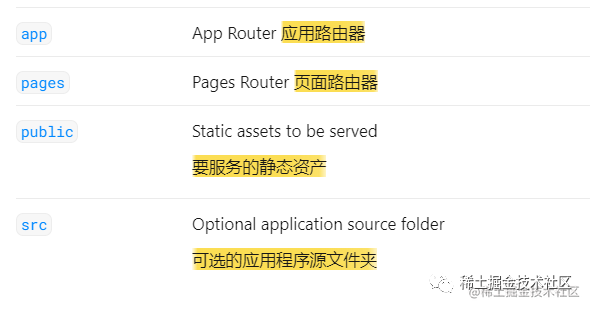
-
app文件夾用于定義路由, layout.tsx和page.tsx文件。當用戶訪問應(yīng)用程序的根目錄/時,訪問到的就是 app下的page.jsx.

每個文件夾表示一個路由,映射到一個URL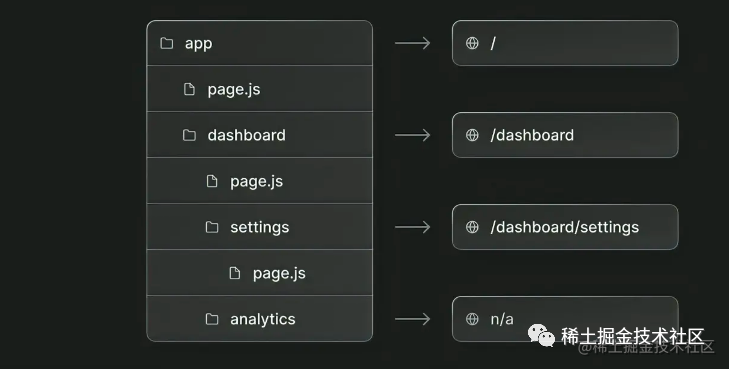
-
pages/api 用于編寫next后端接口
前端頁面
app文件路由
Next 中 app里的每一個文件就是一個路由
-
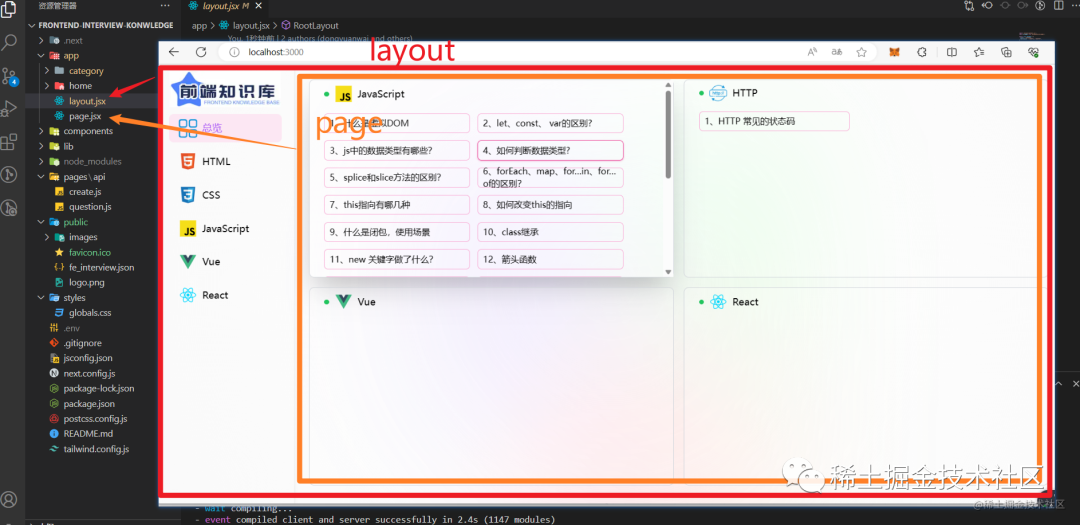
根目錄 http://localhost:3000/,對應(yīng) app下的page.jsx
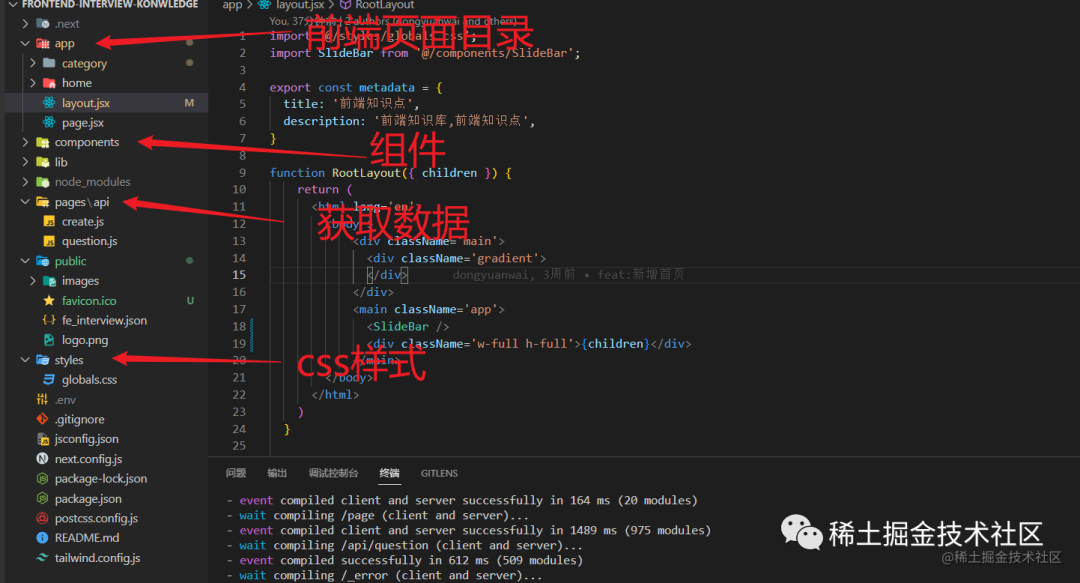
Layout.jsx 是一個用于組織頁面結(jié)構(gòu)和共享組件的重要概念。Layout 可以看作是一個組件包裹器,它包含了頁面共享的部分,例如頁眉(Header)、頁腳(Footer)和導航欄(Navigation)或者 page.jsx;layout.jsx相當于page的布局組件.
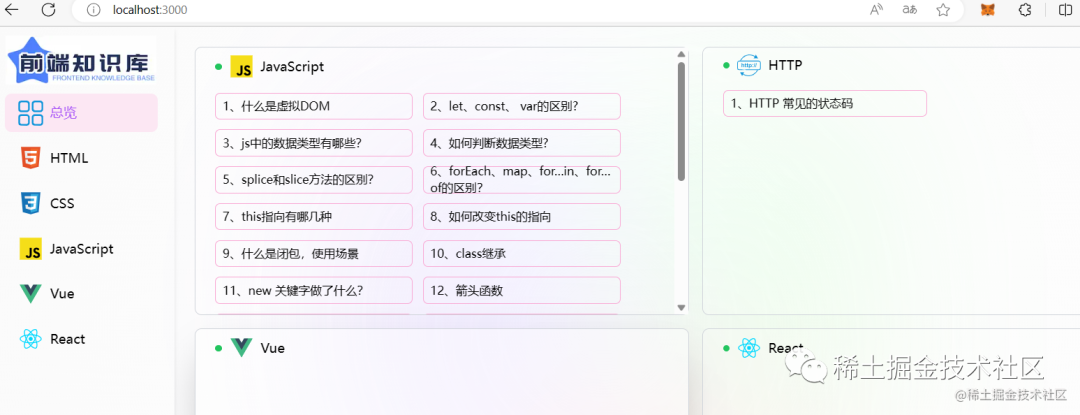
前端知識庫 無論是首頁還是子路由都需要有一個左側(cè)導航欄,所以可以把導航欄放到Layout.jsx頁面,page頁面會映射到 children 里
import '@/styles/globals.css';
import SlideBar from '@/components/SlideBar';

function RootLayout({ children }) {
    return (
      <html lang='en'>
        <body >
            <main className='app'>
              <SlideBar />
              <div className='w-full h-full'>{children}</div>
            </main>
        </body>
      </html>
    )
  }
-
二級目錄 http://localhost:3000/category,對應(yīng)app/category下的page.jsx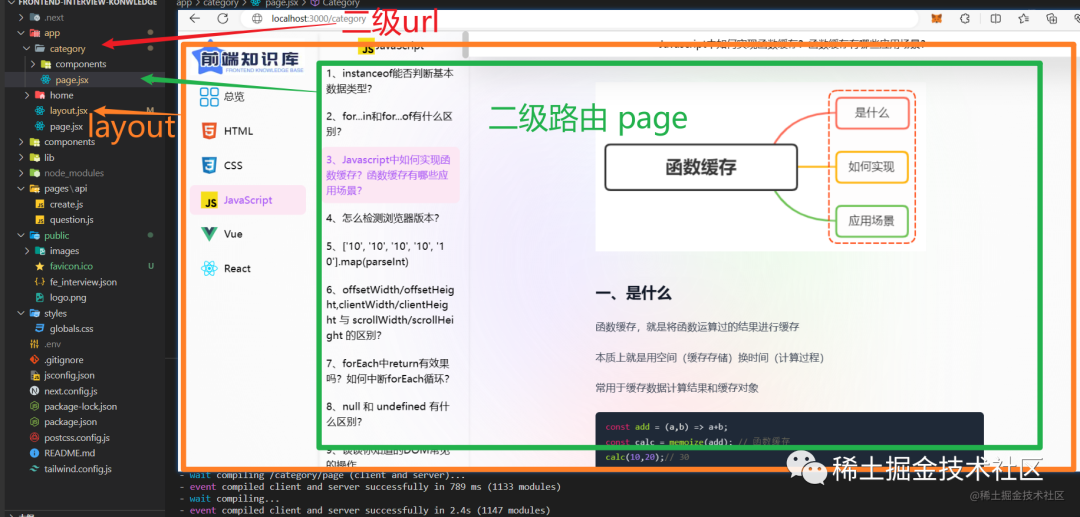
"use client"
"use client" 指令是聲明服務(wù)器和客戶端組件模塊圖之間邊界的約定。
NextJS 13默認情況下,App 文件夾內(nèi)的 所有組件都是服務(wù)器組件。并且 服務(wù)器組件 不能使用 「useState、useEffect」 等客戶端特性。
'use client'
import { useState, useEffect } from "react";
import Image from 'next/image';

const Home = () => {
  return (
    <div>
      <h1>Welcome to Next.js</h1>
      <p>This is the home page content.</p>
      {/* 使用 Next Image 組件 */}
      <Image
        src="/path/to/your/image.jpg"
        alt="Description of the image"
        width={300}
        height={200}
      />
    </div>
  );
};

export default Home;
組件引入
「引入路由 Link」
import React from 'react';
import Link from 'next/link';

const Home = () => {
  return (
    <div>
      <h1>Welcome to Next.js</h1>
      <p>This is the home page content.</p>
      {/* 使用 Link 組件實現(xiàn)導航鏈接 */}
      <Link href="/category">
        跳轉(zhuǎn)路由
      </Link>
    </div>
  );
};
export default Home;
Link 組件使用客戶端導航而不是傳統(tǒng)的頁面刷新。當用戶點擊鏈接時,只有目標頁面的內(nèi)容會被加載,而不會重新加載整個應(yīng)用程序
「Image 圖片引入」
在 Image 組件中,您需要提供以下屬性:
-
src:圖像的路徑。它可以是本地路徑或遠程 URL。 -
alt:圖像的替代文本,用于輔助技術(shù)和當圖像無法加載時顯示。 -
width:圖像的寬度,應(yīng)以像素為單位提供。 -
height:圖像的高度,應(yīng)以像素為單位提供。
import React from 'react';
import Image from 'next/image';
const Home = () => {
  return (
    <div>
      <h1>Welcome to Next.js</h1>
      <p>This is the home page content.</p>
      {/* 使用 Next Image 組件 */}
      <Image
        src="/path/to/your/image.jpg"
        alt="Description of the image"
        width={300}
        height={200}
      />
    </div>
  );
};

export default Home;
Notion數(shù)據(jù)庫
Notion 不僅是一款個人筆記軟件,還可以當作數(shù)據(jù)庫使用 Notion在線筆記
可以通過安裝 Notion API SDK 來進行連接數(shù)據(jù)庫,獲取數(shù)據(jù)
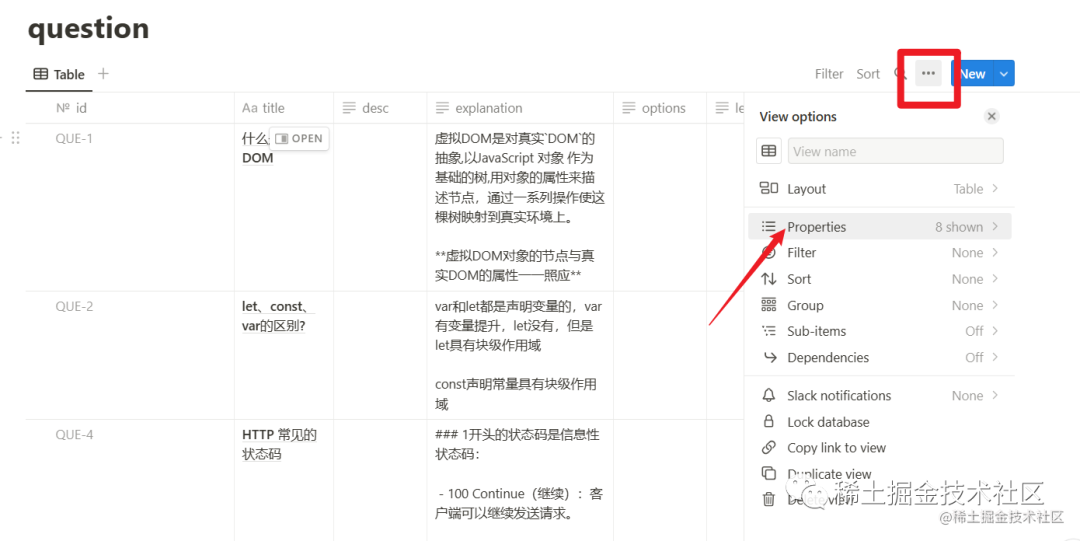
創(chuàng)建數(shù)據(jù)庫
創(chuàng)建一個DATABASE數(shù)據(jù)庫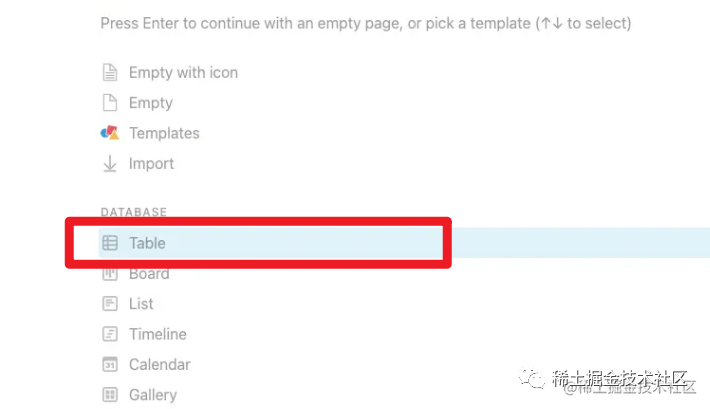 然后再創(chuàng)建各個字段
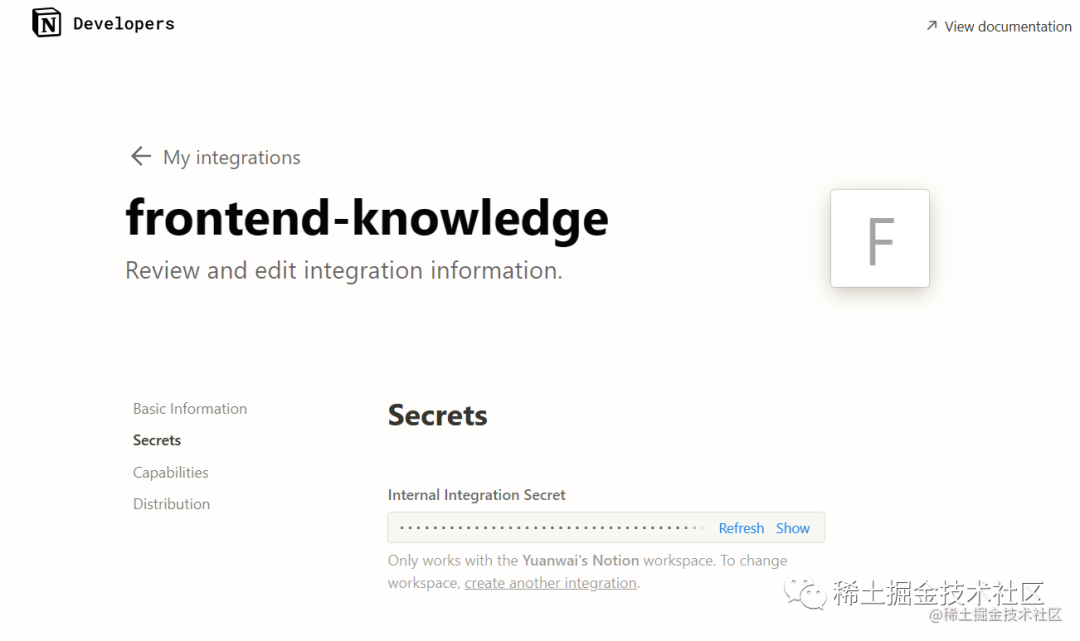
創(chuàng)建應(yīng)用集成,獲取密鑰
去Notion創(chuàng)建一個應(yīng)用集成,獲取 API Key??Notion Developers
數(shù)據(jù)庫就創(chuàng)建好了,接下來就可以再Next里連接數(shù)據(jù)庫進行獲取數(shù)據(jù)了
連接數(shù)據(jù)庫
創(chuàng)建Notion服務(wù)
安裝Notion API 客戶端
npm install @notionhq/client
創(chuàng)建一個 NotionServer 服務(wù),將請求數(shù)據(jù)庫的方法進行封裝
lib/NotionServer.js
import { Client } from "@notionhq/client";
const auth = process.env.NOTION_AUTH;
const database = process.env.NOTION_DATABASE_ID;
export default class NotionService {
  constructor() {
    this.client = new Client({ auth });
  }
  async query() {
    const response = await this.client.databases.query({
      database_id: database,
    });

    return  response.results;
  }
}
NOTION_AUTH是數(shù)據(jù)庫集成的密鑰
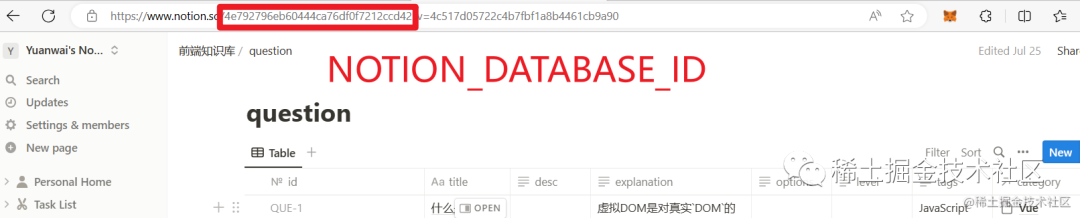
NOTION_DATABASE_ID是notion鏈接上面的 id
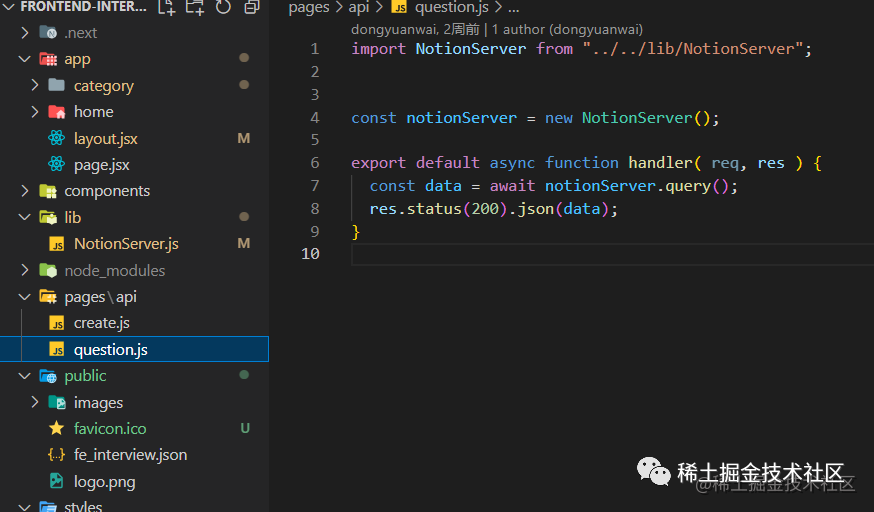
再新建一個pages/api/question.js路由,調(diào)用NotionServer查詢服務(wù)
import NotionServer from "../../lib/NotionServer";
const notionServer = new NotionServer();

export default async function handler( req, res ) {
  const data = await notionServer.query();
  res.status(200).json(data);
}
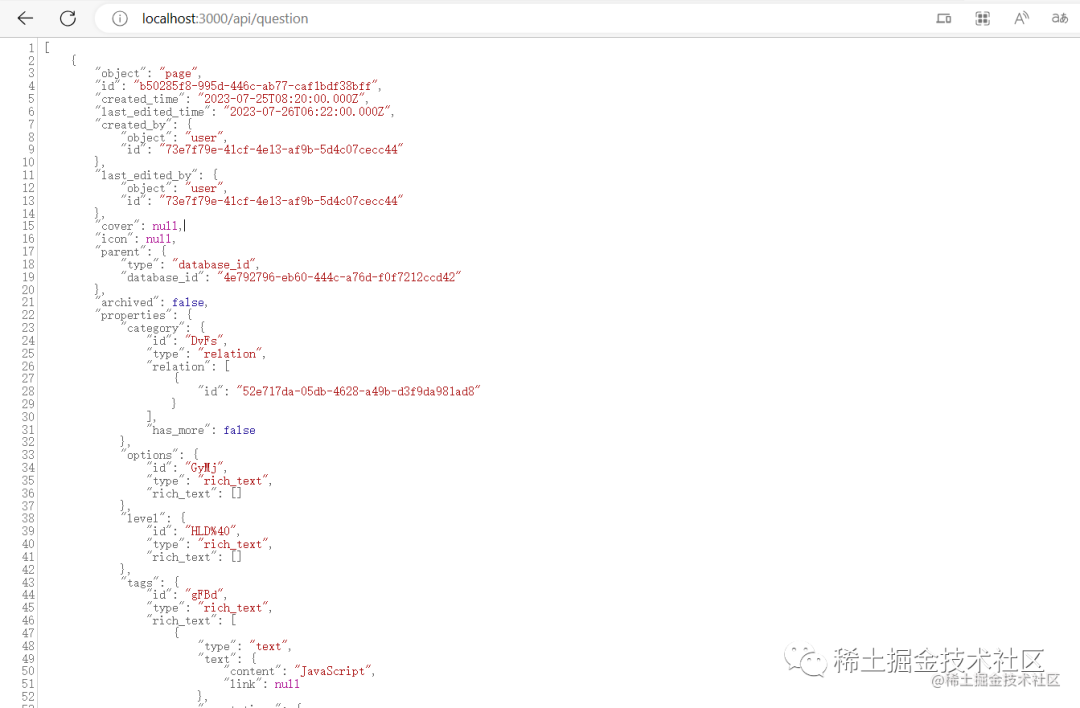
 在瀏覽器中輸入
 localhost:3000/api/question 就可以看到獲取的數(shù)據(jù),此時數(shù)據(jù)還比較雜亂,可以處理一下,返回自己想要的數(shù)據(jù)
展示到前端頁面
在首頁的 page.jsx頁面里使用 fetch方法獲取數(shù)據(jù),前端頁面
"use client";
import { useState, useEffect } from "react";
import QuestionCard from "@/components/QuestionCard"


function Home() {
  const [questionList, setQuestionList] = useState([]);
  const [jsList, setJsList] = useState([]);

  const getQuestionList = () => {
    fetch('/api/question')
      .then((res) => res.json())
      .then((res) => {
        if (res) {
          setQuestionList(res.sort((a, b) => a.id - b.id));
        }
      })
      .catch((error) => {
        console.error(error);
      });
  };

  useEffect(() => {
    getQuestionList();
  }, []);
  useEffect(() => {
    const jsItems = questionList.filter(item => item.tags === "JavaScript");
    setJsList(jsItems);
  }, [questionList]);
  return (
    <div className="w-full h-full  overflow-auto">
      <section className=" gap-4 p-6 space-y-4 md:columns-2">
        <QuestionCard questionList={jsList} type="JavaScript" />
      </section>
    </div>
  )
}
export default Home
Markdown數(shù)據(jù)渲染
數(shù)據(jù)存儲采用的是Markdown格式,所以就需要第三方的Markdown插件進行展示
markdown-it 數(shù)據(jù)展示
安裝 markdown-it
npm install markdown-it
'use client'
import { useState,useEffect } from 'react'
// 1. 引入markdown-it庫
import markdownIt from 'markdown-it'
// 2. 生成實例對象
const md = new markdownIt();

function DialogCard({data,closeDialog}) {
    const [htmlString, setHtmlString] = useState('')  // 存儲解析后的html字符串

    // 3. 解析markdown語法
    const parse = (data) => setHtmlString(md.render(data.explanation));
    useEffect(()=>{
        parse(data)
    },[])

  return (
    <div className='show w-full mt-1 flex-grow overflow-auto '>
          <div
              className='w-full'
              dangerouslySetInnerHTML={{ __html: htmlString }} // 將html字符串解析成真正的html標簽
          />
    </div>
  )
}

export default DialogCard
Tailwind css 默認將所有的 h1-h6和ul,li 基礎(chǔ)樣式重寫,所以markdown展示的樣式和普通文本沒有區(qū)別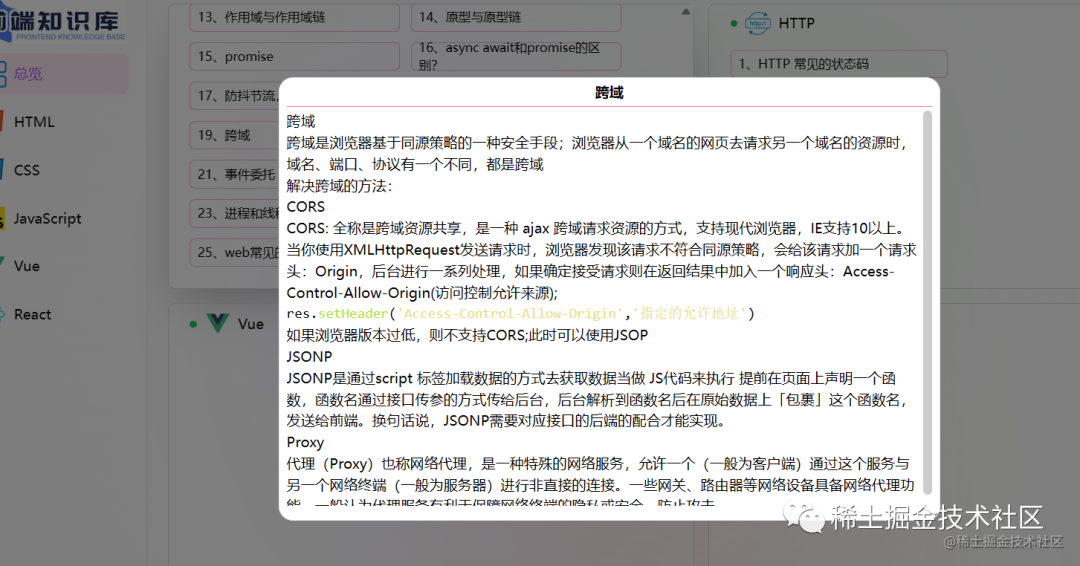
官方的Tailwind CSS Typgraphy插件提供了一組 prose 類,可以使用它們?yōu)槿魏尾皇芸刂频?strong style="color: rgb(53, 148, 247);">「普通HTML」添加漂亮的排版默認值,「例如從Markdown呈現(xiàn)的HTML或從CMS中提取的HTML。」
安裝:
npm install -D @tailwindcss/typography
然后將插件添加到 tailwind.config.js 文件中:
/** @type {import('tailwindcss').Config} */
module.exports = {
  plugins: [
    require("@tailwindcss/typography")
  ],
}
最后在 div 添加 prose 類
 <div  className='prose w-full'
  dangerouslySetInnerHTML={{ __html: htmlString }} // 將html字符串解析成真正的html標簽
/>
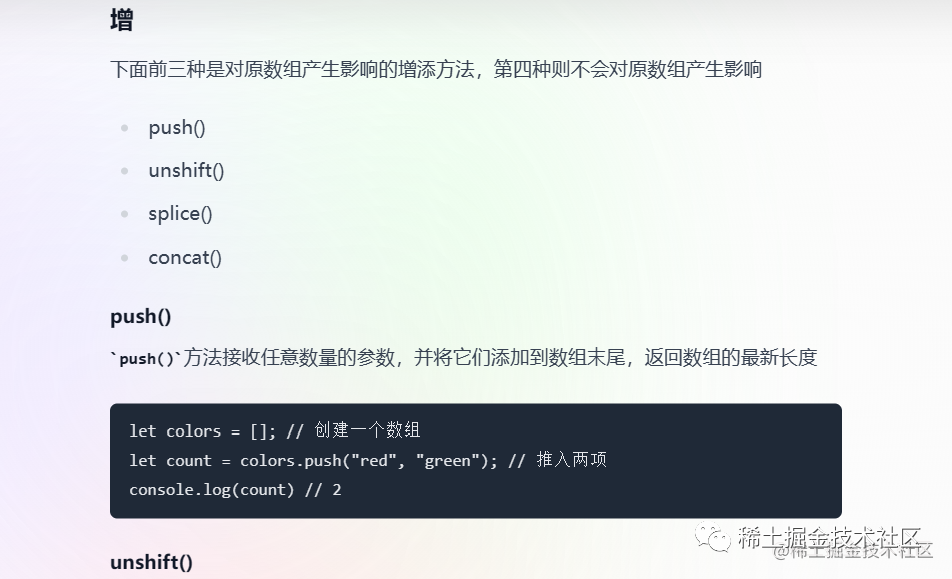
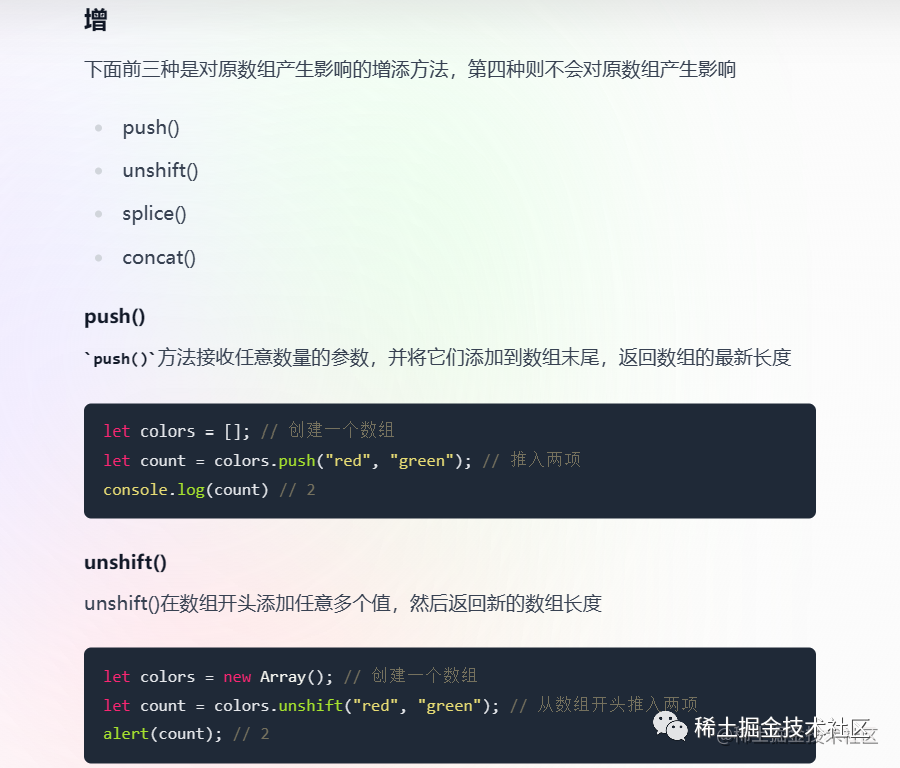
代碼高亮
markdown-it 默認的代碼塊格式?jīng)]有樣式,可以安裝highlight 插件進行添加代碼塊樣式
npm install highlight.js
然后引入樣式文件,在生成實例時,進行初始化
import hljs from "highlight.js";
import 'highlight.js/styles/monokai-sublime.css'
// 2. 生成實例對象
const md = new markdownIt({
 highlight: function (str, lang) {
   if (lang && hljs.getLanguage(lang)) {
     try {
       return hljs.highlight(str, { language: lang }).value;
     } catch (_) {}
   }
   return ""; // 使用額外的默認轉(zhuǎn)義
 },
});
寫到這里項目也算是完成了,源碼放到了GitHub上????????frontend-konwledge 歡迎大家 star??????
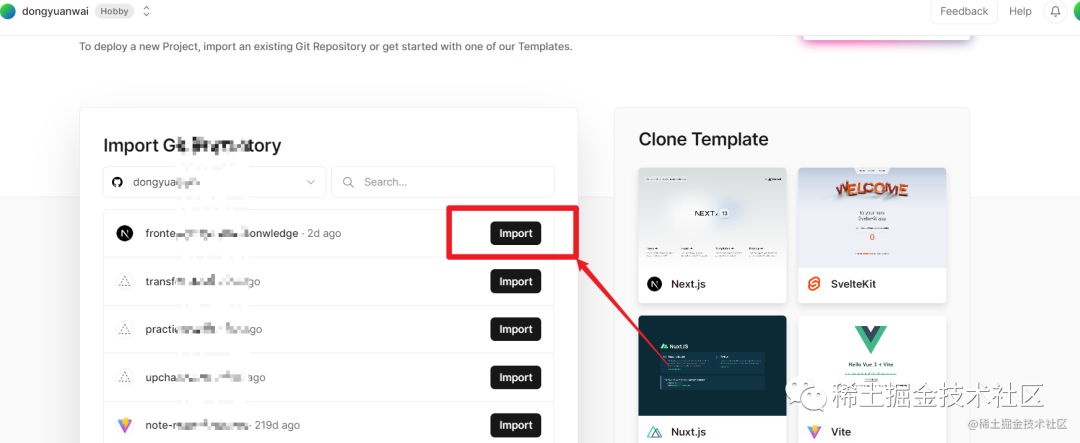
部署到Vercel
使用github賬號登錄到 Vercel 上
找到項目,選擇導入
添加環(huán)境變量名和值,相當于.env里的值
部署成功后就可以訪問了
更新新代碼時,不用再次部署,它會自動更新到最新代碼。只不過國內(nèi)訪問可能會被??墻
在線預(yù)覽地址?? 前端知識點 (frontend-konwledge.vercel.app)
最后
本文只介紹了項目中使用到的Next技巧,和其他的一些使用教程
像一些SSR,動態(tài)路由,元數(shù)據(jù)等使用方式,準備在項目優(yōu)化時配合著真實的案例再記錄
?Tailwind css教程可以看這篇文章??Tailwind css 在項目中的使用與問題
項目源碼放到了GitHub上????????frontend-konwledge
在線預(yù)覽地址?? 前端知識點 (frontend-konwledge.vercel.app)
?
如果文章對你有幫助的話歡迎
「關(guān)注+點贊+收藏」