
基于 Nest.js+TypeORM 實(shí)戰(zhàn),項(xiàng)目已開源,推薦!
大廠技術(shù) 高級前端 Node進(jìn)階
點(diǎn)擊上方 程序員成長指北,關(guān)注公眾號
回復(fù)1,加入高級Node交流群
考拉?? 的 Nest.js 系列文章(系列會持續(xù)更新):
學(xué)完這篇 Nest.js 實(shí)戰(zhàn),還沒入門的來錘我!(長文預(yù)警)
Nest.js 實(shí)戰(zhàn)系列第二篇-實(shí)現(xiàn)注冊、掃碼登陸、jwt認(rèn)證等
這篇文章是上篇實(shí)現(xiàn)登錄、注冊的后續(xù), 本來是和上一篇文章寫在一起的, 考慮篇幅問題,就拆了一個下篇出來。
文章主要內(nèi)容:
有的小伙伴可能覺得文章不就增刪改查嘛,沒什么好寫的吧!
其實(shí)在我整體寫下來,覺得文章模塊還是涉及到很多知識點(diǎn)的,比如分類表與文章表的一對多以及文章表與標(biāo)簽表多對多處理、文件上傳等,還有一些實(shí)現(xiàn)的小細(xì)節(jié):關(guān)于文章摘要的提取方式,Markdown轉(zhuǎn)html等,都會在這篇文章中給大家介紹清楚。
前置說明
首先我們說一下文章設(shè)計(jì)的需求,文章基本信息:標(biāo)題、封面、摘要、閱讀量、點(diǎn)贊量等;文章有分類,一篇只能選擇一個分類;一篇文章可以選擇多個標(biāo)簽,文章的狀態(tài)分為草稿和已發(fā)布,考慮到后期文章的展示,還給文章設(shè)置了推薦標(biāo)識。
數(shù)據(jù)表關(guān)系
前面文章中已經(jīng)說了TypeORM建表時,是通過@Entity()裝飾的class 映射為數(shù)據(jù)表, 所以實(shí)體中的關(guān)系也就是表關(guān)系。接下來探索一下如何用TypeORM創(chuàng)建一對一、一對多和多對多的關(guān)系。
一對一
一對一指的是表中一條數(shù)據(jù)僅關(guān)聯(lián)另外一個表中的另一條數(shù)據(jù)。例如用戶表和用戶檔案表, 一個用戶只有一份檔案。我們在TypeORM中如何實(shí)現(xiàn)user表和info之間這種對一對的關(guān)系呢?
// user.entity.ts

@Entity('user')
export class UserEntity {
  @PrimaryGeneratedColumn()
  id: number;

  @Column()
  username: string;

  @OneToOne(type =>InfoEntity, info => info.user)
  @JoinColumn()
  info: InformationEntity;
}
info 是 InfoEntity類型的,但是存入在數(shù)據(jù)庫中類型卻是 info.id 的類型。從上面代碼可以看出, 是通過@OneToOne裝飾器來修飾的, 在裝飾器中需要指定對方entity的類型,以及指定對方entity的外鍵。
@JoinColumn必須在且只在關(guān)系的一側(cè)的外鍵上, 你設(shè)置@JoinColumn的哪一方,哪一方的表將包含一個relation id和目標(biāo)實(shí)體表的外鍵。記住,不能同時在二者entity中。
看一下info實(shí)體如何實(shí)現(xiàn):
@Entity('info')
export class InfoEntity {
  @PrimaryGeneratedColumn()
  id: number;

  @Column()
  idcard: string;

  @Column()
  gender: string;
  ...
  @OneToOne(type =>UserEntity, user => user.info)
  user: UserEntity;
}
以上兩個實(shí)體映射的數(shù)據(jù)表如下:
|                       user表                                         |
+--------+--------------+-----+-----------------+----------------------+
| Field  | Type         | Key | Default         | Extra                |
+--------+--------------+-----+-----------------+----------------------+
| id     | int(11)      | PRI | NULL            | auto_increment       |
| name   | varchar(255) |     | NULL            |                      |
| infoId | int(11)      | MUL | NULL            |                      |
+--------+--------------+-----+-----------------+----------------------+

|                       info表                                         |
+--------+--------------+-----+-----------------+----------------------+
| Field  | Type         | Key | Default         | Extra                |
+--------+--------------+-----+-----------------+----------------------+
| id     | int(11)      | PRI | NULL            | auto_increment       |
| idcard | varchar(255) |     | NULL            |                      |
| gender | varchar(255) |     | NULL            |                      |
+--------+--------------+-----+-----------------+----------------------+
生成的從數(shù)據(jù)表可以看出,默認(rèn)生成的"relation id 格式為xxId, 如果你是數(shù)據(jù)表中希望對其進(jìn)行重名名, 可以通過@JoinColumn配置,在一對多例子中會實(shí)踐一下。
一對多
在一對多關(guān)系中,表A中的一條記錄,可以關(guān)聯(lián)表B中的一條或多條記錄。比如:每一個文章分類都可以對應(yīng)多篇文章,反過來一篇文章只能屬于一個分類,這種文章表和分類表的關(guān)系就是一對多的關(guān)系。
同樣我們用代碼看看TypeOrm中如何實(shí)現(xiàn)這種關(guān)系的:
// category.entity.ts
import {PostEntity} from "../../post/post.entity"
@Entity('category')
export class CategoryEntity {
  @PrimaryGeneratedColumn()
  id: number;

  @Column()
  name: string;

  @OneToMany(() => PostEntity, post => post.category)
  post: PostEntity[];
}
將@OneToMany添加到post屬性中, 并且在@OneToMany中指定對方的類型為PostEntity, 接下來定義文章實(shí)體:
// posts.entity.ts
...
import { CategoryEntity } from './../category/entities/category.entity';

@Entity('post')
export class PostsEntity {
 @PrimaryGeneratedColumn()
 id: number;

 @Column({ length: 50 })
 title: string;

 ...
  // 分類
 @Exclude()
 @ManyToOne(() => CategoryEntity, (category) => category.posts)
 @JoinColumn({name: "category_id"})
 category: CategoryEntity;
}
@ JoinColumn不僅定義了關(guān)系的哪一側(cè)包含帶有外鍵的連接列,還允許自定義連接列名和引用的列名。上邊文章entity中,就自定義了列名為category_id, 如果不自定義, 默認(rèn)生成的列名為categoryId。
TypeORM在處理“一對多”的關(guān)系時, 將一的主鍵作為多的外鍵,即@ManyToOne裝飾的屬性;這樣建表時有最少的數(shù)據(jù)表操作代價,避免數(shù)據(jù)冗余,提高效率, 上面的實(shí)體關(guān)系會生成以下表:
|                       category表                                         |
+--------+--------------+-----+-----------------+----------------------+
| Field  | Type         | Key | Default         | Extra                |
+--------+--------------+-----+-----------------+----------------------+
| id     | int(11)      | PRI | NULL            | auto_increment       |
| name   | varchar(255) |     | NULL            |                      |
+--------+--------------+-----+-----------------+----------------------+

|                       post表                                         |
+-------------+--------------+-----+------------+----------------------+
| Field       | Type         | Key | Default    | Extra                |
+-------------+--------------+-----+------------+----------------------+
| id          | int(11)      | PRI | NULL       | auto_increment       |
| title       | varchar(50)  |     | NULL       |                      |
| category_id | int(11)      |     | NULL       |                      |
+-------------+--------------+-----+------------+----------------------+
最后再看一下多對多的關(guān)系。
多對多
在多對多關(guān)系中, 表A的中的記錄可能與表B中一個或多個的記錄相關(guān)聯(lián)。例如,文章和標(biāo)簽?zāi)阒g存在多對多的關(guān)系:一篇文章可以有多個標(biāo)簽, 一個標(biāo)簽頁可以對應(yīng)多篇文章。
// posts.entity.ts
...
import { TagEntity } from './../tag/entities/tag.entity';

@Entity('post')
export class PostsEntity {
 @PrimaryGeneratedColumn()
 id: number;

 @Column({ length: 50 })
 title: string;
 ...
// 標(biāo)簽
@ManyToMany(() => TagEntity, (tag) => tag.posts)
@JoinTable({
  name: 'post_tag',
  joinColumns: [{ name: 'post_id' }],
  inverseJoinColumns: [{ name: 'tag_id' }],
})
tags: TagEntity[];
標(biāo)簽表實(shí)體:
// tag.entity.ts
...
import { PostsEntity } from 'src/posts/posts.entity';

@Entity('tag')
export class TagEntity {
 @PrimaryGeneratedColumn()
 id: number;

 @Column({ length: 50 })
 name: string;
 ...

@ManyToMany(() => PostsEntity, (post) => post.tags)
posts: Array<PostsEntity>;
@JoinTable用于描述“多對多”關(guān)系, 并描述中間表表的連接列。中間表是通過TypeORM 自動創(chuàng)建的一個特殊的單獨(dú)表, 其中包含引用相關(guān)實(shí)體的列。通過配置joinColumns和inverseJoinColumns來自定義中間表的列名稱。
注意:新版中是
joinColumns和inverseJoinColumns, 之前的版本是joinColumn沒有s
上面的實(shí)體關(guān)系會生成以下表:
|                       post表                                         |
+-------------+--------------+-----+------------+----------------------+
| Field       | Type         | Key | Default    | Extra                |
+-------------+--------------+-----+------------+----------------------+
| id          | int(11)      | PRI | NULL       | auto_increment       |
| title       | varchar(50)  |     | NULL       |                      |
| category_id | int(11)      |     | NULL       |                      |
+-------------+--------------+-----+------------+----------------------+

|                       tag表                                          |
+-------------+--------------+-----+------------+----------------------+
| Field       | Type         | Key | Default    | Extra                |
+-------------+--------------+-----+------------+----------------------+
| id          | int(11)      | PRI | NULL       | auto_increment       |
| name        | varchar(50)  |     | NULL       |                      |
| category_id | int(11)      |     | NULL       |                      |
+-------------+--------------+-----+------------+----------------------+

|                       post_tag表                                     |
+-------------+--------------+-----+------------+----------------------+
| Field       | Type         | Key | Default    | Extra                |
+-------------+--------------+-----+------------+----------------------+
| tag_id      | int(11)      | PRI | NULL       | auto_increment       |
| post_id     | int(11)      |     | NULL       |                      |
+-------------+--------------+-----+------------+----------------------+
從上面生成的表不難得出,TypeORM處理多對多的方式是,將其轉(zhuǎn)化為兩個一對多的關(guān)系:
-
文章表 post 與 中間表 post_tag 一對多 -
標(biāo)簽表 tag 與中間表 post_tag 也是一對多
小結(jié)
前面我們學(xué)習(xí)了TypeORM 中是如何處理一對一、一對多以及多對多的關(guān)系,做一個簡單的總結(jié)。
關(guān)系裝飾器:
-
@OneToOne: 用于描述一對一關(guān)系 -
@ManyToOne、@OneToMany:用于描述一對多關(guān)系,OneToMany總是反向的,并且總是與ManyToOne成對出現(xiàn)。 -
@ManyToMany: 用于描述多對多關(guān)系 -
@JoinColumn:定義關(guān)系哪一側(cè)帶外鍵的連接列,可以自定義連接列名稱和引用的列名稱 -
@JoinTable:用于描述“多對多”關(guān)系, 并描述中間表表的連接列
文章接口實(shí)現(xiàn)
這里簡單了繪制一個實(shí)體關(guān)系圖,方便理解一下我們要定義的實(shí)體有哪些:
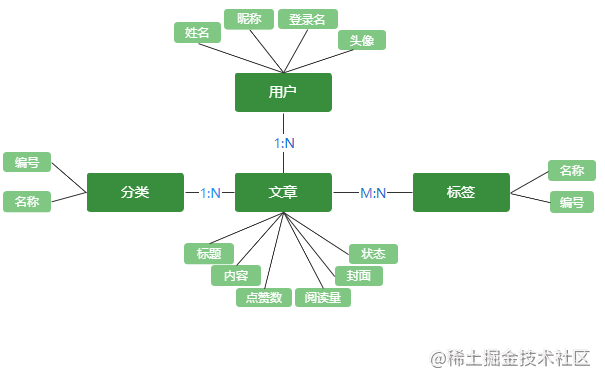
從圖中可以看出,需要定義用戶 User、 分類Category、標(biāo)簽Tag 以及文章Post 實(shí)體,其中User和Category與 Post是一對多關(guān)系,而Tag與Post是多對多。
我們要實(shí)現(xiàn)的接口:
-
創(chuàng)建文章 -
獲取全部文章列表 -
通過分類/標(biāo)簽/作者獲取文章列表 -
根據(jù)月份對文章歸檔 -
獲取文章詳情 -
更新閱讀量/點(diǎn)贊量 -
關(guān)鍵詞搜索文章
實(shí)體定義
上一篇文章實(shí)現(xiàn)登錄注冊時, 以及完成用戶實(shí)體定義,這里就不贅述,主要介紹一下文章實(shí)體:
@Entity('post')
export class PostsEntity {
  @PrimaryGeneratedColumn()
  id: number; // 標(biāo)記為主列,值自動生成
  // 文章標(biāo)題
  @Column({ length: 50 })
  title: string;
  // markdown內(nèi)容
  @Column({ type: 'mediumtext', default: null })
  content: string;
  // markdown 轉(zhuǎn) html,自動生成
  @Column({ type: 'mediumtext', default: null, name: 'content_html' })
  contentHtml: string;
  // 摘要,自動生成
  @Column({ type: 'text', default: null })
  summary: string;
  // 封面圖
  @Column({ default: null, name: 'cover_url' })
  coverUrl: string;
  // 閱讀量
  @Column({ type: 'int', default: 0 })
  count: number;
  // 點(diǎn)贊量
  @Column({ type: 'int', default: 0, name: 'like_count' })
  likeCount: number;
  // 推薦顯示
  @Column({ type: 'tinyint', default: 0, name: 'is_recommend' })
  isRecommend: number;
  // 文章狀態(tài)
  @Column('simple-enum', { enum: ['draft', 'publish'] })
  status: string;
  // 作者
  @ManyToOne((type) => User, (user) => user.posts)
  author: User;
  // 分類
  @Exclude()
  @ManyToOne(() => CategoryEntity, (category) => category.posts)
  @JoinColumn({
    name: 'category_id',
  })
  category: CategoryEntity;
  // 標(biāo)簽
  @ManyToMany(() => TagEntity, (tag) => tag.posts)
  @JoinTable({
    name: 'post_tag',
    joinColumns: [{ name: 'post_id' }],
    inverseJoinColumns: [{ name: 'tag_id' }],
  })
  tags: TagEntity[];

  @Column({ type: 'timestamp', name: 'publish_time', default: null })
  publishTime: Date;

  @Column({ type: 'timestamp', default: () => 'CURRENT_TIMESTAMP' })
  create_time: Date;

  @Column({ type: 'timestamp', default: () => 'CURRENT_TIMESTAMP' })
  update_time: Date;
}
這里我將文章字段都列出來, 其中contentHtml和summary是通過用戶傳入的文章內(nèi)容自動生成的,publishTime是文章狀態(tài)為發(fā)布publish時才會添加相應(yīng)的值, 這些字段都是在新增/更新文章時單獨(dú)處理的。
新增文章實(shí)現(xiàn)
新增文章這里涉及到的邏輯,我們一一進(jìn)行拆分:
首先,新增文章并不是任何人都可以創(chuàng)建的, 首先必須登錄,所以我們需要校驗(yàn)token, 其次用戶角色必須是admin或者root才可行, 如果是visitor游客, 那沒有權(quán)限創(chuàng)建。
接著,我們需要對字段進(jìn)行驗(yàn)證,文章title是必傳的,如果沒有不能創(chuàng)建;其次文章標(biāo)題重復(fù)時,不能新增,所有需要先查詢要新增的文章是否存在。
然后需要對分類和標(biāo)簽的插入進(jìn)行處理,同時還需要判斷status是草稿draft還是發(fā)布publish, 如果是publish,需要設(shè)置publishTime為當(dāng)前時間。
順著這個思路, 我們來實(shí)現(xiàn)一下這個接口, 首先判斷用戶有沒有新增文章的權(quán)限
定義授權(quán)守衛(wèi)RoleGuard
其實(shí)我們常說的鑒權(quán)本質(zhì)上分為兩步:
-
認(rèn)證(identification): 檢查用戶是否為合法用戶,用于確認(rèn)用戶的身份。這一步不會跟權(quán)限扯上關(guān)系, 比如上一篇文章登錄認(rèn)證實(shí)現(xiàn)的登錄獲取
token -
授權(quán)(authorization):通過
認(rèn)證的用戶, 獲得相應(yīng)的角色。不同的角色具有不同的權(quán)限。比如游客不能寫文章、只有查看、點(diǎn)贊的權(quán)限
那我們就需要處理授權(quán), 知道通過認(rèn)證的用戶到底有沒有操作權(quán)限。怎么來實(shí)現(xiàn)呢?這里我們使用Nestjs中的守衛(wèi)Guard來實(shí)現(xiàn)。
守衛(wèi)的本質(zhì)也是中間件的一種, 如果當(dāng)前請求是不被允許的,當(dāng)前中間將不會調(diào)用后續(xù)中間件, 達(dá)到阻斷請求的目的。
-
在 auth模塊中創(chuàng)建role.guard.ts文件,定義基于角色的身份驗(yàn)證的路由守衛(wèi),中間件都需要用@Injectable()裝飾器處理,需要實(shí)現(xiàn)一個canActivate接口。
// role.guard.ts
...
@Injectable()
export class RolesGuard implements CanActivate {
  constructor(
    private readonly reflector: Reflector,
    private readonly jwtService: JwtService,
  ) {}

  canActivate(context: ExecutionContext): boolean {
    // 獲取路由角色
    const roles = this.reflector.get('roles', context.getHandler());
    if (!roles) {
      return true;
    }
    // 讀取user
    const req = context.switchToHttp().getRequest();
    const user = req.user;
    if (!user) {
      return false;
    }
   // 判斷用戶的角色是否包含和roles相同的角色列表,并返回一個布爾類型
    const hasRoles = roles.some((role) => role === user.role);
    return hasRoles;
  }
}
-
定義一個角色裝飾器 @Roles, 在role.guard.ts中實(shí)現(xiàn):
export const Roles = (...roles: string[]) => SetMetadata('roles', roles);
-
在路由控制器中使用授權(quán)守衛(wèi) RoleGuard, 通過@Roles裝飾器設(shè)置可訪問路由的角色admin和root:
// posts.controller.ts

@ApiOperation({ summary: '創(chuàng)建文章' })
@ApiBearerAuth()
@Post()
@Roles('admin', 'root')
@UseGuards(AuthGuard('jwt'), RolesGuard)
async create(@Body() post: CreatePostDto, @Req() req) {
    return await this.postsService.create(req.user, post);
}
一個完整授權(quán)守衛(wèi)的從定義到使用就完全實(shí)現(xiàn)了,實(shí)現(xiàn)的功能是:根據(jù)獲取當(dāng)前用戶的角色與當(dāng)前正在處理的路徑所需的實(shí)際角色進(jìn)行比較,判斷其是否滿足條件。
對上面代碼實(shí)現(xiàn)進(jìn)行簡單分析:
-
為了獲得路徑設(shè)置的可訪問角色,定義了
@Roles裝飾器, 并使用Reflector輔助類獲取(它由框架提供, 并從@nestjs/core中導(dǎo)入) -
因?yàn)槭跈?quán)之前首先需要對
token進(jìn)行認(rèn)證, 認(rèn)證通過后才會進(jìn)入角色授權(quán)守衛(wèi) -
通 request對象可以獲取到user -
使用守衛(wèi)時認(rèn)證在前 @UseGuards(AuthGuard('jwt'), RolesGuard) -
判斷當(dāng)前用戶的角色是否包含在路由要求的角色列表中
-
存在, 返回true,進(jìn)入請求 -
不存在, 返回false,阻斷請求, 并拋出一個 ForbiddenException異常, 你也可以自定義拋出異常。
業(yè)務(wù)邏輯實(shí)現(xiàn)
// posts.service.ts
 async create(user, post: CreatePostDto): Promise<number> {
    const { title } = post;
    if (!title) {
      throw new HttpException('缺少文章標(biāo)題', HttpStatus.BAD_REQUEST);
    }

    const doc = await this.postsRepository.findOne({
      where: { title},
    });
    if (doc) {
      throw new HttpException('文章已存在', HttpStatus.BAD_REQUEST);
    }

    let { tag, category = 0, status, isRecommend, coverUrl } = post;

    // 根據(jù)分類id獲取分類
    const categoryDoc = await this.categoryService.findById(category);
    // 根據(jù)傳入的標(biāo)簽id,如 `1,2`,獲取標(biāo)簽
    const tags = await this.tagService.findByIds(('' + tag).split(','));
    const postParam: Partial<PostsEntity> = {
      ...post,
      isRecommend: isRecommend ? 1 : 0,
      category: categoryDoc,
      tags: tags,
      author: user,
    };
    // 判斷狀態(tài),為publish則設(shè)置發(fā)布時間
    if (status === 'publish') {
      Object.assign(postParam, {
        publishTime: new Date(),
      });
    }
    const newPost: PostsEntity = await this.postsRepository.create({
      ...postParam,
    });
    const created = await this.postsRepository.save(newPost);
    return created.id;
  }
聯(lián)表查詢
以獲取全部文章列表為例,這個接口實(shí)現(xiàn)主要的點(diǎn)在于多表關(guān)聯(lián)查詢的實(shí)現(xiàn), 首先需要認(rèn)識一下多表關(guān)聯(lián)查詢怎么實(shí)現(xiàn)。介紹三種 TypeORM提供的多表關(guān)聯(lián)查詢方式
-
Find選項(xiàng) -
Query Builder -
原生SQL
find 選項(xiàng)
所有存儲庫和管理器查找方法都接受特殊選項(xiàng),您可以使用這些選項(xiàng)查詢所需的數(shù)據(jù):
查詢所有文章(不涉及到關(guān)聯(lián)關(guān)系)
const postRepository = connect.getRepository(PostsEntity)
const result = await postRepository.find()
執(zhí)行的SQL類似于:
select * from post
使用select指定要查詢的字段:
const postRepository = connect.getRepository(PostsEntity)
const result = await postRepository.find({select:["id","title"]})
執(zhí)行的SQL類似:
select id, title from post
查詢條件是通過where來指定, 這里就不一一進(jìn)行演示,直接看多表關(guān)聯(lián)find應(yīng)該如何查詢, 通過relations指定關(guān)聯(lián)查詢(前提是先有外鍵關(guān)聯(lián)關(guān)系):
const postRepository = connect.getRepository(PostsEntity)
const result = await postRepository.find({relations:["author"]})
執(zhí)行的SQL類似
select a.*, b.* from post as a left join user as b on a.authorId = b.id
除了find選項(xiàng)實(shí)現(xiàn)查詢,TypeORM還提供了一種QueryBilder方式。
QueryBilder 相關(guān)
find操作起來很簡潔,但是無法應(yīng)對所以場景:
QueryBuilder是 TypeORM 最強(qiáng)大的功能之一 ,它讓我們可以使用優(yōu)雅便捷的語法構(gòu)建 SQL 查詢,執(zhí)行并獲得自動轉(zhuǎn)換的實(shí)體。
有三種方式可以創(chuàng)建QueryBuilder:
// 1. 使用 connection:
import { getConnection } from "typeorm";
const user = await getConnection()
    .createQueryBuilder()
    .select("user")
    .from(User, "user")
    .where("user.id = :id", { id: 1 })
    .getOne();

// 2. 使用 entity manager:
import { getManager } from "typeorm";
const user = await getManager()
    .createQueryBuilder(User, "user")
    .where("user.id = :id", { id: 1 })
    .getOne();

// 3.使用 repository:
import { getRepository } from "typeorm";
const user = await getRepository(User)
    .createQueryBuilder("user")
    .where("user.id = :id", { id: 1 })
    .getOne();
QueryBilder中實(shí)現(xiàn)連表查詢的常用方法是leftJoinAndSelect,看看如何使用的:
const posts = await this.postsRepository
      .createQueryBuilder('post')
      .leftJoinAndSelect('post.tags','tag')
      .getMany()
查詢結(jié)果:
[
 {
    id: 46,
    title: '文章1'
    content: '測試文章內(nèi)容輸入....',
    ...
    tags: [
    {
      id: 1,
      name: 'vue'
    },{
       id: 9,
       name: 'vuex'
    }]
  }...]
從結(jié)果可以看出leftJoinAndSelect自動加載了文章1的所有標(biāo)簽tags。
leftJoinAndSelect第一個參數(shù)是要加載的關(guān)系, 第二個參數(shù)是為此關(guān)系的表分配的別名。后面可以在查詢構(gòu)建器中的任何位置使用此別名。例如, 篩選有標(biāo)簽名為node的文章:
const posts = await this.postsRepository
      .createQueryBuilder('post')
      .leftJoinAndSelect('post.tags','tag')
      .where('tag.name=:name', { name: 'node' });
      .getMany()
SQL原生語句
利用以上對find和QueryBilder知識點(diǎn)的學(xué)習(xí), 可以實(shí)現(xiàn)獲取文章列表的接口, 這里我使用的是QueryBilder方式, 源碼文件中,也有find方式的實(shí)現(xiàn), 感興趣的小伙伴自己下載源碼看。
 async findAll(query): Promise<PostsRo> {
    const qb = await this.postsRepository
      .createQueryBuilder('post')
      .leftJoinAndSelect('post.category', 'category')
      .leftJoinAndSelect('post.tags', 'tag')
      .leftJoinAndSelect('post.author', 'user')
      .orderBy('post.updateTime', 'DESC');
    qb.where('1 = 1');
    qb.orderBy('post.create_time', 'DESC');

    const count = await qb.getCount();
    const { pageNum = 1, pageSize = 10, ...params } = query;
    qb.limit(pageSize);
    qb.offset(pageSize * (pageNum - 1));

    let posts = await qb.getMany();
    const result: PostInfoDto[] = posts.map((item) => item.toResponseObject());
    return { list: result, count: count };
 }
在上面代碼中使用到了toResponseObject實(shí)例方法來整理返回?cái)?shù)據(jù)的格式,這方法是在posts.entity.ts中定義的, 因?yàn)樵诤芏喾祷匚恼聰?shù)據(jù)的地方都需要對數(shù)據(jù)進(jìn)行格式化,比如,直接查詢出來的結(jié)果,標(biāo)簽是嵌套的數(shù)組對象, 而前端只需要顯示標(biāo)簽,我們直接返回多個標(biāo)簽名就可以了,同理,聯(lián)表查詢出來的user、category等數(shù)據(jù)都是嵌套的,我們也需要進(jìn)行處理。
// posts.entity.ts

  toResponseObject(): PostInfoDto {
    let responseObj: PostInfoDto = {
      ...this,
      isRecommend: this.isRecommend ? true : false,
    };
    if (this.category) {
      responseObj.category = this.category.name;
    }
    if (this.tags && this.tags.length) {
      responseObj.tags = this.tags.map((item) => item.name);
    }
    if (this.author && this.author.id) {
      responseObj.userId = this.author.id;
      responseObj.author = this.author.nickname || this.author.username;
    }
    return responseObj;
  }
最后我們查詢出來的數(shù)據(jù)的格式就清爽多了(省略了一些字段顯示) :
{
  "data": {
    "list": [
      {
        "id": 47,
        "title": "2323232",
        "content": "string",
        "status": "publish",
        "category": "前端",
        "tags": [ "JavaScript","node"],
        "author": "admin",
        "userId": "d2244619-f6a9-4bb2-b00f-b809eb9a458a"
      }
    ],
    "count": 7
  },
  "code": 0,
  "msg": "請求成功"
}
文章閱讀量
對于文章閱讀量計(jì)數(shù),我們這里采用的方案是,獲取文章詳情時,閱讀量+1。首先表明這個實(shí)現(xiàn)只是一個過渡方案,雖然實(shí)現(xiàn)簡單, 但是有幾個問題:
-
當(dāng)有大量的人同時閱讀這個內(nèi)容的時候,可能涉及到加鎖的問題 -
當(dāng)流量較大時,同時讀取和修改同一條數(shù)據(jù), 對數(shù)據(jù)庫壓力來說壓力很大 -
同一個人不停的屬性頁面,也容易導(dǎo)致數(shù)據(jù)準(zhǔn)確率不高
針對上面的問題是有解決方案的, 可以通過redis很方便的解決, 鑒于部分小伙伴對redis不甚了解, 所以后面會單獨(dú)用一篇文章來將redis, 以及在我們項(xiàng)目中的應(yīng)用,
閱讀量+1實(shí)現(xiàn)
在posts.service.ts中業(yè)務(wù)代碼實(shí)現(xiàn):
async findById(id): Promise<any> {
    const qb = this.postsRepository
      .createQueryBuilder('post')
      .leftJoinAndSelect('post.category', 'category')
      .leftJoinAndSelect('post.tags', 'tag')
      .leftJoinAndSelect('post.author', 'user')
      .where('post.id=:id')
      .setParameter('id', id);

    const result = await qb.getOne();
    if(!result) throw new HttpException(`id為${id}的文章不存在`, HttpStatus.BAD_REQUEST);
    await this.postsRepository.update(id, {count: result.count+1})

    return result.toResponseObject();
  }
上傳文件到COS
在前面文章實(shí)體定義中有文章封面coverUrl字段,文章封面我們不是直接上傳到服務(wù)器的,而是使用騰訊云的對象存儲cos。
我們都知道在前端實(shí)現(xiàn)文件上傳,但是將SecretId和SecretKey暴露在前端頁面, 很容易泄露,存在嚴(yán)重的安全隱患, 所以上傳文件到騰訊云COS還是放在后端去實(shí)現(xiàn)更合理。
為了節(jié)省資源以及資源復(fù)用,在上傳圖片時,計(jì)算圖片MD5值對比文件是否已經(jīng)存在,如果存在則不再上傳,而是返回查詢到的文件地址。
文件上傳過程實(shí)現(xiàn)流程:
-
首先獲取到上傳的文件 -
根據(jù)文件后綴判斷文件類型,指定上傳文件的路徑(將不同的文件類型上傳到對應(yīng)的文件夾中) -
MD5加密文件生成字符串,對文件進(jìn)行命名 -
查詢文件是否已存在于COS中 -
存在,則拼接文件路徑返回 -
不存在, 調(diào)用騰訊api將文件上傳到cos中
Nest內(nèi)置文件上傳
為了處理文件上傳, Nest.js為Express提供了一個基于multer中間件包的內(nèi)置模塊,Multer 處理以 multipart/form-data 格式發(fā)布的數(shù)據(jù),該格式主要用于通過 HTTP POST 請求上傳文件。
我們無需再安裝multer, 為了有更好的代碼提示和類型檢查,最好安裝一下類型包:
npm i -D @types/multer
要實(shí)現(xiàn)單個文件上傳,只需要將FileInterceptor()攔截器綁定到路由, 然后使用@UploadFile裝飾器從請求中提取文件。
 @Post('upload')
  @ApiOperation({ summary: '上傳文件' })
  @ApiConsumes('multipart/form-data')
  @UseInterceptors(FileInterceptor('file'))
  async uploadFile(@UploadedFile('file') file: Express.Multer.File) {
    return await this.appService.upload(file);
  }
這樣我們就可以獲取到上傳的文件,此時我們獲取到的文件如下:
 {
  fieldname: 'file',
  originalname: '1636192811zfb.jpg',
  encoding: '7bit',
  mimetype: 'image/jpeg',
  buffer: <Buffer 89 50 4e 47 0d 0a 1a 0a 00 00 00 0d 49 48 44 52 00 00 01 96 00 00 02 44 08 06 00 00 00 35 e6 02 2f 00 00 00 01 73 52 47 42 00 ae ce 1c e9 00 00 00 04 ... 62223 more bytes>,
  size: 62273
}
但是我們想要對文件的名字以及后綴名進(jìn)行一下處理,怎么實(shí)現(xiàn)呢?
方式一:放到service中去處理,這種方式?jīng)]什么多說點(diǎn)的~
說說另一種方式, 就是通過配置multer的diskStorage,讓上傳的文件帶有后綴名且名字根據(jù)MD5加密。
代碼實(shí)現(xiàn):
const image = ['gif', 'png', 'jpg', 'jpeg', 'bmp', 'webp'];
const video = ['mp4', 'webm'];
const audio = ['mp3', 'wav', 'ogg'];

...
  @UseInterceptors( FileInterceptor('file', {
      storage: multer.diskStorage({
        // 配置上傳后文件存儲位置
        destination: (req, file, cb) => {
          // 根據(jù)上傳的文件類型將圖片視頻音頻和其他類型文件分別存到對應(yīng)英文文件夾
          const mimeType = file.mimetype.split('/')[1];
          let temp = 'other';
          image.filter((item) => item === mimeType).length > 0
            ? (temp = 'image')
            : '';
          video.filter((item) => item === mimeType).length > 0
            ? (temp = 'video')
            : '';
          audio.filter((item) => item === mimeType).length > 0
            ? (temp = 'audio')
            : '';

          const filePath = `${config.fileTempPath}${temp}`;
          // 判斷文件夾是否存在,不存在則自動生成
          if (!fs.existsSync(filePath)) {
            fs.mkdirSync(filePath);
          }
          return cb(null, `${filePath}`);
        },
        // 配置文件名稱
        filename: async (req, file, cb) => {
          const index = file.originalname.lastIndexOf('.');

          const md5File = await getMd5File(file);
          //獲取后綴
          const ext = file.originalname.substr(index);
          cb(null, md5File + ext);
        },
      }),
    }),
  )
其中對文件MD5加密實(shí)現(xiàn)如下,使用的是crypto來進(jìn)行加密:
function getMd5File(file) {
    const buffer =Buffer.from(JSON.stringify(file), 'utf-8')
    const md5File = crypto
          .createHash('md5')
          .update(JSON.stringify(buffer))
          .digest('hex');
          return md5File
  }
獲取到利用MD5加密的文件名后, 接下來就是對接騰訊云對象API, 主要使用兩個API:文件上傳和文件對象獲取
騰訊云存儲文件
首先我們需要有騰訊云賬號, 并且開通對象存儲功能,拿到對象存儲的SecretId和SecretKey
首先安裝騰訊云提供的Node.js版本的SDK, cos-nodejs-sdk-v5
npm install cos-nodejs-sdk-v5 --save
初始化COS對象, 需要使用SecretId和SecretKey, 我這里是將這兩個變量寫在.env文件中的:
const { env } = process;
...
const cos = new COS({
     SecretId: env.TXSecretId,
     SecretKey: env.TXSecretKey,
 });
文件上傳實(shí)現(xiàn):
  async uploadFile(cosName: string, localPath: string): Promise<UploadFileRo> {
    return new Promise((resolve, reject) => {
      const params = {
        Bucket: env.Bucket,
        Region: env.Region,
        Key: this.cosPath + cosName, // cos 圖片地址
        FilePath: localPath /* 必須 ,本地地址*/,
        SliceSize: 1024 * 1024 * 2 /* 超過2MB使用分塊上傳,非必須 */,
      };
      cos.uploadFile({
          ...params,
          onFileFinish: (err, data, options) => {
            console.log(options.Key + '上傳' + (err ? '失敗' : '完成'));
          }},
        (err, data) => {
          // 刪除本地文件
          fs.unlinkSync(localPath);
          if (err) throw new HttpException(err, 401);
          resolve({
            url: 'https://' + data.Location,
            filename: cosName,
          } as UploadFileRo);
        },
      );
    });
  }
調(diào)用cos的uploadFile方法, 參數(shù)說明:
-
Bucket: 存儲桶的名稱 -
Region:存儲桶所在地域 -
Key: 對象在存儲桶中的唯一標(biāo)識, 需要注意包含存儲桶中的路徑,不僅僅是文件名稱 -
FilePath: 上傳的文件所在路徑 -
SliceSize:設(shè)置分塊上傳大小
最后,記得刪除存在服務(wù)器上的文件, 否則文件會越來越多,占用空間。這里還可進(jìn)行優(yōu)化
獲取文件對象
 async getFile(filename: string, localPath: string): Promise<UploadFileRo> {
    return new Promise((resolve, reject) => {
      cos.getBucket({
          Bucket: env.Bucket,
          Region: env.Region,
          Prefix: this.cosPath + filename},
        (err, data) => {
          // 刪除本地文件
          fs.unlinkSync(localPath);
          if (err) {
            reject(err);
            throw new HttpException(err, 401);
          }
          // 文件已存在
          if (data.Contents && data.Contents.length > 0) {
            resolve({ url: this.urlPrefix + this.cosPath + filename })
          } else {
            resolve({ url: '' });
          }
        }
      );
    });
  }
當(dāng)獲取到文件時,拼裝文件地址返回。前面已經(jīng)實(shí)現(xiàn)了文件上傳到騰訊云以及獲取, 最后需要做的就是判斷什么時機(jī)調(diào)用上傳。
首先必須調(diào)用獲取文件對象方法getFile判斷當(dāng)前文件是否已經(jīng)在騰訊云COS中已存在,如果已經(jīng)存在,直接返回結(jié)果, 反之進(jìn)行上傳, 在app.service.ts文件中實(shí)現(xiàn):
import { CosService, UploadFileRo } from './core/shared-service/cos.service';
@Injectable()
export class AppService {
  constructor(private readonly cosService: CosService) {}
  async upload(file): Promise<UploadFileRo> {
    // 判斷文件是否存在
    const existFile = await this.cosService.getFile(file.filename, file.path);
    if (existFile.url) {
      return existFile;
    }
    return await this.cosService.uploadFile(file.filename, file.path);
  }
}
單文件上傳至騰訊云就實(shí)現(xiàn)了, 可以思考一下多文件上傳如何實(shí)現(xiàn)~
關(guān)于文章模塊的實(shí)現(xiàn)還有使用中間件實(shí)現(xiàn)自動生成文章摘要以及markdown轉(zhuǎn)html, 實(shí)現(xiàn)比較簡單,篇幅太長就不一一的介紹了, 可以在源碼中查看(文末有源碼獲取方式)。
公眾號回復(fù)【Nest.js】 獲取源碼
總結(jié)
回顧一下【Nest入門系列文章】
-
Nest.js 手把手帶你實(shí)戰(zhàn)-項(xiàng)目創(chuàng)建&數(shù)據(jù)庫操作 -
Nest.js 手把手帶你實(shí)戰(zhàn)-實(shí)現(xiàn)注冊、掃碼登陸、jwt認(rèn)證等
預(yù)告一下接下來【Nest.js進(jìn)階系列文章】,會對Nest.js的核心知識點(diǎn)進(jìn)行詳細(xì)拆解,結(jié)合Redis解決我們?nèi)腴T系列文章中留下的坑,并且對數(shù)據(jù)庫操作高級應(yīng)用的講解。
        Node 社群


     我組建了一個氛圍特別好的 Node.js 社群,里面有很多 Node.js小伙伴,如果你對Node.js學(xué)習(xí)感興趣的話(后續(xù)有計(jì)劃也可以),我們可以一起進(jìn)行Node.js相關(guān)的交流、學(xué)習(xí)、共建。下方加 考拉 好友回復(fù)「Node」即可。


     如果你覺得這篇內(nèi)容對你有幫助,我想請你幫我2個小忙:


      1. 點(diǎn)個「在看」,讓更多人也能看到這篇文章


      2. 訂閱官方博客 www.inode.club 讓我們一起成長
參考鏈接:
微信掃碼登錄背后的實(shí)現(xiàn)原理:https://juejin.cn/post/6881597417637511181
TypeOrm操作數(shù)據(jù)庫:https://segmentfault.com/a/1190000040207165
點(diǎn)贊和在看就是最大的支持??