深入理解 Mocha 測試框架:從零實現(xiàn)一個 Mocha
大廠技術 堅持周更 精選好文
本文為來自飛書 aPaaS Growth 研發(fā)團隊成員的文章。
aPaaS Growth 團隊專注在用戶可感知的、宏觀的 aPaaS 應用的搭建流程,及租戶、應用治理等產(chǎn)品路徑,致力于打造 aPaaS 平臺流暢的 “應用交付” 流程和體驗,完善應用構建相關的生態(tài),加強應用搭建的便捷性和可靠性,提升應用的整體性能,從而助力 aPaaS 的用戶增長,與基礎團隊一起推進 aPaaS 在企業(yè)內(nèi)外部的落地與提效。
前言
什么是自動化測試
自動化測試在很多團隊中都是Devops環(huán)節(jié)中很難執(zhí)行起來的一個環(huán)節(jié),主要原因在于測試代碼的編寫工作很難抽象,99%的場景都需要和業(yè)務強綁定,而且寫測試代碼的編寫工作量往往比編寫實際業(yè)務代碼的工作量更多。在一些很多業(yè)務場景中投入產(chǎn)出比很低,適合寫自動化測試的應該是那些中長期業(yè)務以及一些諸如組件一樣的基礎庫。自動化測試是個比較大的概念,其中分類也比較多,比如單元測試,端對端測試,集成測試等等,其中單元測試相對而言是我們比較耳熟能詳?shù)囊粋€領域。單元測試框架有很多,比如Mocha,Jest,AVA等。Mocha是我們今天文章的重點,我們先來了解下mocha是怎樣的一款框架。
什么是Mocha
Mocha是一款運行在nodejs上的測試框架,相信大家或多或少都有聽過或是見過,支持同步和異步測試,同時還支持TDD,BDD等多種測試風格,mocha作為一款老牌的測試框架已經(jīng)被廣泛應用在單元測試或是端對端測試的場景中。mocha的源碼十分的冗長,而且包含了很多的高級玩法,但實際上mocha的核心原理是十分簡單的,導致源碼體積龐雜的原因主要在于實現(xiàn)了很多其他的功能,做了很多代碼上的兼容處理。比如生成html格式的測試報告這種,支持多種的測試風格,插件系統(tǒng)等等。但實際在業(yè)務中我們對mocha本身90%的場景的使用也僅僅是他的“測試”功能而已。諸如多種文本格式的測試覆蓋率報告的生成,斷言庫,測試數(shù)據(jù)mock等等其它功能都可以使用做的更好一些第三方庫來代替。mocha本身是個比較純粹的測試框架。
準備
了解mocha
綜上所述,撇棄mocha其它的復雜實現(xiàn),針對于它的核心原理的解讀是本次分享的主題。源碼閱讀十分枯燥,我們將根據(jù)目前現(xiàn)有的mocha核心功能實現(xiàn)一個簡易的mocha。在此之前我們先認識下如何使用mocha,下面是一段來自lodash判斷數(shù)據(jù)類型的代碼:
// mocha-demo/index.js
const toString = Object.prototype.toString;

function getTag(value) {
  if (value == null) {
    return value === undefined ? '[object Undefined]' : '[object Null]'
  }
  return toString.call(value)
}

module.exports = {
  getTag,
};
上述代碼使用了Object.prototype.toString來判斷了數(shù)據(jù)類型,我們針對上述代碼的測試用例(此處斷言使用node原生的assert方法,采用BDD的測試風格):
// test/getTag.spec.js
const assert = require('assert');
const { getTag } = require('../index');

describe('檢查:getTag函數(shù)執(zhí)行', function () {
  before(function() {
    console.log('??before鉤子觸發(fā)');
  });
  describe('測試:正常流', function() {
    it('類型返回: [object JSON]', function (done) {
      setTimeout(() => {
        assert.equal(getTag(JSON), '[object JSON]');
        done();
      }, 1000);
    });
    it('類型返回: [object Number]', function() {
      assert.equal(getTag(1), '[object Number]');
    });
  });
  describe('測試:異常流', function() {
    it('類型返回: [object Undefined]', function() {
      assert.equal(getTag(undefined), '[object Undefined]');
    });
  });
  after(function() {
    console.log('??after鉤子觸發(fā)');
  });
});
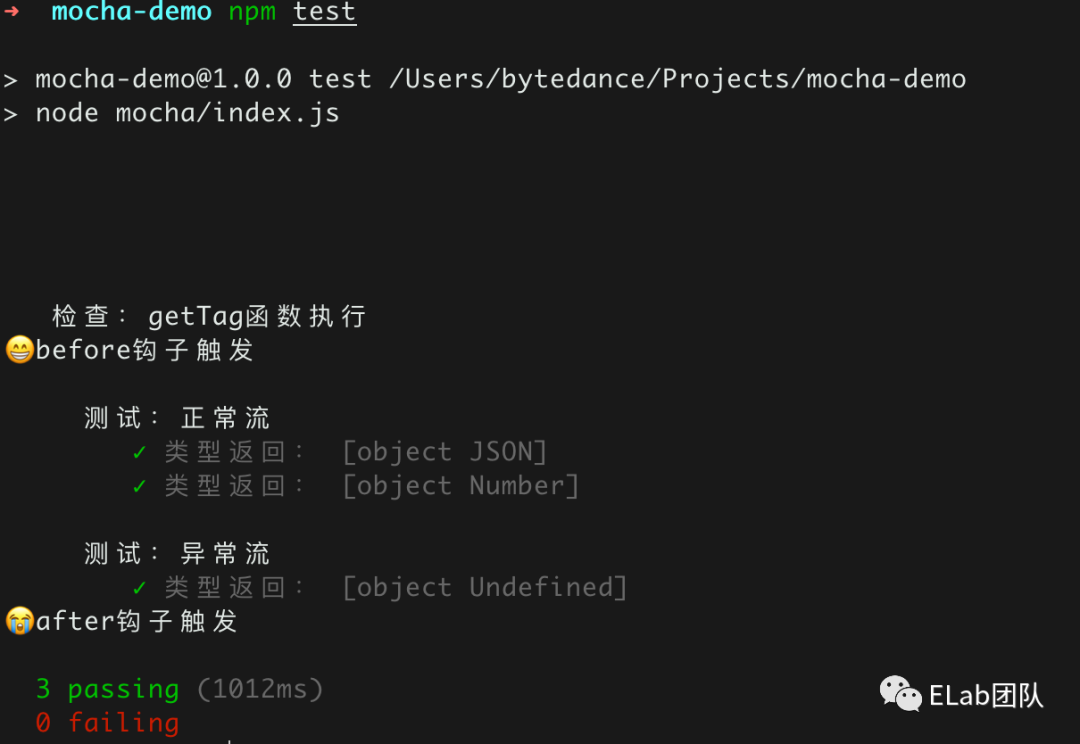
mocha提供的api語義還是比較強的,即使沒寫過單元測試代碼,單看這段代碼也不難理解這段代碼干了啥,而這段測試代碼頁會作為我們最后驗證簡易Mocha的樣例,我們先來看下使用mocha運行該測試用例的執(zhí)行結(jié)果:
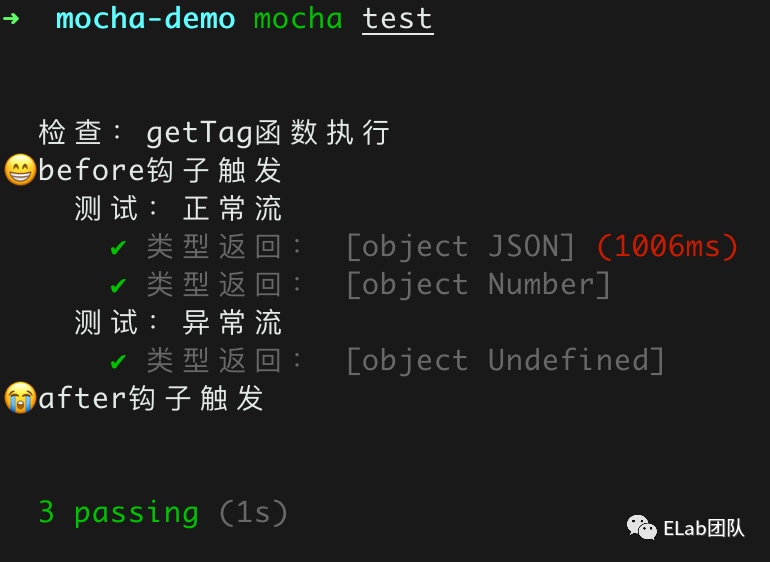
如上圖所示,即我們前面測試代碼的執(zhí)行結(jié)果,我們來拆分下當前mocha實現(xiàn)的一些功能點。
注:mocha更多使用方法可參考Mocha - the fun, simple, flexible JavaScript test framework[1]
核心函數(shù)
首先我們可以看到mocha主要提供兩個核心函數(shù) describe和it來進行測試用例的編寫。describe函數(shù)我們稱之為測試套件,它的核心功能是來描述測試的流程,it函數(shù)我們稱之為一個測試單元,它的功能是來執(zhí)行具體的測試用例。
測試風格
上面的測試用例編寫我們采用了典型的BDD風格,所謂的BDD風格可以理解為需求先行的一種測試風格,還有一種比較常見的測試風格TDD即測試驅(qū)動開發(fā),TDD強調(diào)的是測試先行。在具體的業(yè)務開發(fā)中我們可以理解為TDD是指在寫具體的業(yè)務的代碼之前先寫好測試用例,用提前編寫好的測試用例去一步步完善我們的業(yè)務代碼,遵循著測試用例->編碼 -> 驗證 -> 重構的過程,而BDD是指針對既有的業(yè)務代碼進行編寫測試用例,強調(diào)的是行為先行,使得測試用例覆蓋業(yè)務代碼所有的case。mocha默認采用的是BDD的測試風格,而且我們在實際開發(fā)中,更多涉及的其實也是BDD的測試風格,因此我們此次也將實現(xiàn)BDD的測試風格。
鉤子函數(shù)
如上在執(zhí)行測試套件或是測試單元之前mocha提供了很多的鉤子: before:在執(zhí)行測試套件之前觸發(fā)該鉤子; after:在測試套件執(zhí)行結(jié)束之后觸發(fā)該鉤子; beforeEach:在每個測試單元執(zhí)行之前觸發(fā)該鉤子; afterEach:在每個測試單元執(zhí)行結(jié)束后觸發(fā)該鉤子;
鉤子的使用場景更多是在實際的業(yè)務場景中進行mock數(shù)據(jù)、測試數(shù)據(jù)收集、測試報告的自定義等;因此鉤子也是mocha的核心功能之一;
支持異步
如上第一個測試用例:
it('類型返回: [object JSON]', function (done) {
  setTimeout(() => {
    assert.equal(getTag(JSON), '[object JSON]');
    done();
  }, 1000);
});
這種異步代碼在我們實際業(yè)務中也是十分常見的,比如某一部分代碼依賴接口數(shù)據(jù)的返回,或是對某些定時器進行單測用例的編寫。mocha支持兩種方式的異步代碼,一種是回調(diào)函數(shù)直接返回一個Promise,一種是支持在回調(diào)函數(shù)中傳參數(shù)done,手動調(diào)用done函數(shù)來結(jié)束用例。
執(zhí)行結(jié)果和執(zhí)行順序
我們可以看到用例的執(zhí)行是嚴格按照從外到里,從上到下的執(zhí)行順序來執(zhí)行,其中鉤子的執(zhí)行順序和它的編寫順序無關,而且我們發(fā)現(xiàn)在測試用例編寫過程中,諸如 describe、it和before/after都無需引用依賴,直接調(diào)用即可,因此我們還要實現(xiàn)下相關 api 的全局掛載。
設計
目錄結(jié)構設計
├── index.js            #待測試代碼(業(yè)務代碼)
├── mocha               #簡易mocha所在目錄
│   ├── index.js       #簡易mocha入口文件
│   ├── interfaces     #存放不同的測試風格
│   │   ├── bdd.js    #BDD 測試風格的實現(xiàn)
│   │   └── index.js  #方便不同測試風格的導出
│   ├── reporters      #生成測試報告
│   │   ├── index.js
│   │   └── spec.js
│   └── src            #簡易mocha核心目錄
│       ├── mocha.js   #存放Mocha類控制整個流程
│       ├── runner.js  #Runner類,輔助Mocha類執(zhí)行測試用例
│       ├── suite.js   #Suite類,處理describe函數(shù)
│       ├── test.js    #Test類,處理it函數(shù)
│       └── utils.js   #存放一些工具函數(shù)
├── package.json
└── test               #測試用例編寫
    └── getTag.spec.js
上面的mocha文件夾就是我們將要實現(xiàn)的簡易版mocha目錄,目錄結(jié)構參考的mocha源碼,但只采取了核心部分目錄結(jié)構。
總體流程設計
首先我們需要一個整體的Mocha類來控制整個流程的執(zhí)行:
class Mocha {
  constructor() {}
  run() {}
}
module.exports = Mocha;
入口文件更新為:
// mocha-demo/mocha/index.js
const Mocha = require('./src/mocha');
const mocha = new Mocha();
mocha.run();
測試用例的執(zhí)行過程順序尤其重要,前面說過用例的執(zhí)行遵循從外到里,從上到下的順序,對于describe和it的回調(diào)函數(shù)處理很容易讓我們想到這是一個樹形結(jié)構,而且是深度優(yōu)先的遍歷順序。簡化下上面的用例代碼:
describe('檢查:getTag函數(shù)執(zhí)行', function () {
  describe('測試:正常流', function() {
   it('類型返回: [object JSON]', function (done) {
      setTimeout(() => {
        assert.equal(getTag(JSON), '[object JSON]');
        done();
      }, 1000);
    });
    it('類型返回: [object Number]', function() {
      assert.equal(getTag(1), '[object Number]');
    });
  });
  describe('測試:異常流', function() {
    it('類型返回: [object Undefined]', function() {
      assert.equal(getTag(undefined), '[object Undefined]');
    });
  });
});
針對這段代碼結(jié)構如下:
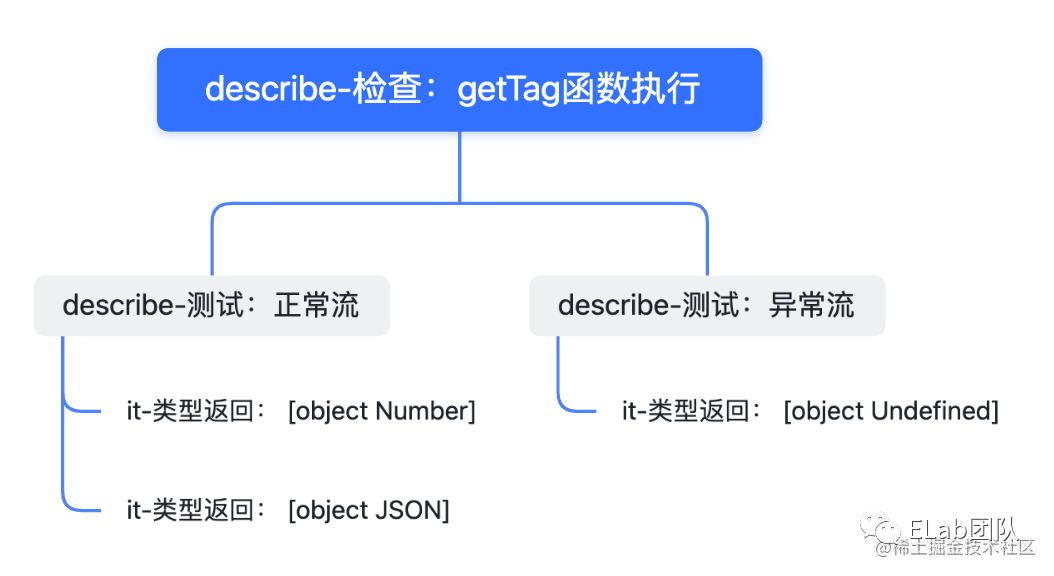
整個樹的結(jié)構如上,而我們在處理具體的函數(shù)的時候則可以定義Suite/Test兩個類來分別描述describe/it兩個函數(shù)。可以看到describe函數(shù)是存在父子關系的,關于Suite類的屬性我們定義如下:
 // mocha/src/suite.js
class  Suite {
  /**
*
* @param { * } parent 父節(jié)點
* @param { * } title Suite名稱,即describe傳入的第一個參數(shù)
*/
 constructor ( parent, title ) {
 this . title = title; // Suite名稱,即describe傳入的第一個參數(shù)
 this . parent = parent // 父suite
this . suites = [];  // 子級suite
 this . tests = []; // 包含的it 測試用例方法
 this . _beforeAll = []; // before 鉤子
 this . _afterAll = []; // after 鉤子
 this . _beforeEach = []; // beforeEach鉤子
 this . _afterEach = []; // afterEach 鉤子
    // 將當前Suite實例push到父級的suties數(shù)組中
 if (parent instanceof  Suite ) {
parent. suites . push ( this );
}
}
}

module . exports = Suite ;
而Test類代表it就可以定義的較為簡單:
 // mocha/src/test.js
class Test {
  constructor(props) {
    this.title = props.title;  // Test名稱,it傳入的第一個參數(shù)
    this.fn = props.fn;        // Test的執(zhí)行函數(shù),it傳入的第二個參數(shù)
  }
}

module.exports = Test;
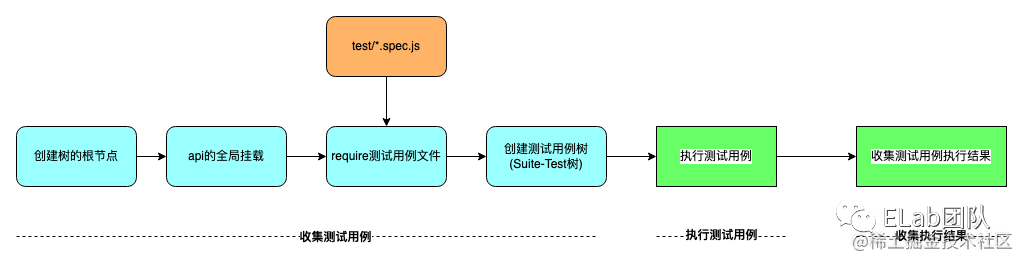
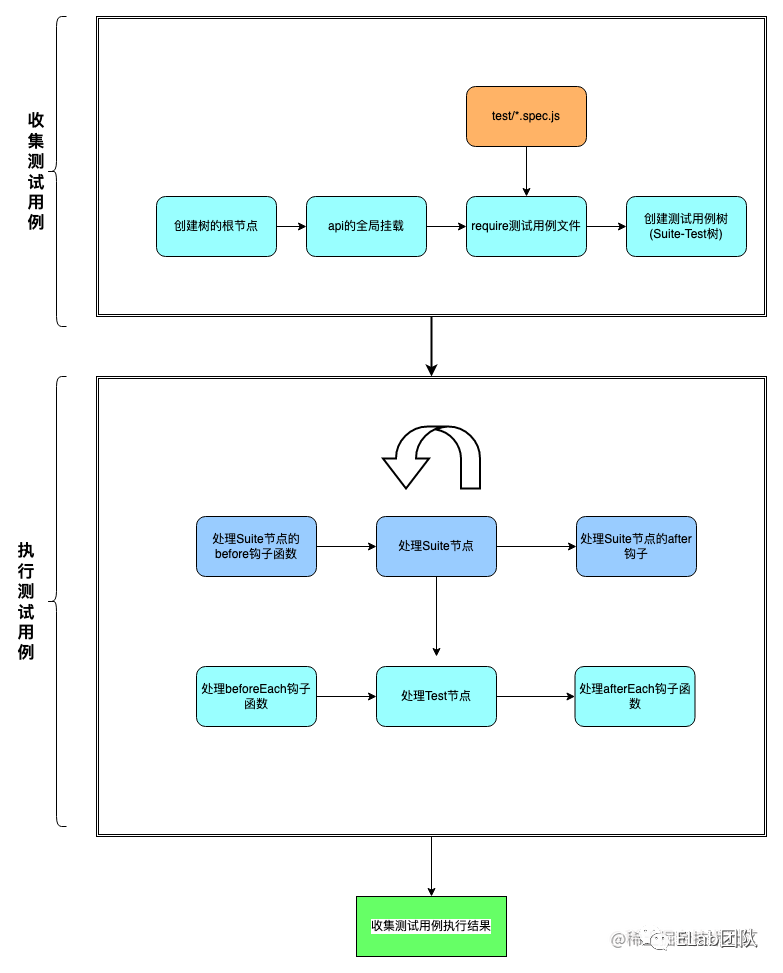
此時我們整個流程就出來了:
收集用例(通過Suite和Test類來構造整棵樹); 執(zhí)行用例(遍歷這棵樹,執(zhí)行所有的用例函數(shù)); 收集測試用例的執(zhí)行結(jié)果。
此時我們整個的流程如下(其中執(zhí)行測試用例和收集執(zhí)行結(jié)果已簡化):
OK,思路已經(jīng)非常清晰,實現(xiàn)一下具體的代碼吧
實現(xiàn)
創(chuàng)建根節(jié)點
首先我們的測試用例樹要有個初始化根節(jié)點,在Mocha類中創(chuàng)建如下:
// mocha/src/mocha.js
const Suite = require('./suite');
class Mocha {
  constructor() {
    // 創(chuàng)建根節(jié)點
    this.rootSuite = new Suite(null, '');
  }
  run() { }
}
module.exports = Mocha;
api全局掛載
實際上Mocha為BDD 測試風格提供了 describe()、context()、it()、specify()、before()、after()、beforeEach() 和 afterEach()共8個api,其中context僅僅是describe的別名,主要作用是為了保障測試用例編寫的可讀性和可維護性,與之類似specify則是it的別名。我們先將相關api初始化如下:
// mocha/interfaces/bdd.js
// context是我們的上下文環(huán)境,root是我們的樹的根節(jié)點
module.exports = function (context, root) {
  // context是describe的別名,主要目的是處于測試用例代碼的組織和可讀性的考慮
  context.describe = context.context = function(title, fn) {}
  // specify是it的別名
  context.it = context.specify = function(title, fn) {}
  context.before = function(fn) {}
  context.after = function(fn) {}
  context.beforeEach = function(fn) {}
  context.afterEach = function(fn) {}
}
為方便支持各種測試風格接口我們進行統(tǒng)一的導出:
// mocha/interfaces/index.js
'use strict';
exports.bdd = require('./bdd');
然后在Mocha類中進行bdd接口的全局掛載:
// mocha/src/mocha.js
const interfaces = require('../interfaces');
class Mocha {
  constructor() {
    // this.rootSuite = ...
    // 注意第二個參數(shù)是我們的前面創(chuàng)建的根節(jié)點,此時
    interfaces['bdd'](global, this.rootSuite "'bdd'");
  }
  run() {}
}

module.exports = Mocha;
此時我們已經(jīng)完成了api的全局掛載,可以放心導入測試用例文件讓函數(shù)執(zhí)行了。
導入測試用例文件
測試用例文件的導入mocha的實現(xiàn)比較復雜,支持配置,支持終端調(diào)用,也有支持CJS的實現(xiàn),也有支持 ESM的實現(xiàn),另外還有預加載,懶加載的實現(xiàn),以滿足在不同場景下測試用例的執(zhí)行時機。我們此處簡單的將測試用例文件的路徑寫死即可,直接加載我們本地使用的測試用例文件:
// mocha/src/utils.js
const path = require('path');
const fs = require('fs');

/**
*
* @param { * } filepath 文件或是文件夾路徑
* @returns 所有測試文件路徑數(shù)組
*/
module.exports.findCaseFile = function (filepath) {
  function readFileList(dir, fileList = []) {
    const files = fs.readdirSync(dir);
    files.forEach((item, _ ) => {
        var fullPath = path.join(dir, item);
        const stat = fs.statSync(fullPath);
        if (stat.isDirectory()) {
            readFileList(path.join(dir, item), fileList);  // 遞歸讀取文件
        } else {
            fileList.push(fullPath);
        }
    });
    return fileList;
  }
  let fileList = [];
  // 路徑如果是文件則直接返回
  try {
    const stat = fs.statSync(filepath);
    if (stat.isFile()) {
      fileList = [filepath];
      return fileList;
    }
    readFileList(filepath, fileList);
  } catch(e) {console.log(e)}

  return fileList;
}
上面函數(shù)簡單的實現(xiàn)了一個方法,用來遞歸的讀取本地所有的測試用例文件,然后在Mocha類中使用該方法加載我們當前的測試用例文件:
// mocha/src/mocha.js
const path = require('path');
const interfaces = require('../interfaces');
const utils = require('./utils');
class Mocha {
  constructor() {
    // this.rootSuite = ...
    // interfaces['bdd'](global, this.rootSuite "'bdd'");
    // 寫死我們本地測試用例所在文件夾地址
    const spec = path.resolve(__dirname, '../../test');
    const files = utils.findCaseFile(spec);
    // 加載測試用例文件
    files.forEach(file => require(file));
  }
  run() {}
}

module.exports = Mocha;
創(chuàng)建Suite-Test樹
到這一步我們的測試用例文件已經(jīng)加載進來了,而describe和it函數(shù)也都已經(jīng)執(zhí)行,但我們上面的 describe和it還都是個空函數(shù),我們接下來修改下我們提供的describe和it函數(shù),來創(chuàng)建我們需要的樹形結(jié)構,在前面我們已經(jīng)在bdd.js文件中對describe和it進行了初始化,此時補充上我們借用棧創(chuàng)建Suite-Test樹的邏輯:
// mocha/interfaces/bdd.js

const Suite = require('../src/suite');
const Test = require('../src/test');

module.exports = function (context, root) {
  // 樹的根節(jié)點進棧
  const suites = [root];
  // context是describe的別名,主要目的是處于測試用例代碼的組織和可讀性的考慮
  context.describe = context.context = function (title, callback) {
    // 獲取當前棧中的當前節(jié)點
    const cur = suites[0];
    // 實例化一個Suite對象,存儲當前的describe函數(shù)信息
    const suite = new Suite(cur, title);
    // 入棧
    suites.unshift(suite);
    // 執(zhí)行describe回調(diào)函數(shù)
    callback.call(suite);
    // Suite出棧
    suites.shift();
  }
  context.it = context.specify = function (title, fn) {
    // 獲取當前Suite節(jié)點
    const cur = suites[0];
    const test = new Test(title, fn);
    // 將Test實例對象存儲在tests數(shù)組中
    cur.tests.push(test);
  }
  // ...
}
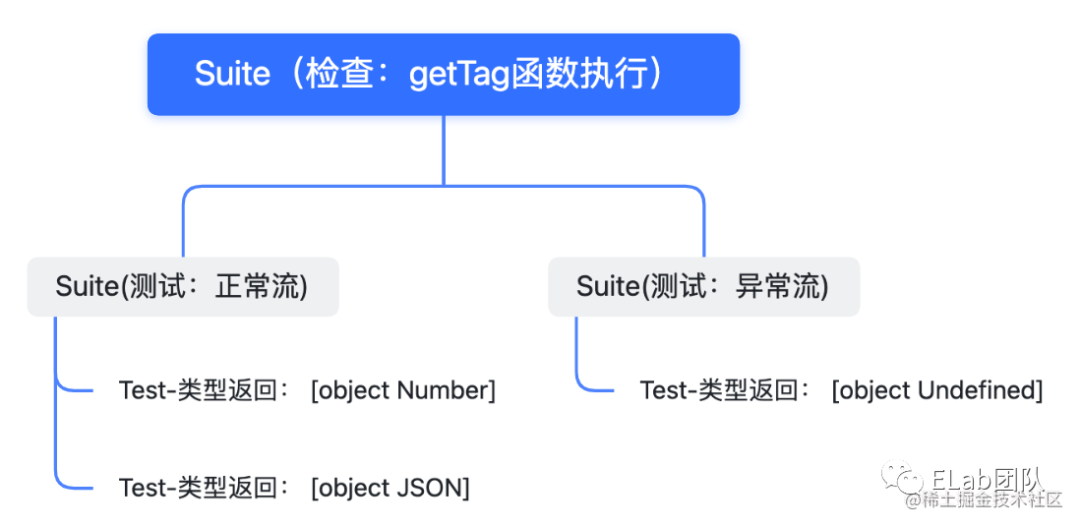
注意,上面的代碼我們僅僅是通過執(zhí)行describe的回調(diào)函數(shù)將樹的結(jié)構創(chuàng)建了出來,里面具體的測試用例代碼(it的回調(diào)函數(shù))還未開始執(zhí)行。基于以上代碼,我們整個Suite-Test樹就已經(jīng)創(chuàng)建出來了,截止到目前的代碼我們收集用例的過程已經(jīng)實現(xiàn)完成。此時我們的Sute-Test樹創(chuàng)建出來是這樣的結(jié)構:
支持異步
前面說過,mocha支持異步代碼的用例編寫,異步代碼的支持也很簡單,我們可以在代碼內(nèi)部實現(xiàn)一個Promise適配器,將所有的 測試用例 所在的回調(diào)函數(shù)包裹在適配器里面,Promise適配器實現(xiàn)如下:
// mocha/src/utils.js
const path = require('path');
const fs = require('fs');

// module.exports.findCaseFile = ...

module.exports.adaptPromise = function(fn) {
  return () => new Promise(resolve => {
    if (fn.length === 0) {
      // 不使用參數(shù) done
      try {
        const ret = fn();
        // 判斷是否返回promise
        if (ret instanceof Promise) {
          return ret.then(resolve, resolve);
        } else {
          resolve();
        }
      } catch (error) {
        resolve(error);
      }
    } else {
      // 使用參數(shù) done
      function done(error) {
        resolve(error);
      }
      fn(done);
    }
  })
}
我們改造下之前創(chuàng)建的Suite-Test樹,將it、before、after、beforeEach和afterEach的回調(diào)函數(shù)進行適配:
// mocha/interfaces/bdd.js
const Suite = require('../src/suite');
const Test = require('../src/test');
const { adaptPromise } = require('../src/utils');

module.exports = function (context, root) {
  const suites = [root];
  // context是describe的別名,主要目的是處于測試用例代碼的組織和可讀性的考慮
  // context.describe = context.context = ...
  context.it = context.specify = function (title, fn) {
    const cur = suites[0];
    const test = new Test(title, adaptPromise(fn));
    cur.tests.push(test);
  }
  context.before = function (fn) {
    const cur = suites[0];
    cur._beforeAll.push(adaptPromise(fn));
  }
  context.after = function (fn) {
    const cur = suites[0];
    cur._afterAll.push(adaptPromise(fn));
  }
  context.beforeEach = function (fn) {
    const cur = suites[0];
    cur._beforeEach.push(adaptPromise(fn));
  }
  context.afterEach = function (fn) {
    const cur = suites[0];
    cur._afterEach.push(adaptPromise(fn));
  }
}
執(zhí)行測試用例
以上我們已經(jīng)實現(xiàn)了所有收集測試用例的代碼,并且也支持了異步,對測試用例的執(zhí)行比較復雜我們可以單獨創(chuàng)建一個Runner類去實現(xiàn)執(zhí)行測試用例的邏輯:
// mocha/src/runner.js
class Runner {}
此時梳理下測試用例的執(zhí)行邏輯,基于以上創(chuàng)建的Suite-Test樹,我們可以對樹進行一個遍歷從而執(zhí)行所有的測試用例,而對于異步代碼的執(zhí)行我們可以借用async/await來實現(xiàn)。此時我們的流程圖更新如下:
整個思路梳理下來就很簡單了,針對Suite-Test樹,從根節(jié)點開始遍歷這棵樹,將這棵樹中所有的Test節(jié)點所掛載的回調(diào)函數(shù)進行執(zhí)行即可。相關代碼實現(xiàn)如下:
// mocha/src/runner.js
class Runner {
  constructor() {
    super();
    // 記錄 suite 根節(jié)點到當前節(jié)點的路徑
    this.suites = [];
  }
  /*
* 主入口
*/
  async run(root) {
    // 開始處理Suite節(jié)點
    await this.runSuite(root);
  }
  /*
* 處理suite
*/
  async runSuite(suite) {
    // 1.執(zhí)行before鉤子函數(shù)
    if (suite._beforeAll.length) {
      for (const fn of suite._beforeAll) {
        const result = await fn();
      }
    }
    // 推入當前節(jié)點
    this.suites.unshift(suite);

    // 2. 執(zhí)行test
    if (suite.tests.length) {
      for (const test of suite.tests) {
        // 執(zhí)行test回調(diào)函數(shù)
        await this.runTest(test);
      }
    }

    // 3. 執(zhí)行子級suite
    if (suite.suites.length) {
      for (const child of suite.suites) {
        // 遞歸處理Suite
        await this.runSuite(child);
      }
    }

    // 路徑棧推出節(jié)點
    this.suites.shift();

    // 4.執(zhí)行after鉤子函數(shù)
    if (suite._afterAll.length) {
      for (const fn of suite._afterAll) {
        // 執(zhí)行回調(diào)
        const result = await fn();
      }
    }
  }

  /*
* 處理Test
*/
  async runTest(test) {
    // 1. 由suite根節(jié)點向當前suite節(jié)點,依次執(zhí)行beforeEach鉤子函數(shù)
    const _beforeEach = [].concat(this.suites).reverse().reduce((list, suite) => list.concat(suite._beforeEach), []);
    if (_beforeEach.length) {
      for (const fn of _beforeEach) {
        const result = await fn();
      }
    }
    // 2. 執(zhí)行測試用例
    const result = await test.fn();
    // 3. 由當前suite節(jié)點向suite根節(jié)點,依次執(zhí)行afterEach鉤子函數(shù)
    const _afterEach = [].concat(this.suites).reduce((list, suite) => list.concat(suite._afterEach), []);
    if (_afterEach.length) {
      for (const fn of _afterEach) {
        const result = await fn();
      }
    }
  }
}
module.exports = Runner;
將Runner類注入到Mocha類中:
// mocha/src/mocha.js
const Runner = require('./runner');

class Mocha {
  // constructor()..
  run() {
    const runner = new Runner();
    runner.run(this.rootSuite);
  }
}

module.exports = Mocha;
簡單介紹下上面的代碼邏輯,Runner類包括兩個方法,一個方法用來處理Suite,一個方法用來處理Test,使用棧的結(jié)構遍歷Suite-Test樹,遞歸處理所有的Suite節(jié)點,從而找到所有的Test節(jié)點,將Test中的回調(diào)函數(shù)進行處理,測試用例執(zhí)行結(jié)束。但到這里我們會發(fā)現(xiàn),只是執(zhí)行了測試用例而已,測試用例的執(zhí)行結(jié)果還沒獲取到,測試用例哪個通過了,哪個沒通過我們也無法得知。
收集測試用例執(zhí)行結(jié)果
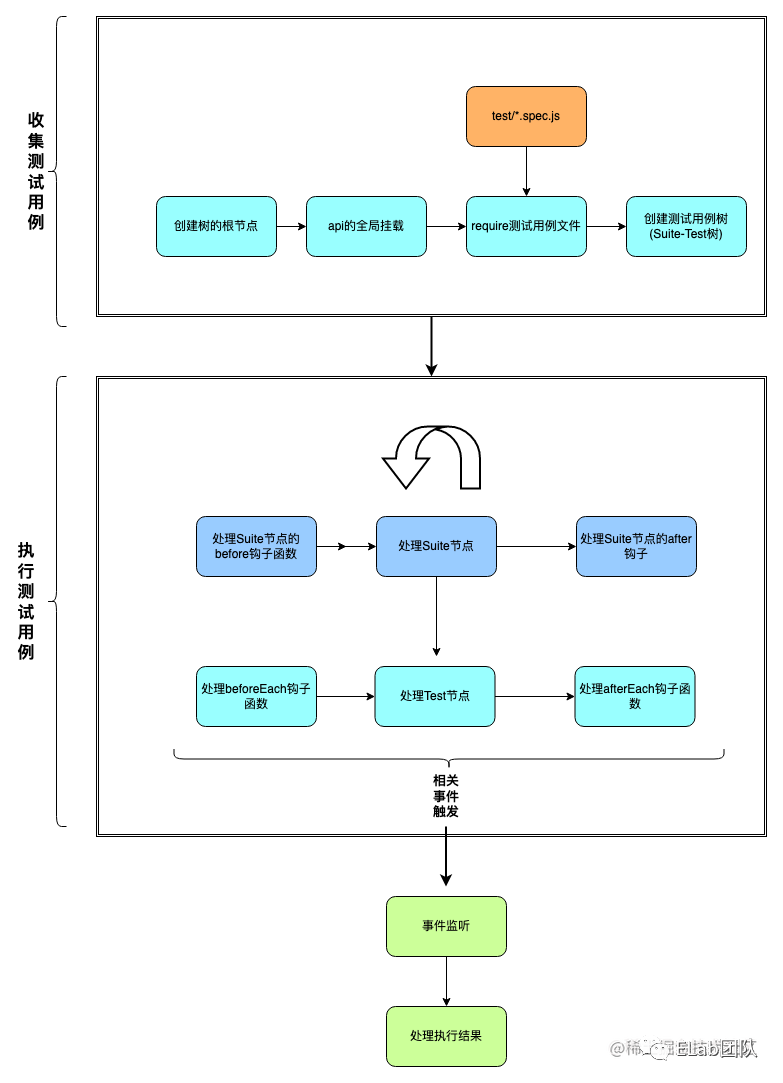 我們需要一個中間人來記錄下執(zhí)行的結(jié)果,輸出給我們,此時我們的流程圖更新如下:
修改Runner類,讓它繼承EventEmitter,來實現(xiàn)事件的傳遞工作:
// mocha/src/runner.js
const EventEmitter = require('events').EventEmitter;

// 監(jiān)聽事件的標識
const constants = {
  EVENT_RUN_BEGIN: 'EVENT_RUN_BEGIN',      // 執(zhí)行流程開始
  EVENT_RUN_END: 'EVENT_RUN_END',          // 執(zhí)行流程結(jié)束
  EVENT_SUITE_BEGIN: 'EVENT_SUITE_BEGIN',  // 執(zhí)行suite開始
  EVENT_SUITE_END: 'EVENT_SUITE_END',      // 執(zhí)行suite結(jié)束
  EVENT_FAIL: 'EVENT_FAIL',                // 執(zhí)行用例失敗
  EVENT_PASS: 'EVENT_PASS'                 // 執(zhí)行用例成功
}

class Runner extends EventEmitter {
  // ...
  /*
* 主入口
*/
  async run(root) {
    this.emit(constants.EVENT_RUN_BEGIN);
    await this.runSuite(root);
    this.emit(constants.EVENT_RUN_END);
  }

  /*
* 執(zhí)行suite
*/
  async runSuite(suite) {
    // suite執(zhí)行開始
    this.emit(constants.EVENT_SUITE_BEGIN, suite);

    // 1. 執(zhí)行before鉤子函數(shù)
    if (suite._beforeAll.length) {
      for (const fn of suite._beforeAll) {
        const result = await fn();
        if (result instanceof Error) {
          this.emit(constants.EVENT_FAIL, `"before all" hook in ${suite.title}: ${result.message}`);
          // suite執(zhí)行結(jié)束
          this.emit(constants.EVENT_SUITE_END);
          return;
        }
      }
    }

    // ...

    // 4. 執(zhí)行after鉤子函數(shù)
    if (suite._afterAll.length) {
      for (const fn of suite._afterAll) {
        const result = await fn();
        if (result instanceof Error) {
          this.emit(constants.EVENT_FAIL, `"after all" hook in ${suite.title}: ${result.message}`);
          // suite執(zhí)行結(jié)束
          this.emit(constants.EVENT_SUITE_END);
          return;
        }
      }
    }
    // suite結(jié)束
    this.emit(constants.EVENT_SUITE_END);
  }

  /*
* 處理Test
*/
  async runTest(test) {
    // 1. 由suite根節(jié)點向當前suite節(jié)點,依次執(zhí)行beforeEach鉤子函數(shù)
    const _beforeEach = [].concat(this.suites).reverse().reduce((list, suite) => list.concat(suite._beforeEach), []);
    if (_beforeEach.length) {
      for (const fn of _beforeEach) {
        const result = await fn();
        if (result instanceof Error) {
          return this.emit(constants.EVENT_FAIL, `"before each" hook for ${test.title}: ${result.message}`)
        }
      }
    }

    // 2. 執(zhí)行測試用例
    const result = await test.fn();
    if (result instanceof Error) {
      return this.emit(constants.EVENT_FAIL, `${test.title}`);
    } else {
      this.emit(constants.EVENT_PASS, `${test.title}`);
    }

    // 3. 由當前suite節(jié)點向suite根節(jié)點,依次執(zhí)行afterEach鉤子函數(shù)
    const _afterEach = [].concat(this.suites).reduce((list, suite) => list.concat(suite._afterEach), []);
    if (_afterEach.length) {
      for (const fn of _afterEach) {
        const result = await fn();
        if (result instanceof Error) {
          return this.emit(constants.EVENT_FAIL, `"after each" hook for ${test.title}: ${result.message}`)
        }
      }
    }
  }
}

Runner.constants = constants;
module.exports = Runner
在測試結(jié)果的處理函數(shù)中監(jiān)聽執(zhí)行結(jié)果的回調(diào)進行統(tǒng)一處理:
// mocha/reporter/sped.js
const constants = require('../src/runner').constants;
const colors = {
  pass: 90,
  fail: 31,
  green: 32,
}
function color(type, str) {
  return '\u001b[' + colors[type] + 'm' + str + '\u001b[0m';
}
module.exports = function (runner) {
  let indents = 0;
  let passes = 0;
  let failures = 0;
  let time = +new Date();
  function indent(i = 0) {
    return Array(indents + i).join('  ');
  }
  // 執(zhí)行開始
  runner.on(constants.EVENT_RUN_BEGIN, function() {});
  // suite執(zhí)行開始
  runner.on(constants.EVENT_SUITE_BEGIN, function(suite) {
    ++indents;
    console.log(indent(), suite.title);
  });
  // suite執(zhí)行結(jié)束
  runner.on(constants.EVENT_SUITE_END, function() {
    --indents;
    if (indents == 1) console.log();
  });
  // 用例通過
  runner.on(constants.EVENT_PASS, function(title) {
    passes++;
    const fmt = indent(1) + color('green', '  ?') + color('pass', ' %s');
    console.log(fmt, title);
  });
  // 用例失敗
  runner.on(constants.EVENT_FAIL, function(title) {
    failures++;
    const fmt = indent(1) + color('fail', '  × %s');
    console.log(fmt, title);
  });
  // 執(zhí)行結(jié)束
  runner.once(constants.EVENT_RUN_END, function() {
    console.log(color('green', '  %d passing'), passes, color('pass', `(${Date.now() - time}ms)`));
    console.log(color('fail', '  %d failing'), failures);
  });
}
上面代碼的作用對代碼進行了收集。
驗證
截止到目前我們實現(xiàn)的mocha已經(jīng)完成,執(zhí)行下npm test看下用例的執(zhí)行結(jié)果。
我們再手動構造一個失敗用例:
const assert = require('assert');
const { getTag } = require('../index');
describe('檢查:getTag函數(shù)執(zhí)行', function () {
  before(function() {
    console.log('??before鉤子觸發(fā)');
  });
  describe('測試:正常流', function() {
    it('類型返回: [object JSON]', function (done) {
      setTimeout(() => {
        assert.equal(getTag(JSON), '[object JSON]');
        done();
      }, 1000);
    });
    it('類型返回: [object Number]', function() {
      assert.equal(getTag(1), '[object Number]');
    });
  });
  describe('測試:異常流', function() {
    it('類型返回: [object Undefined]', function() {
      assert.equal(getTag(undefined), '[object Undefined]');
    });
    it('類型返回: [object Object]', function() {
      assert.equal(getTag([]), '[object Object]');
    });
  });
  after(function() {
    console.log('??after鉤子觸發(fā)');
  });
});
執(zhí)行下:
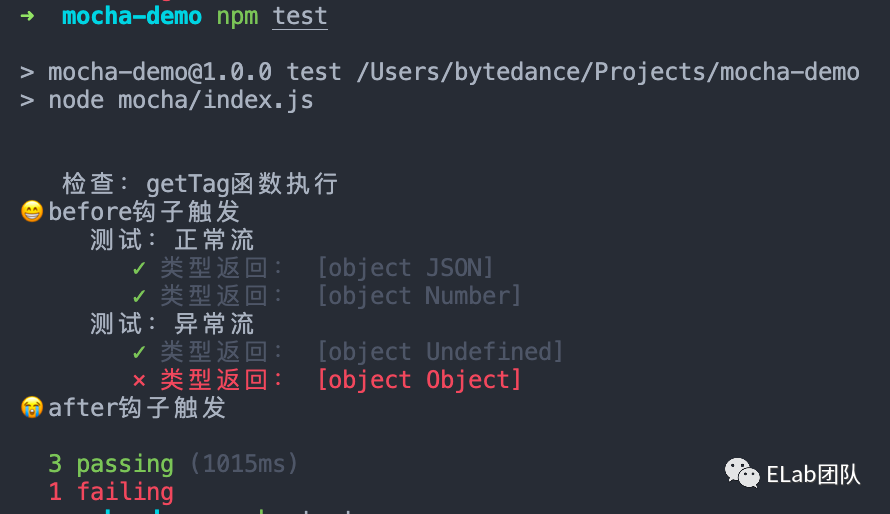
一個精簡版mocha就此完成!
后記
整個mocha的核心思想還是十分簡單的,但mocha的強大遠不止此,mocha是個非常靈活的測試框架,可擴展性很高,但也與此同時會帶來一些學習成本。像Jest那種包攬一切,斷言庫,快照測試,數(shù)據(jù)mock,測試覆蓋率報告的生成等等全部打包提供的使用起來是很方便,但問題在于不方便去做一些定制化開發(fā)。而mocha搭配他的生態(tài)(用chai斷言,用sinon來mock數(shù)據(jù),istanbul來生成覆蓋率報告等)可以很方便的去做一些定制化開發(fā)。
參考
https://github.com/mochajs/mocha
https://mochajs.org/
參考資料
Mocha - the fun, simple, flexible JavaScript test framework: https://mochajs.org/

往期推薦


最后
歡迎加我微信,拉你進技術群,長期交流學習...
歡迎關注「前端Q」,認真學前端,做個專業(yè)的技術人...