使用 github 快速搭建屬于自己的圖床

起因
說起來,圖床應(yīng)用這東西,在github上有很多,但是大多都是基于一些云廠商免費的靜態(tài)存儲服務(wù)來實現(xiàn)的,比如七牛云的靜態(tài)存儲,考慮到這些云廠商的賺錢欲望,所以我并不放心將他們作為圖床的服務(wù)提供商。
也有支持github的,比如picgo,不過涉及到personal token,我也不是很放心將自己的token寫入到一個開源項目的桌面應(yīng)用里。而且picgo導(dǎo)出的github圖片鏈接是以 githubusercontent.com 為host的鏈接,眾所周知,該域名在中國很多地區(qū)都被DNS污染了,只有通過改host或是科學(xué)上網(wǎng)進行訪問,所以結(jié)論是,picgo基于github導(dǎo)出的圖片鏈接,在國內(nèi)等于沒用。
那有沒有一種方式,既能讓圖片鏈接不被DNS污染或是被墻掉,又不會涉及到開發(fā)者personal token,影響賬戶安全呢?
于是,就有了picpic。picpic是我在做一個另一個大型的開源項目的過程中抽空實現(xiàn)的,初始版本只用了兩天就寫出來了,但是我本人自認為是一個合格和還不錯的product maker,并不愿意產(chǎn)出一個使用繁瑣,功能殘缺的半成品給別人使用——關(guān)鍵是自己用的也不爽。
我做產(chǎn)品,核心觀點就是,做出來的東西自己愿不愿意用,用起來有沒有感受到“美”,是不是能夠沉靜在產(chǎn)品中去感受它,這很重要,正是因為我從沒將自己定位成一個前端,或是node開發(fā),而是product maker,終極理想就是artist,就是做藝術(shù),內(nèi)心始終有一個想法:你不是在寫代碼,你是在畫一幅畫,你享受這個過程,如果能夠讓別人享受到“結(jié)果”,那是再好不過了。
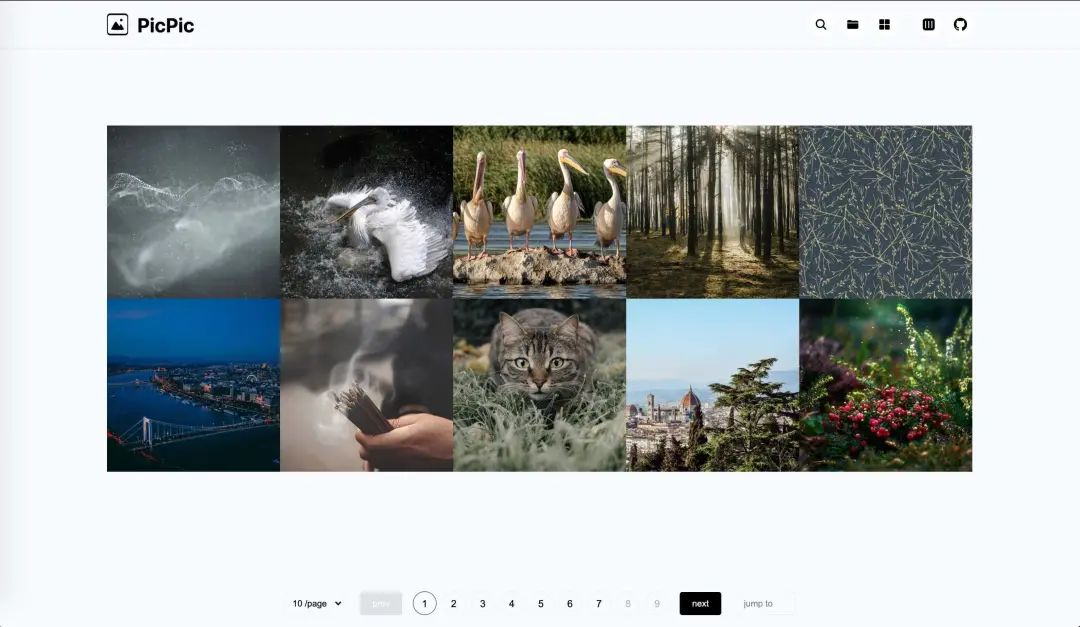
所以就有了它:
DEMO地址:https://matrixage.github.io/picpic_example/
項目地址:https://github.com/MatrixAges/picpic
基于離線版本,脫離了webpack的vue.js構(gòu)建的單頁面應(yīng)用,原理就是通過node把圖片數(shù)據(jù)預(yù)編譯并寫入到window對象中,然后通過chunk進行分片,提供翻頁功能,至于文件夾模式,則是通過node把assets文件夾下的文件結(jié)構(gòu)預(yù)編譯成樹形數(shù)據(jù),寫入到window對象,然后給頁面中的js進行調(diào)用。
服務(wù)基于github pages,自動化構(gòu)建使用的是github actions,通過自動化構(gòu)建部署,部署靜態(tài)文件到gh-pages分支,然后訪問 username.github.io/${repo}/${img_path} 即可訪問不被槍的靜態(tài)圖片。
幾經(jīng)打磨,最后我把它做成了cli,你只需要npm i @matrixage/picpic,即可使用。
下面講講,我是如何通過node和vue構(gòu)建這樣一個單頁面應(yīng)用的。
沒有webpack的web應(yīng)用
使用github actions也有一段時間了,在經(jīng)歷過很多次構(gòu)建之后,我觀察到了一個現(xiàn)象:那就是80%的時間都是webpack花掉的,關(guān)鍵是一些很簡單的項目,因為webpack,還是會有一個比較長的安裝npm包的時間,那這對于一個圖床應(yīng)用來說,是致命的。
所以我決定擺脫webpack,使用離線版本的vue.min.js來構(gòu)建應(yīng)用,將部署時間控制在30s以內(nèi),做到提交圖片,即刻可用。
<script?src='./libs/js/vue.min.js'>script>
<script?src='./libs/js/lodash.chunk.js'>script>
<script?src='./libs/js/lodash.throttle.js'>script>
<script?src='./libs/js/clipboard.js'>script>
<script?src='./index.js'>script>
使用XHR和CustomEvent進行組件化開發(fā)
在html頂部引入include.js,改文件的作用是在文檔加載完成之后將include標簽中的地址通過同步的XHR,請求到組件的html內(nèi)容,然后寫入到頁面中。
//?include.js

getFileContent:?function?(url){
????var?o?=?new?XMLHttpRequest()
?
?o.open('get',?url,?false)
?o.send(null)
?
?return?o.responseText
}
接著通過自定義事件發(fā)出通知:
//?include.js

var?evt?=?new?CustomEvent('included',?{
?bubbles:?true,
?cancelable:?false
})

window.onload?=?function?(){
????new?Include().replaceIncludeElements()
????
????document.dispatchEvent(evt);
}
在其他腳本中接收通知:
//?index.js

document.addEventListener('included',?function?(){...})
通過node預(yù)編譯組件
僅僅是使用include是不夠的,組件的js和css代碼同樣要分離出來,這樣才有意義,于是node出場,其實你理解的webpack,不過時穿上紳士馬甲的node編譯腳本,本質(zhì)上還是預(yù)編譯。
所以不用webpack,我們直溯本源,手寫預(yù)編譯代碼。在picpic項目根目錄新建一個build文件夾,其中的文件就是預(yù)編譯要用的代碼。
//?build/index.js

const?fs?=?require('fs-extra')
const?globby?=?require('globby')
const?inject?=?require('./inject')
const?paths?=?require('./utils/paths')

const?main?=?async?()?=>?{
?if?(!fs.existsSync(paths.dist))?{
??fs.mkdirSync(paths.dist)
?}?else?{
??fs.removeSync(paths.dist)
??fs.mkdirSync(paths.dist)
??????}
??????
?fs.writeFileSync(`${paths.dist}/index.html`,?await?inject())
?fs.copySync(paths.assets,?paths.dist)
?fs.copySync(paths.getPath('../../src'),?paths.dist)
?fs.removeSync(`${paths.dist}/source.html`)

?const?less?=?await?globby(`${paths.dist}/**/*.less`)

??????less.map(item?=>?fs.removeSync(item))
??????
?console.log('----------?picpic?build?success!?----------?\n')
}

try?{
?main()
}?catch?(error)?{
?console.log('----------?picpic?build?error!?----------?\n')
?console.error(error)
}
這里的inject就是注入組件和數(shù)據(jù)之后的html,接下來展示一下如何進行組件注入。
//?build/inject/index.js

const?fs?=?require('fs-extra')
const?injectData?=?require('./injectData')
const?injectStyles?=?require('./injectStyles')
const?injectTemplates?=?require('./injectTemplates')
const?injectJs?=?require('./injectJs')
const?paths?=?require('../utils/paths')

function?Inject?(){
?this.html?=?''

?this.getSource?=?()?=>?{
??this.html?=?fs.readFileSync(paths.getPath('../../src/source.html')).toString()

??return?new?Promise(resolve?=>?resolve(this.html))
?}

?this.injectData?=?async?()?=>?{
??this.html?=?await?injectData(this.html)

??return?new?Promise(resolve?=>?resolve(this.html))
?}

?this.injectStyles?=?async?()?=>?{
??this.html?=?await?injectStyles(this.html)

??return?new?Promise(resolve?=>?resolve(this.html))
?}

?this.injectTemplates?=?async?()?=>?{
??this.html?=?await?injectTemplates(this.html)

??return?new?Promise(resolve?=>?resolve(this.html))
?}
}

const?inject?=?async?()?=>?{
?return?await?new?Inject()
??.getSource()
??.then(res?=>?injectData(res))
??.then(res?=>?injectStyles(res))
??.then(res?=>?injectTemplates(res))
??.then(res?=>?injectJs(res))
}

module.exports?=?inject
通過返回this的方法進行鏈式調(diào)用,比一層一層用方法包裹優(yōu)雅很多,有沒有感受到代碼之美,嘻嘻。
injectStyles injectTemplates injectJs這三種方法異曲同工,原理特簡單,就是字符串替換,不過這里要注意空格,少一個都匹配不到。
//?build/inject/injectStyles.js
const?globby?=?require('globby')
const?paths?=?require('../utils/paths')
module.exports?=?async?str?=>?{
?const?paths_source?=?await?globby([?`${paths.getPath('../../src/components/**/*.css')}`?])
?const?paths_target?=?[]
?paths_source.map(item?=>
??paths_target.push(item.replace('src',?'.').split('/').slice(-4).join('/'))
??????)
?const?items?=?paths_target.map(item?=>?'@import?'?+?"'"?+?item?+?"'"?+?';'?+?'\n')
?return?str.replace(
??`
??????
`,
??`
??????
`
?)
}
在頁面中,三種占位符分別用于注入組件相關(guān)的文件:
<style>style>


<template-slot>template-slot>


<script?id="component_scripts">script>
注入之后的結(jié)果為:
<style>
@import?'./components/Detail/index.css';
@import?'./components/Empty/index.css';
@import?'./components/FolderSelect/index.css';
@import?'./components/Header/index.css';
@import?'./components/ImgItems/index.css';
@import?'./components/Msg/index.css';
@import?'./components/Pagination/index.css';
style>


<include?src="./components/Detail/index.html">include>
<include?src="./components/Empty/index.html">include>
<include?src="./components/FolderSelect/index.html">include>
<include?src="./components/Header/index.html">include>
<include?src="./components/ImgItems/index.html">include>
<include?src="./components/Msg/index.html">include>
<include?src="./components/Pagination/index.html">include>


<script?src="./components/Detail/index.js">script>
<script?src="./components/Empty/index.js">script>
<script?src="./components/FolderSelect/index.js">script>
<script?src="./components/Header/index.js">script>
<script?src="./components/ImgItems/index.js">script>
<script?src="./components/Msg/index.js">script>
<script?src="./components/Pagination/index.js">script>
不要詬病組件文件夾大寫,我是react的擁躉,如果不是因為web-component強制使用-分割符小寫,所有的組件我都希望大寫,因為辨識度比前者高很多。
通過node預(yù)編譯目錄數(shù)據(jù)
主要是通過dree到處樹形數(shù)據(jù),通過imageinfo獲取圖片長寬,然后再進行數(shù)據(jù)裁剪,把需要的數(shù)據(jù)進行組裝后導(dǎo)出。代碼多且雜,這里僅結(jié)果,有興趣的可以去github看代碼。
{
????"name":"assets",
????"type":"directory",
????"size":"1.14MB",
????"children":[
????????{
????????????"name":"projects",
????????????"type":"directory",
????????????"size":"1.14MB",
????????????"children":[
????????????????{
????????????????????"name":"picpic",
????????????????????"type":"directory",
????????????????????"size":"1.14MB",
????????????????????"children":[
????????????????????????{
????????????????????????????"name":"choose_gh_pages.jpg",
????????????????????????????"type":"file",
????????????????????????????"extension":"jpg",
????????????????????????????"size":"61.1KB",
????????????????????????????"dimension":"2020x940",
????????????????????????????"path":"projects/picpic/choose_gh_pages.jpg"
????????????????????????},
????????????????????????{
????????????????????????????"name":"folder_hover_status.jpg",
????????????????????????????"type":"file",
????????????????????????????"extension":"jpg",
????????????????????????????"size":"116.74KB",
????????????????????????????"dimension":"956x1896",
????????????????????????????"path":"projects/picpic/folder_hover_status.jpg"
????????????????????????}
????????????????????]
????????????????}
????????????]
????????}
????]
}
然后寫入到html中:
//?build/inject/injectData.js

const?{?getFileTree?}?=?require('../utils')

module.exports?=?async?str?=>?{
?const?tree?=?await?getFileTree()

?return?str.replace(
??`
??????
????????????PicPic
??????
`,
??`
??????
????????????PicPic
????????????
??????
`
?)
}
做成命令行工具
僅僅做成上面那樣使用起來,還需要別人clone你的倉庫,后續(xù)升級麻煩,而且編譯源文件什么的都暴露出來了,看起來臟的不行,所以不僅要產(chǎn)品本身美,使用方式也需要簡單優(yōu)雅。
在 package.json 中添加如下字段,發(fā)布包之后,當別人在 npm i @matrixage/picpic 時會生成命令行工具文件:
"bin":?{
????"picpic":?"./bin/index.js"
}
編寫命令行工具代碼:
//?bin/index.js

#!/usr/bin/env?node

const?fs?=?require('fs-extra')
const?path?=?require('path')
const?child_process?=?require('child_process')
const?pkg?=?require(`${process.cwd()}/package.json`)

const?main?=?()?=>?{
?const?args?=?process.argv[2]
?const?root?=?process.cwd()
?const?getPath?=?p?=>?path.join(__dirname,?p)

?switch?(args)?{
??case?'init':
???pkg['scripts']['build']?=?'picpic?build'

???fs.writeFileSync('./package.json',?JSON.stringify(pkg,?null,?2).concat('\n'))
???if?(!fs.existsSync(`${root}/assets`))?fs.mkdirSync(`${root}/assets`)
???if?(!fs.existsSync(`${root}/.github`))?fs.mkdirSync(`${root}/.github`)
???if?(!fs.existsSync(`${root}/.gitignore`))?fs.writeFileSync(`${root}/.gitignore`,`/dist?\n/node_modules?\n.DS_Store`)
???fs.copySync(getPath('../.github'),?`${root}/.github`)

???console.log('----------?picpic?init?success!?----------?\n')
???break
??case?'build':
???child_process.execSync(`node?${getPath('../build/index.js')}`)
???break
??default:
???break
?}
}

try?{
?main()

?process.exit(0)
}?catch?(e)?{
?console.error(e)

?process.exit(1)
}
當用戶 npm i @matrixage/picpic 之后,在 package.json 的 scripts 字段中加入 "init": "picpic init" ,然后執(zhí)行npm run init,項目根目錄會生成 .github assets 文件夾以及 .gitignore 文件。
這個時候用戶只需要把圖片移動到assets文件夾中,支持在assets中新建任意不超過12層的文件夾。然后提交到github,github action將自動進行構(gòu)建,然后把構(gòu)建出的dist文件夾推送到倉庫的gh-pages上,如果沒有開啟gh-pages請自行開啟。
至此,全部構(gòu)建流程講解完畢。這個過程,寫預(yù)編譯代碼其實是最簡單,麻煩的是:
如何構(gòu)建美的應(yīng)用? 如何讓用戶簡單且優(yōu)雅地使用?
回首我做過的所有項目,花在邏輯上的時間其實是最少的,寫邏輯是跟機器對話,機器嘛,就那幾句話,記住就行了。而畫界面,做交互,是在跟人,首先就是跟自己進行對話,了解自己內(nèi)心深處的想法,然后就是跟用戶進行對話,其實你把用戶當成千千萬萬個我,那你就能感受到,你的idea,該如何生長,你的畫,該是何模樣。
總之,以人為本。
DEMO地址:https://matrixage.github.io/picpic_example/
項目地址:https://github.com/MatrixAges/picpic
注意,在github的readme文件中使用username.github.io/repo/~這樣的鏈接,github會將之自動轉(zhuǎn)化為camo.githubusercontent.com該host下的圖片鏈接,該鏈接被DNS污染了,如要預(yù)覽,請在host中加入如下DNS解析:
199.232.96.133?raw.githubusercontent.com
199.232.96.133?camo.githubusercontent.com
如果你發(fā)現(xiàn)訪問github很慢,那是因為本地服務(wù)商在進行DNS網(wǎng)絡(luò)過濾,加入如下host跳過服務(wù)商網(wǎng)絡(luò)過濾:
140.82.112.3?github.com
如果你的倉庫的主分支是master而不是main,請自行修改構(gòu)建腳本依賴分支為master,在.github/workflows/ci.yml中。
最后
歡迎加我微信(winty230),拉你進技術(shù)群,長期交流學(xué)習(xí)...
歡迎關(guān)注「前端Q」,認真學(xué)前端,做個專業(yè)的技術(shù)人...