
Spring Boot 整合 FreeMarker 實例
1前言
在之前的文章Spring Boot 整合 Thymeleaf[1]中,我們學習了如何將模板 Thymeleaf 整合到 Spring Boot 中,那今天我們就來看看,另一個老牌的開源免費模板引擎 - FreeMarker!
2FreeMarker 簡介
FreeMarker 是一款模板引擎:即一種基于模板和要改變的數(shù)據(jù),并用來生成輸出文本(HTML 網(wǎng)頁,電子郵件,配置文件,源代碼等)的通用工具。它不是面向最終用戶的,而是一個 Java 類庫,是一款程序員可以嵌入他們所開發(fā)產(chǎn)品的組件。
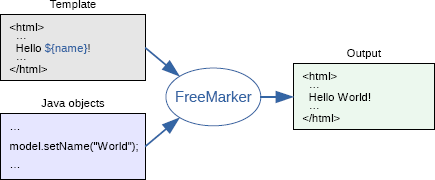
以上就是出自 FreeMarker 的官方定義,我們通過使用 FreeMarker,可以將我們所需的模板和數(shù)據(jù)渲染成 HTML,從而實現(xiàn)我們想要的效果。通過將模板與數(shù)據(jù)分開,讓分工更加明確,模板方面則專注于如何將數(shù)據(jù)進行展現(xiàn),而在數(shù)據(jù)方面,我們就可以專注于展示何種數(shù)據(jù),下圖就是我們以上所描述的 FreeMarker 的功能。
那接下來,我們就來看看,如何將 FreeMarker 像 Thymeleaf 一樣整合到我們的 Spring Boot 中,讓我們的開發(fā)更加簡單。
3準備工作
環(huán)境準備
正式開始之前,依然給出本文所基于的環(huán)境,避免環(huán)境問題可能給大家?guī)淼挠绊憽?/p>
- JDK 17(理論上推薦不低于 1.8 版本)
- IDEA
- SpringBoot 2.x
添加 FreeMarker 依賴
開始之前,我們需要添加 FreeMarker 的相關(guān)依賴,同樣這里我們可以選擇兩種方式。一種是在創(chuàng)建項目時就添加上,另一種則是創(chuàng)建項目后在項目 pom.xml 文件中手動添加,接下來我們分別來看看兩種不同的方式應該如何添加。如果還不清楚如何創(chuàng)建 Spring Boot 項目,可以參照我之前的一篇文章:創(chuàng)建 Spring Boot 項目的 3 種方式[2]。
- 第一種
在使用 IDEA 創(chuàng)建 Spring Boot 新項目時,添加依賴時將模板引擎中的 Apache FreeMarker 勾選上。

2.第二種
如果在創(chuàng)建時未添加 FreeMarker 模板引擎依賴,或者在項目開始創(chuàng)建之初并未有此需求,但后續(xù)過程中又增加了該需求,則此時可以直接在項目 pom.xml 中手動添加 FreeMarker 依賴即可。
<dependency>
????<groupId>org.springframework.bootgroupId>
????<artifactId>spring-boot-starter-freemarkerartifactId>
dependency>
添加 FreeMarker 相關(guān)配置
添加依賴后,我們需要在項目配置文件 application.yml 中添加 FreeMarker 的相關(guān)配置。
spring:
??freemarker:
????#?模板后綴名
????suffix:?.ftl
????#?文檔類型
????content-type:?text/html
????#?頁面編碼
????charset:?UTF-8
????#?頁面緩存
????cache:?false
????#?模板路徑
????template-loader-path:?classpath:/templates/
4編寫實體類和 Controller
編寫實體類
創(chuàng)建一個 User 類,并將其各種 setter、getter、構(gòu)造方法等完成,這里我依然使用了 Lombok 插件,以便簡化我們的代碼。關(guān)于該插件的更多用法,可以參照我之前的文章:Lombok 的安裝及使用指南[3]。
package?com.cunyu.springbootfreemarkerdemo.entity;

import?lombok.AllArgsConstructor;
import?lombok.Data;
import?lombok.NoArgsConstructor;
import?org.springframework.stereotype.Component;

/**
?*?Created?with?IntelliJ?IDEA.
?*
?*?@author?:?zhangliang
?*?@version?:?1.0
?*?@project?:?java-learning
?*?@package?:?com.cunyu.springbootfreemarkerdemo.entity
?*?@className?:?User
?*?@createTime?:?2021/11/30?21:55
?*?@email?:[email protected]
?*?@公眾號?:?村雨遙
?*?@website?:?https://cunyu1943.github.io
?*?@description?:
?*/

@Component
@Data
@AllArgsConstructor
@NoArgsConstructor
public?class?User?{
????private?int?age;
????private?String?name;
????private?String?email;
}
編寫 Controller
這里我們創(chuàng)建一個 User 對象,然后設(shè)置其年齡、Email、姓名等相關(guān)信息,然后將其加到屬性中,方便傳輸?shù)角岸诉M行展示。
package?com.cunyu.springbootfreemarkerdemo.controller;

import?com.cunyu.springbootfreemarkerdemo.entity.User;
import?org.springframework.stereotype.Controller;
import?org.springframework.ui.Model;
import?org.springframework.web.bind.annotation.GetMapping;

/**
?*?Created?with?IntelliJ?IDEA.
?*
?*?@author?:?zhangliang
?*?@version?:?1.0
?*?@project?:?java-learning
?*?@package?:?com.cunyu.springbootfreemarkerdemo.controller
?*?@className?:?UserController
?*?@createTime?:?2021/11/30?22:04
?*?@email?:[email protected]
?*?@公眾號?:?村雨遙
?*?@website?:?https://cunyu1943.github.io
?*?@description?:
?*/
@Controller
public?class?UserController?{
????@GetMapping("/index")
????public?String?index(Model?model)?{
????????User?user?=?new?User();
????????user.setAge(26);
????????user.setEmail("[email protected]");
????????user.setName("村雨遙");
????????model.addAttribute("user",?user);
????????return?"index";
????}
}
數(shù)據(jù)渲染
當完成實體類和 Controller 編寫后,我們就可以利用模板來進行展示了。我們在項目的 resources/templates 路進行新建一個 index.ftl 文件,注意這里文件名要保持和 Controller 中 index 方法所返回的字符串一致。
html>
<html?lang="en">
<head>
????<meta?charset="UTF-8">
????<title>FreeMarker?實驗title>
head>
<body>
????<table>
????????<tr>
????????????<td>姓名td>
????????????<td>年齡td>
????????????<td>Emailtd>
????????tr>
????????<tr>
????????????<td>${user.name}td>
????????????<td>${user.age}td>
????????????<td>${user.email}td>
????????tr>
????table>
body>
html>
測試
將我們的項目啟動起來,然后在瀏覽器中訪問如下路徑:
http://localhost:8080/index
如果顯示如下圖中的信息,那么就說明我們此次的整合工作順利完成!

5總結(jié)
以上就是 Spring Boot 整合 FreeMarker 的具體過程了,可以結(jié)合之前的文章:Spring Boot 整合 Thymeleaf 實例共同閱讀,對比 Thymeleaf 和 FreeMarker 在整合過程中的一些共同點和不同點,相信你會有更多的收獲。
最后,關(guān)于本文案例代碼,我已經(jīng)上傳到 Github,有需要的小伙伴可以自取:傳送門[4]。
參考資料
[1]Spring Boot 整合 Thymeleaf: https://cunyu1943.blog.csdn.net/article/details/107671467
[2]創(chuàng)建 Spring Boot 項目的 3 種方式: https://cunyu1943.blog.csdn.net/article/details/119618308
[3]Lombok 的安裝及使用指南: https://blog.csdn.net/github_39655029/article/details/119992626
[4]傳送門: https://github.com/cunyu1943/java-learning/tree/main/springBoot-demo/springboot-freemarker-demo