
《從 0 到 1 手寫 babel》思路分享
前言
周末我在開心地寫著小冊的時候,不小心碰倒了飲料,撒了一些在鍵盤上,雖然我很快的收拾了一下,但電腦卻突然關(guān)機了。我嘗試著重啟了一下發(fā)現(xiàn)啟動不了了,最終確認它壞掉了。
電腦壞掉倒不是我最擔心的,主要是我答應(yīng)了很多讀者要下周上線小冊,不能再鴿了,可是現(xiàn)在不得不鴿了,因為代碼全在那臺電腦。
我在想著怎么彌補比較好,想起不少人期待最后的《手寫簡易的 babel》那個案例的,正好我最近也在寫那個案例了,我想著要不提前分享下思路吧。算是一些補償(也公布下再鴿幾天的消息)。
整體思路
babel 的編譯流程
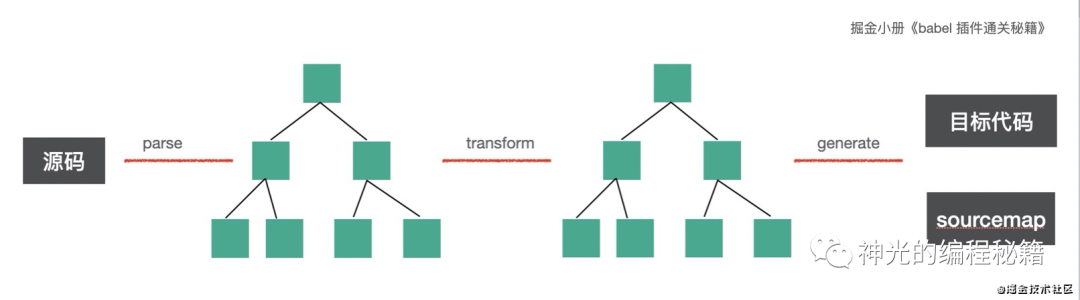
我們知道,babel 的主要編譯流程是 parse、transform、generate。
parse 是把源碼轉(zhuǎn)成 AST transform 是對 AST 做增刪改 generate 是打印 AST 成目標代碼并生成 sourcemap
babel7 內(nèi)置的包
babel 7 把這些功能的實現(xiàn)放到了不同的包里面:
@babel/parser解析源碼成 AST,對應(yīng) parse 階段@babel/traverse遍歷 AST 并調(diào)用 visitor 函數(shù),對應(yīng) transform 階段@babel/generate打印 AST,生成目標代碼和 sorucemap,對應(yīng) generate 階段
其中,遍歷過程中需要創(chuàng)建 AST,會用到:
@babel/types創(chuàng)建、判斷 AST@babel/template根據(jù)模塊批量創(chuàng)建 AST
上面是每一個階段的功能, babel 整體功能的入口是在:
@babel/core解析配置、應(yīng)用 plugin、preset,完成整體編譯流程
插件和插件之間有一些公共函數(shù),這些都是在:
@babel/helpers用于轉(zhuǎn)換 es next 代碼需要的通過模板創(chuàng)建的 AST,比如 _typeof、_defineProperties 等@babel/helper-xxx其他的插件之間共享的用于操作 AST 的公共函數(shù)
當然,除了編譯期轉(zhuǎn)換的時候會有公共函數(shù)以外,運行時也有,這部分是放在:
@babel/runtime主要是包含 corejs、helpers、regenerator 這 3 部分:helper:helper 函數(shù)的運行時版本(不是通過 AST 注入了,而是運行時引入代碼) corejs:es next 的 api 的實現(xiàn),corejs 2 只支持靜態(tài)方法,corejs 3 還支持實例方法 regenerator:async await 的實現(xiàn),由 facebook 維護
(babel 做語法轉(zhuǎn)換是自己實現(xiàn)的 helper,但是做 polyfill 都不是自己實現(xiàn)的,而是借助了第三方的 corejs、regenerator)
我們要實現(xiàn)哪些包
上面介紹的是 babel 完成功能所內(nèi)置的一些包,我們?nèi)绻獙懸粋€簡易的 babel,也得實現(xiàn)這些包,但可以做一些簡化。
parser 包是肯定要實現(xiàn)的,babel parser 是基于 acorn fork 的,我們也基于 acorn,做一點擴展。完成從源碼到 AST 的轉(zhuǎn)換。traverse 包是對 AST 的遍歷,需要知道不同類型的 AST 都遍歷哪些 key,這些是在 @babel/types 包里面定義的,我們也用類似的實現(xiàn)方式,并且會調(diào)用對應(yīng)的 visitor,實現(xiàn) path 和 path.scope 的一些 api 然后傳入。generate 包是打印 AST 成目標代碼,生成 sourcemap。打印這部分每個 AST 類型都要寫一個對應(yīng)的函數(shù)來處理,生成 sourcemap 使用 source-map 這個包,關(guān)聯(lián) parse 時記錄的 loc 和打印時計算的位置來生成每一個 mapping。types 包用于創(chuàng)建 AST,會維護創(chuàng)建和判斷各種 AST 的 api,并且提供每種 AST 需要遍歷的屬性是哪些,用于 traverse 的過程template 包是批量創(chuàng)建 AST 的,這里我們實現(xiàn)一個簡單的版本,傳入字符串,parse 成 AST 返回。core 包是整體流程的串聯(lián),支持 plugins 和 presets,調(diào)用插件,合并成最終的 visitors,然后再 traverse。helper 包我們也會實現(xiàn)一個,因為支持了 plugin,那么中有一些公共的函數(shù)可以復(fù)用runtime 包我們也提供一下,不過只加入一些用于做語法轉(zhuǎn)換的輔助函數(shù)就好了
這是我們大概會做的事情,把這些都實現(xiàn)一遍就算一個比較完整的 babel 了。實現(xiàn)的過程中更能加深我們對 babel、對轉(zhuǎn)譯器的認識,不只是掌握 babel 本身。
下面我們來詳細分析一下每一步的具體思路:
代碼實現(xiàn)
(因為代碼在那臺壞掉的電腦拿不出來,加上這也不是小冊里,所以只會提供思路,等小冊上線會提供完整源碼的)
為了簡化,我們不做分包了,把代碼都放在一個包里實現(xiàn)。
parser
主流的 parser 有 esprima、acorn 等,acorn 是最流行的,babel parser 是 fork 自 acorn,做了很多修改。我們不需要 fork,基于 acorn 的插件機制做一些擴展即可。
比如 acorn 所 parse 出的 AST 只有 Literal (字面量)類型,不區(qū)分具體是字符串、數(shù)字或者布爾等字面量,而 babel parser 把它們細化成了 StringLiteral、NumericLiteral、BooleanLiteral 等 AST。
我們就實現(xiàn)一下對 AST 做了這種擴展的 parser。
我們先用一下原本的 acorn parser:
const acorn = require("acorn");

const Parser = acorn.Parser;

const ast = Parser.parse(`
    const a = 1;
`);
console.log(JSON.stringify(ast, null, 2));
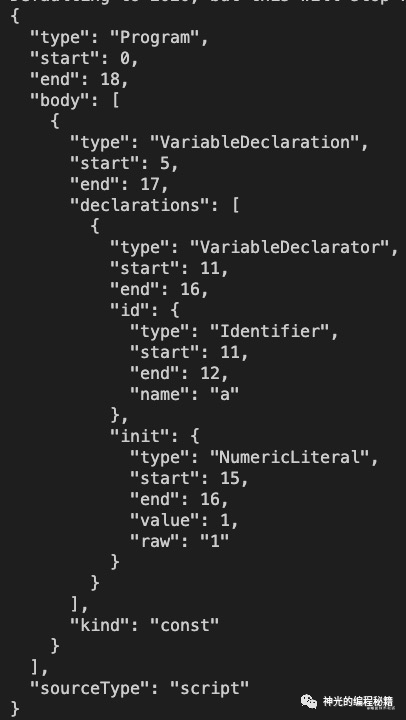
打印如下:
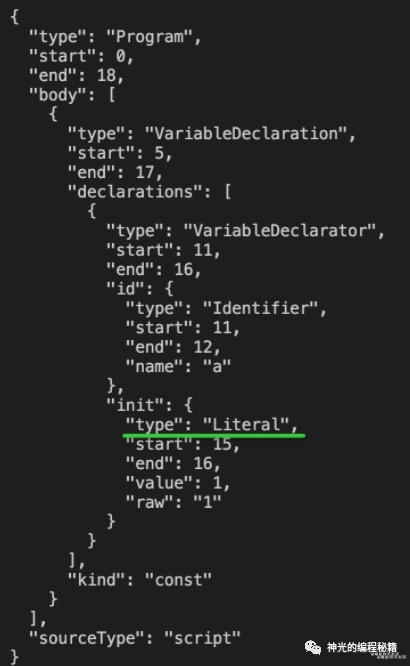
可以看到數(shù)字字面量 parse 的結(jié)果是 Literal,這樣判斷類型還需要去看下值的類型,才能確定是什么字面量,比較麻煩。這也是為什么 babel 把它們做了細化。
我們也細化一下:
acorn 擴展的方式是繼承 + 重寫,繼承之前的 parser,重寫一些方法,返回新 parser。
const acorn = require("acorn");

const Parser = acorn.Parser;

var literalExtend = function(Parser) {
  return class extends Parser {
    parseLiteral (...args) {
        const node = super.parseLiteral(...args);
        switch(typeof node.value) {
            case 'number':
                node.type = 'NumericLiteral';
                break;
            case 'string':
                node.type = 'StringLiteral';
                break;
        }
        return  node;
    }
  }
}
const newParser = Parser.extend(literalExtend);

const ast = newParser.parse(`
    const a = 1;
`);
console.log(JSON.stringify(ast, null, 2));
我們在 parse 的時候就判斷了字面量的類型,然后設(shè)置了 type。
試下效果:

這樣,我們就實現(xiàn)了類似 babel parser 對 acorn 的擴展。
當然,babel parser 的擴展有很多,這里我們只是簡單實現(xiàn),理清思路即可。
traverse
遍歷 AST 是一個深度優(yōu)先搜索的過程,當處理到具體的 AST 節(jié)點我們要知道怎么繼續(xù)遍歷子 AST 節(jié)點。
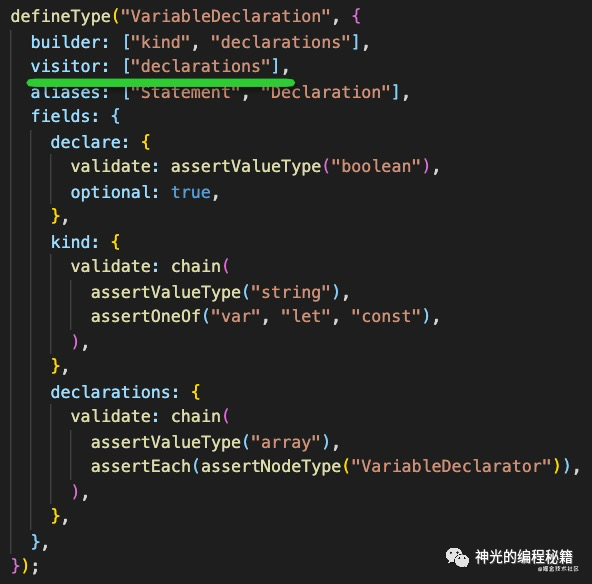
在 babel types 包中定義了不同 AST 怎么遍歷(visitor)、怎么創(chuàng)建(builder)、怎么判斷(fidelds.validate)以及別名(alias)。
這里我們也需要維護每種 AST 怎么遍歷的數(shù)據(jù):
const AST_DEFINATIONS_MAP = new Map();

AST_DEFINATIONS_MAP.set('Program', {
    visitor: ['body']
});
AST_DEFINATIONS_MAP.set('VariableDeclaration', {
    visitor: ['declarations']
});
AST_DEFINATIONS_MAP.set('VariableDeclarator', {
    visitor: ['id', 'init']
});
AST_DEFINATIONS_MAP.set('Identifier', {});
AST_DEFINATIONS_MAP.set('NumericLiteral', {});
然后基于這些數(shù)據(jù)對 AST 進行深度優(yōu)先遍歷:
function traverse(node) {
    const defination = astDefinationsMap.get(node.type);

    console.log(node.type);

    if (defination.visitor) {
        defination.visitor.forEach(key => {
            const prop = node[key];
            if (Array.isArray(prop)) { // 如果該屬性是數(shù)組
                prop.forEach(childNode => {
                    traverse(childNode);
                })
            } else {
                traverse(prop);
            }
        })
    }
}
打印結(jié)果如下:
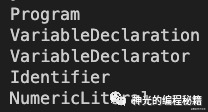
對照下剛才的 AST 結(jié)構(gòu),確實實現(xiàn)了深度優(yōu)先遍歷。
visitor
遍歷之后,我們要實現(xiàn) visitors 的功能,在遍歷的過程中對 AST 做增刪改。這個就是遍歷的過程中根據(jù) node.type 來調(diào)用對應(yīng)的 visitor 函數(shù):
function traverse(node, visitors) {
    const defination = astDefinationsMap.get(node.type);

    const visitorFunc = visitors[node.type];

    if(visitorFunc && typeof visitorFunc === 'function') {
        visitorFunc(node);
    }


    if (defination.visitor) {
        defination.visitor.forEach(key => {
            const prop = node[key];
            if (Array.isArray(prop)) { // 如果該屬性是數(shù)組
                prop.forEach(childNode => {
                    traverse(childNode, visitors);
                })
            } else {
                traverse(prop, visitors);
            }
        })
    }
}
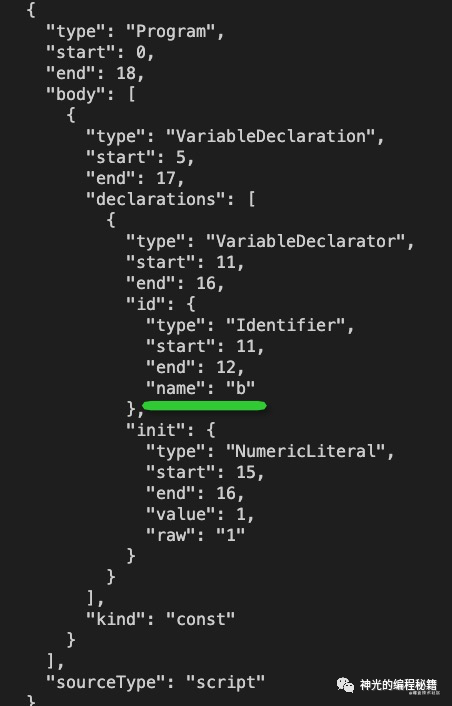
我們來試驗一下:
traverse(ast, {
    Identifier(node) {
        node.name = 'b';
    }
});
之后再次查看 AST,發(fā)現(xiàn) Identifier 的 name 已經(jīng)從 a 變成了 b
babel 的 visitor 也支持指定 enter、exit 來選擇在遍歷子節(jié)點之前和之后調(diào)用,如果傳入的是函數(shù),那么就被當做 enter:
function traverse(node, visitors) {
    const defination = astDefinationsMap.get(node.type);

    let visitorFuncs = visitors[node.type] || {};

    if(typeof visitorFuncs === 'function') {
        visitorFuncs = {
            enter: visitorFuncs
        }
    }

    visitorFuncs.enter && visitorFuncs.enter(node);

    if (defination.visitor) {
        defination.visitor.forEach(key => {
            const prop = node[key];
            if (Array.isArray(prop)) { // 如果該屬性是數(shù)組
                prop.forEach(childNode => {
                    traverse(childNode, visitors);
                })
            } else {
                traverse(prop, visitors);
            }
        })
    }
    visitorFuncs.exit && visitorFuncs.exit(node);

}
這樣,我們傳入的 visitor 也可以這樣寫:
traverse(ast, {
    Identifier: {
        exit(node) {
            node.name = 'b';
        }
    }
});
會在遍歷完子節(jié)點之后被調(diào)用。
path
我們實現(xiàn)的 visitor 是直接傳入的 node,但是 AST 中并沒有父節(jié)點的信息,所以我們要把父節(jié)點也傳進去。
babel 提供了 path 的功能,它是從當前節(jié)點到根節(jié)點的一條路徑,通過 parent 串聯(lián)。
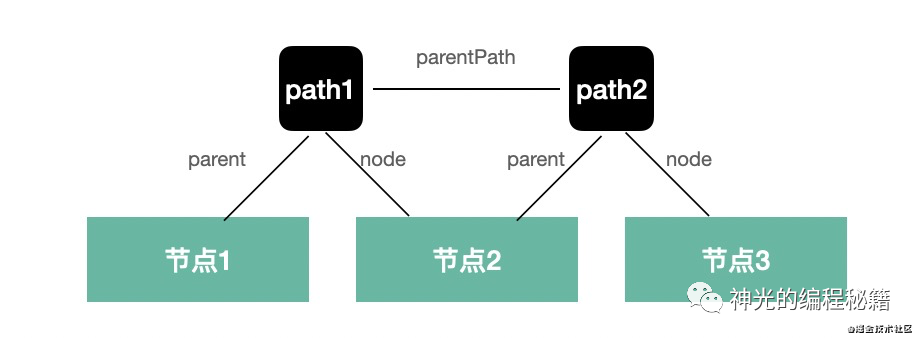
我們封裝一個 NodePath 的類:
class NodePath {
    constructor(node, parent, parentPath) {
        this.node = node;
        this.parent = parent;
        this.parentPath = parentPath;
    }
}
調(diào)用 visitor 的時候創(chuàng)建 path 對象傳入:
function traverse(node, visitors, parent, parentPath) {
    const defination = astDefinationsMap.get(node.type);

    let visitorFuncs = visitors[node.type] || {};

    if(typeof visitorFuncs === 'function') {
        visitorFuncs = {
            enter: visitorFuncs
        }
    }
    const path = new NodePath(node, parent, parentPath);

    visitorFuncs.enter && visitorFuncs.enter(path);

    if (defination.visitor) {
        defination.visitor.forEach(key => {
            const prop = node[key];
            if (Array.isArray(prop)) { // 如果該屬性是數(shù)組
                prop.forEach(childNode => {
                    traverse(childNode, visitors, node, path);
                })
            } else {
                traverse(prop, visitors, node, path);
            }
        })
    }
    visitorFuncs.exit && visitorFuncs.exit(path);
}
這樣,我們可以在 visitor 中拿到父節(jié)點,父節(jié)點的父節(jié)點,我們來試一下:
traverse(ast, {
    Identifier: {
        exit(path) {
            path.node.name = 'b';
            let curPath = path;
            while (curPath) {
                console.log(curPath.node.type);
                curPath = curPath.parentPath;
            }
        }
    }
});
打印結(jié)果如下:
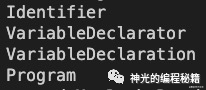
從當前節(jié)點到根節(jié)點的 AST 都可以獲取到。
path 的 api
parent 可以保存,同理 sibling 也可以,也就是說我們可以通過 path 拿到所有的 AST。但是直接操作 AST 有點麻煩,所以我們要提供一些 api 來簡化操作。
首先我們要把遍歷到的 AST 的屬性對應(yīng)的 key 和如果是數(shù)組時對應(yīng)的 listKey 都保存下來。
class NodePath {
    constructor(node, parent, parentPath, key, listKey) {
        this.node = node;
        this.parent = parent;
        this.parentPath = parentPath;
        this.key = key;
        this.listKey = listKey;
    }
}

function traverse(node, visitors, parent, parentPath, key, listKey) {
    const defination = astDefinationsMap.get(node.type);

    let visitorFuncs = visitors[node.type] || {};

    if(typeof visitorFuncs === 'function') {
        visitorFuncs = {
            enter: visitorFuncs
        }
    }
    const path = new NodePath(node, parent, parentPath, key, listKey);

    visitorFuncs.enter && visitorFuncs.enter(path);

    if (defination.visitor) {
        defination.visitor.forEach(key => {
            const prop = node[key];
            if (Array.isArray(prop)) { // 如果該屬性是數(shù)組
                prop.forEach((childNode, index) => {
                    traverse(childNode, visitors, node, path, key, index);
                })
            } else {
                traverse(prop, visitors, node, path, key);
            }
        })
    }
    visitorFuncs.exit && visitorFuncs.exit(path);
}
然后基于 key 和 listKey 來實現(xiàn) replaceWith 和 remove 的 api:
class NodePath {
    constructor(node, parent, parentPath, key, listKey) {
        this.node = node;
        this.parent = parent;
        this.parentPath = parentPath;
        this.key = key;
        this.listKey = listKey;
    }
    replaceWith(node) {
        if (this.listKey) {
            this.parent[this.key].splice(this.listKey, 1, node);
        }
        this.parent[this.key] = node
    }
    remove () {
        if (this.listKey) {
            this.parent[this.key].splice(this.listKey, 1);
        }
        this.parent[this.key] = null;
    }
}
試驗下效果:
traverse(ast, {
    NumericLiteral(path) {
        path.replaceWith({ type: 'Identifier', name: 'bbbbbbb' });
    }
});
結(jié)果為:
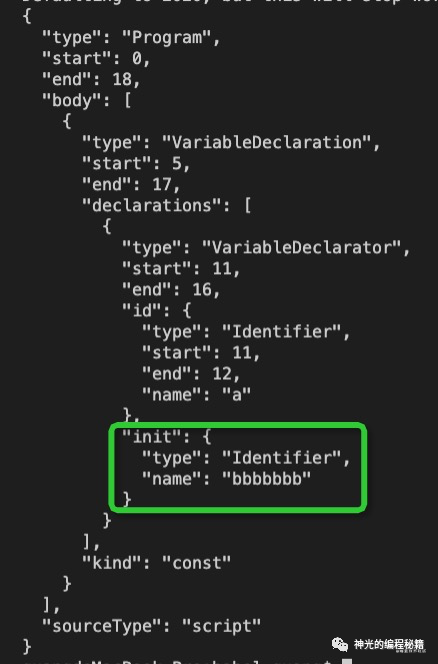
NumericLiteral 被替換為了 Identifier。我們成功的實現(xiàn)了 path.replaceWith。
path.scope
path.scope 是作用域的信息,記錄聲明的變量的 binding、它們的引用 reference、在哪里被修改 (constantViolations),以及父作用域等。是靜態(tài)作用域鏈的實現(xiàn)。
實現(xiàn)思路:
首先函數(shù)、塊、模塊都會生成作用域,當處理到這些 AST 時要創(chuàng)建一個 Scope 對象,它有 bindings 屬性,每一個聲明都會創(chuàng)建一個 binding(比如變量聲明語句 VariableDeclaration、函數(shù)聲明語句 FuncitonDeclaration 以及參數(shù)、import 等)
通過 Identifier 引用這些作用域中的 binding 的時候就會記錄 references,如果被修改,則記錄修改的語句的 AST 對應(yīng)的 path,比如賦值語句。
同樣需要提供一系列 api 來簡化作用域的分析和操作,比如查找 getBinding、刪除 removeBinding、重命名 rename 等。
篇幅關(guān)系,這里就不做實現(xiàn)了,《babel 插件通關(guān)秘籍》小冊中會有完整的實現(xiàn)。
types
在 traverse 的時候我們實現(xiàn)了 path.replaceWith 的 api,用于替換 AST 成新的 AST,我們是直接傳入了字面量對象,這種方式比較麻煩。babel 是通過 types 包來提供創(chuàng)建 AST 的能力,我們來分析一下實現(xiàn)思路:
其實創(chuàng)建 AST 節(jié)點也是一個遞歸的過程,需要保證每一部分都是正確的,我們在遍歷的時候保存了 visitor 的 key,在創(chuàng)建的時候仍然是創(chuàng)建這些 key 對應(yīng)的 AST,不過需要對傳入的參數(shù)做一下檢驗。
defineType("BinaryExpression", {
    builder: ["operator", "left", "right"],
    fields: {
      operator: {
        validate: assertOneOf(...BINARY_OPERATORS),
      },
      left: {
        validate: assertNodeType("Expression"),
      },
      right: {
        validate: assertNodeType("Expression"),
      },
    },
    visitor: ["left", "right"],
    aliases: ["Binary", "Expression"],
});
babel 內(nèi)部通過 defineType 方法定義 AST 類型的創(chuàng)建邏輯,其中 fileds 屬性包含了這個 AST 需要什么屬性,每種屬性怎么校驗。通過校驗之后會根據(jù)相應(yīng)的參數(shù)創(chuàng)建 AST。
template
babel template 是通過字符串批量創(chuàng)建 AST,我們可以基于 parser 實現(xiàn)一個簡單的 template
function template(code) {
    return parse(code);
}
template.expression = function(code) {
    return template(code).body[0].expression;
}
上面的代碼就可以變成:
traverse(ast, {
    NumericLiteral(path) {
        path.replaceWith(template.expression('bbb'));
    }
});
generate
上面都是對 AST 的增刪改,接下來我們來實現(xiàn)下 generate,把 AST 打印成目標代碼。
其實就是一個拼接字符串的過程:
class Printer {
    constructor () {
        this.buf = '';
    }

    space() {
        this.buf += ' ';
    }

    nextLine() {
        this.buf += '\n';
    }

    Program (node) {
        node.body.forEach(item => {
            this[item.type](item) + ';';
            this.nextLine();
        });

    }
    VariableDeclaration(node) {
        this.buf += node.kind;
        this.space();
        node.declarations.forEach((declaration, index) => {
            if (index != 0) {
                this.buf += ',';
            }
            this[declaration.type](declaration);
        });
        this.buf += ';';
    }
    VariableDeclarator(node) {
        this[node.id.type](node.id);
        this.buf += '=';
        this[node.init.type](node.init);
    }
    Identifier(node) {
        this.buf += node.name;
    }
    NumericLiteral(node) {
        this.buf += node.value;
    }

}
class Generator extends Printer{

    generate(node) {
        this[node.type](node);
        return this.buf;
    }
}
function generate (node) {
    return new Generator().generate(node);
}
我們來試驗一下:
const sourceCode = `
const a = 1,b=2,c=3;
const d=4,e=5;
`;

ast = parse(sourceCode);
traverse(ast, {
    NumericLiteral(path) {
        if (path.node.value === 2) {
            path.replaceWith(template.expression('aaaaa'));
        }
    }
})
console.log(generate(ast));
打印結(jié)果如下:
const a=1,b=aaaaa,c=3;
const d=4,e=5;
我們成功的實現(xiàn)了 generate 方法。
sourcemap
generator 除了打印目標代碼外還要生成 sourcemap,這個是轉(zhuǎn)譯器很重要的一個功能。
sourcemap 的實現(xiàn)思路也比較簡單:
parse 之后的 AST 中保留了源碼中的位置信息(行列號),在打印成目標代碼的時候計算新的行列號,這樣有了新舊行列號,就可以用 source-map 包的 api 生成 sourcemap 了。
var map = new SourceMapGenerator({
  file: "source-mapped.js"
});

map.addMapping({
  generated: {
    line: 10,
    column: 35
  },
  source: "foo.js",
  original: {
    line: 33,
    column: 2
  },
  name: "christopher"
});

console.log(map.toString());
// '{"version":3,"file":"source-mapped.js",
//   "sources":["foo.js"],"names":["christopher"],"mappings":";;;;;;;;;mCAgCEA"}'
core
上面我們已經(jīng)實現(xiàn)了全流程的功能,但是平時我們平時很少使用 api,更多還是使用全流程的包 @babel/core,所以要基于上面的包實現(xiàn) core 包,然后支持 plugin 和 preset。
function transformSync(code, options) {
    const ast = parse(code);

    const pluginApi = {
        template
    }
    const visitors = {};
    options.plugins.forEach(([plugin, options]) => {
        const res = plugin(pluginApi, options);
        Object.assign(visitors, res.visitor);
    })

    traverse(ast, visitors);
    return generate(ast);
}
plugin 支持傳入 options,并且在 plugin 里面可以拿到 api 和 options,返回值是 visitor 函數(shù):
const sourceCode = `
const a = 1;
`;

const code = transformSync(sourceCode, {
    plugins: [
        [
            function plugin1(api, options) {
                return {
                    visitor: {
                        Identifier(path) {
                                // path.node.value = 2222;
                                path.replaceWith(api.template.expression(options.replaceName));
                        }
                    }
                }
            },
            {
                replaceName: 'ddddd'
            }
        ]
    ]
});
console.log(code);
結(jié)果為:
const ddddd=1;
至此我們完成了 babel 所有內(nèi)置功能的簡易版本實現(xiàn)。(helper 就是一個放公共函數(shù)的包, runtime 是用于運行時引入的 api,這兩個包比較簡單,就不實現(xiàn)了。在《babel 插件通關(guān)秘籍》的小冊里面會詳細實現(xiàn))
總結(jié)
我們梳理了 babel 的編譯流程和內(nèi)置的包的各自的功能,然后明確了我們要實現(xiàn)的包:parser、traverse、generate、types、template、core。接下來依次做了實現(xiàn)或梳理了實現(xiàn)思路。
parser 包基于 acorn,babel 是 fork 自 acorn,我們是直接基于 acorn 插件來修改 AST。我們實現(xiàn)了 Literal 的 AST 的擴展。
traverse 包負責遍歷 AST,我們通過記錄 visitor key 實現(xiàn)了 AST 的深度優(yōu)先遍歷,并且在遍歷的過程中調(diào)用 visitor,而且還支持 enter 和 exit 兩個階段的調(diào)用。visitor 傳入的參數(shù)支持了 path,可以拿到 parent,可以調(diào)用 replaceWith 和 remove 等 api。我們還梳理了實現(xiàn) scope 的思路。
types 和 template 都是用于創(chuàng)建 AST 的,我們梳理了 types 的實現(xiàn)思路,就是遞歸創(chuàng)建 AST 然后組裝,實現(xiàn)了簡單的 template,使用直接從字符串 parse 的方式。
generate 包負責把修改以后的 AST 打印成目標代碼以及生成 sourcemap,我們實現(xiàn)了代碼的打印。梳理了 sourcemap 的思路。
core 包是整個編譯流程的集成,而且支持 plugins 和 preset,我們實現(xiàn)了 transformSync 的 api,也支持了 plugin 的調(diào)用。
上面就是 babel 的實現(xiàn)思路,細化一下是能夠?qū)崿F(xiàn)一個完整功能的 babel 的。
這個是《babel 插件通關(guān)秘籍》 的最后一個案例,小冊中的實現(xiàn)思路和代碼會更清晰,也會提供源碼。
這周末電腦突然壞了,代碼可能也有丟失,所以不得不鴿一段時間。但是挺多人挺期待這本小冊上線的,我實在過意不過,所以把大家感興趣的《手寫簡易的 babel》的實現(xiàn)思路分享了出來,希望能夠幫大家更好的掌握 babel 以及類似的編譯器。(小冊在我電腦修好后也會盡快寫完的)
如果你覺得這篇內(nèi)容對你挺有啟發(fā),我想邀請你幫我三個小忙:
點個「在看」,讓更多的人也能看到這篇內(nèi)容(喜歡不點在看,都是耍流氓 -_-) 歡迎加我微信「TH0000666」一起交流學(xué)習(xí)... 關(guān)注公眾號「前端Sharing」,持續(xù)為你推送精選好文。