
目標檢測的常用數(shù)據(jù)處理方法!
前沿
在上節(jié)內(nèi)容中,我們介紹了目標檢測的基礎概念,并分析了實現(xiàn)目標檢測的常用思路,本篇文章將重點介紹在該領域的經(jīng)典數(shù)據(jù)集:VOC數(shù)據(jù)集,以及使用Dataloader對其進行數(shù)據(jù)讀取和預處理的全過程。
一、 目標檢測數(shù)據(jù)集VOC
VOC數(shù)據(jù)集是目標檢測領域最常用的標準數(shù)據(jù)集之一,幾乎所有檢測方向的論文,如faster_rcnn、yolo、SSD等都會給出其在VOC數(shù)據(jù)集上訓練并評測的效果。本文中,我們使用VOC2007和VOC2012這兩個最流行的版本作為訓練和測試的數(shù)據(jù)。
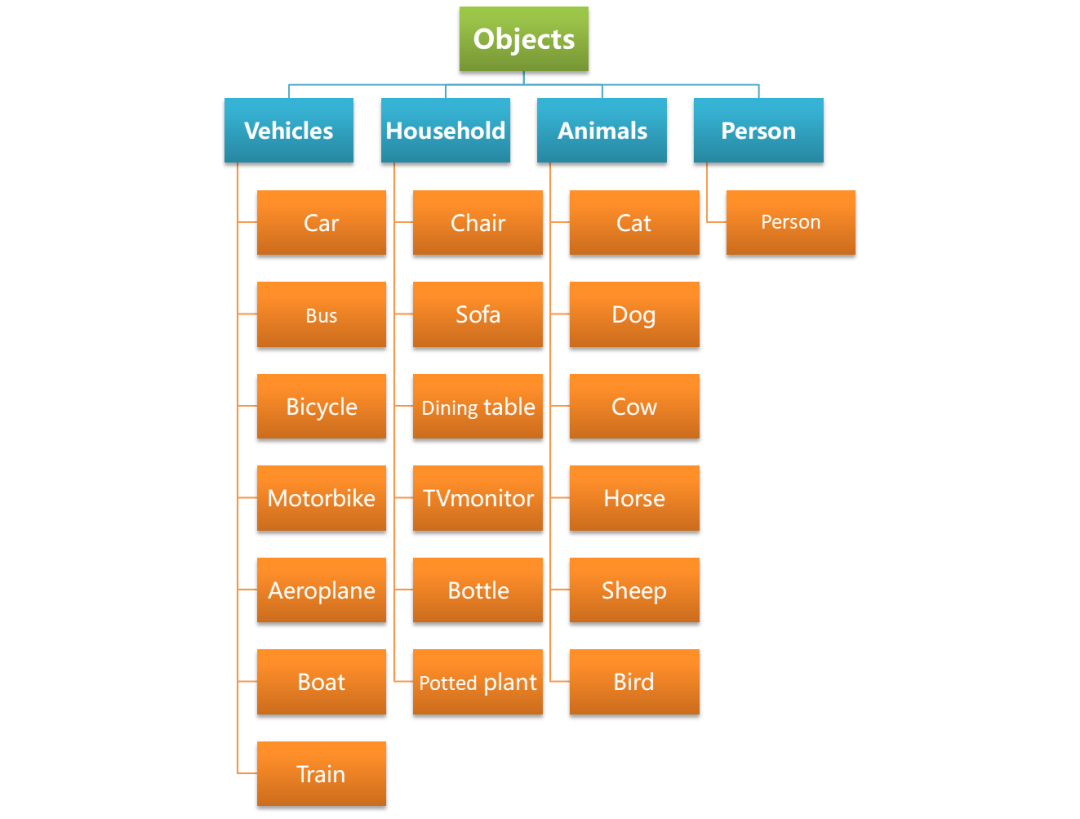
1. 數(shù)據(jù)集類別
VOC數(shù)據(jù)集在類別上可以分為4大類,20小類,其類別信息下圖所示。
2. 數(shù)據(jù)集量級
VOC數(shù)量集圖像和目標數(shù)量的基本信息如下圖所示:

其中,Images表示圖片數(shù)量,Objects表示目標數(shù)量
3. 數(shù)據(jù)集下載
VOC官網(wǎng)經(jīng)常上不去,確保后續(xù)實驗準確且順利的進行,已打包數(shù)據(jù)集,在Datawhale后臺回復【目標檢測】可直接下載,下載后放到dataset目錄下解壓即可。
下面是通過官網(wǎng)下載的步驟:
進入VOC官網(wǎng)鏈接:http://host.robots.ox.ac.uk/pascal/VOC/.
在下圖所示區(qū)域找到歷年VOC挑戰(zhàn)賽鏈接,比如選擇VOC2012.

VOC官網(wǎng)頁面 在VOC2012頁面,找到下圖所示區(qū)域,點擊下載即可。

VOC2012數(shù)據(jù)集下載頁面 VOC2007同理進行下載即可。
4. 數(shù)據(jù)集說明
將下載得到的壓縮包解壓,可以得到如圖3-9所示的一系列文件夾,由于VOC數(shù)據(jù)集不僅被拿來做目標檢測,也可以拿來做分割等任務,因此除了目標檢測所需的文件之外,還包含分割任務所需的文件,比如SegmentationClass,SegmentationObject,這里,我們主要對目標檢測任務涉及到的文件進行介紹。

JPEGImages:這個文件夾中存放所有的圖片,包括訓練驗證測試用到的所有圖片。 ImageSets:這個文件夾中包含三個子文件夾,Layout、Main、Segmentation;Layout文件夾中存放的是train,valid,test和train+valid數(shù)據(jù)集的文件名 Segmentation:文件夾中存放的是分割所用train,valid,test和train+valid數(shù)據(jù)集的文件名 Main:文件夾中存放的是各個類別所在圖片的文件名,比如cow_val,表示valid數(shù)據(jù)集中,包含有cow類別目標的圖片名稱。 Annotations:Annotation文件夾中存放著每張圖片相關的標注信息,以xml格式的文件存儲,可以通過記事本或者瀏覽器打開,我們以000001.jpg這張圖片為例說明標注文件中各個屬性的含義。 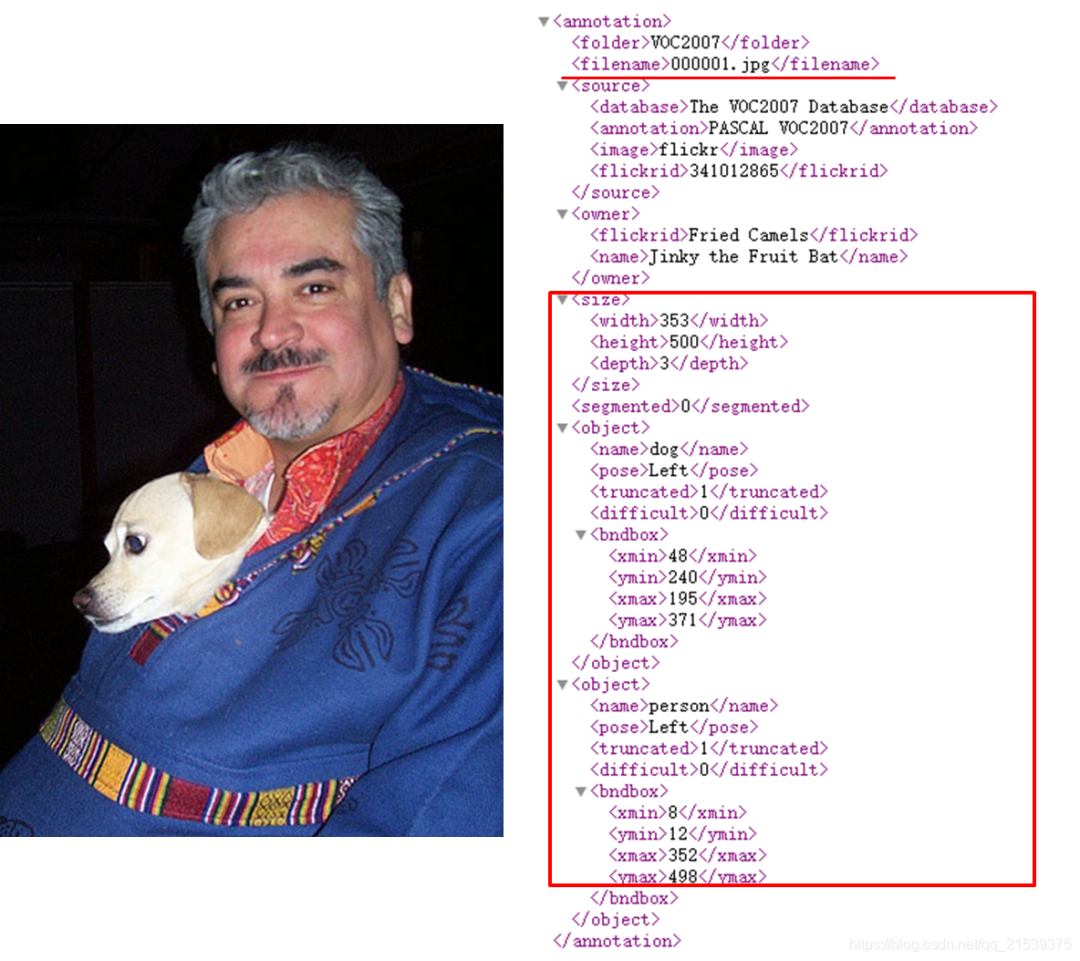
猛一看去,內(nèi)容又多又復雜,其實仔細研究一下,只有紅框區(qū)域內(nèi)的內(nèi)容是我們真正需要關注的。
filename:圖片名稱
size:圖片寬高
depth表示圖片通道數(shù)
object:表示目標,包含下面兩部分內(nèi)容。
首先是目標類別name為dog,pose表示目標姿勢為left,truncated表示是否是一個被截斷的目標,1表示是,0表示不是,在這個例子中,只露出狗頭部分,所以truncated為1。difficult為0表示此目標不是一個難以識別的目標。
然后就是目標的bbox信息,可以看到,這里是以[xmin,ymin,xmax,ymax]格式進行標注的,分別表示dog目標的左上角和右下角坐標。
一張圖片中有多少需要識別的目標,其xml文件中就有多少個object。上面的例子中有兩個object,分別對應人和狗。
二、VOC數(shù)據(jù)集的dataloader的構(gòu)建
1. 數(shù)據(jù)集準備
根據(jù)上面的介紹可以看出,VOC數(shù)據(jù)集的存儲格式還是比較復雜的,為了后面訓練中的讀取代碼更加簡潔,這里我們準備了一個預處理腳本create_data_lists.py。
該腳本的作用是進行一系列的數(shù)據(jù)準備工作,主要是提前將記錄標注信息的xml文件(Annotations)進行解析,并將信息整理到json文件之中,這樣在運行訓練腳本時,只需簡單的從json文件中讀取已經(jīng)按想要的格式存儲好的標簽信息即可。
注: 這樣的預處理并不是必須的,和算法或數(shù)據(jù)集本身均無關系,只是取決于開發(fā)者的代碼習慣,不同檢測框架的處理方法也是不一致的。
可以看到,create_data_lists.py腳本僅有幾行代碼,其內(nèi)部調(diào)用了utils.py中的create_data_lists方法:
"""python
    create_data_lists
"""
from utils import create_data_lists

if __name__ == '__main__':
    # voc07_path,voc12_path為我們訓練測試所需要用到的數(shù)據(jù)集,output_folder為我們生成構(gòu)建dataloader所需文件的路徑
    # 參數(shù)中涉及的路徑以個人實際路徑為準,建議將數(shù)據(jù)集放到dataset目錄下,和教程保持一致
    create_data_lists(voc07_path='../../../dataset/VOCdevkit/VOC2007',
                      voc12_path='../../../dataset/VOCdevkit/VOC2012',
                      output_folder='../../../dataset/VOCdevkit')
設置好對應路徑后,我們運行數(shù)據(jù)集準備腳本:
tiny_detector_demo$ python create_data_lists.py
很快啊!dataset/VOCdevkit目錄下就生成了若干json文件,這些文件會在后面訓練中真正被用到。
不妨手動打開這些json文件,看下都記錄了哪些信息。
下面來介紹一下parse_annotation函數(shù)內(nèi)部都做了什么,json中又記錄了哪些信息。這部分作為選學,不感興趣可以跳過,只要你已經(jīng)明確了json中記錄的信息的含義。
代碼閱讀可以參照注釋,建議配下圖一起食用:
"""python
    xml文件解析
"""

import json
import os
import torch
import random
import xml.etree.ElementTree as ET    #解析xml文件所用工具
import torchvision.transforms.functional as FT

#GPU設置
device = torch.device("cuda" if torch.cuda.is_available() else "cpu")

# Label map
#voc_labels為VOC數(shù)據(jù)集中20類目標的類別名稱
voc_labels = ('aeroplane', 'bicycle', 'bird', 'boat', 'bottle', 'bus', 'car', 'cat', 'chair', 'cow', 'diningtable',
              'dog', 'horse', 'motorbike', 'person', 'pottedplant', 'sheep', 'sofa', 'train', 'tvmonitor')

#創(chuàng)建label_map字典,用于存儲類別和類別索引之間的映射關系。比如:{1:'aeroplane', 2:'bicycle',......}
label_map = {k: v + 1 for v, k in enumerate(voc_labels)}
#VOC數(shù)據(jù)集默認不含有20類目標中的其中一類的圖片的類別為background,類別索引設置為0
label_map['background'] = 0

#將映射關系倒過來,{類別名稱:類別索引}
rev_label_map = {v: k for k, v in label_map.items()}  # Inverse mapping

#解析xml文件,最終返回這張圖片中所有目標的標注框及其類別信息,以及這個目標是否是一個difficult目標
def parse_annotation(annotation_path):
    #解析xml
    tree = ET.parse(annotation_path)
    root = tree.getroot()

    boxes = list()    #存儲bbox
    labels = list()    #存儲bbox對應的label
    difficulties = list()    #存儲bbox對應的difficult信息

    #遍歷xml文件中所有的object,前面說了,有多少個object就有多少個目標
    for object in root.iter('object'):
        #提取每個object的difficult、label、bbox信息
        difficult = int(object.find('difficult').text == '1')
        label = object.find('name').text.lower().strip()
        if label not in label_map:
            continue
        bbox = object.find('bndbox')
        xmin = int(bbox.find('xmin').text) - 1
        ymin = int(bbox.find('ymin').text) - 1
        xmax = int(bbox.find('xmax').text) - 1
        ymax = int(bbox.find('ymax').text) - 1
        #存儲
        boxes.append([xmin, ymin, xmax, ymax])
        labels.append(label_map[label])
        difficulties.append(difficult)

    #返回包含圖片標注信息的字典
    return {'boxes': boxes, 'labels': labels, 'difficulties': difficulties}
為什么得到的新坐標減1?VOC的矩形標注坐標是以1為基準的(1-based),而我們在處理圖像坐標都是0起始的(0-based)。
所以在這里才要對從xml文件中讀取的xmin,ymin,xmax,ymax 統(tǒng)統(tǒng)減1將坐標變?yōu)槲覀冏鰯?shù)據(jù)處理時所需要的0-based坐標。
返回值的形狀boxes (n,4) 的list,label (n) 的list,返回的都是標簽對應的數(shù)字。difficulties (n)的list,返回的只有0或1。
看了上面的代碼如果還不太明白,試試結(jié)合這張圖理解下:

"""python
    分別讀取train和valid的圖片和xml信息,創(chuàng)建用于訓練和測試的json文件
"""
def create_data_lists(voc07_path, voc12_path, output_folder):
    """
    Create lists of images, the bounding boxes and labels of the objects in these images, and save these to file.
    :param voc07_path: path to the 'VOC2007' folder
    :param voc12_path: path to the 'VOC2012' folder
    :param output_folder: folder where the JSONs must be saved
    """

    #獲取voc2007和voc2012數(shù)據(jù)集的絕對路徑
    voc07_path = os.path.abspath(voc07_path)
    voc12_path = os.path.abspath(voc12_path)

    train_images = list()
    train_objects = list()
    n_objects = 0

    # Training data
    for path in [voc07_path, voc12_path]:

        # Find IDs of images in training data
        #獲取訓練所用的train和val數(shù)據(jù)的圖片id
        with open(os.path.join(path, 'ImageSets/Main/trainval.txt')) as f:
            ids = f.read().splitlines()

        #根據(jù)圖片id,解析圖片的xml文件,獲取標注信息
        for id in ids:
            # Parse annotation's XML file
            objects = parse_annotation(os.path.join(path, 'Annotations', id + '.xml'))
            if len(objects['boxes']) == 0:    #如果沒有目標則跳過
                continue
            n_objects += len(objects)        #統(tǒng)計目標總數(shù)
            train_objects.append(objects)    #存儲每張圖片的標注信息到列表train_objects
            train_images.append(os.path.join(path, 'JPEGImages', id + '.jpg'))    #存儲每張圖片的路徑到列表train_images,用于讀取圖片

    assert len(train_objects) == len(train_images)        #檢查圖片數(shù)量和標注信息量是否相等,相等才繼續(xù)執(zhí)行程序

    # Save to file
    #將訓練數(shù)據(jù)的圖片路徑,標注信息,類別映射信息,分別保存為json文件
    with open(os.path.join(output_folder, 'TRAIN_images.json'), 'w') as j:
        json.dump(train_images, j)
    with open(os.path.join(output_folder, 'TRAIN_objects.json'), 'w') as j:
        json.dump(train_objects, j)
    with open(os.path.join(output_folder, 'label_map.json'), 'w') as j:
        json.dump(label_map, j)  # save label map too

    print('\nThere are %d training images containing a total of %d objects. Files have been saved to %s.' % (
        len(train_images), n_objects, os.path.abspath(output_folder)))


    #與Train data一樣,目的是將測試數(shù)據(jù)的圖片路徑,標注信息,類別映射信息,分別保存為json文件,參考上面的注釋理解
    # Test data
    test_images = list()
    test_objects = list()
    n_objects = 0

    # Find IDs of images in the test data
    with open(os.path.join(voc07_path, 'ImageSets/Main/test.txt')) as f:
        ids = f.read().splitlines()

    for id in ids:
        # Parse annotation's XML file
        objects = parse_annotation(os.path.join(voc07_path, 'Annotations', id + '.xml'))
        if len(objects) == 0:
            continue
        test_objects.append(objects)
        n_objects += len(objects)
        test_images.append(os.path.join(voc07_path, 'JPEGImages', id + '.jpg'))

    assert len(test_objects) == len(test_images)

    # Save to file
    with open(os.path.join(output_folder, 'TEST_images.json'), 'w') as j:
        json.dump(test_images, j)
    with open(os.path.join(output_folder, 'TEST_objects.json'), 'w') as j:
        json.dump(test_objects, j)

    print('\nThere are %d test images containing a total of %d objects. Files have been saved to %s.' % (
        len(test_images), n_objects, os.path.abspath(output_folder)))
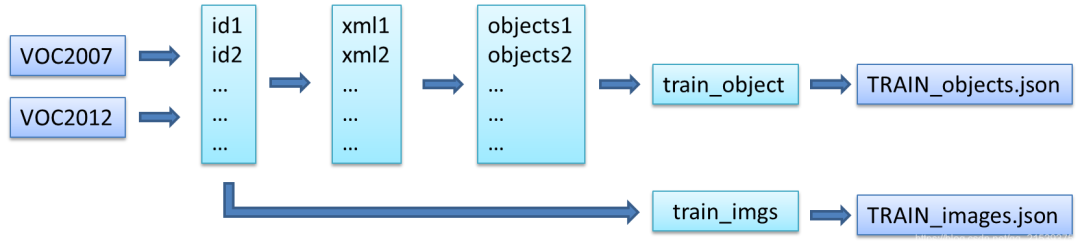
同時加載voc07,voc12兩個數(shù)據(jù)集,ids = f.read().splitlines()是把文件名以列表形式存儲。設圖片數(shù)量為n,每張圖片中的object數(shù)為m(非固定)。
TRAIN_images.json 是列表,長度為n,裝著是圖片的絕對路徑 TRAIN_objects.json 是列表,長度為n,裝著n個字典,字典里有鍵 boxes (m,4) , label (m) , difficulties (m) ? ?#括號里都是形狀
同樣,建議配圖食用:
到這里,我們的訓練數(shù)據(jù)就準備好了,接下來開始一步步構(gòu)建訓練所需的dataloader吧!
2. 構(gòu)建dataloader
在這里,我們假設你對Pytorch的 Dataset 和 DataLoader 兩個概念有最基本的了解。下面開始介紹構(gòu)建dataloader的相關代碼:
首先了解一下訓練的時候在哪里定義了dataloader以及是如何定義的。以下是train.py中的部分代碼段:
 #train_dataset和train_loader的實例化
  train_dataset = PascalVOCDataset(data_folder,
                                   split='train',
                                   keep_difficult=keep_difficult)
  train_loader = torch.utils.data.DataLoader(train_dataset, batch_size=batch_size, shuffle=True,collate_fn=train_dataset.collate_fn, num_workers=workers,pin_memory=True)
  # note that we're passing the collate function here
可以看到,首先需要實例化PascalVOCDataset類得到train_dataset,然后將train_dataset傳入torch.utils.data.DataLoader,進而得到train_loader。
pin_memory就是鎖頁內(nèi)存,創(chuàng)建DataLoader時,設置pin_memory=True,則意味著生成的Tensor數(shù)據(jù)最開始是屬于內(nèi)存中的鎖頁內(nèi)存,這樣將內(nèi)存的Tensor轉(zhuǎn)義到GPU的顯存就會更快一些。顯卡不好就不要開了。
collate_fn是如何將(C,H,W)組合成(N,C,H,W)的方式。
接下來看一下PascalVOCDataset是如何定義的。
代碼位于 datasets.py 腳本中,可以看到,PascalVOCDataset繼承了torch.utils.data.Dataset,然后重寫了__init__ , getitem, len 和 collate_fn 四個方法,這也是我們在構(gòu)建自己的dataset的時候需要經(jīng)常做的工作,配合下面注釋理解代碼:
"""python
PascalVOCDataset具體實現(xiàn)過程
"""
import torch
from torch.utils.data import Dataset
import json
import os
from PIL import Image
from utils import transform
class PascalVOCDataset(Dataset):
"""
A PyTorch Dataset class to be used in a PyTorch DataLoader to create batches.
"""
#初始化相關變量
#讀取images和objects標注信息
def __init__(self, data_folder, split, keep_difficult=False):
"""
:param data_folder: folder where data files are stored
:param split: split, one of 'TRAIN' or 'TEST'
:param keep_difficult: keep or discard objects that are considered difficult to detect?
"""
self.split = split.upper() #保證輸入為純大寫字母,便于匹配{'TRAIN', 'TEST'}
assert self.split in {'TRAIN', 'TEST'}
self.data_folder = data_folder
self.keep_difficult = keep_difficult
# Read data files
with open(os.path.join(data_folder, self.split + '_images.json'), 'r') as j:
self.images = json.load(j)
with open(os.path.join(data_folder, self.split + '_objects.json'), 'r') as j:
self.objects = json.load(j)
assert len(self.images) == len(self.objects)
#循環(huán)讀取image及對應objects
#對讀取的image及objects進行tranform操作(數(shù)據(jù)增廣)
#返回PIL格式圖像,標注框,標注框?qū)念悇e索引,對應的difficult標志(True or False)
def __getitem__(self, i):
# Read image
#*需要注意,在pytorch中,圖像的讀取要使用Image.open()讀取成PIL格式,不能使用opencv
#*由于Image.open()讀取的圖片是四通道的(RGBA),因此需要.convert('RGB')轉(zhuǎn)換為RGB通道
image = Image.open(self.images[i], mode='r')
image = image.convert('RGB')
# Read objects in this image (bounding boxes, labels, difficulties)
objects = self.objects[i]
boxes = torch.FloatTensor(objects['boxes']) # (n_objects, 4)
labels = torch.LongTensor(objects['labels']) # (n_objects)
difficulties = torch.ByteTensor(objects['difficulties']) # (n_objects)
# Discard difficult objects, if desired
#如果self.keep_difficult為False,即不保留difficult標志為True的目標
#那么這里將對應的目標刪去
if not self.keep_difficult:
boxes = boxes[(1 - difficulties).bool()] #uint8可以作為索引,但是轉(zhuǎn)成bool去索引更好
labels = labels[(1 - difficulties).bool()]
difficulties = difficulties[(1 - difficulties).bool()]
# Apply transformations
#對讀取的圖片應用transform
image, boxes, labels, difficulties = transform(image, boxes, labels, difficulties, split=self.split)
return image, boxes, labels, difficulties
#獲取圖片的總數(shù),用于計算batch數(shù)
def __len__(self):
return len(self.images)
#我們知道,我們輸入到網(wǎng)絡中訓練的數(shù)據(jù)通常是一個batch一起輸入,而通過__getitem__我們只讀取了一張圖片及其objects信息
#如何將讀取的一張張圖片及其object信息整合成batch的形式呢?
#collate_fn就是做這個事情,
#對于一個batch的images,collate_fn通過torch.stack()將其整合成4維tensor,對應的objects信息分別用一個list存儲
def collate_fn(self, batch):
"""
Since each image may have a different number of objects, we need a collate function (to be passed to the DataLoader).
This describes how to combine these tensors of different sizes. We use lists.
Note: this need not be defined in this Class, can be standalone.
:param batch: an iterable of N sets from __getitem__()
:return: a tensor of images, lists of varying-size tensors of bounding boxes, labels, and difficulties
"""
images = list()
boxes = list()
labels = list()
difficulties = list()
for b in batch:
images.append(b[0])
boxes.append(b[1])
labels.append(b[2])
difficulties.append(b[3])
#(3,224,224) -> (N,3,224,224)
images = torch.stack(images, dim=0)
return images, boxes, labels, difficulties # tensor (N, 3, 224, 224), 3 lists of N tensors each
3. 關于數(shù)據(jù)增強
到這里為止,我們的dataset就算是構(gòu)建好了,已經(jīng)可以傳給torch.utils.data.DataLoader來獲得用于輸入網(wǎng)絡訓練的數(shù)據(jù)了。但是不急,構(gòu)建dataset中有個很重要的一步我們上面只是提及了一下,那就是transform操作(數(shù)據(jù)增強),也就是這一行代碼
image, boxes, labels, difficulties = transform(image, boxes, labels, difficulties, split=self.split)
這部分比較重要,但是涉及代碼稍多,對于基礎較薄弱的伙伴可以作為選學內(nèi)容,后面再認真讀代碼。你只需知道,同分類網(wǎng)絡一樣,訓練目標檢測網(wǎng)絡同樣需要進行數(shù)據(jù)增強,這對提升網(wǎng)絡精度和泛化能力很有幫助。
需要注意的是,涉及位置變化的數(shù)據(jù)增強方法,同樣需要對目標框進行一致的處理,因此目標檢測框架的數(shù)據(jù)處理這部分的代碼量通常都不小,且比較容易出bug。這里為了降低代碼的難度,我們只是使用了幾種比較簡單的數(shù)據(jù)增強。
transform 函數(shù)的具體代碼實現(xiàn)位于 utils.py 中,下面簡單進行講解:
"""python
    transform操作是訓練模型中一項非常重要的工作,其中不僅包含數(shù)據(jù)增強以提升模型性能的相關操作,也包含如數(shù)據(jù)類型轉(zhuǎn)換(PIL to Tensor)、歸一化(Normalize)這些必要操作。
"""
import json
import os
import torch
import random
import xml.etree.ElementTree as ET
import torchvision.transforms.functional as FT

"""
可以看到,transform分為TRAIN和TEST兩種模式,以本實驗為例:

在TRAIN時進行的transform有:
1.以隨機順序改變圖片亮度,對比度,飽和度和色相,每種都有50%的概率被執(zhí)行。photometric_distort
2.擴大目標,expand
3.隨機裁剪圖片,random_crop
4.0.5的概率進行圖片翻轉(zhuǎn),flip
*注意:a. 第一種transform屬于像素級別的圖像增強,目標相對于圖片的位置沒有改變,因此bbox坐標不需要變化。
         但是2,3,4,5都屬于圖片的幾何變化,目標相對于圖片的位置被改變,因此bbox坐標要進行相應變化。

在TRAIN和TEST時都要進行的transform有:
1.統(tǒng)一圖像大小到(224,224),resize
2.PIL to Tensor
3.歸一化,F(xiàn)T.normalize()

注1: resize也是一種幾何變化,要知道應用數(shù)據(jù)增強策略時,哪些屬于幾何變化,哪些屬于像素變化
注2: PIL to Tensor操作,normalize操作必須執(zhí)行
"""

def transform(image, boxes, labels, difficulties, split):
    """
    Apply the transformations above.
    :param image: image, a PIL Image
    :param boxes: bounding boxes in boundary coordinates, a tensor of dimensions (n_objects, 4)
    :param labels: labels of objects, a tensor of dimensions (n_objects)
    :param difficulties: difficulties of detection of these objects, a tensor of dimensions (n_objects)
    :param split: one of 'TRAIN' or 'TEST', since different sets of transformations are applied
    :return: transformed image, transformed bounding box coordinates, transformed labels, transformed difficulties
    """

    #在訓練和測試時使用的transform策略往往不完全相同,所以需要split變量指明是TRAIN還是TEST時的transform方法
    assert split in {'TRAIN', 'TEST'}

    # Mean and standard deviation of ImageNet data that our base VGG from torchvision was trained on
    # see: https://pytorch.org/docs/stable/torchvision/models.html
    #為了防止由于圖片之間像素差異過大而導致的訓練不穩(wěn)定問題,圖片在送入網(wǎng)絡訓練之間需要進行歸一化
    #對所有圖片各通道求mean和std來獲得
    mean = [0.485, 0.456, 0.406]
    std = [0.229, 0.224, 0.225]

    new_image = image
    new_boxes = boxes
    new_labels = labels
    new_difficulties = difficulties

    # Skip the following operations for evaluation/testing
    if split == 'TRAIN':
        # A series of photometric distortions in random order, each with 50% chance of occurrence, as in Caffe repo
        new_image = photometric_distort(new_image)

        # Convert PIL image to Torch tensor
        new_image = FT.to_tensor(new_image)

        # Expand image (zoom out) with a 50% chance - helpful for training detection of small objects
        # Fill surrounding space with the mean of ImageNet data that our base VGG was trained on
        if random.random() < 0.5:
            new_image, new_boxes = expand(new_image, boxes, filler=mean)

        # Randomly crop image (zoom in)
        new_image, new_boxes, new_labels, new_difficulties = random_crop(new_image, new_boxes, new_labels,new_difficulties)

        # Convert Torch tensor to PIL image
        new_image = FT.to_pil_image(new_image)

        # Flip image with a 50% chance
        if random.random() < 0.5:
            new_image, new_boxes = flip(new_image, new_boxes)

    # Resize image to (224, 224) - this also converts absolute boundary coordinates to their fractional form
    new_image, new_boxes = resize(new_image, new_boxes, dims=(224, 224))

    # Convert PIL image to Torch tensor
    new_image = FT.to_tensor(new_image)

    # Normalize by mean and standard deviation of ImageNet data that our base VGG was trained on
    new_image = FT.normalize(new_image, mean=mean, std=std)

    return new_image, new_boxes, new_labels, new_difficulties
TRAIN transform的步驟:
顏色變化、to_tensor(變形(CHW),歸一化,pil變tensor) 創(chuàng)建一個背景并把圖放上去(等效縮小圖片) 隨機裁剪圖片(丟失了部分框) 轉(zhuǎn)為pil、隨機左右翻轉(zhuǎn)、resize(這里面對boxes做了歸一化處理) 再變tensor、標準化處理
4. 構(gòu)建DataLoader
至此,我們已經(jīng)將VOC數(shù)據(jù)轉(zhuǎn)換成了dataset,接下來可以用來創(chuàng)建dataloader,這部分pytorch已經(jīng)幫我們實現(xiàn)好了,我們只需將創(chuàng)建好的dataset送入即可,注意理解相關參數(shù)。
"""python
    DataLoader
"""
#參數(shù)說明:
#在train時一般設置shufle=True打亂數(shù)據(jù)順序,增強模型的魯棒性
#num_worker表示讀取數(shù)據(jù)時的線程數(shù),一般根據(jù)自己設備配置確定(如果是windows系統(tǒng),建議設默認值0,防止出錯)
#pin_memory,在計算機內(nèi)存充足的時候設置為True可以加快內(nèi)存中的tensor轉(zhuǎn)換到GPU的速度,具體原因可以百度哈~
train_loader = torch.utils.data.DataLoader(train_dataset, batch_size=batch_size, shuffle=True,collate_fn=train_dataset.collate_fn, num_workers=workers, pin_memory=True)  # note that we're passing the collate function here
小結(jié)
本文介紹了經(jīng)典VOC數(shù)據(jù)集并對其進行了數(shù)據(jù)讀取和預處理工作。現(xiàn)在,大家可以拿著這些已經(jīng)處理好的數(shù)據(jù),丟進模型里,盡情煉丹了。
參考連接:https://github.com/datawhalechina/dive-into-cv-pytorch