
使用OpenCV測量圖像中物體之間的距離
點擊上方“小白學視覺”,選擇加"星標"或“置頂”
重磅干貨,第一時間送達

本文轉自:opencv學堂
本文來自光頭哥哥的博客【Measuring distance between objects in an image with OpenCV】,僅做學習分享。
原文鏈接:https://www.pyimagesearch.com/2016/04/04/measuring-distance-between-objects-in-an-image-with-opencv/
計算物體之間的距離與計算圖像中物體的大小算法思路非常相似——都是從參考對象開始的。我們將使用0.25美分作為我們的參考對象,它的寬度為0.955英寸。
并且我們還將0.25美分總是放在圖片最左側使其容易識別。這樣它就滿足了我們上面提到的參考對象的兩個特征。
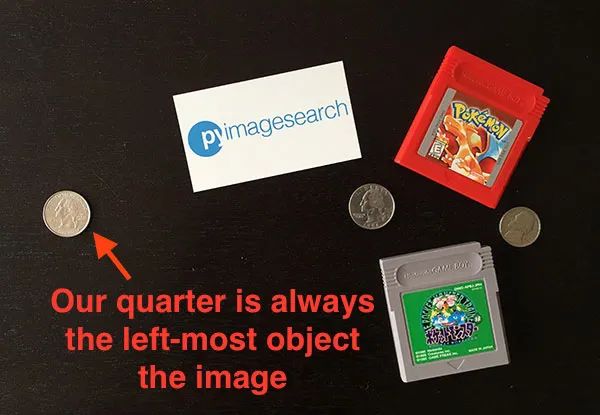
我們的目標是找到0.25美分,然后利用0.25美分的尺寸來測量0.25美分硬幣與所有其他物體之間的距離。
打開一個新文件,將其命名為distance_between.py,插入以下代碼:
# import the necessary packagesfrom scipy.spatial import distance as distfrom imutils import perspectivefrom imutils import contoursimport numpy as npimport argparseimport imutilsimport cv2def midpoint(ptA, ptB):return ((ptA[0] + ptB[0]) * 0.5, (ptA[1] + ptB[1]) * 0.5)# construct the argument parse and parse the argumentsap = argparse.ArgumentParser()ap.add_argument("-i", "--image", required=True,help="path to the input image")ap.add_argument("-w", "--width", type=float, required=True,help="width of the left-most object in the image (in inches)")args = vars(ap.parse_args())
我們這里的代碼與上周的代碼幾乎相同。我們從在第2-8行上導入所需的Python包開始。
第12-17行解析命令行參數。這里我們需要兩個參數:——image,它是包含我們想要測量的對象的輸入圖像的路徑,以及——width,為我們參考對象的寬度(單位為英寸)。
接下來,我們需要對圖像進行預處理:
# load the image, convert it to grayscale, and blur it slightlyimage = cv2.imread(args["image"])gray = cv2.cvtColor(image, cv2.COLOR_BGR2GRAY)gray = cv2.GaussianBlur(gray, (7, 7), 0)# perform edge detection, then perform a dilation + erosion to# close gaps in between object edgesedged = cv2.Canny(gray, 50, 100)edged = cv2.dilate(edged, None, iterations=1)edged = cv2.erode(edged, None, iterations=1)# find contours in the edge mapcnts = cv2.findContours(edged.copy(), cv2.RETR_EXTERNAL,cv2.CHAIN_APPROX_SIMPLE)cnts = imutils.grab_contours(cnts)# sort the contours from left-to-right and, then initialize the# distance colors and reference object(cnts, _) = contours.sort_contours(cnts)colors = ((0, 0, 255), (240, 0, 159), (0, 165, 255), (255, 255, 0),(255, 0, 255))refObj = None
第2-4行從磁盤加載圖像,將其轉換為灰度圖,然后使用7 x 7內核的高斯濾波器對其進行模糊降噪。
當我們的圖像被模糊后,我們應用Canny邊緣檢測器來檢測圖像中的邊緣,然后進行膨脹+腐蝕來縮小邊緣圖中的縫隙(第7-9行)。
調用cv2.findContours檢測邊緣圖中對象的輪廓(第11-13行),而第16行從左到右對輪廓進行排序。由于我們知道0.25美分(即參考對象)將始終是圖像中最左邊,因此從左到右對輪廓進行排序可以確保與參考對象對應的輪廓始終是cnts列表中的第一個。
然后,我們初始化用于繪制距離的colors列表以及refObj變量,該變量將存儲參考對象的邊界框、質心和pixels-per-metric值(看上一篇就明白pixels-per-metric的具體定義,其實就是參考對象的實際大小(單位英寸)與圖片中的寬度(單位為像素)的比值)。
# loop over the contours individuallyfor c in cnts:# if the contour is not sufficiently large, ignore itif cv2.contourArea(c) < 100:continue# compute the rotated bounding box of the contourbox = cv2.minAreaRect(c)box = cv2.cv.BoxPoints(box) if imutils.is_cv2() else cv2.boxPoints(box)box = np.array(box, dtype="int")# order the points in the contour such that they appear# in top-left, top-right, bottom-right, and bottom-left# order, then draw the outline of the rotated bounding# boxbox = perspective.order_points(box)# compute the center of the bounding boxcX = np.average(box[:, 0])cY = np.average(box[:, 1])
在第2行,我們開始對cnts列表中的每個輪廓進行循環(huán)。如果輪廓比較小(第4和5行),我們認為是噪聲并忽略它。
然后,第7-9行計算當前對象的最小旋轉包圍框。
第14行上調用order_points函數(此系列第一篇定義的函數)來對矩形框四個頂點以左上角、右上角、右下角和左下角的順序排列,我們將看到,在計算物體之間的距離時,這一點非常重要。
第16行和第17行通過取邊界框在x和y方向上的平均值來計算旋轉后的邊界框的中心(x, y)坐標。
下一步是校準我們的refObj:
# if this is the first contour we are examining (i.e.,# the left-most contour), we presume this is the# reference objectif refObj is None:# unpack the ordered bounding box, then compute the# midpoint between the top-left and top-right points,# followed by the midpoint between the top-right and# bottom-right(tl, tr, br, bl) = box(tlblX, tlblY) = midpoint(tl, bl)(trbrX, trbrY) = midpoint(tr, br)# compute the Euclidean distance between the midpoints,# then construct the reference objectD = dist.euclidean((tlblX, tlblY), (trbrX, trbrY))refObj = (box, (cX, cY), D / args["width"])continue
如果refObj為None(第4行),則需要對其進行初始化。
我們首先獲取(排序后的)最小旋轉邊界框坐標,并分別計算四個頂點之間的中點(第10-15行)。
然后計算中點之間的歐氏距離,給出我們的“像素/尺寸”比例,來確定一英寸為多少像素寬度。
最后,我們將refObj實例化為一個3元組,包括:
物體對象的最小旋轉矩形對象box
參考對象的質心。
像素/寬度比例,我們將用其來結合物體之間的像素距離來確定物體之間的實際距離。
下一個代碼塊負責繪制參考對象和當前檢查對象的輪廓,然后定義變量refCoords和objCoords,這樣(1)最小包圍矩陣坐標和(2)質心的(x, y)坐標都包含在同一個數組中:
# draw the contours on the imageorig = image.copy()cv2.drawContours(orig, [box.astype("int")], -1, (0, 255, 0), 2)cv2.drawContours(orig, [refObj[0].astype("int")], -1, (0, 255, 0), 2)# stack the reference coordinates and the object coordinates# to include the object centerrefCoords = np.vstack([refObj[0], refObj[1]])objCoords = np.vstack([box, (cX, cY)])
現在我們可以開始計算圖像中各個物體的質心和質心之間的距離了:
# loop over the original pointsfor ((xA, yA), (xB, yB), color) in zip(refCoords, objCoords, colors):# draw circles corresponding to the current points and# connect them with a linecv2.circle(orig, (int(xA), int(yA)), 5, color, -1)cv2.circle(orig, (int(xB), int(yB)), 5, color, -1)cv2.line(orig, (int(xA), int(yA)), (int(xB), int(yB)),color, 2)# compute the Euclidean distance between the coordinates,# and then convert the distance in pixels to distance in# unitsD = dist.euclidean((xA, yA), (xB, yB)) / refObj[2](mX, mY) = midpoint((xA, yA), (xB, yB))cv2.putText(orig, "{:.1f}in".format(D), (int(mX), int(mY - 10)),cv2.FONT_HERSHEY_SIMPLEX, 0.55, color, 2)# show the output imagecv2.imshow("Image", orig)cv2.waitKey(0)
在第2行,我們開始對圖片中物體對象的頂點(x, y)坐標進行循環(huán)。
然后我們畫一個圓表示我們正在計算距離的當前點坐標,并畫一條線連接這些點(第5-7條線)。
然后,第12行計算參考位置和對象位置之間的歐式距離,然后除以“像素/度量”,得到兩個對象之間的實際距離(以英寸為單位)。然后在圖像上標識出計算的距離(第13-15行)。
下面是一個GIF動畫,演示了我們的程序運行效果:
在每種情況下,我們的腳本都匹配左上(紅色)、右上(紫色)、右下(橙色)、左下(藍綠色)和質心(粉色)坐標,然后計算參考對象和當前對象之間的距離(以英寸為單位)。
注意圖像中的兩個0.25美分完全平行,這意味著所有五個頂點之間的距離均為6.1英寸。
下面是第二個例子,這次計算的是參考對象和藥丸之間的距離:
這個例子可以作為藥片分類機器人的輸入,自動獲取一組藥片,并根據它們的大小和與藥片容器的距離來組織它們。
最后一個例子計算了我們的參考對象(一張3.5英寸x 2英寸的名片)和一組7英寸的黑膠唱片和信封之間的距離:
交流群
歡迎加入公眾號讀者群一起和同行交流,目前有SLAM、三維視覺、傳感器、自動駕駛、計算攝影、檢測、分割、識別、醫(yī)學影像、GAN、算法競賽等微信群(以后會逐漸細分),請掃描下面微信號加群,備注:”昵稱+學校/公司+研究方向“,例如:”張三 + 上海交大 + 視覺SLAM“。請按照格式備注,否則不予通過。添加成功后會根據研究方向邀請進入相關微信群。請勿在群內發(fā)送廣告,否則會請出群,謝謝理解~