
使用 Flutter 開發(fā) Chrome 插件
前言
Flutter3.0推出后,對多平臺支持更好且更穩(wěn)定,今天我們將探索一種將Flutter應(yīng)用作為Chrome擴展程序的獨特運行方式。您可以使用帶有--csp標(biāo)志的HTML渲染器生成Flutter Web構(gòu)建,并且可以將其用作 chrome擴展。想了解更多信息,請繼續(xù)。
構(gòu)建chrome擴展程序
今天,我們將使用一個生成二維碼的例子看一下使用Flutter來構(gòu)建chrome擴展程序。
讓我們從創(chuàng)建一個新的 Flutter 項目開始。
項目創(chuàng)建
您可以使用與創(chuàng)建任何基本 Flutter 項目完全相同的 Flutter 命令:
flutter create qr_code_extension
這里,qr_code_extension 是 Flutter 項目的名稱。這里的Flutter版本僅供參考,我目前使用的是 Flutter 3.0.1 版。
創(chuàng)建項目后,使用您喜歡的 IDE 打開它,我這里使用 VS Code打開。
如何將這個基本的 Flutter Web 應(yīng)用程序作為 chrome 擴展程序運行?
僅需要三步即可完成…
1、刪除不支持的js腳本
導(dǎo)航到 web/index.html 文件并刪除所有 <script>...</script> 標(biāo)記:

然后只在 <body> 中插入以下<script>標(biāo)簽:
<script src="main.dart.js" type="application/javascript"></script>
2、設(shè)置擴展程序尺寸
擴展程序具有固定的尺寸,因此您需要在 HTML 中明確指定擴展視圖的寬度和高度值。
只需將起始 <html> 標(biāo)記替換為以下內(nèi)容:
<html style="height: 600px; width: 350px">
這會將擴展視圖的高度和寬度分別設(shè)置為 600 像素和 350 像素。
3、在 manifest.json 中進行一些更改
導(dǎo)航到 web/manifest.json 文件并將整個內(nèi)容替換為以下內(nèi)容:
{
    "name": "QR Code Extension",
    "description": "QR Code Extension",
    "version": "1.0.0",
    "content_security_policy": {
        "extension_pages": "script-src 'self' ; object-src 'self'"
    },
    "action": {
        "default_popup": "index.html",
        "default_icon": "icons/Icon-192.png"
    },
    "manifest_version": 3
}
構(gòu)建擴展程序
完成所需的更改后,您就可以將其作為 Chrome 擴展程序構(gòu)建和運行了。
默認(rèn)情況下,當(dāng)您使用以下命令運行 Flutter Web 構(gòu)建時:
flutter build web
它為移動瀏覽器使用 HTML 渲染器,為桌面瀏覽器使用 CanvasKit 渲染器。
為了提供一點上下文,F(xiàn)lutter web 支持兩種類型的渲染器(參考文檔: https://docs.flutter.dev/development/platform-integration/web/renderers):
HTML 渲染器
使用 HTML 元素、CSS、Canvas 元素和 SVG 元素的組合。此渲染器具有較小的下載大小。
CanvasKit 渲染器
此渲染器具有更快的性能和更高的小部件密度(支持像素級別的操作),但下載大小增加了約 2MB。
但是為了將其用作擴展,您必須僅使用 HTML 渲染器專門生成構(gòu)建。可以使用以下命令完成:
flutter build web --web-renderer html
暫時不要運行該命令!
最后,您必須使用 --csp 標(biāo)志來禁用在生成的輸出中動態(tài)生成代碼,這是滿足 CSP 限制所必需的。
運行此命令:
flutter build web --web-renderer html --csp
您將在 Flutter 項目根目錄中的 build/web 文件夾中找到生成的文件。
擴展程序運行
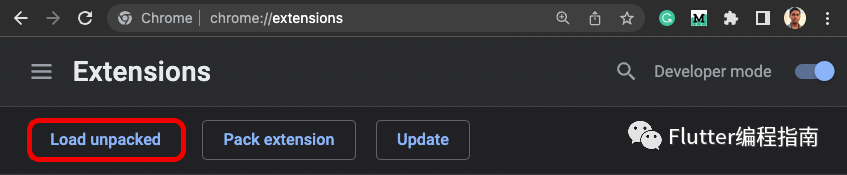
要安裝和使用此擴展程序,請在 Chrome 瀏覽器打開以下 URL:
chrome://extensions
此頁面列出了所有 Chrome 擴展程序(如果您已有安裝的擴展程序)。
啟用網(wǎng)頁右上角的開發(fā)者模式切換。

單擊「加載已解壓的擴展程序」。
選擇
/build/web 
您將看到新的擴展程序現(xiàn)已添加到該頁面。
該擴展程序?qū)⒆詣影惭b,您可以像任何常規(guī)擴展程序一樣通過單擊頂部欄中的擴展程序圖標(biāo)來訪問它(也可以固定它以便于訪問)。
QR碼生成擴展程序?qū)嵺`
現(xiàn)在讓我們進入一個實際的實現(xiàn),并使用 Flutter 構(gòu)建 QR 碼生成器擴展程序。
首先,轉(zhuǎn)到 lib 目錄中的 main.dart 文件。將該頁面的全部內(nèi)容替換為以下內(nèi)容:
import 'package:flutter/material.dart';

import 'qr_view.dart';

void main() => runApp(const MyApp());

class MyApp extends StatelessWidget {
  const MyApp({Key? key}) : super(key: key);

  @override
  Widget build(BuildContext context) {
    return MaterialApp(
      title: 'Flutter Chrome Extension',
      debugShowCheckedModeBanner: false,
      theme: ThemeData(
        primarySwatch: Colors.blue,
      ),
      home: const QRView(),
    );
  }
}
這只是為了簡化應(yīng)用程序的起點,并刪除與演示計數(shù)器應(yīng)用程序相關(guān)的代碼。
接下來,在名為 qr_view.dart 的 lib 文件夾中創(chuàng)建一個新文件。在這個文件中,我們將添加用于構(gòu)建 QR 碼擴展 UI 的代碼和一些用于根據(jù) TextField 中存在的文本生成 QR 碼的邏輯。
為了在 UI 中呈現(xiàn) QR 碼,我們將使用名為 qr_flutter 的 Flutter 包。從 Flutter 根目錄運行以下命令來安裝這個包:
flutter pub add qr_flutter
添加如下代碼到qr_view.dart文件:
import 'package:flutter/material.dart';
import 'package:qr_flutter/qr_flutter.dart';

class QRView extends StatefulWidget {
  const QRView({Key? key}) : super(key: key);

  @override
  State<QRView> createState() => _QRViewState();
}

class _QRViewState extends State<QRView> {
  late final TextEditingController _textController;
  late final FocusNode _textFocus;
  String qrText = '';
  int qrColorIndex = 0;
  int qrBackgroundColorIndex = 0;

  @override
  void initState() {
    _textController = TextEditingController(text: qrText);
    _textFocus = FocusNode();

    super.initState();
  }

  @override
  Widget build(BuildContext context) {
    // TODO: Add the UI code here
    return Scaffold();
  }
}
在上面的代碼中,我們導(dǎo)入了 qr_flutter 包,并為 TextField 小部件初始化了一些變量,并用于訪問當(dāng)前選擇的 QR 碼背景和前景色。
現(xiàn)在,在 lib 目錄中創(chuàng)建另一個名為 color_list.dart 的文件,并添加顏色列表以顯示為 QR 碼背景和前景色選擇。
import 'package:flutter/material.dart';

const List<Color> qrBackgroundColors = [
  Colors.white,
  Colors.orange,
  Colors.blueGrey,
  Colors.red,
  Colors.greenAccent,
];

const List<Color> qrColors = [
  Colors.black,
  Colors.purple,
  Colors.white,
  Colors.green,
  Colors.blue,
];
最后,完成擴展的用戶界面。
這是 QRView 小部件的完整代碼以及擴展的 UI:
import 'package:flutter/material.dart';
import 'package:qr_flutter/qr_flutter.dart';

import 'color_list.dart';

class QRView extends StatefulWidget {
  const QRView({Key? key}) : super(key: key);

  @override
  State<QRView> createState() => _QRViewState();
}

class _QRViewState extends State<QRView> {
  late final TextEditingController _textController;
  late final FocusNode _textFocus;
  String qrText = '';
  int qrColorIndex = 0;
  int qrBackgroundColorIndex = 0;

  @override
  void initState() {
    _textController = TextEditingController(text: qrText);
    _textFocus = FocusNode();

    super.initState();
  }

  @override
  Widget build(BuildContext context) {
    return Scaffold(
      backgroundColor: Colors.white,
      body: Padding(
        padding: const EdgeInsets.symmetric(
          horizontal: 16.0,
          vertical: 24.0,
        ),
        child: Row(
          crossAxisAlignment: CrossAxisAlignment.start,
          children: [
            ClipRRect(
              borderRadius: BorderRadius.circular(16),
              child: QrImage(
                data: qrText,
                padding: const EdgeInsets.all(16),
                backgroundColor: qrBackgroundColors[qrBackgroundColorIndex],
                foregroundColor: qrColors[qrColorIndex],
              ),
            ),
            Expanded(
              child: Padding(
                padding: const EdgeInsets.symmetric(
                  horizontal: 24.0,
                  vertical: 16,
                ),
                child: Column(
                  crossAxisAlignment: CrossAxisAlignment.start,
                  mainAxisSize: MainAxisSize.min,
                  children: [
                    TextField(
                      controller: _textController,
                      focusNode: _textFocus,
                      decoration: InputDecoration(
                        labelText: 'QR Text',
                        labelStyle: const TextStyle(
                          color: Color(0xFF80919F),
                        ),
                        hintText: 'Enter text / URL',
                        hintStyle: const TextStyle(
                          color: Color(0xFF80919F),
                        ),
                        enabledBorder: OutlineInputBorder(
                          borderSide: const BorderSide(
                            color: Colors.black54,
                            width: 2,
                          ),
                          borderRadius: BorderRadius.circular(16),
                        ),
                        focusedBorder: OutlineInputBorder(
                          borderSide: const BorderSide(
                            color: Colors.black,
                            width: 2,
                          ),
                          borderRadius: BorderRadius.circular(16),
                        ),
                      ),
                      onChanged: (value) => setState(() {
                        qrText = value;
                      }),
                    ),
                    const SizedBox(height: 24),
                    const Text(
                      'Choose QR Color',
                      style: TextStyle(
                        color: Colors.black,
                        fontSize: 16,
                      ),
                    ),
                    Expanded(
                      child: ListView.separated(
                        shrinkWrap: true,
                        scrollDirection: Axis.horizontal,
                        separatorBuilder: (_, __) => const SizedBox(width: 8),
                        itemCount: qrColors.length,
                        itemBuilder: (context, index) {
                          return InkWell(
                            hoverColor: Colors.transparent,
                            splashColor: Colors.transparent,
                            highlightColor: Colors.transparent,
                            onTap: () => setState(() {
                              qrColorIndex = index;
                            }),
                            child: Stack(
                              alignment: Alignment.center,
                              children: [
                                CircleAvatar(
                                  radius: qrColorIndex == index ? 23 : 22,
                                  backgroundColor: qrColorIndex == index
                                      ? Colors.black
                                      : Colors.black26,
                                ),
                                CircleAvatar(
                                  radius: 20,
                                  backgroundColor: qrColors[index],
                                ),
                              ],
                            ),
                          );
                        },
                      ),
                    ),
                    const Text(
                      'Choose QR Background Color',
                      style: TextStyle(
                        color: Colors.black,
                        fontSize: 16,
                      ),
                    ),
                    Expanded(
                      child: ListView.separated(
                        shrinkWrap: true,
                        scrollDirection: Axis.horizontal,
                        separatorBuilder: (_, __) => const SizedBox(width: 8),
                        itemCount: qrBackgroundColors.length,
                        itemBuilder: (context, index) {
                          return InkWell(
                            hoverColor: Colors.transparent,
                            splashColor: Colors.transparent,
                            highlightColor: Colors.transparent,
                            onTap: () => setState(() {
                              qrBackgroundColorIndex = index;
                            }),
                            child: Stack(
                              alignment: Alignment.center,
                              children: [
                                CircleAvatar(
                                  radius:
                                      qrBackgroundColorIndex == index ? 23 : 22,
                                  backgroundColor:
                                      qrBackgroundColorIndex == index
                                          ? Colors.black
                                          : Colors.black26,
                                ),
                                CircleAvatar(
                                  radius: 20,
                                  backgroundColor: qrBackgroundColors[index],
                                ),
                              ],
                            ),
                          );
                        },
                      ),
                    ),
                    const SizedBox(height: 16),
                  ],
                ),
              ),
            )
          ],
        ),
      ),
    );
  }
}
轉(zhuǎn)到 web/index.html 文件,并將起始 標(biāo)記內(nèi)定義的尺寸更改為以下內(nèi)容:
<html style="height: 350px; width: 650px">
擴展程序的視圖尺寸必須明確定義,上述尺寸應(yīng)正確適應(yīng)擴展 UI。
至此,您已成功創(chuàng)建 QR 碼生成器擴展。運行相同的 flutter build 命令來重新生成 Flutter web 文件:
flutter build web --web-renderer html --csp
按照我們之前討論的相同步驟安裝擴展。
哇喔!您的 QR 碼生成器擴展程序已準(zhǔn)備好使用。??

局限性
盡管看起來令人興奮,但也存在一定的局限性。
以下是我在探索如何使用 Flutter 構(gòu)建 chrome 擴展時遇到的一些限制(其中一些可能是可以修復(fù)的,這需要更多的探索)。
1. 僅限于 HTML 渲染器
另一個讓 QR 碼生成器擴展更酷的附加功能是添加了“另存為圖像”按鈕。使用它,您可以將生成的二維碼保存為普通圖像文件。
但不幸的是,由于擴展不支持 CanvasKit 渲染器,因此您不能在任何 RenderRepaintBoundary 對象上使用 toImage() 方法(這是將任何 Flutter 小部件轉(zhuǎn)換為圖像格式所必需的)。
2. 無法使用 Firebase(應(yīng)該可以)
如果您還記得,最初我們修改了 index.html 文件以刪除大部分 <script> 標(biāo)記。這是為了滿足內(nèi)容安全策略 (CSP) 規(guī)則。Manifest V3 不支持第三方 URL 的內(nèi)聯(lián)執(zhí)行。
但是我嘗試運行一個較舊的項目,該項目不使用 Flutter 中的 Firebase 的僅 Dart 初始化(很可能應(yīng)該解決它,因為在這種情況下您不需要在 <script> 標(biāo)記內(nèi)定義 Firebase 插件 )。
3. 小部件狀態(tài)丟失
這可能不被視為限制,而只是您在使用 Flutter 構(gòu)建擴展時應(yīng)牢記的一點。每當(dāng)您在擴展視圖之外單擊以將其關(guān)閉時,您的所有應(yīng)用程序狀態(tài)都會丟失。
您應(yīng)該使用 Flutter 插件在本地存儲狀態(tài),例如 shared_preferences 插件(它工作正常,我已經(jīng)在擴展中測試過它)。
最后,QR 碼生成器 Chrome 擴展的 GitHub 代碼倉庫可在以下鏈接中找到:
https://github.com/sbis04/flutter_qr_extension
參考
Chrome 擴展文檔:https://developer.chrome.com/docs/extensions/
Flutter Web 文檔:https://docs.flutter.dev/get-started/web
Flutter Web 渲染器:https://docs.flutter.dev/development/platform-integration/web/renderers
原文:https://medium.com/flutter-community/building-a-chrome-extension-using-flutter-aeb100a6d6c
往期干貨:
26個經(jīng)典微信小程序+35套微信小程序源碼+微信小程序合集源碼下載(免費)
干貨~~~2021最新前端學(xué)習(xí)視頻~~速度領(lǐng)取
前端書籍-前端290本高清pdf電子書打包下載
點贊和在看就是最大的支持??