
沒想到Sharding-Jdbc竟然這么牛逼!一鍵實現(xiàn)讀寫分離、分庫分表~

來源:blog.csdn.net/qq_40378034/article/details/115264837
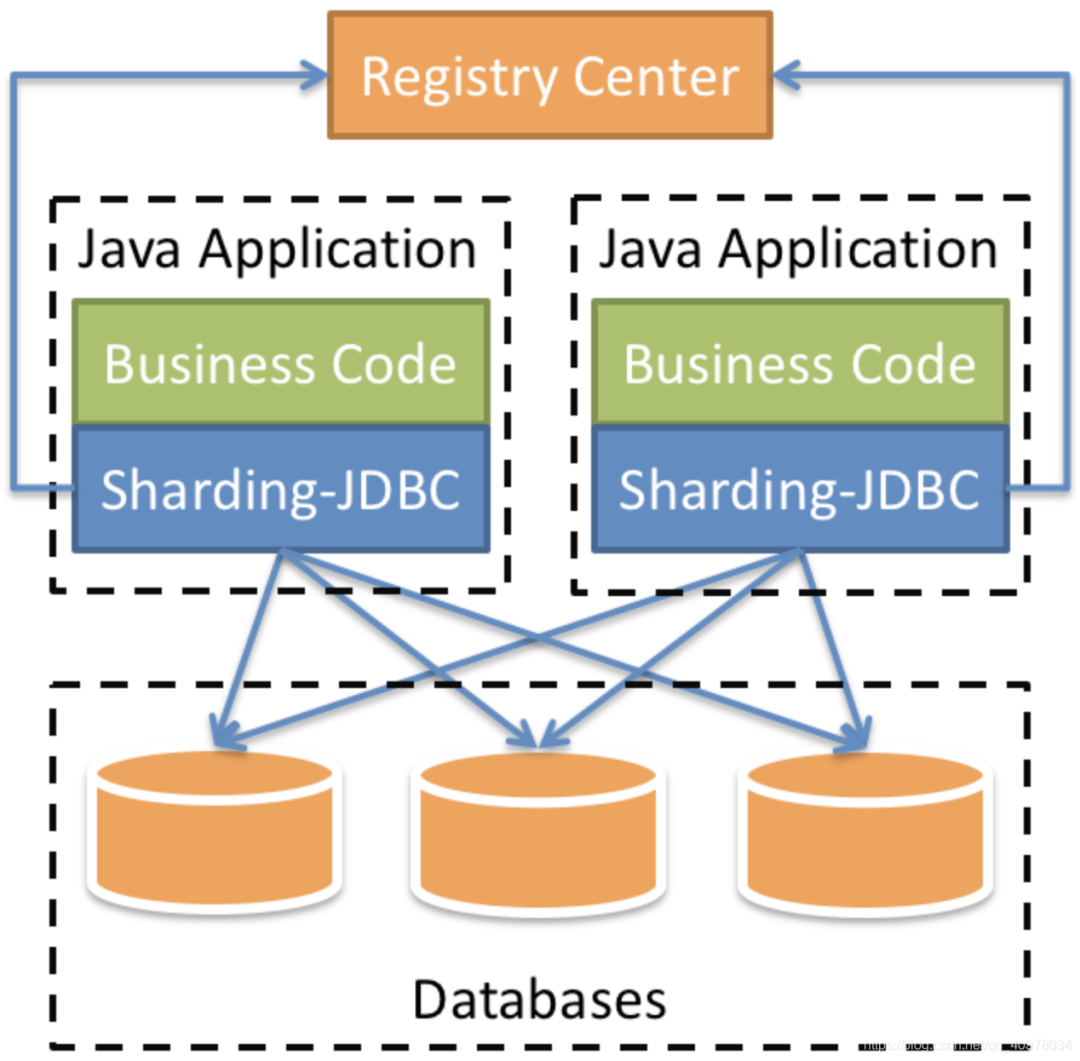
概覽
MySQL主從復制
docker配置mysql主從復制
1)創(chuàng)建主服務器所需目錄
mkdir -p /usr/local/mysqlData/master/cnfmkdir -p /usr/local/mysqlData/master/data
vim /usr/local/mysqlData/master/cnf/mysql.cnf[mysqld]## 設(shè)置server_id,注意要唯一server-id=1## 開啟binloglog-bin=mysql-bin## binlog緩存binlog_cache_size=1M## binlog格式(mixed、statement、row,默認格式是statement)binlog_format=mixed
docker?run?-itd?-p?3306:3306?--name?master?-v?/usr/local/mysqlData/master/cnf:/etc/mysql/conf.d?-v?/usr/local/mysqlData/master/data:/var/lib/mysql?-e?MYSQL_ROOT_PASSWORD=123456?mysql:5.7[root@aliyun /]# docker psCONTAINER ID IMAGE COMMAND CREATED STATUS PORTS NAMES6af1df686fff mysql:5.7 "docker-entrypoint..." 5 seconds ago Up 4 seconds 0.0.0.0:3306->3306/tcp, 33060/tcp master[root@aliyun /]# docker exec -it master /bin/bashroot@41d795785db1:/# mysql -u root -p123456mysql> GRANT REPLICATION SLAVE ON *.* to 'reader'@'%' identified by 'reader';Query OK, 0 rows affected, 1 warning (0.00 sec)mysql> FLUSH PRIVILEGES;Query OK, 0 rows affected (0.00 sec)
mkdir /usr/local/mysqlData/slave/cnf -pmkdir /usr/local/mysqlData/slave/cnf -pvim /usr/local/mysqlData/slave/cnf/mysql.cnf[mysqld]## 設(shè)置server_id,注意要唯一server-id=2## 開啟binlog,以備Slave作為其它Slave的Master時使用log-bin=mysql-slave-bin## relay_log配置中繼日志relay_log=edu-mysql-relay-bin## 如果需要同步函數(shù)或者存儲過程log_bin_trust_function_creators=true## binlog緩存binlog_cache_size=1M## binlog格式(mixed、statement、row,默認格式是statement)binlog_format=mixed## 跳過主從復制中遇到的所有錯誤或指定類型的錯誤,避免slave端復制中斷## 如:1062錯誤是指一些主鍵重復,1032錯誤是因為主從數(shù)據(jù)庫數(shù)據(jù)不一致slave_skip_errors=1062
docker?run?-itd?-p?3307:3306?--name?slaver?-v?/usr/local/mysqlData/slave/cnf:/etc/mysql/conf.d?-v?/usr/local/mysqlData/slave/data:/var/lib/mysql?-e?MYSQL_ROOT_PASSWORD=123456?mysql:5.7首先主服務器上查看master_log_file、master_log_pos兩個參數(shù),然后切換到從服務器上進行主服務器的連接信息的設(shè)置。
root@6af1df686fff:/# mysql -u root -p123456mysql> show master status;+------------------+----------+--------------+------------------+-------------------+| File | Position | Binlog_Do_DB | Binlog_Ignore_DB | Executed_Gtid_Set |+------------------+----------+--------------+------------------+-------------------+| mysql-bin.000003 | 591 | | | |+------------------+----------+--------------+------------------+-------------------+1 row in set (0.00 sec)
[root@aliyun /]# docker inspect --format='{{.NetworkSettings.IPAddress}}' master172.17.0.2
[root@aliyun /]# docker exec -it slaver /bin/bashroot@fe8b6fc2f1ca:/# mysql -u root -p123456mysql>?change?master?to?master_host='172.17.0.2',master_user='reader',master_password='reader',master_log_file='mysql-bin.000003',master_log_pos=591;
mysql> start slave;Query OK, 0 rows affected, 1 warning (0.00 sec)mysql> show slave status\G*************************** 1. row ***************************Slave_IO_State: Waiting for master to send eventMaster_Host: 172.17.0.2Master_User: readerMaster_Port: 3306Connect_Retry: 60Master_Log_File: mysql-bin.000003Read_Master_Log_Pos: 591Relay_Log_File: edu-mysql-relay-bin.000002Relay_Log_Pos: 320Relay_Master_Log_File: mysql-bin.000003Slave_IO_Running: YesSlave_SQL_Running: YesSlave_IO_Running: Yes,Slave_SQL_Running: Yes即表示啟動成功
binlog和redo log回顧
1)redo log(重做日志)
InnoDB首先將redo log放入到redo log buffer,然后按一定頻率將其刷新到redo log file。
下列三種情況下會將redo log buffer刷新到redo log file:
Master Thread每一秒將redo log buffer刷新到redo log file 每個事務提交時會將redo log buffer刷新到redo log file 當redo log緩沖池剩余空間小于1/2時,會將redo log buffer刷新到redo log file
當緩沖池不夠用時,根據(jù)LRU算法會溢出最近最少使用的頁,若此頁為臟頁,那么需要強制執(zhí)行Check Point,將臟頁刷新回磁盤
2)binlog(歸檔日志)
MySQL整體來看就有兩塊:一塊是Server層,主要做的是MySQL功能層面的事情;還有一塊是引擎層,負責存儲相關(guān)的具體事宜。redo log是InnoDB引擎特有的日志,而Server層也有自己的日志,稱為binlog
binlog記錄了對MySQL數(shù)據(jù)庫執(zhí)行更改的所有操作,不包括SELECT和SHOW這類操作,主要作用是用于數(shù)據(jù)庫的主從復制及數(shù)據(jù)的增量恢復
使用mysqldump備份時,只是對一段時間的數(shù)據(jù)進行全備,但是如果備份后突然發(fā)現(xiàn)數(shù)據(jù)庫服務器故障,這個時候就要用到binlog的日志了
binlog格式有三種:STATEMENT,ROW,MIXED
STATEMENT模式:binlog里面記錄的就是SQL語句的原文。優(yōu)點是并不需要記錄每一行的數(shù)據(jù)變化,減少了binlog日志量,節(jié)約IO,提高性能。缺點是在某些情況下會導致master-slave中的數(shù)據(jù)不一致 ROW模式:不記錄每條SQL語句的上下文信息,僅需記錄哪條數(shù)據(jù)被修改了,修改成什么樣了,解決了STATEMENT模式下出現(xiàn)master-slave中的數(shù)據(jù)不一致。缺點是會產(chǎn)生大量的日志,尤其是alter table的時候會讓日志暴漲 MIXED模式:以上兩種模式的混合使用,一般的復制使用STATEMENT模式保存binlog,對于STATEMENT模式無法復制的操作使用ROW模式保存binlog,MySQL會根據(jù)執(zhí)行的SQL語句選擇日志保存方式
redo log是InnoDB引擎特有的;binlog是MySQL的Server層實現(xiàn)的,所有引擎都可以使用 redo log是物理日志,記錄的是在某個數(shù)據(jù)也上做了什么修改;binlog是邏輯日志,記錄的是這個語句的原始邏輯,比如給ID=2這一行的c字段加1 redo log是循環(huán)寫的,空間固定會用完;binlog是可以追加寫入的,binlog文件寫到一定大小后會切換到下一個,并不會覆蓋以前的日志
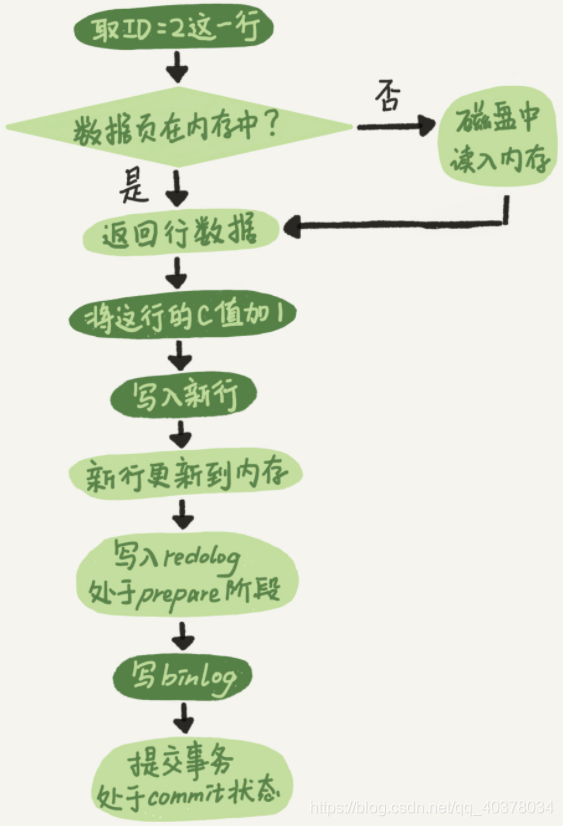
create table T(ID int primary key, c int);update T set c=c+1 where ID=2;
執(zhí)行器和InnoDB引擎在執(zhí)行這個update語句時的內(nèi)部流程:
執(zhí)行器先找到引擎取ID=2這一行。ID是主鍵,引擎直接用樹搜索找到這一行。如果ID=2這一行所在的數(shù)據(jù)也本來就在內(nèi)存中,就直接返回給執(zhí)行器;否則,需要先從磁盤讀入內(nèi)存,然后再返回 執(zhí)行器拿到引擎給的行數(shù)據(jù),把這個值加上1,得到新的一行數(shù)據(jù),再調(diào)用引擎接口寫入這行新數(shù)據(jù) 引擎將這行新數(shù)據(jù)更新到內(nèi)存中,同時將這個更新操作記錄到redo log里面,此時redo log處于prepare狀態(tài)。然后告知執(zhí)行器執(zhí)行完成了,隨時可以提交事務 執(zhí)行器生成這個操作的binlog,并把binlog寫入磁盤 執(zhí)行器調(diào)用引擎的提交事務接口,引擎把剛剛寫入的redo log改成提交狀態(tài),更新完成
update語句的執(zhí)行流程圖如下,圖中淺色框表示在InnoDB內(nèi)部執(zhí)行的,深色框表示是在執(zhí)行器中執(zhí)行的
將redo log的寫入拆成了兩個步驟:prepare和commit,這就是兩階段提交
MySQL主從復制原理
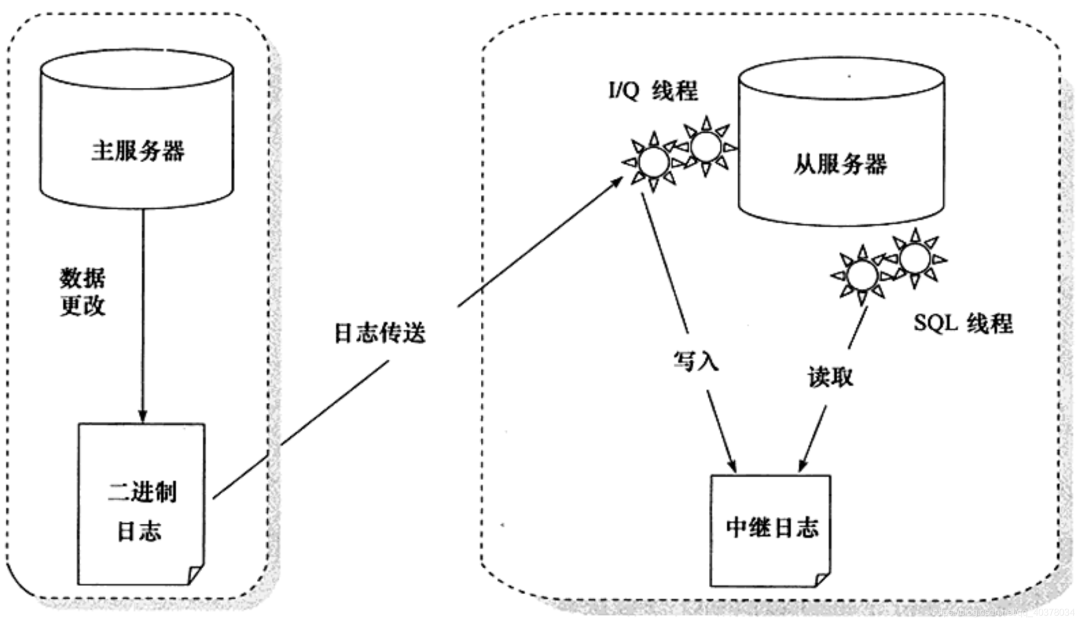
從庫B和主庫A之間維持了一個長連接。主庫A內(nèi)部有一個線程,專門用于服務從庫B的這個長連接。一個事務日志同步的完整過程如下:
在從庫B上通過change master命令,設(shè)置主庫A的IP、端口、用戶名、密碼,以及要從哪個位置開始請求binlog,這個位置包含文件名和日志偏移量
在從庫B上執(zhí)行start slave命令,這時從庫會啟動兩個線程,就是圖中的I/O線程和SQL線程。其中I/O線程負責與主庫建立連接
由于多線程復制方案的引入,SQL線程演化成了多個線程
主從復制不是完全實時地進行同步,而是異步實時。這中間存在主從服務之間的執(zhí)行延時,如果主服務器的壓力很大,則可能導致主從服務器延時較大
Sharding-Jdbc實現(xiàn)讀寫分離
1)、新建Springboot工程,引入相關(guān)依賴
org.springframework.boot spring-boot-starter-web org.mybatis.spring.boot mybatis-spring-boot-starter 2.1.4 mysql mysql-connector-java runtime com.alibaba druid-spring-boot-starter 1.1.21 org.apache.shardingsphere sharding-jdbc-spring-boot-starter 4.0.0-RC1 org.projectlombok lombok true org.springframework.boot spring-boot-starter-test test
2)、application.properties配置文件
spring.main.allow-bean-definition-overriding=true#顯示sqlspring.shardingsphere.props.sql.show=true#配置數(shù)據(jù)源spring.shardingsphere.datasource.names=ds1,ds2,ds3#master-ds1數(shù)據(jù)庫連接信息spring.shardingsphere.datasource.ds1.type=com.alibaba.druid.pool.DruidDataSourcespring.shardingsphere.datasource.ds1.driver-class-name=com.mysql.cj.jdbc.Driverspring.shardingsphere.datasource.ds1.url=jdbc:mysql://47.101.58.187:3306/sharding-jdbc-db?useUnicode=true&useSSL=false&serverTimezone=Asia/Shanghaispring.shardingsphere.datasource.ds1.username=rootspring.shardingsphere.datasource.ds1.password=123456spring.shardingsphere.datasource.ds1.maxPoolSize=100spring.shardingsphere.datasource.ds1.minPoolSize=5#slave-ds2數(shù)據(jù)庫連接信息spring.shardingsphere.datasource.ds2.type=com.alibaba.druid.pool.DruidDataSourcespring.shardingsphere.datasource.ds2.driver-class-name=com.mysql.cj.jdbc.Driverspring.shardingsphere.datasource.ds2.url=jdbc:mysql://47.101.58.187:3307/sharding-jdbc-db?useUnicode=true&useSSL=false&serverTimezone=Asia/Shanghaispring.shardingsphere.datasource.ds2.username=rootspring.shardingsphere.datasource.ds2.password=123456spring.shardingsphere.datasource.ds2.maxPoolSize=100spring.shardingsphere.datasource.ds2.minPoolSize=5#slave-ds3數(shù)據(jù)庫連接信息spring.shardingsphere.datasource.ds3.type=com.alibaba.druid.pool.DruidDataSourcespring.shardingsphere.datasource.ds3.driver-class-name=com.mysql.cj.jdbc.Driverspring.shardingsphere.datasource.ds3.url=jdbc:mysql://47.101.58.187:3307/sharding-jdbc-db?useUnicode=true&useSSL=false&serverTimezone=Asia/Shanghaispring.shardingsphere.datasource.ds3.username=rootspring.shardingsphere.datasource.ds3.password=123456spring.shardingsphere.datasource.ds.maxPoolSize=100spring.shardingsphere.datasource.ds3.minPoolSize=5#配置默認數(shù)據(jù)源ds1 默認數(shù)據(jù)源,主要用于寫spring.shardingsphere.sharding.default-data-source-name=ds1#配置主從名稱spring.shardingsphere.masterslave.name=ms#置主庫master,負責數(shù)據(jù)的寫入spring.shardingsphere.masterslave.master-data-source-name=ds1#配置從庫slave節(jié)點spring.shardingsphere.masterslave.slave-data-source-names=ds2,ds3#配置slave節(jié)點的負載均衡均衡策略,采用輪詢機制spring.shardingsphere.masterslave.load-balance-algorithm-type=round_robin#整合mybatis的配置mybatis.type-aliases-package=com.ppdai.shardingjdbc.entity
3)、創(chuàng)建t_user表
CREATE TABLE `t_user` (`id` int(11) NOT NULL AUTO_INCREMENT,`nickname` varchar(100) DEFAULT NULL,`password` varchar(100) DEFAULT NULL,`sex` int(11) DEFAULT NULL,`birthday` varchar(50) DEFAULT NULL,PRIMARY KEY (`id`)) ENGINE=InnoDB AUTO_INCREMENT=4 DEFAULT CHARSET=utf8mb4;
4)、定義Controller、Mapper、Entity
@Datapublic class User {private Integer id;private String nickname;private String password;private Integer sex;private String birthday;}
@RestController@RequestMapping("/api/user")public class UserController {@Autowiredprivate UserMapper userMapper;@PostMapping("/save")public String addUser() {User user = new User();user.setNickname("zhangsan" + new Random().nextInt());user.setPassword("123456");user.setSex(1);user.setBirthday("1997-12-03");userMapper.addUser(user);return "success";}@GetMapping("/findUsers")public ListfindUsers() { return userMapper.findUsers();}}
public interface UserMapper {("insert into t_user(nickname,password,sex,birthday) values(#{nickname},#{password},#{sex},#{birthday})")void addUser(User user);("select * from t_user")ListfindUsers() ;}
5)、驗證
啟動日志中三個數(shù)據(jù)源初始化成功:

調(diào)用http://localhost:8080/api/user/save一直進入到ds1主節(jié)點

調(diào)用http://localhost:8080/api/user/findUsers一直進入到ds2、ds3節(jié)點,并且輪詢進入

MySQL分庫分表原理
1)、分庫分表
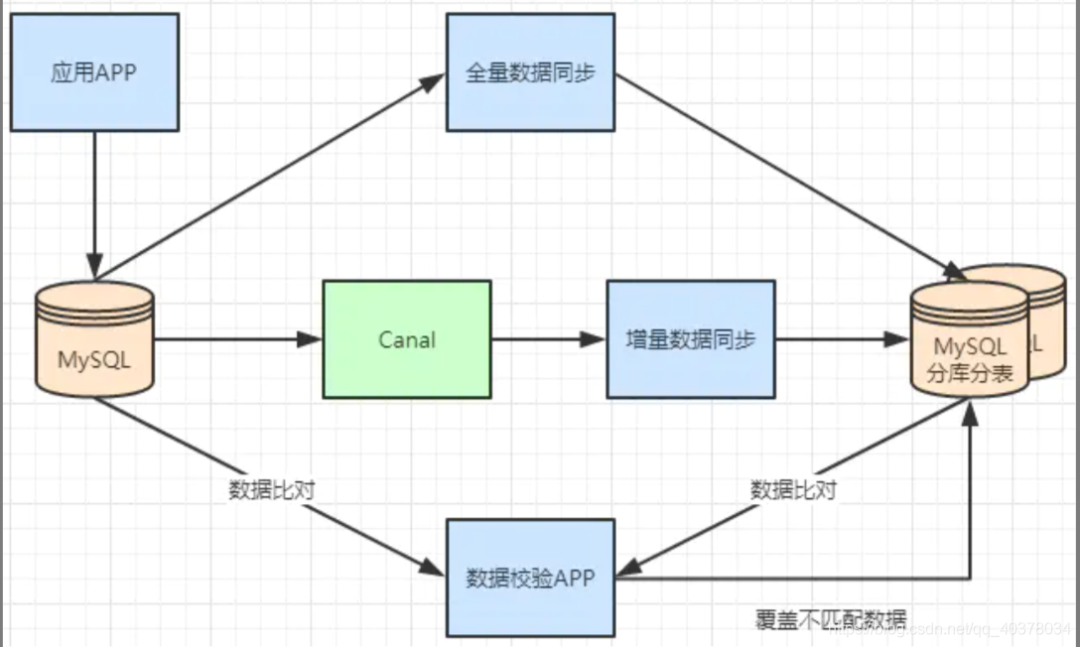
2)、不停機分庫分表數(shù)據(jù)遷移
一般數(shù)據(jù)庫的拆分也是有一個過程的,一開始是單表,后面慢慢拆成多表。那么我們就看下如何平滑的從MySQL單表過度到MySQL的分庫分表架構(gòu)。
利用MySQL+Canal做增量數(shù)據(jù)同步,利用分庫分表中間件,將數(shù)據(jù)路由到對應的新表中 利用分庫分表中間件,全量數(shù)據(jù)導入到對應的新表中 通過單表數(shù)據(jù)和分庫分表數(shù)據(jù)兩兩比較,更新不匹配的數(shù)據(jù)到新表中
Sharding-Jdbc實現(xiàn)分庫分表
1)、邏輯表
用戶數(shù)據(jù)根據(jù)訂單id%2拆分為2個表,分別是:t_order0和t_order1。他們的邏輯表名是:t_order
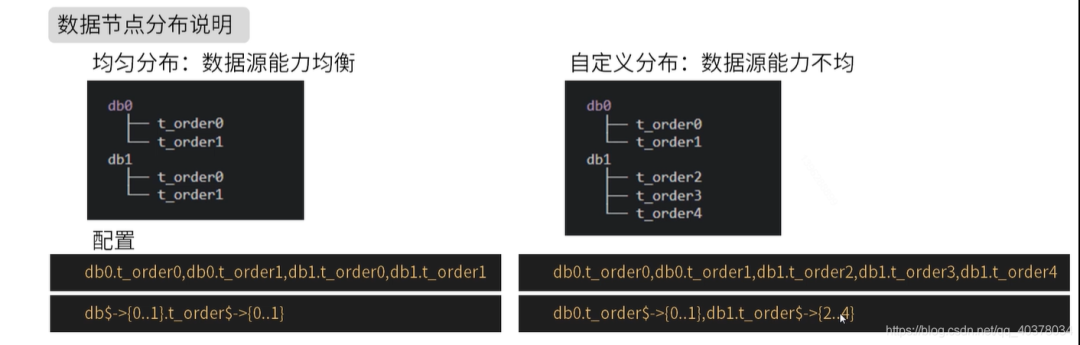
多數(shù)據(jù)源相同表:
#多數(shù)據(jù)源$->{0..N}.邏輯表名$->{0..N} 相同表spring.shardingsphere.sharding.tables.t_order.actual-data-nodes=ds$->{0..1}.t_order$->{0..1}
#多數(shù)據(jù)源$->{0..N}.邏輯表名$->{0..N} 不同表spring.shardingsphere.sharding.tables.t_order.actual-data-nodes=ds0.t_order$->{0..1},ds1.t_order$->{2..4}
#單數(shù)據(jù)源的配置方式spring.shardingsphere.sharding.tables.t_order.actual-data-nodes=ds0.t_order$->{0..4}
spring.shardingsphere.sharding.tables.t_order.actual-data-nodes=ds0.t_order0,ds1.t_order0,ds0.t_order1,ds1.t_order12)、inline分片策略
spring.shardingsphere.sharding.tables.t_order.actual-data-nodes=ds$->{0..1}.t_order$->{0..1}#數(shù)據(jù)源分片策略spring.shardingsphere.sharding.tables.t_order.database-strategy.inline.sharding-column=user_id#數(shù)據(jù)源分片算法spring.shardingsphere.sharding.tables.t_order.database-strategy.inline.algorithm-expression=ds$->{user_id%2}#表分片策略spring.shardingsphere.sharding.tables.t_order.table-strategy.inline.sharding-column=order_id#表分片算法spring.shardingsphere.sharding.tables.t_order.table-strategy.inline.algorithm-expression=t_order$->{order_id%2}
insert?into?t_order(user_id,order_id)?values(2,3),user_id%2?=?0使用數(shù)據(jù)源ds0,order_id%2?=?1使用t_order1,insert語句最終操作的是數(shù)據(jù)源ds0的t_order1表。3)、分布式主鍵配置
#主鍵的列名spring.shardingsphere.sharding.tables.t_order.key-generator.column=id#主鍵生成策略spring.shardingsphere.sharding.tables.t_order.key-generator.type=SNOWFLAKE
4)、inline分片策略實現(xiàn)分庫分表
CREATE TABLE `t_user0` (`id` bigint(20) DEFAULT NULL,`nickname` varchar(200) DEFAULT NULL,`password` varchar(200) DEFAULT NULL,`age` int(11) DEFAULT NULL,`sex` int(11) DEFAULT NULL,`birthday` varchar(100) DEFAULT NULL) ENGINE=InnoDB DEFAULT CHARSET=utf8mb4;CREATE TABLE `t_user1` (`id` bigint(20) DEFAULT NULL,`nickname` varchar(200) DEFAULT NULL,`password` varchar(200) DEFAULT NULL,`age` int(11) DEFAULT NULL,`sex` int(11) DEFAULT NULL,`birthday` varchar(100) DEFAULT NULL) ENGINE=InnoDB DEFAULT CHARSET=utf8mb4;
application.properties:spring.main.allow-bean-definition-overriding=truespring.shardingsphere.props.sql.show=truespring.shardingsphere.datasource.names=ds0,ds1spring.shardingsphere.datasource.ds0.type=com.alibaba.druid.pool.DruidDataSourcespring.shardingsphere.datasource.ds0.driver-class-name=com.mysql.cj.jdbc.Driverspring.shardingsphere.datasource.ds0.url=jdbc:mysql://47.101.58.187:3306/t_user_db0?useUnicode=true&useSSL=false&serverTimezone=Asia/Shanghaispring.shardingsphere.datasource.ds0.username=rootspring.shardingsphere.datasource.ds0.password=123456spring.shardingsphere.datasource.ds0.maxPoolSize=100spring.shardingsphere.datasource.ds0.minPoolSize=5spring.shardingsphere.datasource.ds1.type=com.alibaba.druid.pool.DruidDataSourcespring.shardingsphere.datasource.ds1.driver-class-name=com.mysql.cj.jdbc.Driverspring.shardingsphere.datasource.ds1.url=jdbc:mysql://47.101.58.187:3306/t_user_db1?useUnicode=true&useSSL=false&serverTimezone=Asia/Shanghaispring.shardingsphere.datasource.ds1.username=rootspring.shardingsphere.datasource.ds1.password=123456spring.shardingsphere.datasource.ds1.maxPoolSize=100spring.shardingsphere.datasource.ds1.minPoolSize=5mybatis.type-aliases-package=com.ppdai.shardingjdbc.entityspring.shardingsphere.sharding.tables.t_user.actual-data-nodes=ds$->{0..1}.t_user$->{0..1}spring.shardingsphere.sharding.tables.t_user.database-strategy.inline.sharding-column=sexspring.shardingsphere.sharding.tables.t_user.database-strategy.inline.algorithm-expression=ds$->{sex%2}spring.shardingsphere.sharding.tables.t_user.table-strategy.inline.sharding-column=agespring.shardingsphere.sharding.tables.t_user.table-strategy.inline.algorithm-expression=t_user$->{age%2}spring.shardingsphere.sharding.tables.t_user.key-generator.column=idspring.shardingsphere.sharding.tables.t_user.key-generator.type=SNOWFLAKE
class ShardingJdbcApplicationTests {private UserMapper userMapper;/*** sex:奇數(shù)* age:奇數(shù)* ds1.t_user1*/public void test01() {User user = new User();user.setNickname("zhangsan" + new Random().nextInt());user.setPassword("123456");user.setAge(17);user.setSex(1);user.setBirthday("1997-12-03");userMapper.addUser(user);}/*** sex:奇數(shù)* age:偶數(shù)* ds1.t_user0*/public void test02() {User user = new User();user.setNickname("zhangsan" + new Random().nextInt());user.setPassword("123456");user.setAge(18);user.setSex(1);user.setBirthday("1997-12-03");userMapper.addUser(user);}/*** sex:偶數(shù)* age:奇數(shù)* ds0.t_user1*/public void test03() {User user = new User();user.setNickname("zhangsan" + new Random().nextInt());user.setPassword("123456");user.setAge(17);user.setSex(2);user.setBirthday("1997-12-03");userMapper.addUser(user);}/*** sex:偶數(shù)* age:偶數(shù)* ds0.t_user0*/public void test04() {User user = new User();user.setNickname("zhangsan" + new Random().nextInt());user.setPassword("123456");user.setAge(18);user.setSex(2);user.setBirthday("1997-12-03");userMapper.addUser(user);}}