
Longhorn 企業(yè)級(jí)云原生容器存儲(chǔ)解決方案-部署篇
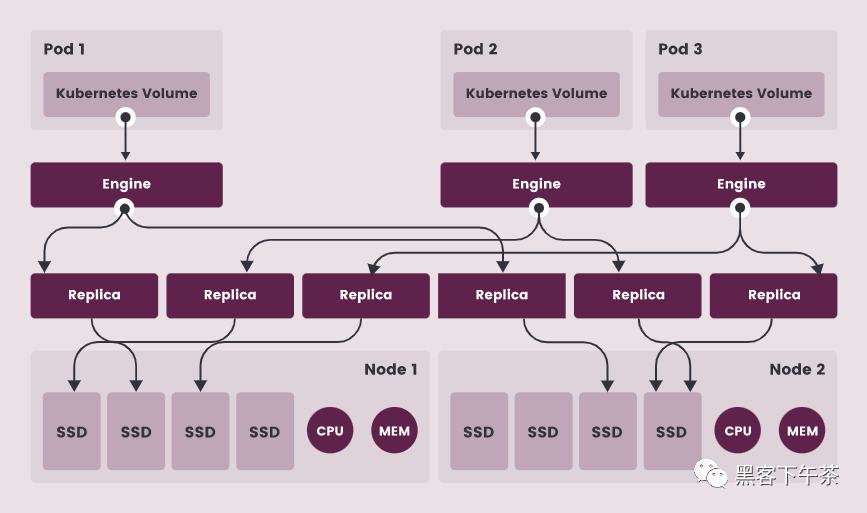
系列
安裝
Longhorn 可以通過(guò)多種方式安裝在 Kubernetes 集群上:
Rancher catalog appkubectlHelm
安裝要求
安裝 Longhorn 的 Kubernetes 集群中的每個(gè)節(jié)點(diǎn)都必須滿(mǎn)足以下要求:
與
Kubernetes兼容的容器運(yùn)行時(shí)(Docker v1.13+、containerd v1.3.7+等)Kubernetes v1.16+.
推薦 Kubernetes v1.17+
open-iscsi已安裝,并且iscsid守護(hù)程序正在所有節(jié)點(diǎn)上運(yùn)行。這是必要的,因?yàn)?nbsp;Longhorn依賴(lài)主機(jī)上的iscsiadm為Kubernetes提供持久卷。RWX support要求每個(gè)節(jié)點(diǎn)都安裝NFSv4 client。主機(jī)文件系統(tǒng)支持
file extents功能來(lái)存儲(chǔ)數(shù)據(jù)。目前我們支持:ext4XFScurl,findmnt,grep,awk,blkid,lsblk必須安裝。Mount propagation 必須啟用。
Longhorn workloads 必須能夠以 root 身份運(yùn)行才能正確部署和操作 Longhorn。
操作系統(tǒng)(OS)/發(fā)行版(Distro)特定配置
Google Kubernetes Engine (GKE)
Longhorn需要一些額外的設(shè)置才能正常運(yùn)行。K3s clusters 需要一些額外的設(shè)置。
RKE clusters with CoreOS 需要
csi-on-rke-and-coreos
使用 Environment Check Script
我們編寫(xiě)了一個(gè)腳本來(lái)幫助您收集有關(guān)這些因素的足夠信息。
注意在運(yùn)行 env check 腳本之前,可能需要在本地安裝 jq。
運(yùn)行腳本:
curl -sSfL https://raw.githubusercontent.com/longhorn/longhorn/v{{< current-version >}}/scripts/environment_check.sh | bash
結(jié)果示例:
daemonset.apps/longhorn-environment-check created
waiting for pods to become ready (0/3)
all pods ready (3/3)

  MountPropagation is enabled!

cleaning up...
daemonset.apps "longhorn-environment-check" deleted
clean up complete
Pod 安全策略
從 v1.0.2 開(kāi)始,Longhorn 附帶了默認(rèn)的 Pod 安全策略,該策略將為 Longhorn 提供必要的權(quán)限以使其能夠正常運(yùn)行。
Longhorn 無(wú)需特殊配置即可在啟用了 Pod 安全策略的集群上正常工作。
注意 Mount Propagation
如果您的 Kubernetes 集群是由 Rancher v2.0.7+ 或更高版本提供的,則默認(rèn)啟用 MountPropagation 功能。
如果 MountPropagation 被禁用,Base Image 功能將被禁用。
安裝 open-iscsi
用于安裝 open-iscsi 的命令因 Linux 發(fā)行版而異。
對(duì)于 GKE,我們建議使用 Ubuntu 作為 guest OS image,因?yàn)樗呀?jīng)包含 open-iscsi。
您可能需要編輯 cluster security group(集群安全組) 以允許 SSH 訪(fǎng)問(wèn)。
對(duì)于 SUSE 和 openSUSE,請(qǐng)使用以下命令:
zypper install open-iscsi
對(duì)于 Debian 和 Ubuntu,請(qǐng)使用以下命令:
apt-get install open-iscsi
對(duì)于帶有 EKS Kubernetes Worker AMI with AmazonLinux2 image 的 RHEL、CentOS 和 EKS,請(qǐng)使用以下命令:
yum install iscsi-initiator-utils
我們還提供了一個(gè) iscsi 安裝程序,使用戶(hù)可以更輕松地自動(dòng)安裝 open-iscsi:
kubectl apply -f https://raw.githubusercontent.com/longhorn/longhorn/v{{< current-version >}}/deploy/prerequisite/longhorn-iscsi-installation.yaml
部署完成后,運(yùn)行以下命令來(lái)檢查安裝程序的 pod 狀態(tài):
kubectl get pod | grep longhorn-iscsi-installation
longhorn-iscsi-installation-49hd7   1/1     Running   0          21m
longhorn-iscsi-installation-pzb7r   1/1     Running   0          39m
也可以通過(guò)以下命令查看日志,查看安裝結(jié)果:
kubectl logs longhorn-iscsi-installation-pzb7r -c iscsi-installation
...
Installed:
  iscsi-initiator-utils.x86_64 0:6.2.0.874-7.amzn2

Dependency Installed:
  iscsi-initiator-utils-iscsiuio.x86_64 0:6.2.0.874-7.amzn2

Complete!
Created symlink from /etc/systemd/system/multi-user.target.wants/iscsid.service to /usr/lib/systemd/system/iscsid.service.
iscsi install successfully
安裝 NFSv4 client
用于安裝 NFSv4 client 的命令因 Linux 發(fā)行版而異。
對(duì)于 Debian 和 Ubuntu,請(qǐng)使用以下命令:
apt-get install nfs-common
對(duì)于帶有 EKS Kubernetes Worker AMI with AmazonLinux2 image 的 RHEL、CentOS 和 EKS,請(qǐng)使用以下命令:
yum install nfs-utils
我們還提供了一個(gè) nfs 安裝程序,使用戶(hù)可以更輕松地自動(dòng)安裝 nfs-client:
kubectl apply -f https://raw.githubusercontent.com/longhorn/longhorn/v{{< current-version >}}/deploy/prerequisite/longhorn-nfs-installation.yaml
部署完成后,運(yùn)行以下命令來(lái)檢查安裝程序的 pod 狀態(tài):
kubectl get pod | grep longhorn-nfs-installation
NAME                                  READY   STATUS    RESTARTS   AGE
longhorn-nfs-installation-t2v9v   1/1     Running   0          143m
longhorn-nfs-installation-7nphm   1/1     Running   0          143m
也可以通過(guò)以下命令查看日志,查看安裝結(jié)果:
kubectl logs longhorn-nfs-installation-t2v9v -c nfs-installation
...
nfs install successfully
檢查 Kubernetes 版本
使用以下命令檢查您的 Kubernetes 服務(wù)器版本
kubectl version
結(jié)果:
Client Version: version.Info{Major:"1", Minor:"19", GitVersion:"v1.19.3", GitCommit:"1e11e4a2108024935ecfcb2912226cedeafd99df", GitTreeState:"clean", BuildDate:"2020-10-14T12:50:19Z", GoVersion:"go1.15.2", Compiler:"gc", Platform:"linux/amd64"}
Server Version: version.Info{Major:"1", Minor:"17", GitVersion:"v1.17.4", GitCommit:"8d8aa39598534325ad77120c120a22b3a990b5ea", GitTreeState:"clean", BuildDate:"2020-03-12T20:55:23Z", GoVersion:"go1.13.8", Compiler:"gc", Platform:"linux/amd64"}
Server Version 應(yīng)該是 v1.16 或更高版本。
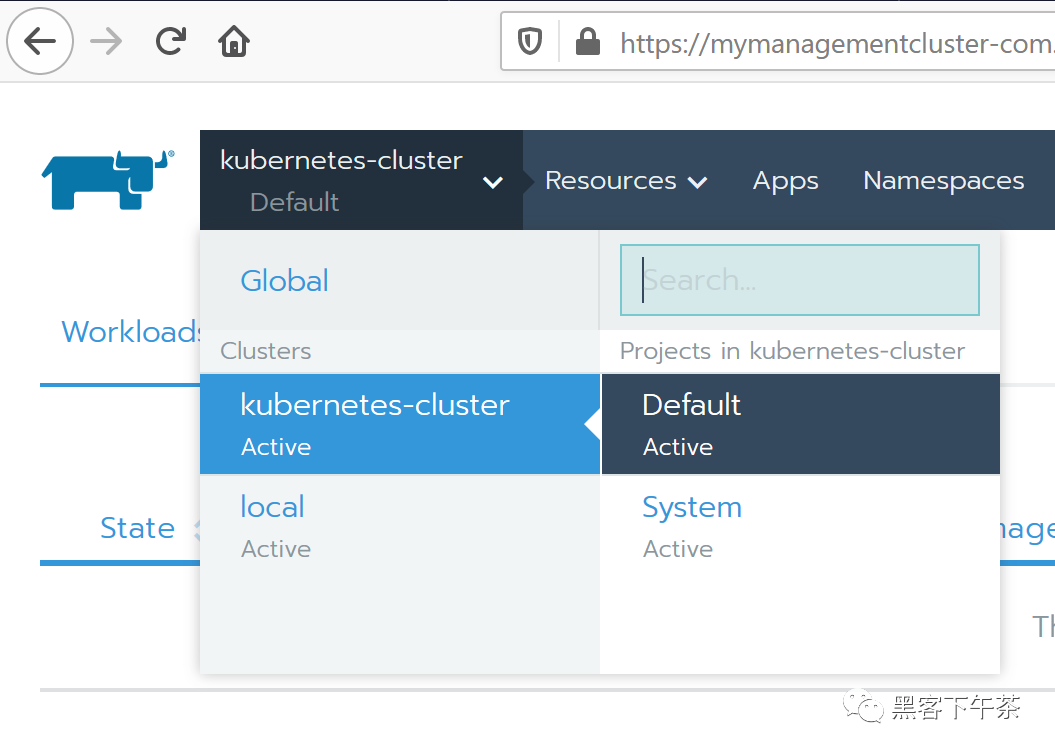
作為 Rancher Catalog App 安裝
通過(guò) Rancher catalog 安裝 Longhorn 的好處之一是 Rancher 為 Longhorn UI 提供身份驗(yàn)證。
如果有新版本的 Longhorn 可用,您將在 Catalog Apps 屏幕上看到 Upgrade Available 標(biāo)志。您可以單擊 Upgrade 按鈕升級(jí) Longhorn manager。
安裝
可選:我們建議為
Longhorn創(chuàng)建一個(gè)新項(xiàng)目,例如Storage。導(dǎo)航到您將安裝
Longhorn的cluster和project。
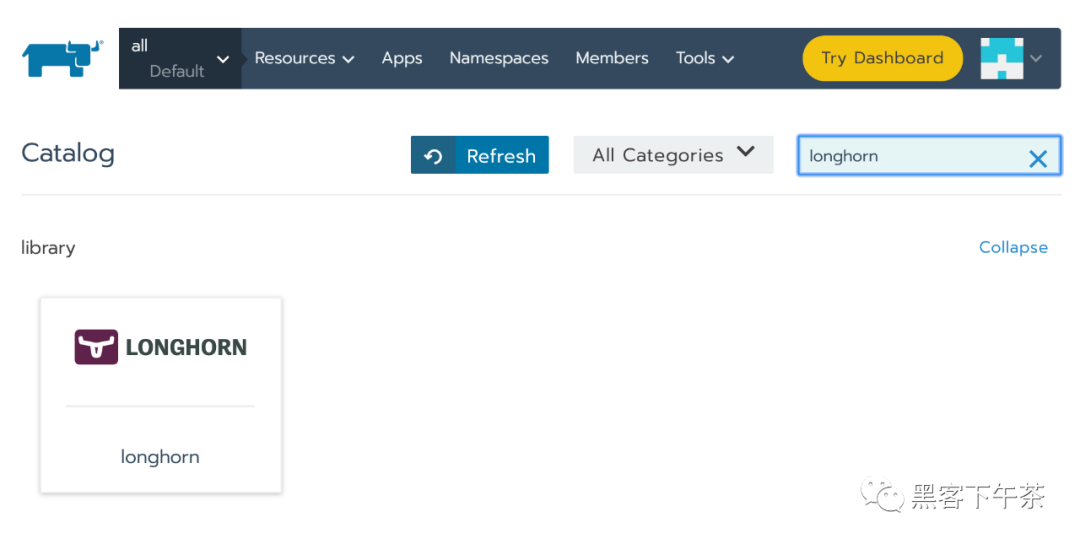
3. 導(dǎo)航到 Catalog Apps 屏幕。
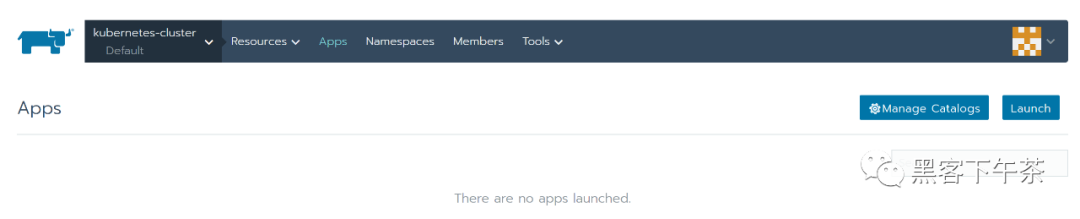
4. 在 catalog 中找到 Longhorn 項(xiàng)目并單擊它。
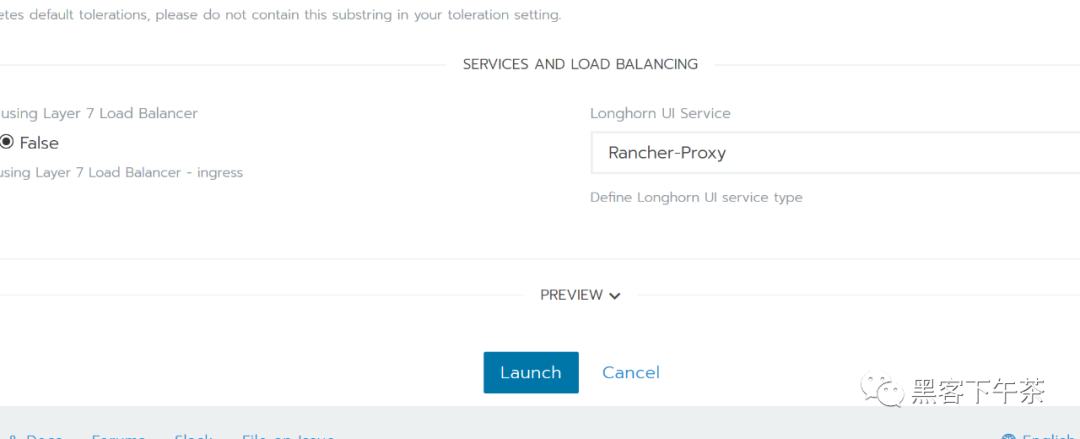
5. 可選:自定義默認(rèn)設(shè)置。6. 單擊 Launch。 Longhorn 將安裝在 longhorn-system 命名空間中。
現(xiàn)在 Longhorn 已經(jīng)安裝好了。
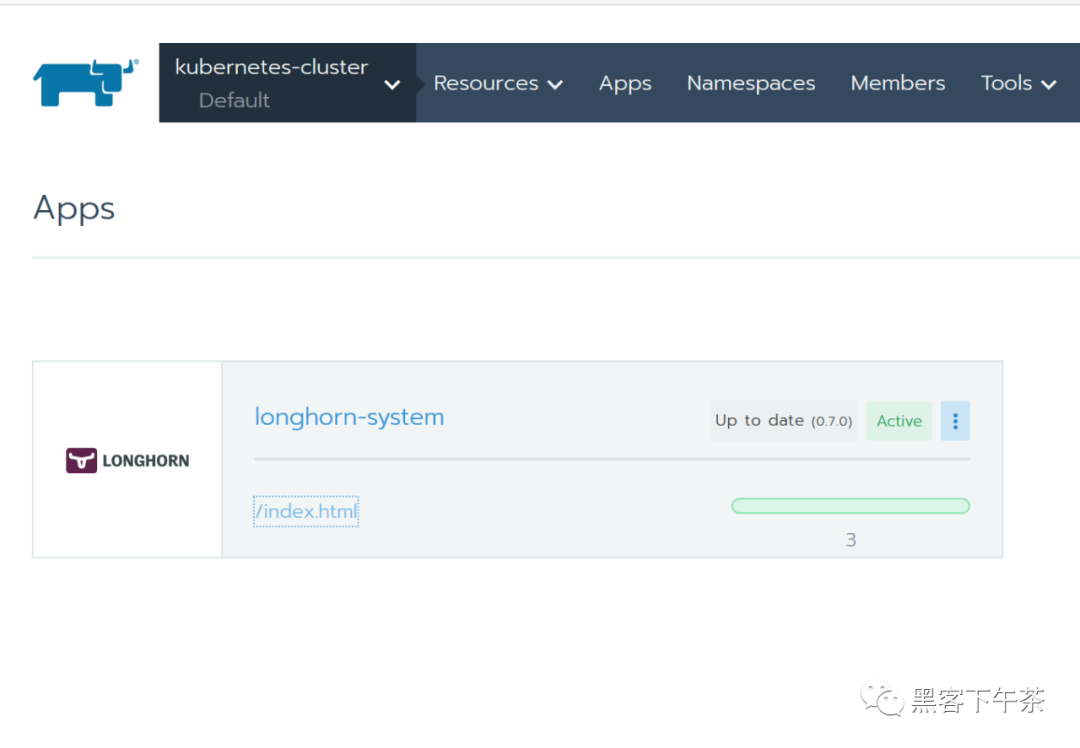
7. 單擊 index.html 鏈接導(dǎo)航到 Longhorn 儀表板。
成功安裝 Longhorn 后,您可以通過(guò)導(dǎo)航到 Catalog Apps 屏幕來(lái)訪(fǎng)問(wèn) Longhorn UI。
使用 Kubectl 安裝
安裝 Longhorn
使用以下命令在任何 Kubernetes 集群上安裝 Longhorn:
kubectl apply -f https://raw.githubusercontent.com/longhorn/longhorn/v{{< current-version >}}/deploy/longhorn.yaml監(jiān)視安裝進(jìn)度的一種方法是觀(guān)察在
longhorn-system命名空間中創(chuàng)建的pod:kubectl get pods \
--namespace longhorn-system \
--watch檢查部署是否成功:
$ kubectl -n longhorn-system get pod
NAME                                        READY     STATUS    RESTARTS   AGE
csi-attacher-6fdc77c485-8wlpg               1/1       Running   0          9d
csi-attacher-6fdc77c485-psqlr               1/1       Running   0          9d
csi-attacher-6fdc77c485-wkn69               1/1       Running   0          9d
csi-provisioner-78f7db7d6d-rj9pr            1/1       Running   0          9d
csi-provisioner-78f7db7d6d-sgm6w            1/1       Running   0          9d
csi-provisioner-78f7db7d6d-vnjww            1/1       Running   0          9d
engine-image-ei-6e2b0e32-2p9nk              1/1       Running   0          9d
engine-image-ei-6e2b0e32-s8ggt              1/1       Running   0          9d
engine-image-ei-6e2b0e32-wgkj5              1/1       Running   0          9d
longhorn-csi-plugin-g8r4b                   2/2       Running   0          9d
longhorn-csi-plugin-kbxrl                   2/2       Running   0          9d
longhorn-csi-plugin-wv6sb                   2/2       Running   0          9d
longhorn-driver-deployer-788984b49c-zzk7b   1/1       Running   0          9d
longhorn-manager-nr5rs                      1/1       Running   0          9d
longhorn-manager-rd4k5                      1/1       Running   0          9d
longhorn-manager-snb9t                      1/1       Running   0          9d
longhorn-ui-67b9b6887f-n7x9q                1/1       Running   0          9d
要啟用對(duì)
Longhorn UI的訪(fǎng)問(wèn),您需要設(shè)置一個(gè)Ingress controller。默認(rèn)情況下不啟用對(duì)Longhorn UI的身份驗(yàn)證。
已部署資源列表
以下項(xiàng)目將部署到 Kubernetes:
Namespace: longhorn-system
所有 Longhorn bits 都將作用于這個(gè)命名空間。
ServiceAccount: longhorn-service-account
Service account 是在 longhorn-system 命名空間中創(chuàng)建的。
ClusterRole: longhorn-role
此角色將有權(quán)訪(fǎng)問(wèn):
In apiextension.k8s.io (All verbs)
customresourcedefinitions
In core (All verbs)
/status
/logs
pods
events
persistentVolumes
persistentVolumeClaims
nodes
proxy/nodes
secrets
services
endpoints
configMaps
In core
namespaces (get, list)
In apps (All Verbs)
daemonsets
statefulSets
deployments
In batch (All Verbs)
jobs
cronjobs
In storage.k8s.io (All verbs)
storageclasses
volumeattachments
csinodes
csidrivers
In coordination.k8s.io
leases
ClusterRoleBinding: longhorn-bind
這將 longhorn-role 連接到 longhorn-system 命名空間中的 longhorn-service-account。
CustomResourceDefinitions
將安裝以下 CustomResourceDefinitions
In longhorn.io
engines
replicas
settings
volumes
engineimages
nodes
instancemanagers
Kubernetes API 對(duì)象
一個(gè)具有默認(rèn)設(shè)置
config maplonghorn-managerDaemonSetlonghorn-backendservice 在內(nèi)部將longhorn-manager DaemonSet暴露給Kuberneteslonghorn-uiDeploymentlonghorn-frontendservice 在內(nèi)部將longhorn-ui暴露給Kuberneteslonghorn-driver-deployer部署 CSI driverlonghorn StorageClass
使用 Helm 安裝
安裝 Helm 的注意事項(xiàng)
有關(guān)安裝 Helm 的幫助,請(qǐng)參閱官方文檔。
如果您使用的是 3.0 版之前的 Helm 版本,則需要使用基于角色的訪(fǎng)問(wèn)控制 (RBAC) 在 Kubernetes 集群中安裝 Tiller。
安裝 Longhorn
添加
Longhorn Helm存儲(chǔ)庫(kù):helm repo add longhorn https://charts.longhorn.io從存儲(chǔ)庫(kù)中獲取最新
charts:helm repo update在
longhorn-system命名空間中安裝Longhorn。要使用Helm 2安裝Longhorn,請(qǐng)使用以下命令:helm install longhorn/longhorn --name longhorn --namespace longhorn-system要使用
Helm 3安裝Longhorn,請(qǐng)使用以下命令:kubectl create namespace longhorn-system
helm install longhorn longhorn/longhorn --namespace longhorn-system要確認(rèn)部署成功,請(qǐng)運(yùn)行:
kubectl -n longhorn-system get pod結(jié)果應(yīng)如下所示:
NAME                                        READY   STATUS              RESTARTS   AGE
compatible-csi-attacher-d9fb48bcf-2rzmb     1/1     Running             0          8m58s
csi-attacher-78bf9b9898-grn2c               1/1     Running             0          32s
csi-attacher-78bf9b9898-lfzvq               1/1     Running             0          8m59s
csi-attacher-78bf9b9898-r64sv               1/1     Running             0          33s
csi-provisioner-8599d5bf97-c8r79            1/1     Running             0          33s
csi-provisioner-8599d5bf97-fc5pz            1/1     Running             0          33s
csi-provisioner-8599d5bf97-p9psl            1/1     Running             0          8m59s
csi-resizer-586665f745-b7p6h                1/1     Running             0          8m59s
csi-resizer-586665f745-kgdxs                1/1     Running             0          33s
csi-resizer-586665f745-vsvvq                1/1     Running             0          33s
engine-image-ei-e10d6bf5-pv2s6              1/1     Running             0          9m30s
instance-manager-e-379373af                 1/1     Running             0          8m41s
instance-manager-r-101f13ba                 1/1     Running             0          8m40s
longhorn-csi-plugin-7v2dc                   4/4     Running             0          8m59s
longhorn-driver-deployer-775897bdf6-k4sfd   1/1     Running             0          10m
longhorn-manager-79xgj                      1/1     Running             0          9m50s
longhorn-ui-9fbb5445-httqf                  0/1     Running             0          33s
要啟用對(duì)
Longhorn UI的訪(fǎng)問(wèn),您需要設(shè)置一個(gè)Ingress controller。默認(rèn)情況下不啟用對(duì)Longhorn UI的身份驗(yàn)證。
訪(fǎng)問(wèn) UI
訪(fǎng)問(wèn)和身份驗(yàn)證的先決條件
這些說(shuō)明假定已安裝 Longhorn。
如果您安裝了 Longhorn YAML 清單,則需要設(shè)置 Ingress controller 以允許外部流量進(jìn)入集群,并且默認(rèn)情況下不會(huì)啟用身份驗(yàn)證。這適用于 Helm 和 kubectl 安裝。
如果 Longhorn 安裝為 Rancher catalog app,Rancher 會(huì)自動(dòng)為您創(chuàng)建一個(gè)具有訪(fǎng)問(wèn)控制(rancher-proxy)的 Ingress controller。
訪(fǎng)問(wèn) Longhorn UI
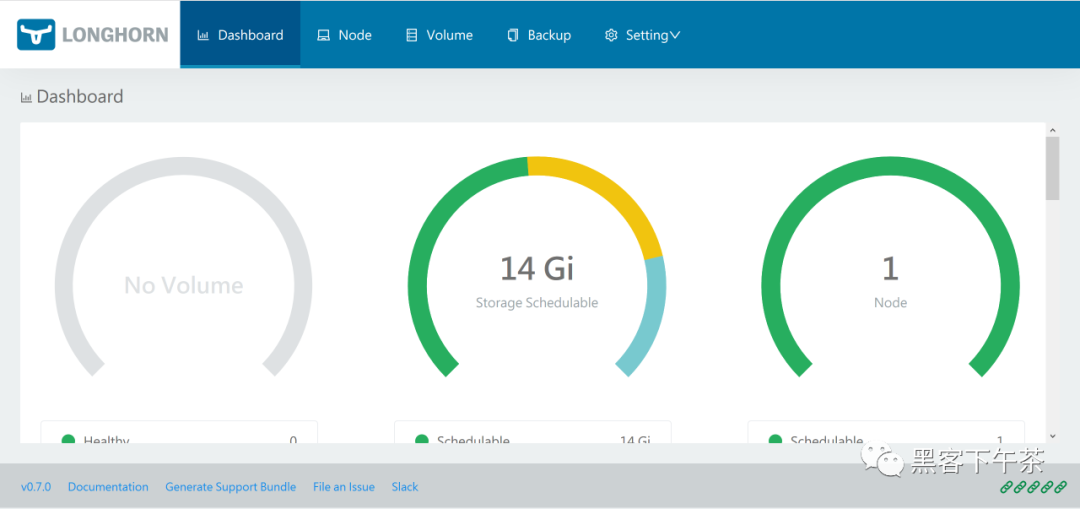
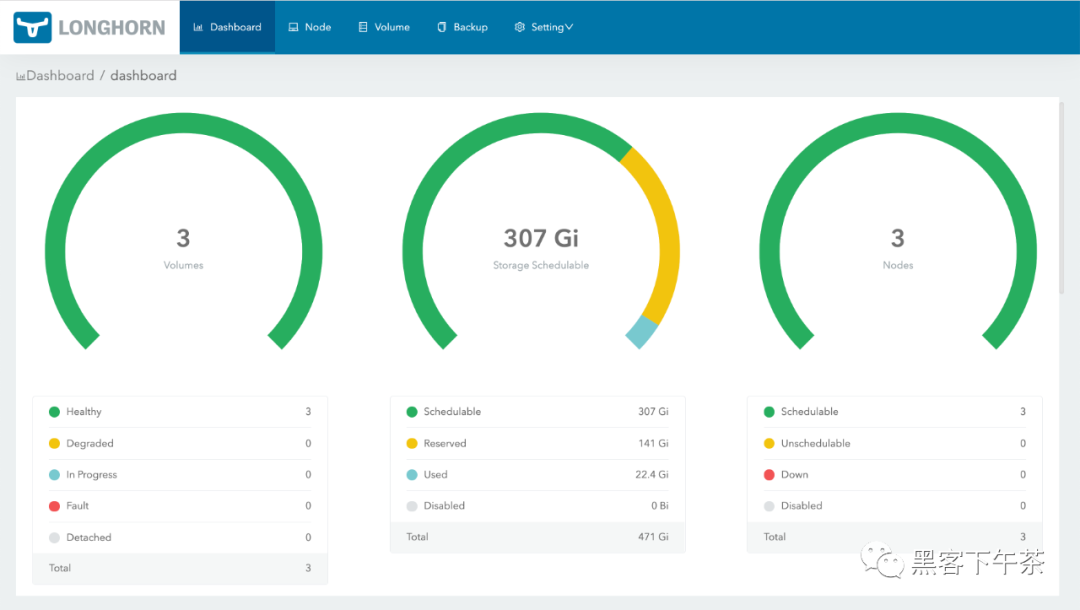
在您的 Kubernetes 集群中安裝 Longhorn 后,您可以訪(fǎng)問(wèn) UI dashboard。
獲取
Longhorn的對(duì)外service IP:kubectl -n longhorn-system get svc對(duì)于
Longhorn v0.8.0,輸出應(yīng)如下所示,并且使用longhorn-frontend的CLUSTER-IP訪(fǎng)問(wèn)Longhorn UI:NAME TYPE CLUSTER-IP EXTERNAL-IP PORT(S) AGE
longhorn-backend ClusterIP 10.20.248.250 <none> 9500/TCP 58m
longhorn-frontend ClusterIP 10.20.245.110 <none> 80/TCP 58m在上面的例子中,
IP是10.20.245.110。對(duì)于
Longhorn v0.8.0+,UI service類(lèi)型從LoadBalancer更改為ClusterIP。在瀏覽器中導(dǎo)航到
longhorn-frontend的IP。Longhorn UI如下所示:
使用基本身份驗(yàn)證 (nginx) 創(chuàng)建 Ingress
如果您使用 kubectl 或 Helm 在 Kubernetes 集群上安裝 Longhorn,則需要?jiǎng)?chuàng)建一個(gè) Ingress 以允許外部流量到達(dá) Longhorn UI。
默認(rèn)情況下,kubectl 和 Helm 安裝未啟用身份驗(yàn)證。在這些步驟中,您將學(xué)習(xí)如何使用 nginx ingress controller 的 annotations 創(chuàng)建具有基本身份驗(yàn)證的 Ingress。
創(chuàng)建一個(gè)基本的認(rèn)證文件
auth。生成的文件命名為auth很重要(實(shí)際上 -secret有一個(gè) keydata.auth),否則Ingress返回503。$ USER=<USERNAME_HERE>; PASSWORD=<PASSWORD_HERE>; echo "${USER}:$(openssl passwd -stdin -apr1 <<< ${PASSWORD})" >> auth創(chuàng)建一個(gè)
secret:$ kubectl -n longhorn-system create secret generic basic-auth --from-file=auth創(chuàng)建一個(gè) Ingress 清單
longhorn-ingress.yml:apiVersion: networking.k8s.io/v1
kind: Ingress
metadata:
name: longhorn-ingress
namespace: longhorn-system
annotations:
# type of authentication
nginx.ingress.kubernetes.io/auth-type: basic
# prevent the controller from redirecting (308) to HTTPS
nginx.ingress.kubernetes.io/ssl-redirect: 'false'
# name of the secret that contains the user/password definitions
nginx.ingress.kubernetes.io/auth-secret: basic-auth
# message to display with an appropriate context why the authentication is required
nginx.ingress.kubernetes.io/auth-realm: 'Authentication Required '
spec:
rules:
- http:
paths:
- pathType: Prefix
path: "/"
backend:
service:
name: longhorn-frontend
port:
number: 80創(chuàng)建 Ingress:
$ kubectl -n longhorn-system apply -f longhorn-ingress.yml
e.g.:
$ USER=foo; PASSWORD=bar; echo "${USER}:$(openssl passwd -stdin -apr1 <<< ${PASSWORD})" >> auth
$ cat auth
foo:$apr1$FnyKCYKb$6IP2C45fZxMcoLwkOwf7k0
$ kubectl -n longhorn-system create secret generic basic-auth --from-file=auth
secret/basic-auth created
$ kubectl -n longhorn-system get secret basic-auth -o yaml
apiVersion: v1
data:
auth: Zm9vOiRhcHIxJEZueUtDWUtiJDZJUDJDNDVmWnhNY29Md2tPd2Y3azAK
kind: Secret
metadata:
creationTimestamp: "2020-05-29T10:10:16Z"
name: basic-auth
namespace: longhorn-system
resourceVersion: "2168509"
selfLink: /api/v1/namespaces/longhorn-system/secrets/basic-auth
uid: 9f66233f-b12f-4204-9c9d-5bcaca794bb7
type: Opaque
$ echo "
apiVersion: networking.k8s.io/v1
kind: Ingress
metadata:
  name: longhorn-ingress
  namespace: longhorn-system
  annotations:
    # type of authentication
    nginx.ingress.kubernetes.io/auth-type: basic
    # prevent the controller from redirecting (308) to HTTPS
    nginx.ingress.kubernetes.io/ssl-redirect: 'false'
    # name of the secret that contains the user/password definitions
    nginx.ingress.kubernetes.io/auth-secret: basic-auth
    # message to display with an appropriate context why the authentication is required
    nginx.ingress.kubernetes.io/auth-realm: 'Authentication Required '
spec:
  rules:
  - http:
      paths:
      - pathType: Prefix
        path: "/"
        backend:
          service:
            name: longhorn-frontend
            port:
              number: 80
" | kubectl -n longhorn-system create -f -
ingress.networking.k8s.io/longhorn-ingress created
$ kubectl -n longhorn-system get ingress
NAME HOSTS ADDRESS PORTS AGE
longhorn-ingress * 45.79.165.114,66.228.45.37,97.107.142.125 80 2m7s
$ curl -v http://97.107.142.125/
* Trying 97.107.142.125...
* TCP_NODELAY set
* Connected to 97.107.142.125 (97.107.142.125) port 80 (#0)
> GET / HTTP/1.1
> Host: 97.107.142.125
> User-Agent: curl/7.64.1
> Accept: */*
>
< HTTP/1.1 401 Unauthorized
< Server: openresty/1.15.8.1
< Date: Fri, 29 May 2020 11:47:33 GMT
< Content-Type: text/html
< Content-Length: 185
< Connection: keep-alive
< WWW-Authenticate: Basic realm="Authentication Required"
<
<html>
<head><title>401 Authorization Required</title></head>
<body>
<center><h1>401 Authorization Required</h1></center>
<hr><center>openresty/1.15.8.1</center>
</body>
</html>
* Connection #0 to host 97.107.142.125 left intact
* Closing connection 0
$ curl -v http://97.107.142.125/ -u foo:bar
* Trying 97.107.142.125...
* TCP_NODELAY set
* Connected to 97.107.142.125 (97.107.142.125) port 80 (#0)
* Server auth using Basic with user 'foo'
> GET / HTTP/1.1
> Host: 97.107.142.125
> Authorization: Basic Zm9vOmJhcg==
> User-Agent: curl/7.64.1
> Accept: */*
>
< HTTP/1.1 200 OK
< Date: Fri, 29 May 2020 11:51:27 GMT
< Content-Type: text/html
< Content-Length: 1118
< Last-Modified: Thu, 28 May 2020 00:39:41 GMT
< ETag: "5ecf084d-3fd"
< Cache-Control: max-age=0
<
<!DOCTYPE html>
<html lang="en">
......
AWS EKS Kubernetes 集群的附加步驟
您將需要?jiǎng)?chuàng)建一個(gè) ELB(彈性負(fù)載均衡器)以將 nginx Ingress controller 公開(kāi)到 Internet。可能需要支付額外費(fèi)用。
根據(jù) nginx ingress controller documentation 創(chuàng)建必須的資源。
按照 ingress-nginx/deploy/#aws 步驟創(chuàng)建
ELB。
References
https://kubernetes.github.io/ingress-nginx/
升級(jí)
在這里,我們介紹了如何從所有以前的版本升級(jí)到最新的 Longhorn。
升級(jí) Longhorn
升級(jí)過(guò)程通常有兩個(gè)步驟:首先將 Longhorn manager 升級(jí)到最新版本,然后使用最新的 Longhorn manager 手動(dòng)將 Longhorn engine 升級(jí)到最新版本。
1. 升級(jí) Longhorn manager
要從
v1.1.x升級(jí),請(qǐng)參閱longhorn-manager。
2. 手動(dòng)升級(jí) Longhorn Engine
Longhorn Manager 升級(jí)后,Longhorn Engine 也需要使用 Longhorn UI 進(jìn)行升級(jí)。
3. 自動(dòng)升級(jí) Longhorn Engine
從 Longhorn v1.1.1 開(kāi)始,我們提供了一個(gè)選項(xiàng)來(lái)幫助您自動(dòng)升級(jí)引擎。
Note:
Longhorn v1.1.0和v1.1.1中提供的實(shí)例管理器鏡像v1_20201216中存在一個(gè)錯(cuò)誤, 該錯(cuò)誤可能導(dǎo)致具有數(shù)百個(gè)卷的大集群中的死鎖(deadlock)。在longhorn/issues/2697查看更多詳細(xì)信息。Longhorn v1.1.2附帶一個(gè)新的實(shí)例管理器鏡像v1_20210621,它修復(fù)了死鎖, 但卷的引擎(engine)/副本(replica)進(jìn)程不會(huì)從舊的實(shí)例管理器遷移到新的實(shí)例管理器, 直到下一次分離(detached)/附加(attached)卷。Longhorn這樣做是因?yàn)槲覀儾幌胫袛嗑淼臄?shù)據(jù)平面。如果您在舊實(shí)例管理器中遇到死鎖,請(qǐng)按照issues/2697#issuecomment-879374809的恢復(fù)步驟操作
升級(jí) Longhorn Manager
從 v1.1.x 升級(jí)
我們只支持從 v1.1.x 升級(jí)到 v1.1.2。其他版本請(qǐng)先升級(jí)到 v1.1.x。
支持從 v1.1.x 到 v1.1.2 的 Engine 實(shí)時(shí)升級(jí)。
對(duì)于 Longhorn 作為 Rancher app 安裝時(shí)的 airgap 升級(jí),您需要修改鏡像名稱(chēng)并刪除 registry URL 部分。
例如,Longhorn images 部分中的鏡像 registry.example.com/longhorn/longhorn-manager:v1.1.2 更改為 longhorn/longhorn-manager:v1.1.2。
準(zhǔn)備升級(jí)
如果 Longhorn 是使用 Helm Chart 安裝的,或者是作為 Rancher catalog app 安裝的, 請(qǐng)檢查以確保默認(rèn) StorageClass 中的參數(shù)未更改。更改默認(rèn) StorageClass 的參數(shù)可能會(huì)導(dǎo)致 chart 升級(jí)失敗。如果要重新配置 StorageClass 中的參數(shù),可以復(fù)制默認(rèn) StorageClass 的配置以創(chuàng)建另一個(gè) StorageClass。
The current default StorageClass has the following parameters:

    parameters:
      numberOfReplicas: <user specified replica count, 3 by default>
      staleReplicaTimeout: "30"
      fromBackup: ""
      baseImage: ""
升級(jí)
先決條件: 始終在升級(jí)前備份卷。如果出現(xiàn)任何問(wèn)題,您可以使用備份恢復(fù)卷。
要使用 kubectl 升級(jí),請(qǐng)運(yùn)行以下命令:
kubectl apply -f https://raw.githubusercontent.com/longhorn/longhorn/v1.1.2/deploy/longhorn.yaml
要使用 Helm 升級(jí),請(qǐng)運(yùn)行以下命令:
helm upgrade longhorn ./longhorn/chart
在 Rancher 2.1 或更新版本管理的 Kubernetes 集群上,升級(jí) catalog app longhorn-system 的步驟與安裝步驟類(lèi)似。
然后等待所有 pod 開(kāi)始運(yùn)行并且 Longhorn UI 工作。例如:
$ kubectl -n longhorn-system get pod
NAME                                        READY   STATUS    RESTARTS   AGE
csi-attacher-78bf9b9898-mb7jt               1/1     Running   1          3m11s
csi-attacher-78bf9b9898-n2224               1/1     Running   1          3m11s
csi-attacher-78bf9b9898-rhv6m               1/1     Running   1          3m11s
csi-provisioner-8599d5bf97-dr5n4            1/1     Running   1          2m58s
csi-provisioner-8599d5bf97-drzn9            1/1     Running   1          2m58s
csi-provisioner-8599d5bf97-rz5fj            1/1     Running   1          2m58s
csi-resizer-586665f745-5bkcm                1/1     Running   0          2m49s
csi-resizer-586665f745-vgqx8                1/1     Running   0          2m49s
csi-resizer-586665f745-wdvdg                1/1     Running   0          2m49s
engine-image-ei-62c02f63-bjfkp              1/1     Running   0          14m
engine-image-ei-62c02f63-nk2jr              1/1     Running   0          14m
engine-image-ei-62c02f63-pjtgg              1/1     Running   0          14m
engine-image-ei-ac045a0d-9bbb8              1/1     Running   0          3m46s
engine-image-ei-ac045a0d-cqvv2              1/1     Running   0          3m46s
engine-image-ei-ac045a0d-wzmhv              1/1     Running   0          3m46s
instance-manager-e-4deb2a16                 1/1     Running   0          3m23s
instance-manager-e-5526b121                 1/1     Running   0          3m28s
instance-manager-e-eff765b6                 1/1     Running   0          2m59s
instance-manager-r-3b70b0db                 1/1     Running   0          3m27s
instance-manager-r-4f7d629a                 1/1     Running   0          3m22s
instance-manager-r-bbcf4f17                 1/1     Running   0          2m58s
longhorn-csi-plugin-bkgjj                   2/2     Running   0          2m39s
longhorn-csi-plugin-tjhhq                   2/2     Running   0          2m39s
longhorn-csi-plugin-zslp6                   2/2     Running   0          2m39s
longhorn-driver-deployer-75b6bf4d6d-d4hcv   1/1     Running   0          3m57s
longhorn-manager-4j77v                      1/1     Running   0          3m53s
longhorn-manager-cwm5z                      1/1     Running   0          3m50s
longhorn-manager-w7scb                      1/1     Running   0          3m50s
longhorn-ui-8fcd9fdd-qpknp                  1/1     Running   0          3m56s
升級(jí)后
為避免現(xiàn)有卷崩潰,以及從已棄用的設(shè)置 Guaranteed Engine CPU 切換 到 the new instance manager CPU reservation mechanism(預(yù)留機(jī)制), Longhorn 將在升級(jí)期間根據(jù)已棄用的設(shè)置值從每個(gè)節(jié)點(diǎn)自動(dòng)設(shè)置 Engine Manager CPU Request 和 Replica Manager CPU Request。然后,新的全局實(shí)例管理器 CPU 設(shè)置 Guaranteed Engine Manager CPU 和 Guaranteed Replica Manager CPU 將不會(huì)生效。您可能需要檢查新機(jī)制和設(shè)置說(shuō)明,以查看是否需要進(jìn)行任何調(diào)整。
故障排除
Error: "longhorn" is invalid: provisioner: Forbidden: updates to provisioner are forbidden.
這意味著對(duì)默認(rèn)
storageClass進(jìn)行了一些修改,您需要在升級(jí)前清理舊的。要清理已棄用的
StorageClass,請(qǐng)運(yùn)行以下命令:kubectl delete -f https://raw.githubusercontent.com/longhorn/longhorn/v1.1.2/examples/storageclass.yaml
手動(dòng)升級(jí) Longhorn Engine
在本節(jié)中,您將學(xué)習(xí)如何從 Longhorn UI 手動(dòng)升級(jí) Longhorn Engine。
先決條件
在升級(jí) Longhorn engine 鏡像之前,請(qǐng)務(wù)必進(jìn)行備份。
在升級(jí) Longhorn engine 之前升級(jí) Longhorn manager。
Note:
Longhorn v1.1.0和v1.1.1中提供的實(shí)例管理器鏡像v1_20201216中存在一個(gè)錯(cuò)誤, 該錯(cuò)誤可能導(dǎo)致具有數(shù)百個(gè)卷的大集群中的死鎖(deadlock)。在longhorn/issues/2697查看更多詳細(xì)信息。Longhorn v1.1.2附帶一個(gè)新的實(shí)例管理器鏡像v1_20210621,它修復(fù)了死鎖, 但卷的引擎/副本(engine/replica)進(jìn)程不會(huì)從舊的實(shí)例管理器遷移到新的實(shí)例管理器, 直到下一次分離/附加(detached/attached)卷。Longhorn這樣做是因?yàn)槲覀儾幌胫袛嗑淼臄?shù)據(jù)平面。為了減少引擎/副本(
engine/replica)進(jìn)程仍在舊實(shí)例管理器中時(shí)發(fā)生死鎖的機(jī)會(huì),您應(yīng)該小批量升級(jí)卷的引擎,例如,一次升級(jí)2或3個(gè)卷。
離線(xiàn)升級(jí)
如果無(wú)法進(jìn)行實(shí)時(shí)升級(jí),或者卷處于降級(jí)狀態(tài),請(qǐng)執(zhí)行以下步驟:
按照
相關(guān) workloads 的 detach procedure進(jìn)行。使用批量選擇選擇所有卷。單擊批量操作按鈕 Upgrade Engine,在列表中選擇可用的
engine鏡像。這是此版本管理器附帶的默認(rèn)引擎。恢復(fù)所有
workloads。任何不屬于Kubernetes workload的卷都必須從Longhorn UI附加。
實(shí)時(shí)升級(jí)
從 v1.1.x 升級(jí)到 v1.1.2 支持實(shí)時(shí)升級(jí)。
iSCSI 前端不支持實(shí)時(shí)升級(jí)。
實(shí)時(shí)升級(jí)應(yīng)該只對(duì)健康的卷進(jìn)行。
選擇要升級(jí)的卷。
單擊下拉菜單中的
Upgrade Engine。選擇要升級(jí)到的
engine鏡像。通常它是列表中唯一的
engine鏡像,因?yàn)?nbsp;UI從列表中排除當(dāng)前鏡像。單擊
OK。
在實(shí)時(shí)升級(jí)期間,用戶(hù)會(huì)暫時(shí)看到雙倍數(shù)量的副本(replicas)。升級(jí)完成后,用戶(hù)應(yīng)該看到與之前相同數(shù)量的副本(replicas),并且應(yīng)該更新卷的 Engine Image 字段。
請(qǐng)注意,實(shí)時(shí)升級(jí)后,Rancher 或 Kubernetes 仍會(huì)顯示 engine 的舊版本鏡像和副本(replicas)的新版本。這是預(yù)期的。如果您在 Volume Detail 頁(yè)面中看到新版本的鏡像列為卷鏡像,則升級(jí)成功。
清理舊鏡像
完成所有鏡像的升級(jí)后,從 Longhorn UI 中選擇 Settings/Engine Image。現(xiàn)在您應(yīng)該能夠刪除非默認(rèn)鏡像。
自動(dòng)升級(jí) Longhorn Engine
從 Longhorn v1.1.1 開(kāi)始,我們提供了一個(gè)選項(xiàng),可以幫助您在升級(jí) Longhorn manager 后自動(dòng)將 Longhorn 卷升級(jí)到新的默認(rèn)引擎版本。此功能減少了升級(jí) Longhorn 時(shí)必須做的手動(dòng)工作量。有一些相關(guān)的概念 此功能如下所示:
1. 每個(gè)節(jié)點(diǎn)限制設(shè)置的并發(fā)自動(dòng)引擎升級(jí)
這是一個(gè)設(shè)置,用于控制在升級(jí) Longhorn manager 后,Longhorn 如何自動(dòng)將卷的引擎升級(jí)到新的默認(rèn)引擎鏡像。此設(shè)置的值指定允許每個(gè)節(jié)點(diǎn)同時(shí)升級(jí)到默認(rèn)引擎鏡像的最大引擎數(shù)量。如果該值為 0,則 Longhorn 不會(huì)自動(dòng)將卷的引擎升級(jí)到默認(rèn)版本。該值越大,引擎升級(jí)過(guò)程完成得越快。
但是,為該設(shè)置提供更大的值會(huì)在引擎升級(jí)過(guò)程中消耗更多節(jié)點(diǎn)的 CPU 和內(nèi)存。我們建議將該值設(shè)置為 3,以便為錯(cuò)誤留出一些空間,但不要因升級(jí)失敗過(guò)多而使系統(tǒng)不堪重負(fù)。
2. Longhorn 在不同體積條件下的行為。
在以下情況下,假設(shè) concurrent automatic engine upgrade per node limit(并發(fā)自動(dòng)引擎升級(jí)每節(jié)點(diǎn)限制)設(shè)置大于 0。
附加卷
如果卷處于附加狀態(tài)并且健康,
Longhorn會(huì)自動(dòng)將卷的引擎實(shí)時(shí)升級(jí)到新的默認(rèn)引擎鏡像。分離卷
Longhorn自動(dòng)對(duì)分離的卷進(jìn)行離線(xiàn)升級(jí)。容災(zāi)卷
Longhorn不會(huì)自動(dòng)將disaster recovery volumes升級(jí)到新的默認(rèn)引擎鏡像,因?yàn)樗鼤?huì)觸發(fā)災(zāi)難恢復(fù)卷的完全恢復(fù)。完全恢復(fù)可能會(huì)影響系統(tǒng)中其他正在運(yùn)行的Longhorn卷的性能。因此,Longhorn由您決定何時(shí)是手動(dòng)升級(jí)災(zāi)難恢復(fù)卷引擎的好時(shí)機(jī)(例如,當(dāng)系統(tǒng)空閑時(shí)或在維護(hù)期間)。但是,當(dāng)您激活容災(zāi)卷時(shí),它會(huì)被激活然后分離。此時(shí),
Longhorn會(huì)自動(dòng)對(duì)卷進(jìn)行脫機(jī)升級(jí),類(lèi)似于分離卷的情況。
3. 如果升級(jí)失敗會(huì)怎樣?
如果卷升級(jí)引擎失敗,卷 spec 中的引擎鏡像將保持與卷狀態(tài)中的引擎鏡像不同。Longhorn 將不斷重試升級(jí),直到成功。
如果每個(gè)節(jié)點(diǎn)無(wú)法升級(jí)的卷太多(即超過(guò) concurrent automatic engine upgrade per node limit(每個(gè)節(jié)點(diǎn)的并發(fā)自動(dòng)引擎升級(jí)限制)設(shè)置),Longhorn 將停止升級(jí)該節(jié)點(diǎn)上的卷。
卸載 Longhorn
在本節(jié)中,您將學(xué)習(xí)如何卸載 Longhorn。
先決條件
從 Rancher UI 卸載 Longhorn
使用 Helm 卸載 Longhorn
使用 kubectl 卸載 Longhorn
故障排除
先決條件
為了防止對(duì) Kubernetes 集群造成損壞, 我們建議刪除所有使用 Longhorn 卷(PersistentVolume、PersistentVolumeClaim、StorageClass、Deployment、StatefulSet、DaemonSet 等)的 Kubernetes 工作負(fù)載。
從 Rancher UI 卸載 Longhorn
從 Rancher UI,導(dǎo)航到 Catalog Apps 選項(xiàng)卡并刪除 Longhorn app。
使用 Helm 卸載 Longhorn
運(yùn)行此命令:
helm uninstall longhorn -n longhorn-system
使用 kubectl 卸載 Longhorn
創(chuàng)建卸載
job以從系統(tǒng)中清除CRDs并等待成功:kubectl create -f https://raw.githubusercontent.com/longhorn/longhorn/v1.1.2/uninstall/uninstall.yaml
kubectl get job/longhorn-uninstall -n default -w示例輸出:
$ kubectl create -f https://raw.githubusercontent.com/longhorn/longhorn/v1.1.2/uninstall/uninstall.yaml
serviceaccount/longhorn-uninstall-service-account created
clusterrole.rbac.authorization.k8s.io/longhorn-uninstall-role created
clusterrolebinding.rbac.authorization.k8s.io/longhorn-uninstall-bind created
job.batch/longhorn-uninstall created

$ kubectl get job/longhorn-uninstall -n default -w
NAME                 COMPLETIONS   DURATION   AGE
longhorn-uninstall   0/1           3s         3s
longhorn-uninstall   1/1           20s        20s
^C
刪除剩余的組件:
kubectl delete -f https://raw.githubusercontent.com/longhorn/longhorn/v1.1.2/deploy/longhorn.yaml
kubectl delete -f https://raw.githubusercontent.com/longhorn/longhorn/v1.1.2/uninstall/uninstall.yaml
Tip: 如果您先嘗試
kubectl delete -f https://raw.githubusercontent.com/longhorn/longhorn/v{{< current-version >}}/deploy/longhorn.yaml并卡在那里,請(qǐng)按Ctrl C然后運(yùn)行kubectl create -f https://raw.githubusercontent.com/longhorn/longhorn/v{{< current-version >}}/uninstall/uninstall.yaml也可以幫你移除Longhorn。最后,不要忘記清理剩余的組件。
故障排除
我從 Rancher UI 中刪除了 Longhorn 應(yīng)用程序,而不是按照卸載程序進(jìn)行操作
重新部署(相同版本)Longhorn App。按照上面的卸載程序進(jìn)行操作。
CRDs 的問(wèn)題
如果您的 CRD 實(shí)例或 CRD 本身由于某種原因無(wú)法刪除,請(qǐng)運(yùn)行以下命令進(jìn)行清理。注意:這將清除所有 Longhorn 狀態(tài)!
# Delete CRD finalizers, instances and definitions
for crd in $(kubectl get crd -o jsonpath={.items[*].metadata.name} | tr ' ' '\n' | grep longhorn.rancher.io); do
  kubectl -n ${NAMESPACE} get $crd -o yaml | sed "s/\- longhorn.rancher.io//g" | kubectl apply -f -
  kubectl -n ${NAMESPACE} delete $crd --all
  kubectl delete crd/$crd
done
卷可以從 UI 附加/分離,但 Kubernetes Pod/StatefulSet 等不能使用它
檢查卷插件目錄是否設(shè)置正確。除非用戶(hù)明確設(shè)置,否則會(huì)自動(dòng)檢測(cè)到它。注意:FlexVolume 插件自 Longhorn v0.8.0 起已棄用,不應(yīng)再使用。
默認(rèn)情況下,Kubernetes 使用 /usr/libexec/kubernetes/kubelet-plugins/volume/exec/,如官方文檔所述。
一些供應(yīng)商出于各種原因選擇更改目錄。例如,GKE 使用 /home/kubernetes/flexvolume 代替。
用戶(hù)可以通過(guò)在主機(jī)上運(yùn)行 ps aux|grep kubelet 并檢查 --volume-plugin-dir 參數(shù)來(lái)找到正確的目錄。如果沒(méi)有,將使用默認(rèn)的 /usr/libexec/kubernetes/kubelet-plugins/volume/exec/。