
公司用了 6 年的Spring Boot 部署方案!打包 + Shell 腳本詳解,穩(wěn)的一批!

本篇和大家分享的是springboot打包并結(jié)合shell腳本命令部署,重點在分享一個shell程序啟動工具,希望能便利工作;
profiles指定不同環(huán)境的配置 maven-assembly-plugin打發(fā)布壓縮包 分享shenniu_publish.sh程序啟動工具 linux上使用shenniu_publish.sh啟動程序
profiles指定不同環(huán)境的配置
通常一套程序分為了很多個部署環(huán)境:開發(fā),測試,uat,線上 等,我們要想對這些環(huán)境區(qū)分配置文件,可以通過兩種方式:
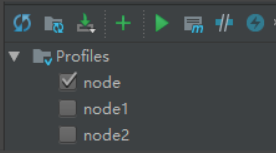
通過application.yml中編碼指定 profile.active=uat 方式指定 通過mvn中profiles來區(qū)分不同環(huán)境對應(yīng)的配置文件夾,人工可以手動在idea勾選生成不同環(huán)境的包(推薦)
這里我們要講的是第二種,首先在mvn中配置如下內(nèi)容:
<profiles>
????<profile>
????????<id>nodeid>
????????<properties>
????????????
????????????<activeProfile>nodeactiveProfile>
????????????<package-name>${scripts_packageName}package-name>
????????????<boot-main>${scripts_bootMain}boot-main>
????????properties>
????????<activation>
????????????<activeByDefault>trueactiveByDefault>
????????activation>
????profile>
????<profile>
????????<id>node1id>
????????<properties>
????????????<activeProfile>node1activeProfile>
????????????<package-name>${scripts_packageName}package-name>
????????????<boot-main>${scripts_bootMain}boot-main>
????????properties>
????profile>
????<profile>
????????<id>node2id>
????????<properties>
????????????<activeProfile>node2activeProfile>
????????????<package-name>${scripts_packageName}package-name>
????????????<boot-main>${scripts_bootMain}boot-main>
????????properties>
????profile>
profiles>
節(jié)點粗解:
id:用來指定不同環(huán)境配置文件所在的目錄,如下我這里:
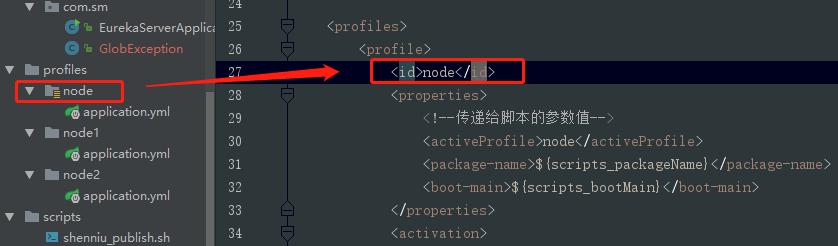
properties:該節(jié)點中的節(jié)點是可作為參數(shù)傳遞給其他配置文件,如我這里的package-name節(jié)點值就可以在另外的assembly.xml或者shell腳本文件中通過${package-name}獲取到,如下:

activeByDefault:指定默認環(huán)境配置文件夾
maven-assembly-plugin打發(fā)布壓縮包
對于springboot程序打包,可以分為jar和war,這里是jar包;有場景是咋們配置文件或者第三方等依賴包不想放到工程jar中,并且把這些文件壓縮成一個zip包,方便上傳到linux;此時通過maven-assembly-plugin和maven-jar-plugin就可以做到,mvn的配置如:
plugin>
????<groupId>org.apache.maven.pluginsgroupId>
????<artifactId>maven-jar-pluginartifactId>
????<version>2.6version>
????<configuration>
????????<archive>
????????????<addMavenDescriptor>falseaddMavenDescriptor>
????????????<manifest>
????????????????<addClasspath>trueaddClasspath>
????????????????<classpathPrefix>lib/classpathPrefix>
????????????????<mainClass>${scripts_bootMain}mainClass>
????????????manifest>
????????archive>
????????
????????<excludes>
????????????<exclude>**/*.ymlexclude>
????????????<exclude>**/*.propertiesexclude>
????????????<exclude>**/*.xmlexclude>
????????????<exclude>**/*.shexclude>
????????excludes>
????configuration>
????<executions>
????????<execution>
????????????<id>make-a-jarid>
????????????<phase>compilephase>
????????????<goals>
????????????????<goal>jargoal>
????????????goals>
????????execution>
????executions>
plugin>

<plugin>
????<groupId>org.apache.maven.pluginsgroupId>
????<artifactId>maven-assembly-pluginartifactId>
????<version>2.4version>
????
????<configuration>
????????
????????<descriptors>
????????????<descriptor>${project.basedir}/src/main/assembly/assembly.xmldescriptor>
????????descriptors>
????configuration>
????<executions>
????????<execution>
????????????<id>make-assemblyid>
????????????<phase>packagephase>
????????????<goals>
????????????????<goal>singlegoal>
????????????goals>
????????execution>
????executions>
plugin>
值得注意的地方如下幾點:
mainClass節(jié)點:用來指定啟動main函數(shù)入口類路徑,如這里的:com.sm.EurekaServerApplication excludes節(jié)點:排除主jar包中配置等一些列后綴文件,因為我們要包這些配置文件放到主包外面 descriptor節(jié)點:用來指定assembly插件對應(yīng)的assembly.xml配置文件
有了上面mvn配置,我們還需要assembly.xml的配置,這里提取了結(jié)合shell腳本發(fā)布程序的配置:
<assembly?xmlns="http://maven.apache.org/ASSEMBLY/2.0.0"?xmlns:xsi="http://www.w3.org/2001/XMLSchema-instance"
??????????xsi:schemaLocation="http://maven.apache.org/ASSEMBLY/2.0.0?http://maven.apache.org/xsd/assembly-2.0.0.xsd
http://maven.apache.org/ASSEMBLY/2.0.0?">
????<id>${activeProfile}id>
????
????<formats>
????????<format>zipformat>
????formats>
????
????<includeBaseDirectory>falseincludeBaseDirectory>
????<dependencySets>
????????<dependencySet>
????????????
????????????<useProjectArtifact>falseuseProjectArtifact>
????????????<outputDirectory>${package-name}-${activeProfile}/liboutputDirectory>
????????????<unpack>falseunpack>
????????dependencySet>
????dependencySets>

????<fileSets>
????????
????????<fileSet>
????????????<directory>${project.basedir}/src/main/profiles/${activeProfile}directory>
????????????<outputDirectory>${package-name}-${activeProfile}/confoutputDirectory>
????????????<includes>
????????????????<include>**/*include>
????????????????
????????????????
????????????????
????????????includes>
????????fileSet>

????????
????????<fileSet>
????????????<directory>${project.basedir}/src/main/scriptsdirectory>
????????????<outputDirectory>outputDirectory>
????????????<includes>
????????????????<include>**/*include>
????????????includes>
????????????
????????????<fileMode>777fileMode>
????????????
????????????<directoryMode>777directoryMode>
????????????
????????????<filtered>truefiltered>
????????fileSet>

????????
????????<fileSet>
????????????<directory>${project.build.directory}directory>
????????????<outputDirectory>${package-name}-${activeProfile}/outputDirectory>
????????????<includes>
????????????????<include>*.jarinclude>
????????????includes>
????????fileSet>
????fileSets>
assembly>
重點節(jié)點介紹:
formats節(jié)點:把配置文件和jar包等壓縮成什么文件格式,這里可以有:zip,tar等 fileMode節(jié)點:指定scripts目錄下腳本文件(這里是:shenniu_publish.sh)在linux上文件權(quán)限為777 filtered節(jié)點:腳本中參數(shù)變量為pom的profiles中properties的值(該配置,是把mvn中屬性值映射生成到sh文件中,如:${package-name})
完成上面配置后,此時我們可以通過idea上勾選切換不同環(huán)境來打zip包,如圖:
分享shenniu_publish.sh程序啟動工具
上面步驟完成了zip格式的發(fā)布包,我們再分享下啟動程序的shell腳本,該腳本具有的功能如:
解壓zip+啟動jar包 啟動jar包 停止對應(yīng)jar運行 重啟jar程序
目前該shell中封裝了兩種啟動jar命令的方式:
java -cp java -jar
如圖命令格式:

來看全部的shell代碼:
?#!/usr/bin/env?bash
?#可變參數(shù)變量
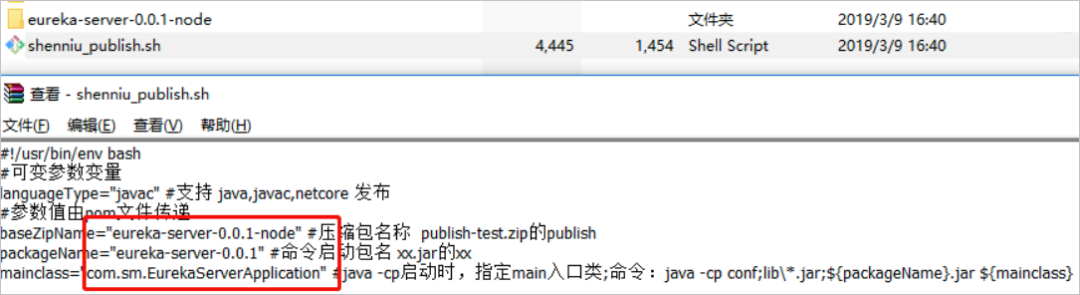
?languageType="javac"?#支持?java,javac,netcore?發(fā)布
?#參數(shù)值由pom文件傳遞
?baseZipName="${package-name}-${activeProfile}"?#壓縮包名稱??publish-test.zip的publish
?packageName="${package-name}"?#命令啟動包名?xx.jar的xx
?mainclass="${boot-main}"?#java -cp啟動時,指定main入口類;命令:java -cp conf;lib\*.jar;${packageName}.jar ${mainclass}
?
?#例子
?#?baseZipName="publish-test"?#壓縮包名稱??publish-test.zip的publish
?#?packageName="publish"?#命令啟動包名?publish.jar的xx
?
?#固定變量
?basePath=$(cd?`dirname?$0`/;?pwd)
?baseZipPath="${basePath}/${baseZipName}.zip"??#壓縮包路徑
?baseDirPath="${basePath}"?#解壓部署磁盤路徑
?pid=?#進程pid
?
?#解壓
?function?shenniu_unzip()
?{
?????echo?"解壓---------------------------------------------"
???? echo "壓縮包路徑:${baseZipPath}"
?????if?[?!?`find?${baseZipPath}`?]
?????then
???????? echo "不存在壓縮包:${baseZipPath}"
?????else
???????? echo "解壓磁盤路徑:${baseDirPath}/${baseZipName}"
?????????echo?"開始解壓..."
?
?????????#解壓命令
?????????unzip?-od?${baseDirPath}/${baseZipName}?${baseZipPath}
?
?????????#設(shè)置執(zhí)行權(quán)限
?????????chmod?+x?${baseDirPath}/${baseZipName}/${packageName}
?
???????? echo "解壓完成。"??
?????fi
?}
?
?#檢測pid
?function?getPid()
?{
?????echo?"檢測狀態(tài)---------------------------------------------"
?????pid=`ps?-ef?|?grep?-n?${packageName}?|?grep?-v?grep?|?awk?'{print?$2}'`
?????if?[?${pid}?]?
?????then
???????? echo "運行pid:${pid}"
?????else
?????????echo?"未運行"
?????fi
?}
?
?#啟動程序
?function?start()
?{
?????#啟動前,先停止之前的
?????stop
?????if?[?${pid}?]
?????then
?????????echo?"停止程序失敗,無法啟動"
?????else
?????????echo?"啟動程序---------------------------------------------"
?????????
?????????#選擇語言類型
???????? read -p "輸入程序類型(java,javac,netcore),下一步按回車鍵(默認:${languageType}):" read_languageType
?????????if?[?${read_languageType}?]
?????????then
?????????????languageType=${read_languageType}
?????????fi
???????? echo "選擇程序類型:${languageType}"
?
?????????#進入運行包目錄
?????????cd?${baseDirPath}/${baseZipName}
?
?????????#分類啟動
?????????if?[?"${languageType}"?==?"javac"?]?
?????????then
?????????????if?[?${mainclass}?]?
?????????????then
?????????????????nohup?java?-cp?conf:lib\*.jar:${packageName}.jar?${mainclass}?>${baseDirPath}/${packageName}.out?2>&1?&
????????????????#nohup?java?-cp?conf:lib\*.jar:${packageName}.jar?${mainclass}?>/dev/null?2>&1?&
?????????????fi
?????????elif?[?"${languageType}"?==?"java"?]?
?????????then
?????????????nohup?java?-jar?${baseDirPath}/${baseZipName}/${packageName}.jar?>/dev/null?2>&1?&
?????????????#?java?-jar?${baseDirPath}/${baseZipName}/${packageName}.jar
?????????elif?[?"${languageType}"?==?"netcore"?]?
?????????then
?????????????#nohup?dotnet?run?${baseDirPath}/${baseZipName}/${packageName}?>/dev/null?2>&1?&
?????????????nohup?${baseDirPath}/${baseZipName}/${packageName}?>/dev/null?2>&1?&
?????????fi
?
?????????#查詢是否有啟動進程
?????????getPid
?????????if?[?${pid}?]
?????????then
?????????????echo?"已啟動"
?????????????#nohup日志
?????????????tail?-n?50?-f?${baseDirPath}/${packageName}.out
?????????else
?????????????echo?"啟動失敗"
?????????fi
?????fi
?}
?
?#停止程序
?function?stop()
?{
?????getPid
?????if?[?${pid}?]?
?????then
?????????echo?"停止程序---------------------------------------------"
?????????kill?-9?${pid}
?????????
?????????getPid
?????????if?[?${pid}?]?
?????????then
?????????????#stop
?????????????echo?"停止失敗"
?????????else
?????????????echo?"停止成功"
?????????fi
?????fi
?}
?
?#啟動時帶參數(shù),根據(jù)參數(shù)執(zhí)行
?if?[?${#}?-ge?1?]?
?then
?????case?${1}?in
?????????"start")?
?????????????start
?????????;;
?????????"restart")?
?????????????start
?????????;;
?????????"stop")?
?????????????stop
?????????;;
?????????"unzip")?
?????????????#執(zhí)行解壓
?????????????shenniu_unzip
?????????????#執(zhí)行啟動
?????????????start
?????????;;
?????????*)?
?????????????echo?"${1}無任何操作"
?????????;;
?????esac
?else
?????echo?"
???? command如下命令:
???? unzip:解壓并啟動
???? start:啟動
???? stop:停止進程
???? restart:重啟
?
?????示例命令如:./shenniu_publish start
?????"
?fi
正如上面小節(jié)說的,shell中的參數(shù) package-name,activeProfile,boot-main 都是由mvn中profiles的properties中提供,是可變的參數(shù),腳本代碼本身不需要人工去修改,只需要變的是mvn的參數(shù)即可;其實在我們生成zip包的時候,shell中的參數(shù)就被替換了,可以看zip中shell文件內(nèi)容如:
linux上使用shenniu_publish.sh啟動程序
把生成的zip上傳到linux上,通過命令解壓:
unzip?-od?eureka-server-0.0.1-node?eureka-server-0.0.1-node.zip
其實shell腳本中包含有解壓命令,但是我在打包時放在了zip中,所以只能通過手動解壓了,當(dāng)然可以調(diào)整;此時進入加壓目錄如此:

注:這里第一次執(zhí)行./shenniu_publish.sh腳本時候,提示了錯誤信息;是由于我是在windows上編輯的這個腳本,其空格等和linux上不一樣,所以運行會有問題,要解決可以使用vim命令在linux把該文件轉(zhuǎn)成linux格式,如下命令:
vim?shenniu_publish.sh
set?ff=unix
:wq
執(zhí)行完后,再來運行腳本./shenniu_publish.sh,此時有如下提示:
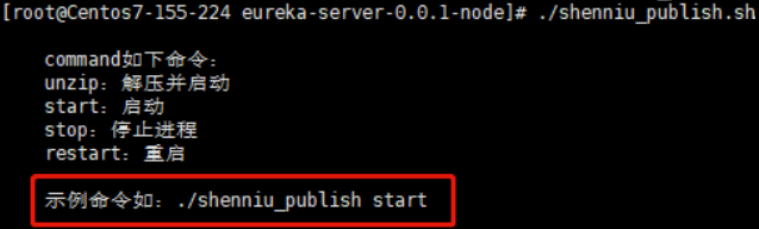
此刻我們文件是解壓狀態(tài),因此只需要start命令啟動程序即可:
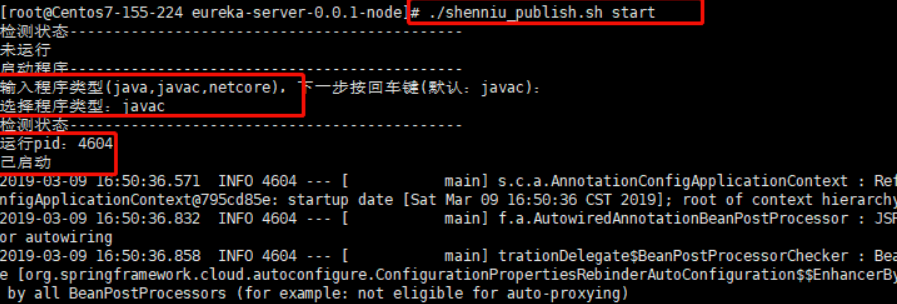
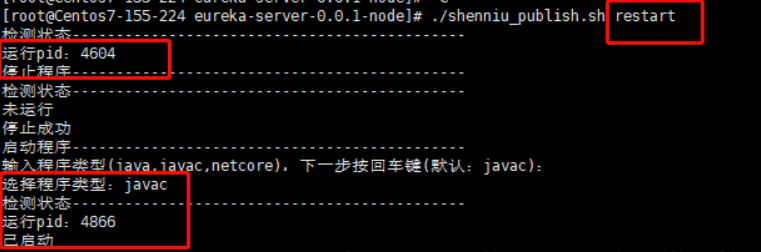
到這里shenniu_publish.sh腳本使用就完成了,只要腳本沒有提示錯誤,基本都能啟動jar服務(wù);其他restart和stop命令也如此執(zhí)行就行:
可以去研究下shell代碼,希望該腳本能給你帶來效率和好的學(xué)習(xí)思路,下面是測試用例git地址,腳本在eureka-server項目中:http://dw-z.ink/0Ug54