
Android仿美團(tuán)滑動(dòng)標(biāo)題欄漸變效果
最近公司的項(xiàng)目剛好需要這個(gè)效果,雖然GitHub上有很多成型的開(kāi)源項(xiàng)目,不過(guò)都附帶了很多其他的東西,為了這個(gè)效果去引用一個(gè)第三方庫(kù)明顯不合適,所以就決定自力更生了。
其實(shí)在日常軟件中還是挺常見(jiàn)的,比如帶Banner廣告圖的首頁(yè)或者是帶頭部的個(gè)人中心,下面是美團(tuán)的實(shí)現(xiàn)效果:

實(shí)現(xiàn)思路:
看下美團(tuán)的效果圖,其實(shí)就可以很明顯的發(fā)現(xiàn)頭部(標(biāo)題欄+狀態(tài)欄)其實(shí)是沒(méi)有動(dòng)的,只是一開(kāi)始呈透明裝,然后隨著內(nèi)容的向上滑動(dòng)在某個(gè)坐標(biāo)點(diǎn)開(kāi)始漸變顏色。
基于這樣的思考,我們把代碼實(shí)現(xiàn)拆分3點(diǎn):
1、整體界面是個(gè)ScrollView,并且我們需要對(duì)滑動(dòng)進(jìn)行監(jiān)聽(tīng)
2、確定坐標(biāo)點(diǎn),在什么時(shí)候開(kāi)始變色,在什么時(shí)候停止變色
3、需要將狀態(tài)欄透明化,并且讓我們的內(nèi)容區(qū)域可以擴(kuò)展到狀態(tài)欄
好了,理清思路,我們就可以開(kāi)始干活了!
先看下我們實(shí)現(xiàn)的效果:

ObservableScrollView的實(shí)現(xiàn)
雖然谷歌官方給ScrollView提供了一個(gè)設(shè)置滑動(dòng)監(jiān)聽(tīng)方法setOnScrollChangeListener,不過(guò)這個(gè)方法需要基于API23之上(Android6.0系統(tǒng)),在日常開(kāi)發(fā)中,我們需要對(duì)老系統(tǒng)用戶進(jìn)行兼容(當(dāng)前兼容版本為Android4.1系統(tǒng)以上),所以這里我們需要去繼承ScrollView并把這個(gè)監(jiān)聽(tīng)事件通過(guò)接口的方式對(duì)外暴露,這里把這個(gè)View取名為ObservableScrollView。
/**?*?重寫(xiě)ScrollView對(duì)外拋出滑動(dòng)監(jiān)聽(tīng)數(shù)據(jù)*/public class ObservableScrollView extends ScrollView {/*** 回調(diào)接口監(jiān)聽(tīng)事件*/private OnObservableScrollViewListener mOnObservableScrollViewListener;public ObservableScrollView(Context context) {super(context);}public ObservableScrollView(Context context, AttributeSet attrs) {super(context, attrs);}public ObservableScrollView(Context context, AttributeSet attrs, int defStyleAttr) {super(context, attrs, defStyleAttr);}/*** 添加回調(diào)接口,便于把滑動(dòng)事件的數(shù)據(jù)向外拋*/public interface OnObservableScrollViewListener {void onObservableScrollViewListener(int l, int t, int oldl, int oldt);}/*** 注冊(cè)回調(diào)接口監(jiān)聽(tīng)事件** @param onObservableScrollViewListener*/public void setOnObservableScrollViewListener(OnObservableScrollViewListener onObservableScrollViewListener) {this.mOnObservableScrollViewListener = onObservableScrollViewListener;}/*** This is called in response to an internal scroll in this view (i.e., the* view scrolled its own contents). This is typically as a result of* {@link #scrollBy(int, int)} or {@link #scrollTo(int, int)} having been* called.** @param l Current horizontal scroll origin. 當(dāng)前滑動(dòng)的x軸距離* @param t Current vertical scroll origin. 當(dāng)前滑動(dòng)的y軸距離* @param oldl Previous horizontal scroll origin. 上一次滑動(dòng)的x軸距離* @param oldt Previous vertical scroll origin. 上一次滑動(dòng)的y軸距離*/@Overrideprotected void onScrollChanged(int l, int t, int oldl, int oldt) {super.onScrollChanged(l, t, oldl, oldt);if (mOnObservableScrollViewListener != null) {//將監(jiān)聽(tīng)到的數(shù)據(jù)向外拋mOnObservableScrollViewListener.onObservableScrollViewListener(l, t, oldl, oldt);}}}
開(kāi)始變色的坐標(biāo)點(diǎn)
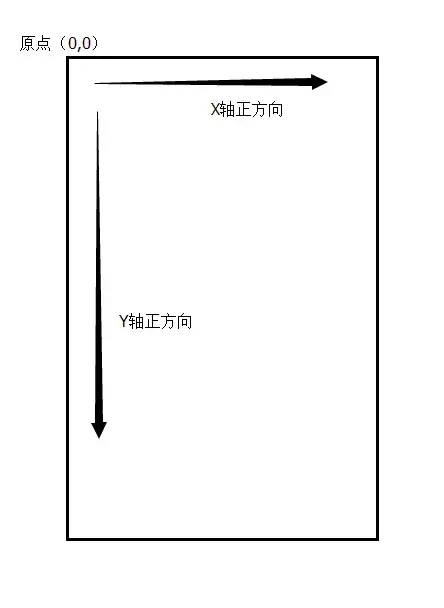
首先我們需要先了解Android系統(tǒng)的坐標(biāo)軸,這里不像我們以前學(xué)數(shù)學(xué)的坐標(biāo)軸一樣,在中心建軸,以中心向上和右為正方向,向下和左為負(fù)方向。
在Android系統(tǒng)里是以屏幕的左上角為原點(diǎn)(0,0),向右為X正軸,向下為Y正軸。
知道了坐標(biāo)系,我們?cè)賮?lái)分解下效果圖:

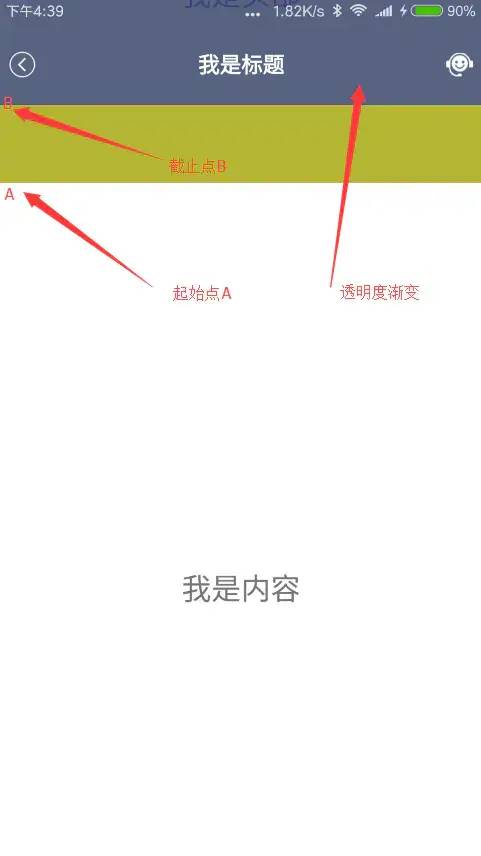

一開(kāi)始標(biāo)題欄和狀態(tài)欄呈透明色,隨著頁(yè)面的向上滑動(dòng)標(biāo)題欄和狀態(tài)欄開(kāi)始變色,當(dāng)A點(diǎn)達(dá)到B點(diǎn)的時(shí)候完成顏色的完整變化,這里我們只需要測(cè)量出A點(diǎn)到B點(diǎn)的距離,然后跟ScrollView所監(jiān)聽(tīng)到的滑動(dòng)距離相比對(duì)并作出相對(duì)應(yīng)的顏色變化,這樣就可以了,其中的A點(diǎn)到頂部的距離和B點(diǎn)到頂部的距離,我們可以通過(guò)ViewTreeObserver得到對(duì)應(yīng)的高度,然后相減即可。
實(shí)現(xiàn)代碼:
/**?*?高仿美團(tuán)APP頁(yè)面滑動(dòng)標(biāo)題欄漸變效果*/public class MainActivity extends AppCompatActivity implements ObservableScrollView.OnObservableScrollViewListener {private ObservableScrollView mObservableScrollView;private TextView mImageView;private LinearLayout mHeaderContent;private int mHeight;@Overrideprotected void onCreate(Bundle savedInstanceState) {super.onCreate(savedInstanceState);//設(shè)置透明狀態(tài)欄StatusbarUtils.enableTranslucentStatusbar(this);setContentView(R.layout.activity_main);//初始化控件mObservableScrollView = (ObservableScrollView) findViewById(R.id.sv_main_content);mImageView = (TextView) findViewById(R.id.iv_main_topImg);mHeaderContent = (LinearLayout) findViewById(R.id.ll_header_content);//獲取標(biāo)題欄高度ViewTreeObserver viewTreeObserver = mImageView.getViewTreeObserver();viewTreeObserver.addOnGlobalLayoutListener(new ViewTreeObserver.OnGlobalLayoutListener() {@Overridepublic void onGlobalLayout() {mImageView.getViewTreeObserver().removeOnGlobalLayoutListener(this);mHeight = mImageView.getHeight() - mHeaderContent.getHeight();//這里取的高度應(yīng)該為圖片的高度-標(biāo)題欄//注冊(cè)滑動(dòng)監(jiān)聽(tīng)mObservableScrollView.setOnObservableScrollViewListener(MainActivity.this);}});}/*** 獲取ObservableScrollView的滑動(dòng)數(shù)據(jù)** @param l* @param t* @param oldl* @param oldt*/@Overridepublic void onObservableScrollViewListener(int l, int t, int oldl, int oldt) {if (t <= 0) {//頂部圖處于最頂部,標(biāo)題欄透明mHeaderContent.setBackgroundColor(Color.argb(0, 48, 63, 159));} else if (t > 0 && t < mHeight) {//滑動(dòng)過(guò)程中,漸變float scale = (float) t / mHeight;//算出滑動(dòng)距離比例float alpha = (255 * scale);//得到透明度mHeaderContent.setBackgroundColor(Color.argb((int) alpha, 48, 63, 159));} else {//過(guò)頂部圖區(qū)域,標(biāo)題欄定色mHeaderContent.setBackgroundColor(Color.argb(255, 48, 63, 159));}}}
透明狀態(tài)欄的實(shí)現(xiàn)
關(guān)于透明狀態(tài)欄這個(gè)東西,國(guó)內(nèi)很多人把它叫成沉浸式狀態(tài)欄,有人認(rèn)同有人反對(duì),因?yàn)楣雀韫俜綄?duì)這個(gè)沒(méi)有具體的定義,所以這里我就不發(fā)表看法了,反正我們就是要讓狀態(tài)欄變成透明,然后內(nèi)容區(qū)域可以擴(kuò)展到狀態(tài)欄,這樣就可以了。
1、首先我們需要對(duì)app的風(fēng)格進(jìn)行設(shè)置:
2、再來(lái)我們要對(duì)狀態(tài)欄進(jìn)行透明化處理,其實(shí)這個(gè)東西我們也可以在xml里去做設(shè)置android:windowTranslucentStatus,不過(guò)現(xiàn)在國(guó)產(chǎn)手機(jī)滿天飛的ROM真是無(wú)奈,有些奇葩的機(jī)型是沒(méi)辦法識(shí)別的,所以這里為了更好的兼容,我們可以在代碼里面去實(shí)現(xiàn)。首先,我們需要判斷當(dāng)前的手機(jī)系統(tǒng)版本,4.4以上和5.0以上的處理方法是有區(qū)別的,具體實(shí)現(xiàn)代碼:
/**?*?設(shè)置系統(tǒng)狀態(tài)欄和導(dǎo)航欄透明化*/public class StatusbarUtils {/*** 啟用 透明狀態(tài)欄** @param activity*/public static void enableTranslucentStatusbar(Activity activity) {if (Build.VERSION.SDK_INT >= Build.VERSION_CODES.KITKAT) {Window window = activity.getWindow();window.addFlags(WindowManager.LayoutParams.FLAG_TRANSLUCENT_STATUS);window.addFlags(WindowManager.LayoutParams.FLAG_TRANSLUCENT_NAVIGATION);}if (Build.VERSION.SDK_INT >= Build.VERSION_CODES.LOLLIPOP) {Window window = activity.getWindow();window.clearFlags(WindowManager.LayoutParams.FLAG_TRANSLUCENT_STATUS| WindowManager.LayoutParams.FLAG_TRANSLUCENT_NAVIGATION);window.getDecorView().setSystemUiVisibility(View.SYSTEM_UI_FLAG_LAYOUT_FULLSCREEN| View.SYSTEM_UI_FLAG_LAYOUT_HIDE_NAVIGATION| View.SYSTEM_UI_FLAG_LAYOUT_STABLE);window.addFlags(WindowManager.LayoutParams.FLAG_DRAWS_SYSTEM_BAR_BACKGROUNDS);window.setStatusBarColor(Color.TRANSPARENT);window.setNavigationBarColor(Color.TRANSPARENT);}}}
在4.4以上及5.0以下的系統(tǒng)狀態(tài)欄會(huì)成半透明狀,在5.0及以上的系統(tǒng)可以實(shí)現(xiàn)完全透明。
如果此時(shí)你運(yùn)行了代碼你會(huì)發(fā)現(xiàn),雖然狀態(tài)欄透明化了,但是我們的布局內(nèi)容并沒(méi)有擴(kuò)展到狀態(tài)欄中,這里需要而外的提到一個(gè)屬性fitsSystemWindows它是在Android4.4系統(tǒng)以后引入的,當(dāng)你的內(nèi)容需要顯示在系統(tǒng)作用域中時(shí)(比如頂部狀態(tài)欄,底部導(dǎo)航欄等),此時(shí)你需要在相關(guān)的第一個(gè)View屬性中添加該屬性,并設(shè)置屬性值為true,它會(huì)按照View的排列順序進(jìn)行深度優(yōu)先的作用在View上。
3、實(shí)現(xiàn)了以上的操作后,我們基本上已經(jīng)成功了,此時(shí)你會(huì)發(fā)現(xiàn)你的標(biāo)題欄已經(jīng)可以擴(kuò)展到透明的系統(tǒng)狀態(tài)欄了,不過(guò)此時(shí)你會(huì)發(fā)現(xiàn),狀態(tài)欄離你的標(biāo)題欄太靠近了,如果你想實(shí)現(xiàn)和上面效果圖一樣的效果,只需要在你的標(biāo)題欄添加一個(gè)paddingTop值就可以,一般系統(tǒng)是25dp,當(dāng)然如果你采用代碼動(dòng)態(tài)獲取的方式也是可以的,這樣可以做好更好的適配,畢竟國(guó)內(nèi)各大廠商都有自己的一套標(biāo)準(zhǔn)。
具體實(shí)現(xiàn)代碼:
activity_mian.xml
xmlns:tools="http://schemas.android.com/tools"android:layout_width="match_parent"android:layout_height="match_parent">android:id="@+id/sv_main_content"android:layout_width="match_parent"android:layout_height="match_parent"android:layout_alignParentLeft="true"android:layout_alignParentStart="true"android:layout_alignParentTop="true"android:scrollbars="none">android:layout_width="match_parent"android:layout_height="match_parent"android:orientation="vertical">android:id="@+id/tv_main_topContent"android:layout_width="match_parent"android:layout_height="280dp"android:background="#b5b433"android:gravity="center"android:src="@mipmap/ic_launcher"android:text="我是頭部"android:textSize="22sp" />android:layout_width="match_parent"android:layout_height="600dp"android:background="#ffffff"android:gravity="center"android:src="@mipmap/ic_launcher"android:text="我是內(nèi)容"android:textSize="22sp" />????
include_header_itl.xml
android:id="@+id/ll_header_content"android:layout_width="match_parent"android:layout_height="wrap_content"android:background="#00000000"android:fitsSystemWindows="true"android:orientation="vertical">android:layout_width="match_parent"android:layout_height="80dp"android:orientation="horizontal"android:paddingTop="25dp">android:id="@+id/iv_header_left"android:layout_width="40dp"android:layout_height="match_parent"android:paddingLeft="8dp"android:paddingRight="12dp"android:src="@mipmap/icon_header_back" />android:id="@+id/tv_header_title"android:layout_width="wrap_content"android:layout_height="match_parent"android:layout_centerHorizontal="true"android:ellipsize="end"android:gravity="center"android:maxLines="2"android:text="我是標(biāo)題"android:textColor="#ffffff"android:textSize="16sp"android:textStyle="bold" />android:id="@+id/iv_header_img"android:layout_width="40dp"android:layout_height="match_parent"android:layout_alignParentRight="true"android:layout_gravity="center"android:paddingLeft="12dp"android:paddingRight="8dp"android:src="@mipmap/icon_header_kefu" />
源碼地址:
https://github.com/Lichenwei-Dev/ObservableScrollView
到這里就結(jié)束啦。