
學(xué)習(xí)Nginx這一篇就夠了
點(diǎn)擊“程序員面試吧”,選擇“星標(biāo)??”
“下拉至文末”查看更多


[root@caochenlei ~]# yum install -y gcc gcc-c++ make libtool wget pcre pcre-devel zlib zlib-devel openssl openssl-devel
[root@caochenlei ~]# wget http://nginx.org/download/nginx-1.18.0.tar.gz
[root@caochenlei ~]# tar -zxvf nginx-1.18.0.tar.gz
[root@caochenlei ~]# cd nginx-1.18.0
[root@caochenlei nginx-1.18.0]# ./configure
[root@caochenlei nginx-1.18.0]# make && make install
暴力停止服務(wù):/usr/local/nginx/sbin/nginx -s stop
優(yōu)雅停止服務(wù):/usr/local/nginx/sbin/nginx -s quit
檢查配置文件:/usr/local/nginx/sbin/nginx -t
重新加載配置:/usr/local/nginx/sbin/nginx -s reload
查看相關(guān)進(jìn)程:ps -ef | grep nginx
[root@caochenlei ~]# /sbin/iptables -I INPUT -p tcp --dport 80 -j ACCEPT
[root@caochenlei ~]# /etc/rc.d/init.d/iptables save
iptables:將防火墻規(guī)則保存到 /etc/sysconfig/iptables:[確定]
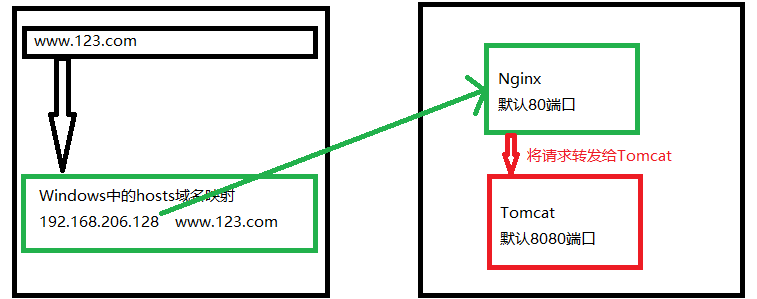
#虛擬機(jī)域名       映射的網(wǎng)址
192.168.206.128 www.123.com
[root@caochenlei ~]# vi /usr/local/nginx/conf/nginx.conf
server {
        listen       80;
        server_name  192.168.206.128;

        #charset koi8-r;

        #access_log  logs/host.access.log  main;

        location / {
            proxy_pass http:127.0.0.1:8080;
            root   html;
            index  index.html index.htm;
        }
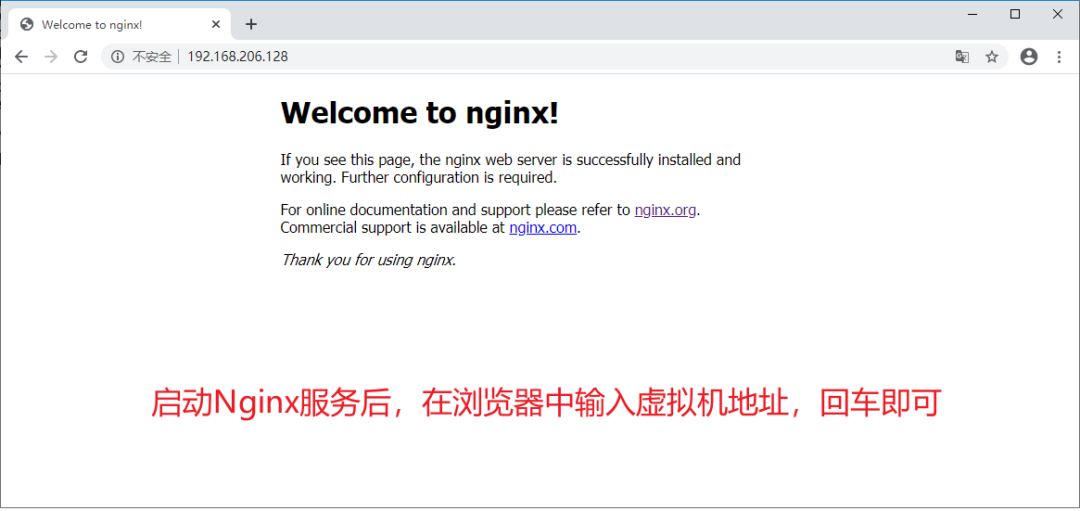
[root@caochenlei ~]# /usr/local/nginx/sbin/nginx
[root@caochenlei ~]# wget https://mirror.bit.edu.cn/apache/tomcat/tomcat-7/v7.0.105/bin/apache-tomcat-7.0.105.tar.gz
[root@caochenlei ~]# tar -zxvf apache-tomcat-7.0.105.tar.gz
[root@caochenlei ~]# mv apache-tomcat-7.0.105 /usr/local/tomcat
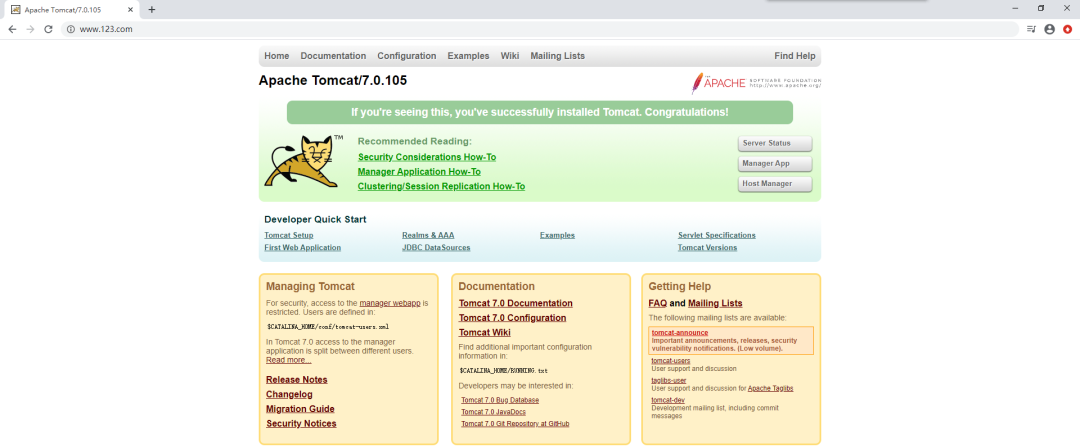
[root@caochenlei ~]# /usr/local/tomcat/bin/startup.sh
[root@caochenlei ~]# /sbin/iptables -I INPUT -p tcp --dport 80 -j ACCEPT
[root@caochenlei ~]# /etc/rc.d/init.d/iptables save
[root@caochenlei ~]# /usr/local/tomcat/bin/shutdown.sh
[root@caochenlei ~]# /usr/local/nginx/sbin/nginx -s quit
[root@caochenlei ~]# /usr/local/tomcat/bin/shutdown.sh
[root@caochenlei ~]# vi /usr/local/nginx/conf/nginx.conf
server {
listen 80;
server_name 192.168.206.128;
#charset koi8-r;
#access_log logs/host.access.log main;
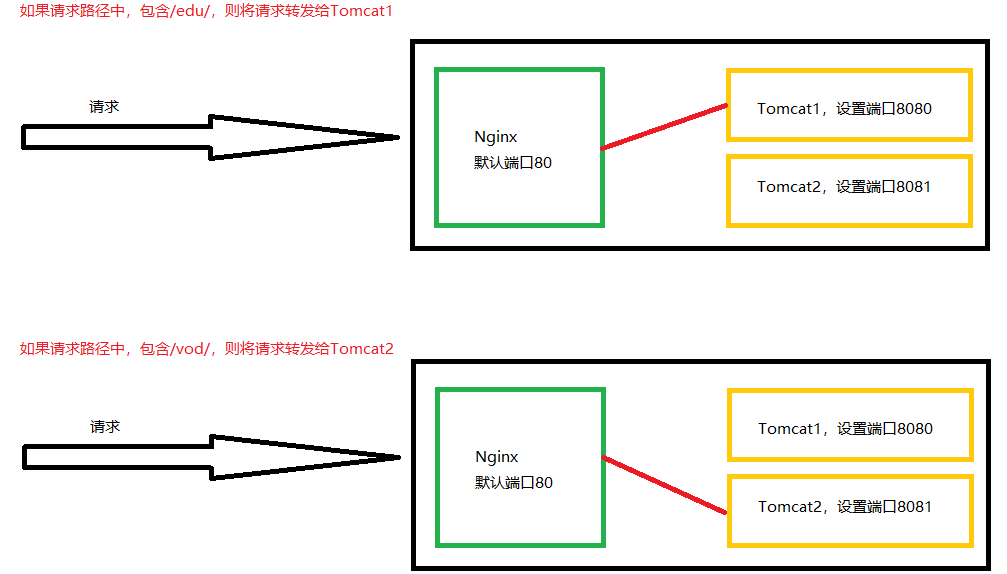
location ~ /edu/ {
proxy_pass http://127.0.0.1:8080;
}
location ~ /vod/ {
proxy_pass http://127.0.0.1:8081;
}
[root@caochenlei ~]# /usr/local/nginx/sbin/nginx
[root@caochenlei ~]# tar -zxvf apache-tomcat-7.0.105.tar.gz
[root@caochenlei ~]# mv apache-tomcat-7.0.105 /usr/local/tomcat1

[root@caochenlei ~]# tar -zxvf apache-tomcat-7.0.105.tar.gz
[root@caochenlei ~]# mv apache-tomcat-7.0.105 /usr/local/tomcat2
[root@caochenlei ~]# rm -f /usr/local/tomcat2/conf/server.xml
[root@caochenlei ~]# vi /usr/local/tomcat2/conf/server.xml
<?xml version='1.0' encoding='utf-8'?>
<!--
Licensed to the Apache Software Foundation (ASF) under one or more
contributor license agreements. See the NOTICE file distributed with
this work for additional information regarding copyright ownership.
The ASF licenses this file to You under the Apache License, Version 2.0
(the "License"); you may not use this file except in compliance with
the License. You may obtain a copy of the License at
http://www.apache.org/licenses/LICENSE-2.0
Unless required by applicable law or agreed to in writing, software
distributed under the License is distributed on an "AS IS" BASIS,
WITHOUT WARRANTIES OR CONDITIONS OF ANY KIND, either express or implied.
See the License for the specific language governing permissions and
limitations under the License.
-->
<!-- Note: A "Server" is not itself a "Container", so you may not
define subcomponents such as "Valves" at this level.
Documentation at /docs/config/server.html
-->
<Server port="8006" shutdown="SHUTDOWN">
<Listener className="org.apache.catalina.startup.VersionLoggerListener" />
<!-- Security listener. Documentation at /docs/config/listeners.html
<Listener className="org.apache.catalina.security.SecurityListener" />
-->
<!--APR library loader. Documentation at /docs/apr.html -->
<Listener className="org.apache.catalina.core.AprLifecycleListener" SSLEngine="on" />
<!--Initialize Jasper prior to webapps are loaded. Documentation at /docs/jasper-howto.html -->
<Listener className="org.apache.catalina.core.JasperListener" />
<!-- Prevent memory leaks due to use of particular java/javax APIs-->
<Listener className="org.apache.catalina.core.JreMemoryLeakPreventionListener" />
<Listener className="org.apache.catalina.mbeans.GlobalResourcesLifecycleListener" />
<Listener className="org.apache.catalina.core.ThreadLocalLeakPreventionListener" />
<!-- Global JNDI resources
Documentation at /docs/jndi-resources-howto.html
-->
<GlobalNamingResources>
<!-- Editable user database that can also be used by
UserDatabaseRealm to authenticate users
-->
<Resource name="UserDatabase" auth="Container"
type="org.apache.catalina.UserDatabase"
description="User database that can be updated and saved"
factory="org.apache.catalina.users.MemoryUserDatabaseFactory"
pathname="conf/tomcat-users.xml" />
</GlobalNamingResources>
<!-- A "Service" is a collection of one or more "Connectors" that share
a single "Container" Note: A "Service" is not itself a "Container",
so you may not define subcomponents such as "Valves" at this level.
Documentation at /docs/config/service.html
-->
<Service name="Catalina">
<!--The connectors can use a shared executor, you can define one or more named thread pools-->
<!--
<Executor name="tomcatThreadPool" namePrefix="catalina-exec-"
maxThreads="150" minSpareThreads="4"/>
-->
<!-- A "Connector" represents an endpoint by which requests are received
and responses are returned. Documentation at :
Java HTTP Connector: /docs/config/http.html (blocking & non-blocking)
Java AJP Connector: /docs/config/ajp.html
APR (HTTP/AJP) Connector: /docs/apr.html
Define a non-SSL HTTP/1.1 Connector on port 8080
-->
<Connector port="8081" protocol="HTTP/1.1"
connectionTimeout="20000"
redirectPort="8444" />
<!-- A "Connector" using the shared thread pool-->
<!--
<Connector executor="tomcatThreadPool"
port="8081" protocol="HTTP/1.1"
connectionTimeout="20000"
redirectPort="8444" />
-->
<!-- Define an SSL HTTP/1.1 Connector on port 8443
This connector uses the BIO implementation that requires the JSSE
style configuration. When using the APR/native implementation, the
OpenSSL style configuration is required as described in the APR/native
documentation -->
<!--
<Connector port="8444" protocol="org.apache.coyote.http11.Http11Protocol"
maxThreads="150" SSLEnabled="true" scheme="https" secure="true"
clientAuth="false" sslProtocol="TLS" />
-->
<!-- Define an AJP 1.3 Connector on port 8009 -->
<!--
<Connector protocol="AJP/1.3"
address="::1"
port="8010"
redirectPort="8444" />
-->
<!-- An Engine represents the entry point (within Catalina) that processes
every request. The Engine implementation for Tomcat stand alone
analyzes the HTTP headers included with the request, and passes them
on to the appropriate Host (virtual host).
Documentation at /docs/config/engine.html -->
<!-- You should set jvmRoute to support load-balancing via AJP ie :
<Engine name="Catalina" defaultHost="localhost" jvmRoute="jvm1">
-->
<Engine name="Catalina" defaultHost="localhost">
<!--For clustering, please take a look at documentation at:
/docs/cluster-howto.html (simple how to)
/docs/config/cluster.html (reference documentation) -->
<!--
<Cluster className="org.apache.catalina.ha.tcp.SimpleTcpCluster"/>
-->
<!-- Use the LockOutRealm to prevent attempts to guess user passwords
via a brute-force attack -->
<Realm className="org.apache.catalina.realm.LockOutRealm">
<!-- This Realm uses the UserDatabase configured in the global JNDI
resources under the key "UserDatabase". Any edits
that are performed against this UserDatabase are immediately
available for use by the Realm. -->
<Realm className="org.apache.catalina.realm.UserDatabaseRealm"
resourceName="UserDatabase"/>
</Realm>
<Host name="localhost" appBase="webapps"
unpackWARs="true" autoDeploy="true">
<!-- SingleSignOn valve, share authentication between web applications
Documentation at: /docs/config/valve.html -->
<!--
<Valve className="org.apache.catalina.authenticator.SingleSignOn" />
-->
<!-- Access log processes all example.
Documentation at: /docs/config/valve.html
Note: The pattern used is equivalent to using pattern="common" -->
<Valve className="org.apache.catalina.valves.AccessLogValve" directory="logs"
prefix="localhost_access_log." suffix=".txt"
pattern="%h %l %u %t "%r" %s %b" />
</Host>
</Engine>
</Service>
</Server>
[root@caochenlei ~]# /sbin/iptables -I INPUT -p tcp --dport 8081 -j ACCEPT
[root@caochenlei ~]# /etc/rc.d/init.d/iptables save
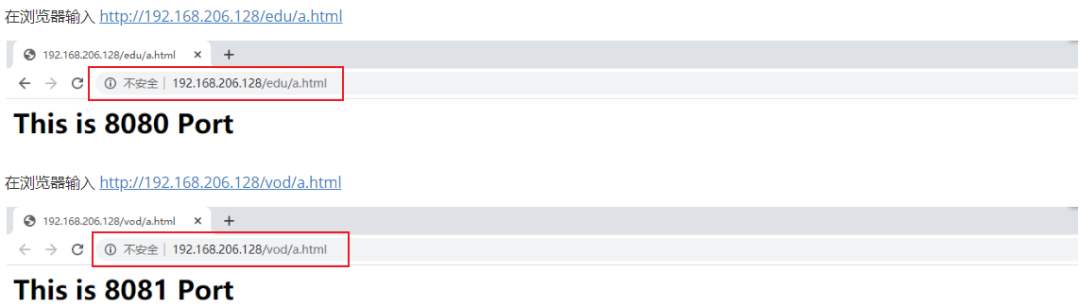
[root@caochenlei ~]# mkdir -p /usr/local/tomcat1/webapps/edu
[root@caochenlei ~]# echo "<h1>This is 8080 Port</h1>" > /usr/local/tomcat1/webapps/edu/a.html

[root@caochenlei ~]# mkdir -p /usr/local/tomcat2/webapps/vod
[root@caochenlei ~]# echo "<h1>This is 8081 Port</h1>" > /usr/local/tomcat2/webapps/vod/a.html
[root@caochenlei ~]# /usr/local/tomcat1/bin/startup.sh
[root@caochenlei ~]# /usr/local/tomcat2/bin/startup.sh


[root@caochenlei ~]# /usr/local/tomcat1/bin/shutdown.sh
[root@caochenlei ~]# /usr/local/tomcat2/bin/shutdown.sh

=:用于不含正則表達(dá)式的uri前,要求請(qǐng)求字符串與uri嚴(yán)格匹配,如果匹配成功,就停止繼續(xù)向下搜索并立即處理該請(qǐng)求。
~:用于表示uri包含正則表達(dá)式,并且區(qū)分大小寫。
~*:用于表示uri包含正則表達(dá)式,并且不區(qū)分大小寫。
^~:用于不含正則表達(dá)式的uri前,要求Nginx服務(wù)器找到標(biāo)識(shí)uri和請(qǐng)求字符串匹配度最高的location后,立即使用此location處理請(qǐng)求,而不再使用location塊中的正則uri和請(qǐng)求字符串做匹配。

[root@caochenlei ~]# vi /usr/local/nginx/conf/nginx.conf
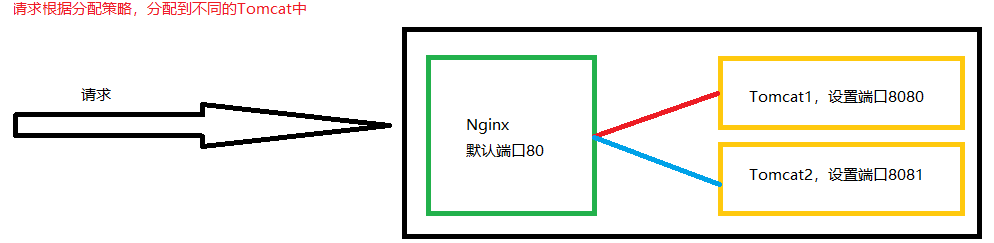
upstream myserver {
        server 192.168.206.128:8080;
        server 192.168.206.128:8081;
    }

    server {
        listen       80;
        server_name  192.168.206.128;

        #charset koi8-r;

        #access_log  logs/host.access.log  main;

        location / {
            proxy_pass http://myserver;
        }
[root@caochenlei ~]# /usr/local/nginx/sbin/nginx
[root@caochenlei ~]# mkdir -p /usr/local/tomcat2/webapps/edu
[root@caochenlei ~]# echo "<h1>This is 8081 Port</h1>" > /usr/local/tomcat2/webapps/edu/a.html
[root@caochenlei ~]# /usr/local/tomcat1/bin/startup.sh
[root@caochenlei ~]# /usr/local/tomcat2/bin/startup.sh


[root@caochenlei ~]# /usr/local/nginx/sbin/nginx -s quit
[root@caochenlei ~]# /usr/local/tomcat1/bin/shutdown.sh
[root@caochenlei ~]# /usr/local/tomcat2/bin/shutdown.sh


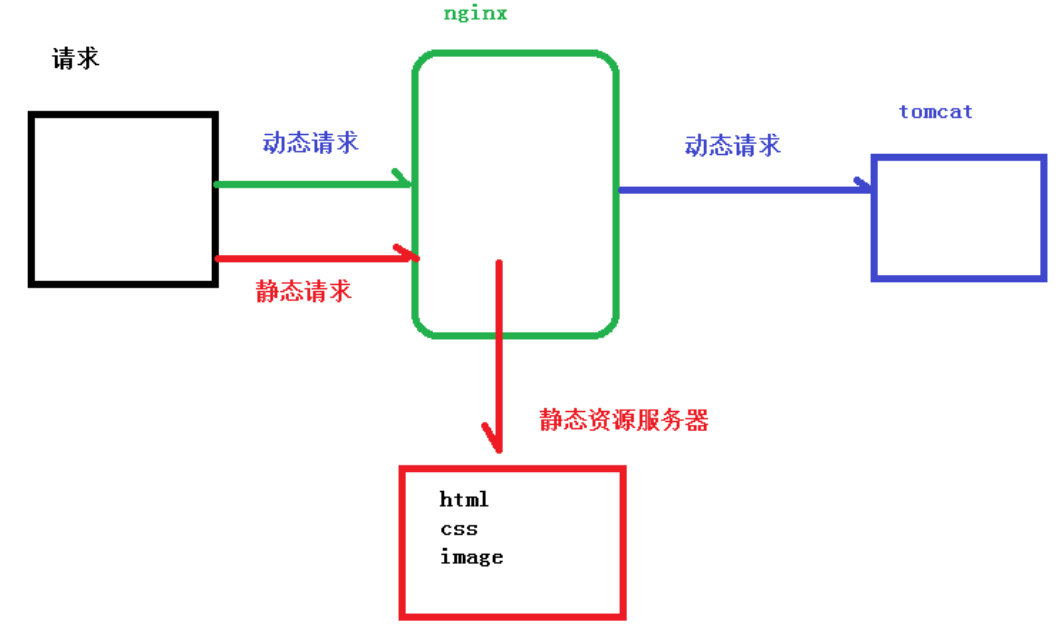
[root@caochenlei ~]# mkdir -p /data/www/
[root@caochenlei ~]# mkdir -p /usr/local/tomcat/webapps/ROOT/www
[root@caochenlei ~]# echo "<h1>/data/www/a.html</h1>" > /data/www/a.html
[root@caochenlei ~]# echo "<h1>/usr/local/tomcat/webapps/ROOT/www/a.html</h1>" > /usr/local/tomcat/webapps/ROOT/www/a.html
[root@caochenlei ~]# vi /usr/local/nginx/conf/nginx.conf
server {
        listen       80;
        server_name  192.168.206.128;

        #charset koi8-r;

        #access_log  logs/host.access.log  main;

        location /www/ {
            root /data/;
            index index.html index.htm;
        }
[root@caochenlei ~]# /usr/local/nginx/sbin/nginx
[root@caochenlei ~]# /usr/local/tomcat/bin/startup.sh

[root@caochenlei ~]# /usr/local/nginx/sbin/nginx -s quit
[root@caochenlei ~]# /usr/local/tomcat/bin/shutdown.sh

[root@caochenlei ~]# vi /usr/local/nginx/conf/nginx.conf
upstream myserver {
        server 192.168.206.128:8080;
        server 192.168.206.128:8081;
    }

    server {
        listen       80;
        server_name  192.168.206.128;

        #charset koi8-r;

        #access_log  logs/host.access.log  main;

        location / {
            proxy_pass http://myserver;
        }
[root@caochenlei ~]# /usr/local/nginx/sbin/nginx
[root@caochenlei ~]# /usr/local/tomcat1/bin/startup.sh
[root@caochenlei ~]# /usr/local/tomcat2/bin/startup.sh
[root@caochenlei ~]# yum install -y keepalived
[root@caochenlei ~]# rm -f /etc/keepalived/keepalived.conf
[root@caochenlei ~]# vi /etc/keepalived/keepalived.conf
! Configuration File for keepalived

global_defs {
   notification_email {
     [email protected]
     [email protected]
     [email protected]
   }
   notification_email_from [email protected]
   #郵件服務(wù)器通知地址(暫不配置,默認(rèn)即可)
   smtp_server 192.168.200.1
   #郵件服務(wù)器超時(shí)時(shí)間(暫不配置,默認(rèn)即可)
   smtp_connect_timeout 30
   #當(dāng)前虛擬機(jī)的IP地址
   router_id 192.168.206.128
}

vrrp_script Monitor_Nginx {
 script "/etc/keepalived/nginx_check.sh"    #檢測(cè)腳本執(zhí)行的路徑
 interval 2                                 #檢測(cè)腳本執(zhí)行的間隔
 weight 2                                   #檢測(cè)腳本執(zhí)行的權(quán)重
}

vrrp_instance VI_1 {
    state MASTER         #標(biāo)識(shí)這個(gè)機(jī)器是MASTER還是BACKUP
    interface eth0       #當(dāng)前機(jī)器的網(wǎng)卡名稱
    virtual_router_id 51 #虛擬路由的編號(hào),主備必須一致
    priority 100         #主、備機(jī)取不同的優(yōu)先級(jí),主機(jī)值較大,備份機(jī)值較小
    advert_int 1         #(VRRP Multicast廣播周期秒數(shù))
    authentication {
        auth_type PASS   #(VRRP認(rèn)證方式)
        auth_pass 1111   #(密碼)
    }
    track_script {
  Monitor_Nginx #(調(diào)用Nginx進(jìn)程檢測(cè)腳本)
 }
    virtual_ipaddress {
        192.168.206.50  #虛擬IP地址
    }
}
[root@caochenlei ~]# vi /etc/keepalived/nginx_check.sh
#!/bin/bash
if [ "$(ps -ef | grep "nginx: master process" | grep -v grep )" == "" ]
 then
 killall keepalived
fi
[root@caochenlei ~]# service keepalived start
[root@caochenlei ~]# yum install -y gcc gcc-c++ make libtool wget pcre pcre-devel zlib zlib-devel openssl openssl-devel
[root@caochenlei ~]# wget http://nginx.org/download/nginx-1.18.0.tar.gz
[root@caochenlei ~]# tar -zxvf nginx-1.18.0.tar.gz
[root@caochenlei ~]# cd nginx-1.18.0
[root@caochenlei nginx-1.18.0]# ./configure
[root@caochenlei nginx-1.18.0]# make && make install
[root@caochenlei nginx-1.18.0]# cd ~
[root@caochenlei ~]# /sbin/iptables -I INPUT -p tcp --dport 80 -j ACCEPT
[root@caochenlei ~]# /etc/rc.d/init.d/iptables save
iptables:將防火墻規(guī)則保存到 /etc/sysconfig/iptables:     [確定]
[root@caochenlei ~]# vi /usr/local/nginx/conf/nginx.conf
upstream myserver {
        server 192.168.206.128:8080;
        server 192.168.206.128:8081;
    }

    server {
        listen       80;
        server_name  192.168.206.128;

        #charset koi8-r;

        #access_log  logs/host.access.log  main;

        location / {
            proxy_pass http://myserver;
        }
[root@caochenlei ~]# /usr/local/nginx/sbin/nginx
[root@caochenlei ~]# yum install -y keepalived
[root@caochenlei ~]# rm -f /etc/keepalived/keepalived.conf
[root@caochenlei ~]# vi /etc/keepalived/keepalived.conf
! Configuration File for keepalived

global_defs {
   notification_email {
     [email protected]
     [email protected]
     [email protected]
   }
   notification_email_from [email protected]
   #郵件服務(wù)器通知地址(暫不配置,默認(rèn)即可)
   smtp_server 192.168.200.1
   #郵件服務(wù)器超時(shí)時(shí)間(暫不配置,默認(rèn)即可)
   smtp_connect_timeout 30
   #當(dāng)前虛擬機(jī)的IP地址
   router_id 192.168.206.129
}

vrrp_script Monitor_Nginx {
 script "/etc/keepalived/nginx_check.sh"    #檢測(cè)腳本執(zhí)行的路徑
 interval 2                                 #檢測(cè)腳本執(zhí)行的間隔
 weight 2                                   #檢測(cè)腳本執(zhí)行的權(quán)重
}

vrrp_instance VI_1 {
    state BACKUP         #標(biāo)識(shí)這個(gè)機(jī)器是MASTER還是BACKUP
    interface eth1       #當(dāng)前機(jī)器的網(wǎng)卡名稱
    virtual_router_id 51 #虛擬路由的編號(hào),主備必須一致
    priority 10          #主、備機(jī)取不同的優(yōu)先級(jí),主機(jī)值較大,備份機(jī)值較小
    advert_int 1         #(VRRP Multicast廣播周期秒數(shù))
    authentication {
        auth_type PASS   #(VRRP認(rèn)證方式)
        auth_pass 1111   #(密碼)
    }
    track_script {
  Monitor_Nginx    #(調(diào)用Nginx進(jìn)程檢測(cè)腳本)
 }
    virtual_ipaddress {
        192.168.206.50   #虛擬IP地址
    }
}
[root@caochenlei ~]# vi /etc/keepalived/nginx_check.sh
#!/bin/bash
if [ "$(ps -ef | grep "nginx: master process" | grep -v grep )" == "" ]
 then
 killall keepalived
fi
[root@caochenlei ~]# service keepalived start


[root@caochenlei ~]# service keepalived stop
[root@caochenlei ~]# /usr/local/nginx/sbin/nginx -s quit
[root@caochenlei ~]# /usr/local/tomcat1/bin/shutdown.sh
[root@caochenlei ~]# /usr/local/tomcat2/bin/shutdown.sh
[root@caochenlei ~]# service keepalived stop
[root@caochenlei ~]# /usr/local/nginx/sbin/nginx -s quit
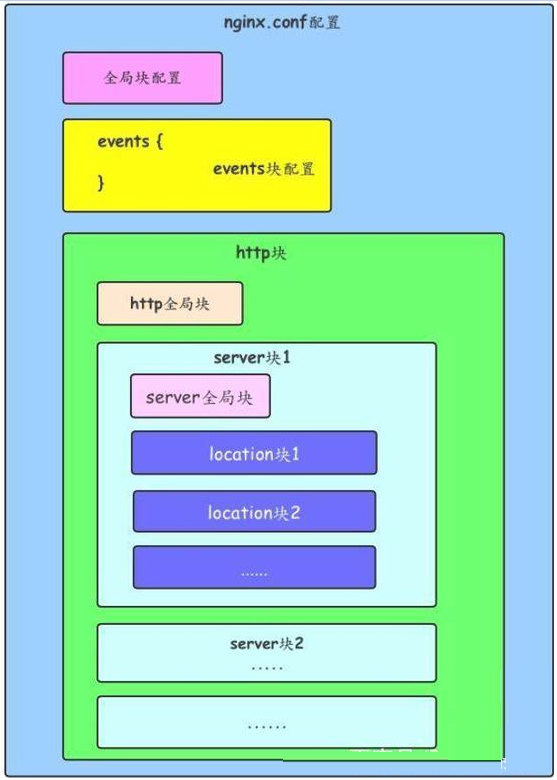
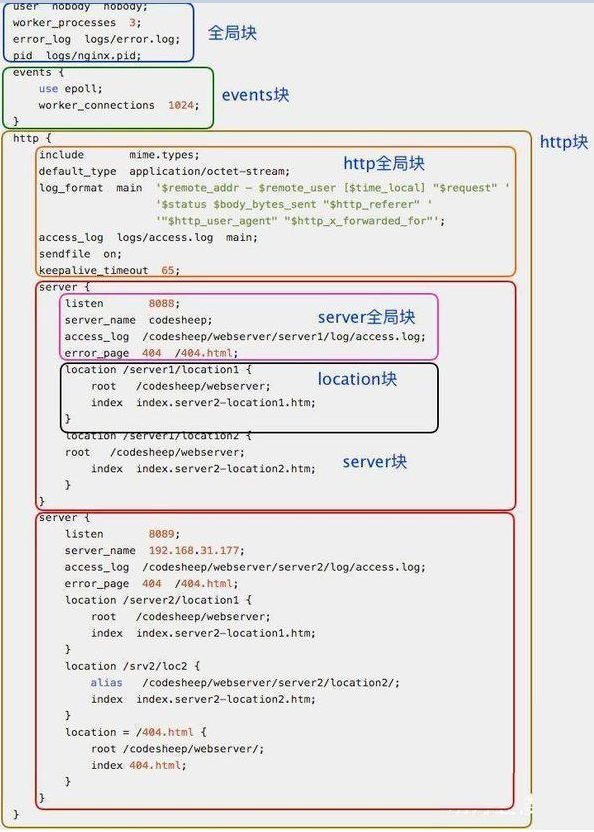
配置運(yùn)行Nginx服務(wù)器用戶(組)
worker process數(shù)
Nginx進(jìn)程
PID存放路徑錯(cuò)誤日志的存放路徑
一個(gè)Nginx進(jìn)程打開的最多文件描述符數(shù)目
#配置worker進(jìn)程運(yùn)行用戶(和用戶組),nobody也是一個(gè)Linux用戶,一般用于啟動(dòng)程序,沒有密碼
user nobody;
#user www www;

#配置工作進(jìn)程數(shù)目,根據(jù)硬件調(diào)整,通常等于CPU數(shù)量或者2倍于CPU數(shù)量
worker_processes 1;

#配置全局錯(cuò)誤日志及類型,[debug | info | notice | warn | error | crit],默認(rèn)是error
error_log logs/error.log;
#error_log logs/error.log notice;
#error_log logs/error.log info;

#配置進(jìn)程pid文件
pid logs/nginx.pid;

#一個(gè)nginx進(jìn)程打開的最多文件描述符數(shù)目,理論值應(yīng)該是最多打開文件數(shù)(系統(tǒng)的值ulimit -n)與Nginx進(jìn)程數(shù)相除,但是Nginx分配請(qǐng)求并不均勻,所以建議與ulimit -n的值保持一致。
worker_rlimit_nofile 65535;
事件驅(qū)動(dòng)模型的選擇
最大連接數(shù)的配置
#參考事件模型,use [ kqueue | rtsig | epoll | /dev/poll | select | poll ];
#epoll模型是Linux 2.6以上版本內(nèi)核中的高性能網(wǎng)絡(luò)I/O模型,如果跑在FreeBSD上面,就用kqueue模型。
use epoll;

#單個(gè)進(jìn)程最大連接數(shù)(最大連接數(shù)=連接數(shù)*進(jìn)程數(shù))
worker_connections 65535;
定義MIMI-Type
自定義服務(wù)日志
允許sendfile方式傳輸文件
連接超時(shí)時(shí)間
單連接請(qǐng)求數(shù)上限
#常見的一些基礎(chǔ)配置
include mime.types; #文件擴(kuò)展名與文件類型映射表
default_type application/octet-stream; #默認(rèn)文件類型
charset utf-8; #默認(rèn)編碼
server_names_hash_bucket_size 128; #服務(wù)器名字的hash表大小
client_header_buffer_size 32k; #上傳文件大小限制
large_client_header_buffers 4 64k; #設(shè)定請(qǐng)求緩沖
client_max_body_size 8m; #設(shè)定請(qǐng)求緩沖
sendfile on; #開啟高效文件傳輸模式,對(duì)于普通應(yīng)用設(shè)為on,如果用來進(jìn)行下載等應(yīng)用磁盤IO重負(fù)載應(yīng)用,可設(shè)置為off,以平衡磁盤與網(wǎng)絡(luò)I/O處理速度,降低系統(tǒng)的負(fù)載。注意:如果圖片顯示不正常把這個(gè)改成off。
autoindex on; #開啟目錄列表訪問,合適下載服務(wù)器,默認(rèn)關(guān)閉。
tcp_nopush on; #防止網(wǎng)絡(luò)阻塞
tcp_nodelay on; #防止網(wǎng)絡(luò)阻塞
keepalive_timeout 120; #長(zhǎng)連接超時(shí)時(shí)間,單位是秒

#FastCGI相關(guān)參數(shù)是為了改善網(wǎng)站的性能:減少資源占用,提高訪問速度。
fastcgi_connect_timeout 300;
fastcgi_send_timeout 300;
fastcgi_read_timeout 300;
fastcgi_buffer_size 64k;
fastcgi_buffers 4 64k;
fastcgi_busy_buffers_size 128k;
fastcgi_temp_file_write_size 128k;

#gzip模塊設(shè)置
gzip on; #開啟gzip壓縮輸出
gzip_min_length 1k; #最小壓縮文件大小
gzip_buffers 4 16k; #壓縮緩沖區(qū)
gzip_http_version 1.0; #壓縮版本(默認(rèn)1.1,前端如果是squid2.5請(qǐng)使用1.0)
gzip_comp_level 2; #壓縮等級(jí)
gzip_types text/plain application/x-javascript text/css application/xml; #壓縮類型
gzip_vary on; #增加響應(yīng)頭'Vary: Accept-Encoding'
limit_zone crawler $binary_remote_addr 10m; #開啟限制IP連接數(shù)的時(shí)候需要使用
配置網(wǎng)絡(luò)監(jiān)聽
配置https服務(wù)
基于名稱的虛擬主機(jī)配置
基于IP的虛擬主機(jī)配置
#虛擬主機(jī)的常見配置
server {
    listen       80; #配置監(jiān)聽端口
    server_name  localhost; #配置服務(wù)名
    charset utf-8; #配置字符集
    access_log  logs/host.access.log  main; #配置本虛擬主機(jī)的訪問日志

    location / {
        root html; #root是配置服務(wù)器的默認(rèn)網(wǎng)站根目錄位置,默認(rèn)為Nginx安裝主目錄下的html目錄
        index index.html index.htm; #配置首頁(yè)文件的名稱
    }

    error_page 404             /404.html; #配置404錯(cuò)誤頁(yè)面
    error_page 500 502 503 504 /50x.html; #配置50x錯(cuò)誤頁(yè)面
}

#配置https服務(wù),安全的網(wǎng)絡(luò)傳輸協(xié)議,加密傳輸,端口443
server {
    listen       443 ssl;
    server_name  localhost;

    ssl_certificate      cert.pem;
    ssl_certificate_key  cert.key;

    ssl_session_cache    shared:SSL:1m;
    ssl_session_timeout  5m;

    ssl_ciphers  HIGH:!aNULL:!MD5;
    ssl_prefer_server_ciphers  on;

    location / {
        root   html;
        index  index.html index.htm;
    }
}
請(qǐng)求根目錄配置更改
網(wǎng)站默認(rèn)首頁(yè)配置
location的URI
root html; #root是配置服務(wù)器的默認(rèn)網(wǎng)站根目錄位置,默認(rèn)為Nginx安裝主目錄下的html目錄
index index.html index.htm; #配置首頁(yè)文件的名稱

proxy_pass http://127.0.0.1:88; #反向代理的地址
proxy_redirect off; #是否開啟重定向
#后端的Web服務(wù)器可以通過X-Forwarded-For獲取用戶真實(shí)IP
proxy_set_header X-Real-IP $remote_addr;
proxy_set_header X-Forwarded-For $proxy_add_x_forwarded_for;
proxy_set_header Host $host;
#以下是一些反向代理的配置,可選。
client_max_body_size 10m; #允許客戶端請(qǐng)求的最大單文件字節(jié)數(shù)
client_body_buffer_size 128k; #緩沖區(qū)代理緩沖用戶端請(qǐng)求的最大字節(jié)數(shù),
proxy_connect_timeout 90; #nginx跟后端服務(wù)器連接超時(shí)時(shí)間(代理連接超時(shí))
proxy_send_timeout 90; #后端服務(wù)器數(shù)據(jù)回傳時(shí)間(代理發(fā)送超時(shí))
proxy_read_timeout 90; #連接成功后,后端服務(wù)器響應(yīng)時(shí)間(代理接收超時(shí))
proxy_buffer_size 4k; #設(shè)置代理服務(wù)器(Nginx)保存用戶頭信息的緩沖區(qū)大小
proxy_buffers 4 32k; #proxy_buffers緩沖區(qū),網(wǎng)頁(yè)平均在32k以下的設(shè)置
proxy_busy_buffers_size 64k; #高負(fù)荷下緩沖大小(proxy_buffers*2)
proxy_temp_file_write_size 64k;  #設(shè)定緩存文件夾大小
=:用于不含正則表達(dá)式的uri前,要求請(qǐng)求字符串與uri嚴(yán)格匹配,如果匹配成功,就停止繼續(xù)向下搜索并立即處理該請(qǐng)求。
~:用于表示uri包含正則表達(dá)式,并且區(qū)分大小寫。
~*:用于表示uri包含正則表達(dá)式,并且不區(qū)分大小寫。
^~:用于不含正則表達(dá)式的uri前,要求Nginx服務(wù)器找到標(biāo)識(shí)uri和請(qǐng)求字符串匹配度最高的location后,立即使用此location處理請(qǐng)求,而不再使用location塊中的正則uri和請(qǐng)求字符串做匹配。
原文鏈接:https://blog.csdn.net/qq_38490457/article/details/108300342 轉(zhuǎn)自:分布式實(shí)驗(yàn)室
![]()