
從代碼到部署微服務(wù)實(shí)戰(zhàn)
當(dāng)前微服務(wù)已經(jīng)成為服務(wù)端開發(fā)的主流架構(gòu),而 Go 語言因其簡(jiǎn)單易學(xué)、內(nèi)置高并發(fā)、快速編譯、占用內(nèi)存小等特點(diǎn)也越來越受到開發(fā)者的青睞,微服務(wù)實(shí)戰(zhàn)系列文章將從實(shí)戰(zhàn)的角度和大家一起學(xué)習(xí)微服務(wù)相關(guān)的知識(shí)。本系列文章將以一個(gè) “博客系統(tǒng)” 由淺入深的和大家一起一步步搭建起一個(gè)完整的微服務(wù)系統(tǒng)
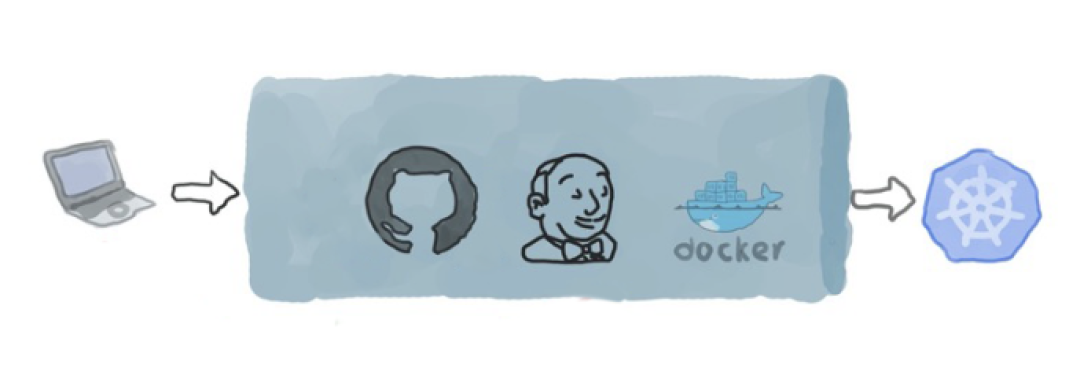
該篇文章為微服務(wù)實(shí)戰(zhàn)系列的第一篇文章,我們將基于 go-zero+gitlab+jenkins+k8s 構(gòu)建微服務(wù)持續(xù)集成和自動(dòng)構(gòu)建發(fā)布系統(tǒng),先對(duì)以上模塊做一個(gè)簡(jiǎn)單介紹:
go-zero 是一個(gè)集成了各種工程實(shí)踐的 web 和 rpc 框架。通過彈性設(shè)計(jì)保障了大并發(fā)服務(wù)端的穩(wěn)定性,經(jīng)受了充分的實(shí)戰(zhàn)檢驗(yàn)
gitlab 是一款基于 Git 的完全集成的軟件開發(fā)平臺(tái),另外,GitLab 且具有 wiki 以及在線編輯、issue 跟蹤功能、CI/CD 等功能
jenkins 是基于 Java 開發(fā)的一種持續(xù)集成工具,用于監(jiān)控持續(xù)重復(fù)的工作,旨在提供一個(gè)開放易用的軟件平臺(tái),使軟件的持續(xù)集成變成可能
kubernetes 常簡(jiǎn)稱為 K8s,是用于自動(dòng)部署、擴(kuò)展和管理容器化應(yīng)用程序” 的開源系統(tǒng)。該系統(tǒng)由 Google 設(shè)計(jì)并捐贈(zèng)給 Cloud Native Computing Foundation(今屬 Linux 基金會(huì))來使用。它旨在提供 “跨主機(jī)集群的自動(dòng)部署、擴(kuò)展以及運(yùn)行應(yīng)用程序容器的平臺(tái)
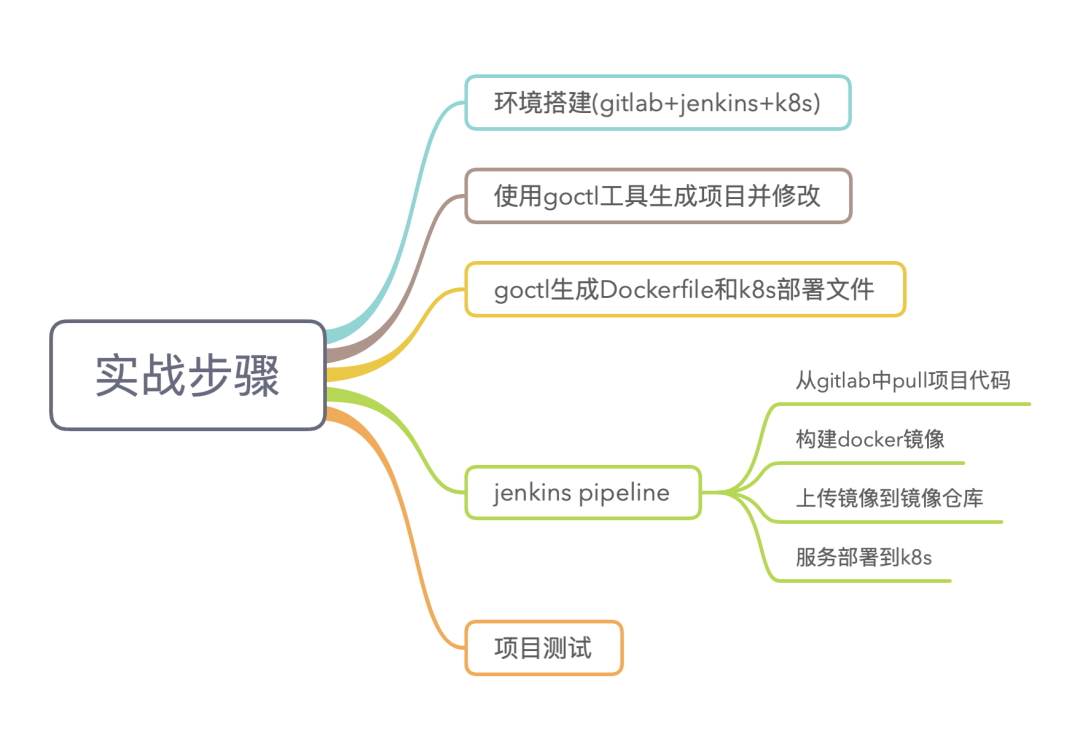
實(shí)戰(zhàn)主要分為五個(gè)步驟,下面針對(duì)以下的五個(gè)步驟分別進(jìn)行詳細(xì)的講解
第一步環(huán)境搭建,這里我采用了兩臺(tái) ubuntu16.04 服務(wù)器分別安裝了 gitlab 和 jenkins,采用 xxx 云彈性 k8s 集群
第二步生成項(xiàng)目,這里我采用 go-zero 提供的 goctl 工具快速生成項(xiàng)目,并對(duì)項(xiàng)目做簡(jiǎn)單的修改以便測(cè)試
第三部生成 Dockerfile 和 k8s 部署文件,k8s 部署文件編寫復(fù)雜而且容易出錯(cuò),goctl 工具提供了生成 Dockerfile 和 k8s 部署文件的功能非常的方便
Jenkins Pipeline 采用聲明式語法構(gòu)建,創(chuàng)建 Jenkinsfile 文件并使用 gitlab 進(jìn)行版本管理
最后進(jìn)行項(xiàng)目測(cè)試驗(yàn)證服務(wù)是否正常
環(huán)境搭建
首先我們搭建實(shí)驗(yàn)環(huán)境,這里我采用了兩臺(tái) ubuntu16.04 服務(wù)器,分別安裝了 gitlab 和 jenkins。gtilab 使用 apt-get 直接安裝,安裝好后啟動(dòng)服務(wù)并查看服務(wù)狀態(tài),各組件為 run 狀態(tài)說明服務(wù)已經(jīng)啟動(dòng),默認(rèn)端口為 9090 直接訪問即可
gitlab-ctl start  // 啟動(dòng)服務(wù)

gitlab-ctl status // 查看服務(wù)狀態(tài)

run: alertmanager: (pid 1591) 15442s; run: log: (pid 2087) 439266s
run: gitaly: (pid 1615) 15442s; run: log: (pid 2076) 439266s
run: gitlab-exporter: (pid 1645) 15442s; run: log: (pid 2084) 439266s
run: gitlab-workhorse: (pid 1657) 15441s; run: log: (pid 2083) 439266s
run: grafana: (pid 1670) 15441s; run: log: (pid 2082) 439266s
run: logrotate: (pid 5873) 1040s; run: log: (pid 2081) 439266s
run: nginx: (pid 1694) 15440s; run: log: (pid 2080) 439266s
run: node-exporter: (pid 1701) 15439s; run: log: (pid 2088) 439266s
run: postgres-exporter: (pid 1708) 15439s; run: log: (pid 2079) 439266s
run: postgresql: (pid 1791) 15439s; run: log: (pid 2075) 439266s
run: prometheus: (pid 10763) 12s; run: log: (pid 2077) 439266s
run: puma: (pid 1816) 15438s; run: log: (pid 2078) 439266s
run: redis: (pid 1821) 15437s; run: log: (pid 2086) 439266s
run: redis-exporter: (pid 1826) 15437s; run: log: (pid 2089) 439266s
run: sidekiq: (pid 1835) 15436s; run: log: (pid 2104) 439266s
jenkins 也是用 apt-get 直接安裝,需要注意的是安裝 jenkins 前需要先安裝 java,過程比較簡(jiǎn)單這里就不再演示,jenkins 默認(rèn)端口為 8080,默認(rèn)賬號(hào)為 admin,初始密碼路徑為/var/lib/jenkins/secrets/initialAdminPassword,初始化安裝推薦的插件即可,后面可以根據(jù)自己的需要再安裝其它插件
k8s 集群搭建過程比較復(fù)雜,雖然可以使用 kubeadm 等工具快速搭建,但距離真正的生產(chǎn)級(jí)集群還是有一定差距,因?yàn)槲覀兊姆?wù)最終是要上生產(chǎn)的,所以這里我選擇了 xxx 云的彈性 k8s 集群版本為 1.16.9,彈性集群的好處是按需收費(fèi)沒有額外的費(fèi)用,當(dāng)我們實(shí)驗(yàn)完成后通過 kubectl delete 立馬釋放資源只會(huì)產(chǎn)生很少的費(fèi)用,而且 xxx 云的 k8s 集群給我們提供了友好的監(jiān)控頁面,可以通過這些界面查看各種統(tǒng)計(jì)信息,集群創(chuàng)建好后需要?jiǎng)?chuàng)建集群訪問憑證才能訪問集群
若當(dāng)前訪問客戶端尚未配置任何集群的訪問憑證,即 ~/.kube/config 內(nèi)容為空,可直接將訪問憑證內(nèi)容并粘貼入 ~/.kube/config 中
若當(dāng)前訪問客戶端已配置了其他集群的訪問憑證,需要通過如下命令合并憑證
KUBECONFIG=~/.kube/config:~/Downloads/k8s-cluster-config kubectl config view --merge --flatten > ~/.kube/config
export KUBECONFIG=~/.kube/config
配置好訪問權(quán)限后通過如下命令可查看當(dāng)前集群
kubectl config current-context
查看集群版本,輸出內(nèi)容如下
kubectl version

Client Version: version.Info{Major:"1", Minor:"16", GitVersion:"v1.16.9", GitCommit:"a17149e1a189050796ced469dbd78d380f2ed5ef", GitTreeState:"clean", BuildDate:"2020-04-16T11:44:51Z", GoVersion:"go1.13.9", Compiler:"gc", Platform:"linux/amd64"}
Server Version: version.Info{Major:"1", Minor:"16+", GitVersion:"v1.16.9-eks.2", GitCommit:"f999b99a13f40233fc5f875f0607448a759fc613", GitTreeState:"clean", BuildDate:"2020-10-09T12:54:13Z", GoVersion:"go1.13.9", Compiler:"gc", Platform:"linux/amd64"}
到這里我們的試驗(yàn)已經(jīng)搭建完成了,這里版本管理也可以使用 github
生成項(xiàng)目
整個(gè)項(xiàng)目采用大倉的方式,目錄結(jié)構(gòu)如下,最外層項(xiàng)目命名為 blog,app 目錄下為按照業(yè)務(wù)拆分成的不同的微服務(wù),比如 user 服務(wù)下面又分為 api 服務(wù)和 rpc 服務(wù),其中 api 服務(wù)為聚合網(wǎng)關(guān)對(duì)外提供 restful 接口,而 rpc 服務(wù)為內(nèi)部通信提供高性能的數(shù)據(jù)緩存等操作
├── blog
│   ├── app
│   │   ├── user
│   │   │   ├── api
│   │   │   └── rpc
│   │   ├── article
│   │   │   ├── api
│   │   │   └── rpc
項(xiàng)目目錄創(chuàng)建好之后我們進(jìn)入 api 目錄創(chuàng)建 user.api 文件,文件內(nèi)容如下,定義服務(wù)端口為 2233,同時(shí)定義了一個(gè)/user/info 接口
type UserInfoRequest struct {
    Uid int64 `form:"uid"`
}

type UserInfoResponse struct {
    Uid   int64  `json:"uid"`
    Name  string `json:"name"`
    Level int    `json:"level"`
}

@server(
    port: 2233
)
service user-api {
    @doc(
        summary:  獲取用戶信息
    )
    @server(
        handler:  UserInfo
    )
    get /user/info(UserInfoRequest) returns(UserInfoResponse)
}
定義好 api 文件之后我們執(zhí)行如下命令生成 api 服務(wù)代碼,一鍵生成真是能大大提升我們的生產(chǎn)力呢
goctl api go -api user.api -dir .
代碼生成后我們對(duì)代碼稍作改造以便后面部署后方便進(jìn)行測(cè)試,改造后的代碼為返回本機(jī)的 ip 地址
func (ul *UserInfoLogic) UserInfo(req types.UserInfoRequest) (*types.UserInfoResponse, error) {
    addrs, err := net.InterfaceAddrs()
    if err != nil {
        return nil, err
    }
    var name string
    for _, addr := range addrs {
        if ipnet, ok := addr.(*net.IPNet); ok && !ipnet.IP.IsLoopback() && ipnet.IP.To4() != nil {
            name = ipnet.IP.String()
        }
    }

    return &types.UserInfoResponse{
        Uid:   req.Uid,
        Name:  name,
        Level: 666,
    }, nil
}
到這里服務(wù)生成部分就完成了,因?yàn)楸竟?jié)為基礎(chǔ)框架的搭建所以只是添加一些測(cè)試的代碼,后面會(huì)繼續(xù)豐富項(xiàng)目代碼
生成鏡像和部署文件
一般的常用鏡像比如 mysql、memcache 等我們可以直接從鏡像倉庫拉取,但是我們的服務(wù)鏡像需要我們自定義,自定義鏡像有多重方式而使用 Dockerfile 則是使用最多的一種方式,使用 Dockerfile 定義鏡像雖然不難但是也很容易出錯(cuò),所以這里我們也借助工具來自動(dòng)生成,這里就不得不再夸一下 goctl 這個(gè)工具真的是棒棒的,還能幫助我們一鍵生成 Dockerfile 呢,在 api 目錄下執(zhí)行如下命令
goctl docker -go user.go
生成后的文件稍作改動(dòng)以符合我們的目錄結(jié)構(gòu),文件內(nèi)容如下,采用了兩階段構(gòu)建,第一階段構(gòu)建可執(zhí)行文件確保構(gòu)建獨(dú)立于宿主機(jī),第二階段會(huì)引用第一階段構(gòu)建的結(jié)果,最終構(gòu)建出極簡(jiǎn)鏡像
FROM golang:alpine AS builder

LABEL stage=gobuilder

ENV CGO_ENABLED 0
ENV GOOS linux
ENV GOPROXY https://goproxy.cn,direct

WORKDIR /build/zero

RUN go mod init blog/app/user/api
RUN go mod download
COPY . .
COPY /etc /app/etc
RUN go build -ldflags="-s -w" -o /app/user user.go


FROM alpine

RUN apk update --no-cache && apk add --no-cache ca-certificates tzdata
ENV TZ Asia/Shanghai

WORKDIR /app
COPY --from=builder /app/user /app/user
COPY --from=builder /app/etc /app/etc

CMD ["./user", "-f", "etc/user-api.yaml"]
然后執(zhí)行如下命令創(chuàng)建鏡像
docker build -t user:v1 app/user/api/
這個(gè)時(shí)候我們使用 docker images 命令查看鏡像會(huì)發(fā)現(xiàn) user 鏡像已經(jīng)創(chuàng)建,版本為 v1
REPOSITORY                            TAG                 IMAGE ID            CREATED             SIZE
user                                  v1                  1c1f64579b40        4 days ago          17.2MB
同樣,k8s 的部署文件編寫也比較復(fù)雜很容易出錯(cuò),所以我們也使用 goctl 自動(dòng)來生成,在 api 目錄下執(zhí)行如下命令
goctl kube deploy -name user-api -namespace blog -image user:v1 -o user.yaml -port 2233
生成的 ymal 文件如下
apiVersion: apps/v1
kind: Deployment
metadata:
  name: user-api
  namespace: blog
  labels:
    app: user-api
spec:
  replicas: 2
  revisionHistoryLimit: 2
  selector:
    matchLabels:
      app: user-api
  template:
    metadata:
      labels:
        app: user-api
    spec:
      containers:
      - name: user-api
        image: user:v1
        lifecycle:
          preStop:
            exec:
              command: ["sh","-c","sleep 5"]
        ports:
        - containerPort: 2233
        readinessProbe:
          tcpSocket:
            port: 2233
          initialDelaySeconds: 5
          periodSeconds: 10
        livenessProbe:
          tcpSocket:
            port: 2233
          initialDelaySeconds: 15
          periodSeconds: 10
        resources:
          requests:
            cpu: 500m
            memory: 512Mi
          limits:
            cpu: 1000m
            memory: 1024Mi
到此生成鏡像和 k8s 部署文件步驟已經(jīng)結(jié)束了,上面主要是為了演示,真正的生產(chǎn)環(huán)境中都是通過持續(xù)集成工具自動(dòng)創(chuàng)建鏡像的
Jenkins Pipeline
jenkins 是常用的繼續(xù)集成工具,其提供了多種構(gòu)建方式,而 pipeline 是最常用的構(gòu)建方式之一,pipeline 支持聲名式和腳本式兩種方式,腳本式語法靈活、可擴(kuò)展,但也意味著更復(fù)雜,而且需要學(xué)習(xí) Grovvy 語言,增加了學(xué)習(xí)成本,所以才有了聲明式語法,聲名式語法是一種更簡(jiǎn)單,更結(jié)構(gòu)化的語法,我們后面也都會(huì)使用聲名式語法
這里再介紹下 Jenkinsfile,其實(shí) Jenkinsfile 就是一個(gè)純文本文件,也就是部署流水線概念在 Jenkins 中的表現(xiàn)形式,就像 Dockerfile 之于 Docker,所有的部署流水線邏輯都可在 Jenkinsfile 文件中定義,需要注意,Jenkins 默認(rèn)是不支持 Jenkinsfile 的,我們需要安裝 Pipeline 插件,安裝插件的流程為 Manage Jenkins -> Manager Plugins 然后搜索安裝即可,之后便可構(gòu)建 pipeline 了
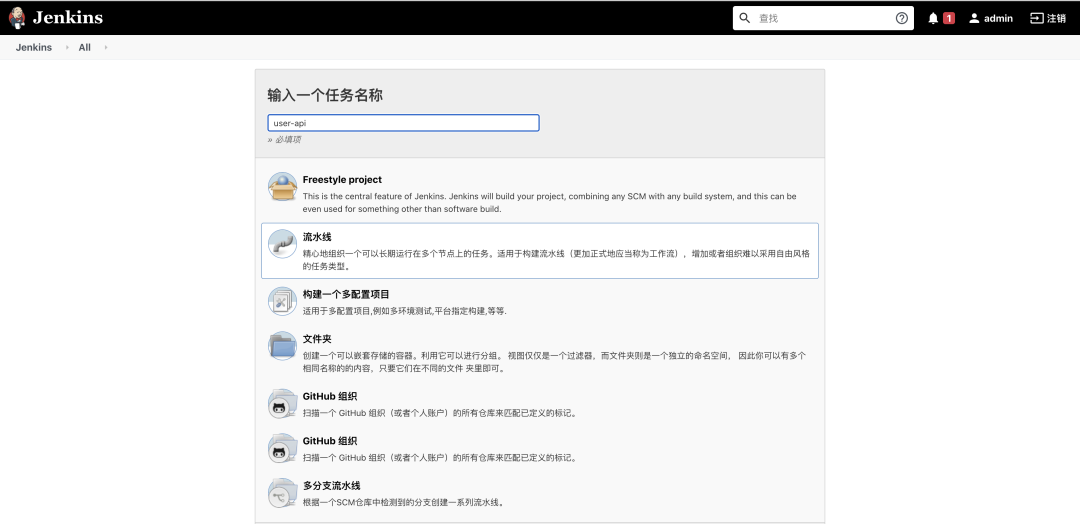
我們可以直接在 pipeline 的界面中輸入構(gòu)建腳本,但是這樣沒法做到版本化,所以如果不是臨時(shí)測(cè)試的話是不推薦這種方式的,更通用的方式是讓 jenkins 從 git 倉庫中拉取 Jenkinsfile 并執(zhí)行
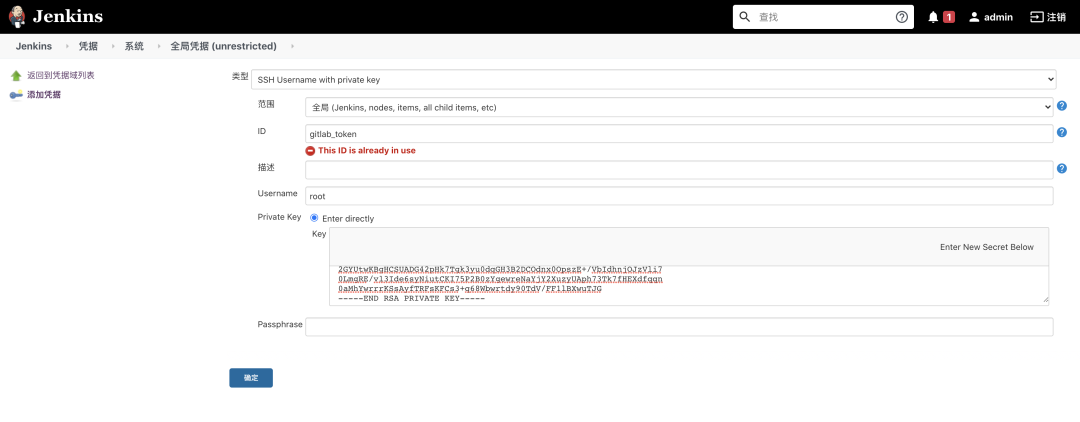
首先需要安裝 Git 插件,然后使用 ssh clone 方式拉取代碼,所以,需要將 git 私鑰放到 jenkins 中,這樣 jenkins 才有權(quán)限從 git 倉庫拉取代碼
將 git 私鑰放到 jenkins 中的步驟是:Manage Jenkins -> Manage credentials -> 添加憑據(jù),類型選擇為 SSH Username with private key,接下來按照提示進(jìn)行設(shè)置就可以了,如下圖所示
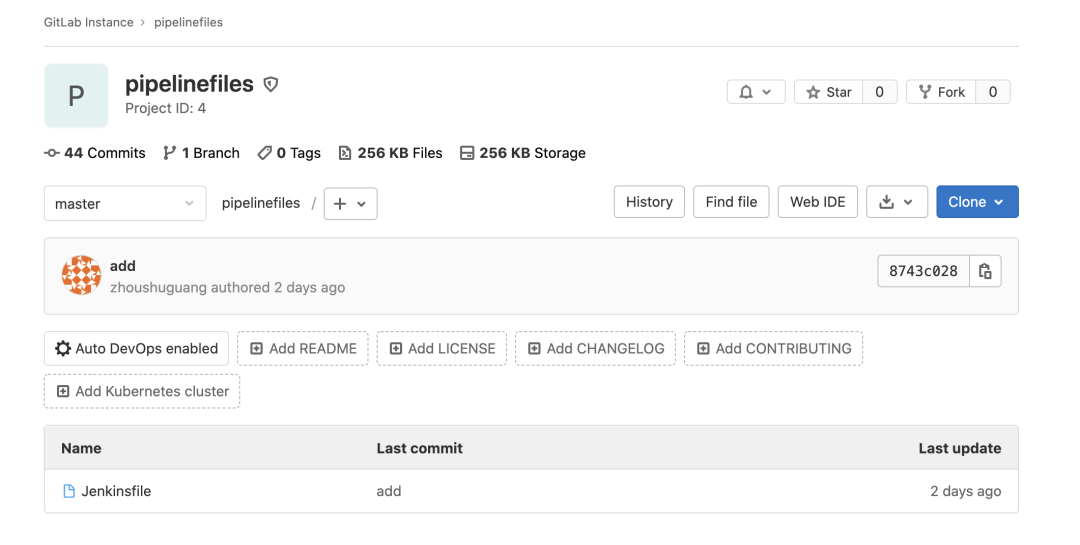
然后在我們的 gitlab 中新建一個(gè)項(xiàng)目,只需要一個(gè) Jenkinsfile 文件
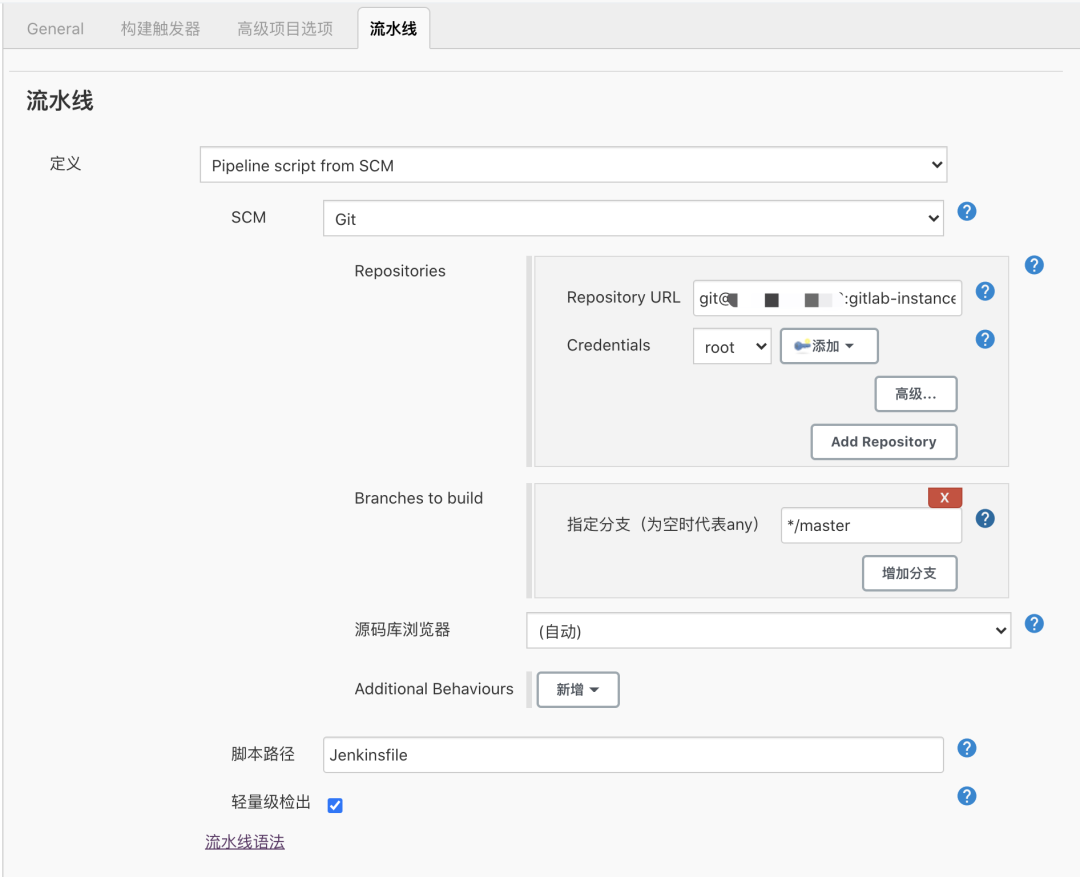
在 user-api 項(xiàng)目中流水線定義選擇 Pipeline script from SCM,添加 gitlab ssh 地址和對(duì)應(yīng)的 token,如下圖所示
接著我們就可以按照上面的實(shí)戰(zhàn)步驟進(jìn)行 Jenkinsfile 文件的編寫了
從 gitlab 拉取代碼,從我們的 gitlab 倉庫中拉取代碼,并使用 commit_id 用來區(qū)分不同版本
stage('從gitlab拉取服務(wù)代碼') {
  steps {
      echo '從gitlab拉取服務(wù)代碼'
      git credentialsId: 'xxxxxxxx', url: 'http://xxx.xxx.xxx.xxx:xxx/blog/blog.git'
      script {
          commit_id = sh(returnStdout: true, script: 'git rev-parse --short HEAD').trim()
      }
  }
}
構(gòu)建 docker 鏡像,使用 goctl 生成的 Dockerfile 文件構(gòu)建鏡像
stage('構(gòu)建鏡像') {
    steps {
        echo '構(gòu)建鏡像'
        sh "docker build -t user:${commit_id} app/user/api/"
    }
}
上傳鏡像到鏡像倉庫,把生產(chǎn)的鏡像 push 到鏡像倉庫
stage('上傳鏡像到鏡像倉庫') {
    steps {
        echo "上傳鏡像到鏡像倉庫"
        sh "docker login -u xxx -p xxxxxxx"
        sh "docker tag user:${commit_id} xxx/user:${commit_id}"
        sh "docker push xxx/user:${commit_id}"
    }
}
部署到 k8s,把部署文件中的版本號(hào)替換,從遠(yuǎn)程拉取鏡,使用 kubectl apply 命令進(jìn)行部署
stage('部署到k8s') {
    steps {
        echo "部署到k8s"
        sh "sed -i 's/<COMMIT_ID_TAG>/${commit_id}/' app/user/api/user.yaml"
        sh "cp app/user/api/user.yaml ."
        sh "kubectl apply -f user.yaml"
    }
}
完整的 Jenkinsfile 文件如下
pipeline {
  agent any

  stages {
      stage('從gitlab拉取服務(wù)代碼') {
          steps {
              echo '從gitlab拉取服務(wù)代碼'
              git credentialsId: 'xxxxxx', url: 'http://xxx.xxx.xxx.xxx:9090/blog/blog.git'
              script {
                  commit_id = sh(returnStdout: true, script: 'git rev-parse --short HEAD').trim()
              }
          }
      }
      stage('構(gòu)建鏡像') {
          steps {
              echo '構(gòu)建鏡像'
              sh "docker build -t user:${commit_id} app/user/api/"
          }
      }
      stage('上傳鏡像到鏡像倉庫') {
          steps {
              echo "上傳鏡像到鏡像倉庫"
              sh "docker login -u xxx -p xxxxxxxx"
              sh "docker tag user:${commit_id} xxx/user:${commit_id}"
              sh "docker push xxx/user:${commit_id}"
          }
      }
      stage('部署到k8s') {
          steps {
              echo "部署到k8s"
                sh "sed -i 's/<COMMIT_ID_TAG>/${commit_id}/' app/user/api/user.yaml"
                sh "kubectl apply -f app/user/api/user.yaml"
          }
      }
  }
}
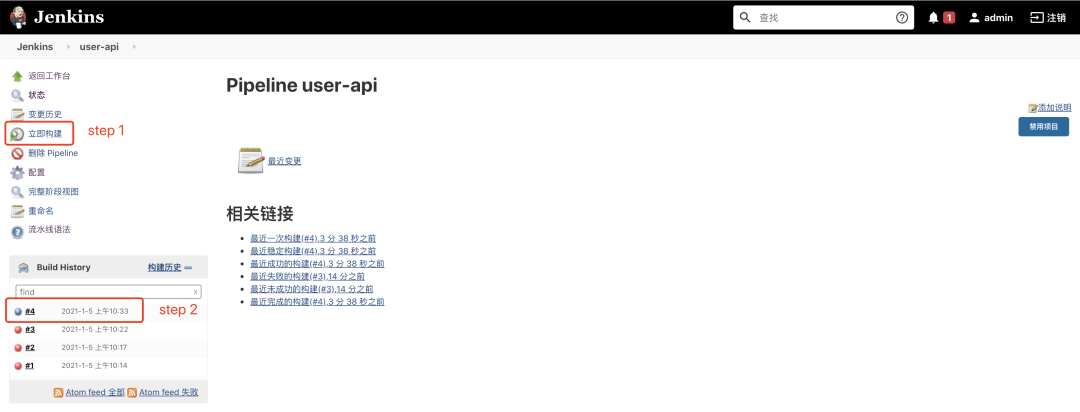
到這里所有的配置基本完畢,我們的基礎(chǔ)框架也基本搭建完成,下面開始執(zhí)行 pipeline,點(diǎn)擊左側(cè)的立即構(gòu)建在下面 Build History 中就回產(chǎn)生一個(gè)構(gòu)建歷史序列號(hào),點(diǎn)擊對(duì)應(yīng)的序列號(hào)然后點(diǎn)擊左側(cè)的 Console Output 即可查看構(gòu)建過程的詳細(xì)信息,如果構(gòu)建過程出現(xiàn)錯(cuò)誤也會(huì)在這里輸出
構(gòu)建詳細(xì)輸出如下,pipeline 對(duì)應(yīng)的每一個(gè) stage 都有詳細(xì)的輸出
Started by user admin
Obtained Jenkinsfile from git [email protected]:gitlab-instance-1ac0cea5/pipelinefiles.git
Running in Durability level: MAX_SURVIVABILITY
[Pipeline] Start of Pipeline
[Pipeline] node
Running on Jenkins in /var/lib/jenkins/workspace/user-api
[Pipeline] {
[Pipeline] stage
[Pipeline] { (Declarative: Checkout SCM)
[Pipeline] checkout
Selected Git installation does not exist. Using Default
The recommended git tool is: NONE
using credential gitlab_token
 > git rev-parse --is-inside-work-tree # timeout=10
Fetching changes from the remote Git repository
 > git config remote.origin.url [email protected]:gitlab-instance-1ac0cea5/pipelinefiles.git # timeout=10
Fetching upstream changes from [email protected]:gitlab-instance-1ac0cea5/pipelinefiles.git
 > git --version # timeout=10
 > git --version # 'git version 2.7.4'
using GIT_SSH to set credentials
 > git fetch --tags --progress [email protected]:gitlab-instance-1ac0cea5/pipelinefiles.git +refs/heads/*:refs/remotes/origin/* # timeout=10
 > git rev-parse refs/remotes/origin/master^{commit} # timeout=10
Checking out Revision 77eac3a4ca1a5b6aea705159ce26523ddd179bdf (refs/remotes/origin/master)
 > git config core.sparsecheckout # timeout=10
 > git checkout -f 77eac3a4ca1a5b6aea705159ce26523ddd179bdf # timeout=10
Commit message: "add"
 > git rev-list --no-walk 77eac3a4ca1a5b6aea705159ce26523ddd179bdf # timeout=10
[Pipeline] }
[Pipeline] // stage
[Pipeline] withEnv
[Pipeline] {
[Pipeline] stage
[Pipeline] { (從gitlab拉取服務(wù)代碼)
[Pipeline] echo
從gitlab拉取服務(wù)代碼
[Pipeline] git
The recommended git tool is: NONE
using credential gitlab_user_pwd
 > git rev-parse --is-inside-work-tree # timeout=10
Fetching changes from the remote Git repository
 > git config remote.origin.url http://xxx.xxx.xxx.xxx:9090/blog/blog.git # timeout=10
Fetching upstream changes from http://xxx.xxx.xxx.xxx:9090/blog/blog.git
 > git --version # timeout=10
 > git --version # 'git version 2.7.4'
using GIT_ASKPASS to set credentials
 > git fetch --tags --progress http://xxx.xxx.xxx.xxx:9090/blog/blog.git +refs/heads/*:refs/remotes/origin/* # timeout=10
 > git rev-parse refs/remotes/origin/master^{commit} # timeout=10
Checking out Revision b757e9eef0f34206414bdaa4debdefec5974c3f5 (refs/remotes/origin/master)
 > git config core.sparsecheckout # timeout=10
 > git checkout -f b757e9eef0f34206414bdaa4debdefec5974c3f5 # timeout=10
 > git branch -a -v --no-abbrev # timeout=10
 > git branch -D master # timeout=10
 > git checkout -b master b757e9eef0f34206414bdaa4debdefec5974c3f5 # timeout=10
Commit message: "Merge branch 'blog/dev' into 'master'"
 > git rev-list --no-walk b757e9eef0f34206414bdaa4debdefec5974c3f5 # timeout=10
[Pipeline] script
[Pipeline] {
[Pipeline] sh
+ git rev-parse --short HEAD
[Pipeline] }
[Pipeline] // script
[Pipeline] }
[Pipeline] // stage
[Pipeline] stage
[Pipeline] { (構(gòu)建鏡像)
[Pipeline] echo
構(gòu)建鏡像
[Pipeline] sh
+ docker build -t user:b757e9e app/user/api/
Sending build context to Docker daemon  28.16kB

Step 1/18 : FROM golang:alpine AS builder
alpine: Pulling from library/golang
801bfaa63ef2: Pulling fs layer
ee0a1ba97153: Pulling fs layer
1db7f31c0ee6: Pulling fs layer
ecebeec079cf: Pulling fs layer
63b48972323a: Pulling fs layer
ecebeec079cf: Waiting
63b48972323a: Waiting
1db7f31c0ee6: Verifying Checksum
1db7f31c0ee6: Download complete
ee0a1ba97153: Verifying Checksum
ee0a1ba97153: Download complete
63b48972323a: Verifying Checksum
63b48972323a: Download complete
801bfaa63ef2: Verifying Checksum
801bfaa63ef2: Download complete
801bfaa63ef2: Pull complete
ee0a1ba97153: Pull complete
1db7f31c0ee6: Pull complete
ecebeec079cf: Verifying Checksum
ecebeec079cf: Download complete
ecebeec079cf: Pull complete
63b48972323a: Pull complete
Digest: sha256:49b4eac11640066bc72c74b70202478b7d431c7d8918e0973d6e4aeb8b3129d2
Status: Downloaded newer image for golang:alpine
 ---> 1463476d8605
Step 2/18 : LABEL stage=gobuilder
 ---> Running in c4f4dea39a32
Removing intermediate container c4f4dea39a32
 ---> c04bee317ea1
Step 3/18 : ENV CGO_ENABLED 0
 ---> Running in e8e848d64f71
Removing intermediate container e8e848d64f71
 ---> ff82ee26966d
Step 4/18 : ENV GOOS linux
 ---> Running in 58eb095128ac
Removing intermediate container 58eb095128ac
 ---> 825ab47146f5
Step 5/18 : ENV GOPROXY https://goproxy.cn,direct
 ---> Running in df2add4e39d5
Removing intermediate container df2add4e39d5
 ---> c31c1aebe5fa
Step 6/18 : WORKDIR /build/zero
 ---> Running in f2a1da3ca048
Removing intermediate container f2a1da3ca048
 ---> 5363d05f25f0
Step 7/18 : RUN go mod init blog/app/user/api
 ---> Running in 11d0adfa9d53
[91mgo: creating new go.mod: module blog/app/user/api
[0mRemoving intermediate container 11d0adfa9d53
 ---> 3314852f00fe
Step 8/18 : RUN go mod download
 ---> Running in aa9e9d9eb850
Removing intermediate container aa9e9d9eb850
 ---> a0f2a7ffe392
Step 9/18 : COPY . .
 ---> a807f60ed250
Step 10/18 : COPY /etc /app/etc
 ---> c4c5d9f15dc0
Step 11/18 : RUN go build -ldflags="-s -w" -o /app/user user.go
 ---> Running in a4321c3aa6e2
[91mgo: finding module for package github.com/tal-tech/go-zero/core/conf
[0m[91mgo: finding module for package github.com/tal-tech/go-zero/rest/httpx
[0m[91mgo: finding module for package github.com/tal-tech/go-zero/rest
[0m[91mgo: finding module for package github.com/tal-tech/go-zero/core/logx
[0m[91mgo: downloading github.com/tal-tech/go-zero v1.1.1
[0m[91mgo: found github.com/tal-tech/go-zero/core/conf in github.com/tal-tech/go-zero v1.1.1
go: found github.com/tal-tech/go-zero/rest in github.com/tal-tech/go-zero v1.1.1
go: found github.com/tal-tech/go-zero/rest/httpx in github.com/tal-tech/go-zero v1.1.1
go: found github.com/tal-tech/go-zero/core/logx in github.com/tal-tech/go-zero v1.1.1
[0m[91mgo: downloading gopkg.in/yaml.v2 v2.4.0
[0m[91mgo: downloading github.com/justinas/alice v1.2.0
[0m[91mgo: downloading github.com/dgrijalva/jwt-go v3.2.0+incompatible
[0m[91mgo: downloading go.uber.org/automaxprocs v1.3.0
[0m[91mgo: downloading github.com/spaolacci/murmur3 v1.1.0
[0m[91mgo: downloading github.com/google/uuid v1.1.1
[0m[91mgo: downloading google.golang.org/grpc v1.29.1
[0m[91mgo: downloading github.com/prometheus/client_golang v1.5.1
[0m[91mgo: downloading github.com/beorn7/perks v1.0.1
[0m[91mgo: downloading github.com/golang/protobuf v1.4.2
[0m[91mgo: downloading github.com/prometheus/common v0.9.1
[0m[91mgo: downloading github.com/cespare/xxhash/v2 v2.1.1
[0m[91mgo: downloading github.com/prometheus/client_model v0.2.0
[0m[91mgo: downloading github.com/prometheus/procfs v0.0.8
[0m[91mgo: downloading github.com/matttproud/golang_protobuf_extensions v1.0.1
[0m[91mgo: downloading google.golang.org/protobuf v1.25.0
[0mRemoving intermediate container a4321c3aa6e2
 ---> 99ac2cd5fa39
Step 12/18 : FROM alpine
latest: Pulling from library/alpine
801bfaa63ef2: Already exists
Digest: sha256:3c7497bf0c7af93428242d6176e8f7905f2201d8fc5861f45be7a346b5f23436
Status: Downloaded newer image for alpine:latest
 ---> 389fef711851
Step 13/18 : RUN apk update --no-cache && apk add --no-cache ca-certificates tzdata
 ---> Running in 51694dcb96b6
fetch http://dl-cdn.alpinelinux.org/alpine/v3.12/main/x86_64/APKINDEX.tar.gz
fetch http://dl-cdn.alpinelinux.org/alpine/v3.12/community/x86_64/APKINDEX.tar.gz
v3.12.3-38-g9ff116e4f0 [http://dl-cdn.alpinelinux.org/alpine/v3.12/main]
v3.12.3-39-ge9195171b7 [http://dl-cdn.alpinelinux.org/alpine/v3.12/community]
OK: 12746 distinct packages available
fetch http://dl-cdn.alpinelinux.org/alpine/v3.12/main/x86_64/APKINDEX.tar.gz
fetch http://dl-cdn.alpinelinux.org/alpine/v3.12/community/x86_64/APKINDEX.tar.gz
(1/2) Installing ca-certificates (20191127-r4)
(2/2) Installing tzdata (2020f-r0)
Executing busybox-1.31.1-r19.trigger
Executing ca-certificates-20191127-r4.trigger
OK: 10 MiB in 16 packages
Removing intermediate container 51694dcb96b6
 ---> e5fb2e4d5eea
Step 14/18 : ENV TZ Asia/Shanghai
 ---> Running in 332fd0df28b5
Removing intermediate container 332fd0df28b5
 ---> 11c0e2e49e46
Step 15/18 : WORKDIR /app
 ---> Running in 26e22103c8b7
Removing intermediate container 26e22103c8b7
 ---> 11d11c5ea040
Step 16/18 : COPY --from=builder /app/user /app/user
 ---> f69f19ffc225
Step 17/18 : COPY --from=builder /app/etc /app/etc
 ---> b8e69b663683
Step 18/18 : CMD ["./user", "-f", "etc/user-api.yaml"]
 ---> Running in 9062b0ed752f
Removing intermediate container 9062b0ed752f
 ---> 4867b4994e43
Successfully built 4867b4994e43
Successfully tagged user:b757e9e
[Pipeline] }
[Pipeline] // stage
[Pipeline] stage
[Pipeline] { (上傳鏡像到鏡像倉庫)
[Pipeline] echo
上傳鏡像到鏡像倉庫
[Pipeline] sh
+ docker login -u xxx -p xxxxxxxx
WARNING! Using --password via the CLI is insecure. Use --password-stdin.
WARNING! Your password will be stored unencrypted in /var/lib/jenkins/.docker/config.json.
Configure a credential helper to remove this warning. See
https://docs.docker.com/engine/reference/commandline/login/#credentials-store

Login Succeeded
[Pipeline] sh
+ docker tag user:b757e9e xxx/user:b757e9e
[Pipeline] sh
+ docker push xxx/user:b757e9e
The push refers to repository [docker.io/xxx/user]
b19a970f64b9: Preparing
f695b957e209: Preparing
ee27c5ca36b5: Preparing
7da914ecb8b0: Preparing
777b2c648970: Preparing
777b2c648970: Layer already exists
ee27c5ca36b5: Pushed
b19a970f64b9: Pushed
7da914ecb8b0: Pushed
f695b957e209: Pushed
b757e9e: digest: sha256:6ce02f8a56fb19030bb7a1a6a78c1a7c68ad43929ffa2d4accef9c7437ebc197 size: 1362
[Pipeline] }
[Pipeline] // stage
[Pipeline] stage
[Pipeline] { (部署到k8s)
[Pipeline] echo
部署到k8s
[Pipeline] sh
+ sed -i s/<COMMIT_ID_TAG>/b757e9e/ app/user/api/user.yaml
[Pipeline] sh
+ kubectl apply -f app/user/api/user.yaml
deployment.apps/user-api created
[Pipeline] }
[Pipeline] // stage
[Pipeline] }
[Pipeline] // withEnv
[Pipeline] }
[Pipeline] // node
[Pipeline] End of Pipeline
Finished: SUCCESS
可以看到最后輸出了 SUCCESS 說明我們的 pipeline 已經(jīng)成了,這個(gè)時(shí)候我們可以通過 kubectl 工具查看一下,-n 參數(shù)為指定 namespace
kubectl get pods -n blog

NAME                       READY   STATUS    RESTARTS   AGE
user-api-84ffd5b7b-c8c5w   1/1     Running   0          10m
user-api-84ffd5b7b-pmh92   1/1     Running   0          10m
我們?cè)?k8s 部署文件中制定了命名空間為 blog,所以在執(zhí)行 pipeline 之前我們需要先創(chuàng)建這個(gè) namespance
kubectl create namespace blog
服務(wù)已經(jīng)部署好了,那么接下來怎么從外部訪問服務(wù)呢?這里使用 LoadBalancer 方式,Service 部署文件定義如下,80 端口映射到容器的 2233 端口上,selector 用來匹配 Deployment 中定義的 label
apiVersion: v1
kind: Service
metadata:
  name: user-api-service
  namespace: blog
spec:
  selector:
    app: user-api
  type: LoadBalancer
  ports:
    - protocol: TCP
      port: 80
      targetPort: 2233
執(zhí)行創(chuàng)建 service,創(chuàng)建完后查看 service 輸出如下,注意一定要加上-n 參數(shù)指定 namespace
kubectl apply -f user-service.yaml
kubectl get services -n blog

NAME               TYPE           CLUSTER-IP   EXTERNAL-IP      PORT(S)        AGE
user-api-service   LoadBalancer   <none>       xxx.xxx.xxx.xx   80:32470/TCP   79m
這里的 EXTERNAL-IP 即為提供給外網(wǎng)訪問的 ip,端口為 80
到這里我們的所有的部署任務(wù)都完成了,大家最好也能親自動(dòng)手來實(shí)踐一下
測(cè)試
最后我們來測(cè)試下部署的服務(wù)是否正常,使用 EXTERNAL-IP 來進(jìn)行訪問
curl "http://xxx.xxx.xxx.xxx:80/user/info?uid=1"

{"uid":1,"name":"172.17.0.5","level":666}

curl http://xxx.xxx.xxx.xxx:80/user/info\?uid\=1

{"uid":1,"name":"172.17.0.8","level":666}
curl 訪問了兩次/user/info 接口,都能正常返回,說明我們的服務(wù)沒有問題,name 字段分別輸出了兩個(gè)不同 ip,可以看出 LoadBalancer 默認(rèn)采用了 Round Robin 的負(fù)載均衡策略
總結(jié)
以上我們實(shí)現(xiàn)了從代碼開發(fā)到版本管理再到構(gòu)建部署的 DevOps 全流程,完成了基礎(chǔ)架構(gòu)的搭建,當(dāng)然這個(gè)架構(gòu)現(xiàn)在依然很簡(jiǎn)陋。在本系列后續(xù)中,我們將以這個(gè)博客系統(tǒng)為基礎(chǔ)逐漸的完善整個(gè)架構(gòu),比如逐漸的完善 CI、CD 流程、增加監(jiān)控、博客系統(tǒng)功能的完善、高可用最佳實(shí)踐和其原理等等
工欲善其事必先利其器,好的工具能大大提升我們的工作效率而且能降低出錯(cuò)的可能,上面我們大量使用了goctl工具簡(jiǎn)直有點(diǎn)愛不釋手了哈哈哈,下次見
由于個(gè)人能力有限難免有表達(dá)有誤的地方,歡迎廣大觀眾姥爺批評(píng)指正!
項(xiàng)目地址
https://github.com/tal-tech/go-zero
歡迎使用并 star 支持我們!??