核桃干貨 | Java后端線上問(wèn)題排查常用命令收藏

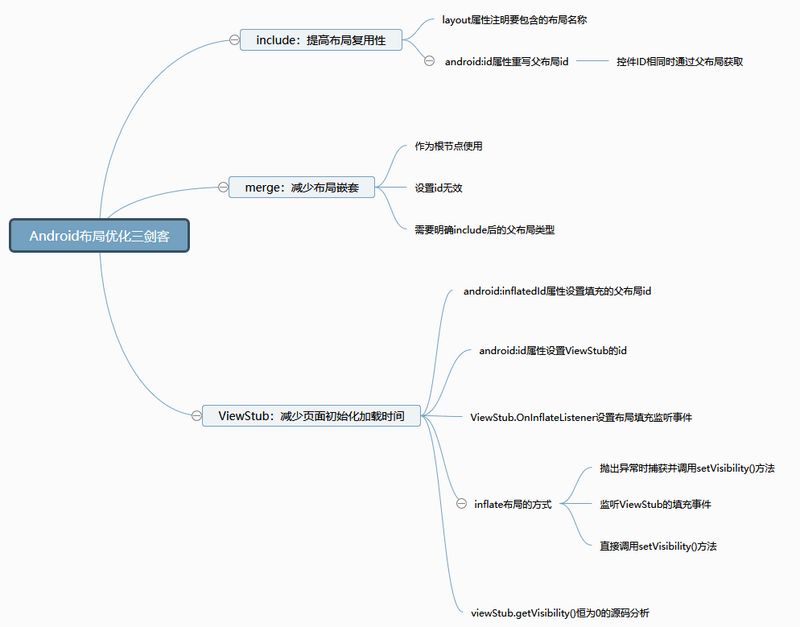
有些布局的在很多頁(yè)面都用到了,而且樣式都一樣,每次用到都要復(fù)制粘貼一大段,有沒(méi)有辦法可以復(fù)用呢? 解決了1中的問(wèn)題之后,發(fā)現(xiàn)復(fù)用的布局外面總要額外套上一層布局,要知道布局嵌套是會(huì)影響性能的吶; 有些布局只有用到時(shí)才會(huì)顯示,但是必須提前寫好,雖然設(shè)置了為invisible或gone,還是多多少少會(huì)占用內(nèi)存的。
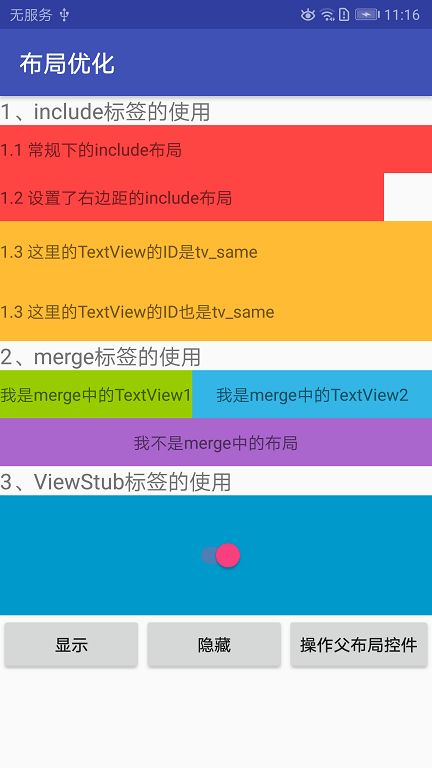
1、include
layout:必填屬性,為你需要插入當(dāng)前主布局的布局名稱,通過(guò)R.layout.xx的方式引用; id:當(dāng)你想給通過(guò)include添加進(jìn)來(lái)的布局設(shè)置一個(gè)id的時(shí)候就可以使用這個(gè)屬性,它可以重寫插入主布局的布局id。
1.1 常規(guī)使用
<?xml version="1.0" encoding="utf-8"?>
<TextView xmlns:android="http://schemas.android.com/apk/res/android"
    android:layout_width="match_parent"
    android:gravity="center_vertical"
    android:textSize="14sp"
    android:background="@android:color/holo_red_light"
    android:layout_height="40dp">

</TextView>
<?xml version="1.0" encoding="utf-8"?>
<LinearLayout xmlns:android="http://schemas.android.com/apk/res/android"
    xmlns:app="http://schemas.android.com/apk/res-auto"
    xmlns:tools="http://schemas.android.com/tools"
    android:layout_width="match_parent"
    android:layout_height="match_parent"
    android:orientation="vertical"
    tools:context=".ViewOptimizationActivity">

    <!--include標(biāo)簽的使用-->
    <TextView
        android:textSize="18sp"
        android:text="1、include標(biāo)簽的使用"
        android:layout_width="wrap_content"
        android:layout_height="wrap_content" />

    <include
        android:id="@+id/tv_include1"
        layout="@layout/layout_include"/>

</LinearLayout>
        TextView tvInclude1 = findViewById(R.id.tv_include1);
        tvInclude1.setText("1.1 常規(guī)下的include布局");

1.2 重寫根布局的布局屬性
    <include
        android:layout_width="match_parent"
        android:layout_height="40dp"
        android:layout_marginEnd="40dp"
        android:id="@+id/tv_include2"
        layout="@layout/layout_include"/>

1.3 控件ID相同時(shí)的處理
<?xml version="1.0" encoding="utf-8"?>
<FrameLayout xmlns:android="http://schemas.android.com/apk/res/android"
    android:layout_width="match_parent"
    android:background="@android:color/holo_orange_light"
    android:layout_height="wrap_content">

    <TextView
        android:gravity="center_vertical"
        android:id="@+id/tv_same"
        android:layout_width="match_parent"
        android:layout_height="50dp" />

</FrameLayout>
<?xml version="1.0" encoding="utf-8"?>
<LinearLayout xmlns:android="http://schemas.android.com/apk/res/android"
    xmlns:app="http://schemas.android.com/apk/res-auto"
    xmlns:tools="http://schemas.android.com/tools"
    android:layout_width="match_parent"
    android:layout_height="match_parent"
    android:orientation="vertical"
    tools:context=".ViewOptimizationActivity">

    <!--include標(biāo)簽的使用-->
    ……

    <include layout="@layout/layout_include2"/>

    <include
        android:id="@+id/view_same"
        layout="@layout/layout_include2"/>

</LinearLayout>
        TextView tvSame = findViewById(R.id.tv_same);
        tvSame.setText("1.3 這里的TextView的ID是tv_same");
        FrameLayout viewSame = findViewById(R.id.view_same);
        TextView tvSame2 = viewSame.findViewById(R.id.tv_same);
        tvSame2.setText("1.3 這里的TextView的ID也是tv_same");

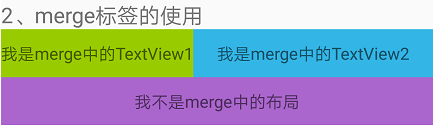
2、merge
2.1 merge常規(guī)使用
<?xml version="1.0" encoding="utf-8"?>
<merge xmlns:android="http://schemas.android.com/apk/res/android"
    android:layout_width="match_parent"
    android:layout_height="wrap_content">

    <TextView
        android:id="@+id/tv_merge1"
        android:text="我是merge中的TextView1"
        android:background="@android:color/holo_green_light"
        android:gravity="center"
        android:layout_width="wrap_content"
        android:layout_height="40dp" />

    <TextView
        android:layout_toEndOf="@+id/tv_merge1"
        android:id="@+id/tv_merge2"
        android:text="我是merge中的TextView2"
        android:background="@android:color/holo_blue_light"
        android:gravity="center"
        android:layout_width="match_parent"
        android:layout_height="40dp" />
</merge>
    <RelativeLayout
        android:layout_width="match_parent"
        android:layout_height="wrap_content">

        <include
            android:id="@+id/view_merge"
            layout="@layout/layout_merge"/>
    </RelativeLayout>

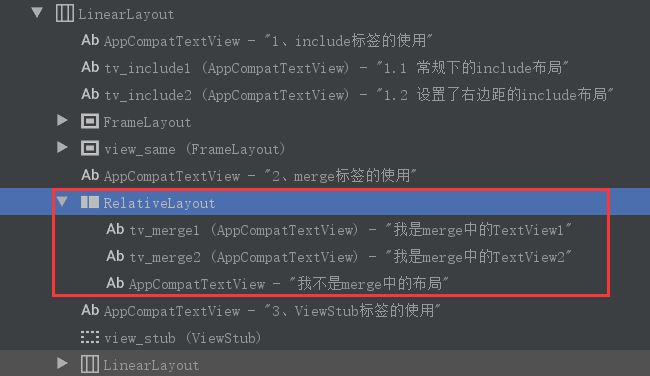
2.3 merge的ID
    <RelativeLayout
        android:layout_width="match_parent"
        android:layout_height="wrap_content">

        <include
            android:id="@+id/view_merge"
            layout="@layout/layout_merge"/>

        <TextView
            android:text="我不是merge中的布局"
            android:layout_below="@+id/view_merge"
            android:background="@android:color/holo_purple"
            android:gravity="center"
            android:layout_width="match_parent"
            android:layout_height="40dp"/>
    </RelativeLayout>
3、ViewStub
android:layout:ViewStub需要填充的視圖名稱,為“R.layout.xx”的形式; android:inflateId:重寫被填充的視圖的父布局id。
3.1 填充布局的正確方式
<?xml version="1.0" encoding="utf-8"?>
<FrameLayout xmlns:android="http://schemas.android.com/apk/res/android"
    android:layout_width="match_parent"
    android:background="@android:color/holo_blue_dark"
    android:layout_height="100dp">
    <Switch
        android:id="@+id/sw"
        android:layout_gravity="center"
        android:layout_width="wrap_content"
        android:layout_height="wrap_content" />
</FrameLayout>
<?xml version="1.0" encoding="utf-8"?>
<LinearLayout xmlns:android="http://schemas.android.com/apk/res/android"
    xmlns:app="http://schemas.android.com/apk/res-auto"
    xmlns:tools="http://schemas.android.com/tools"
    android:layout_width="match_parent"
    android:layout_height="match_parent"
    android:orientation="vertical"
    tools:context=".ViewOptimizationActivity">

    <!--ViewStub標(biāo)簽的使用-->
    <TextView
        android:textSize="18sp"
        android:text="3、ViewStub標(biāo)簽的使用"
        android:layout_width="wrap_content"
        android:layout_height="wrap_content" />

    <ViewStub
        android:id="@+id/view_stub"
        android:inflatedId="@+id/view_inflate"
        android:layout="@layout/layout_view_stub"
        android:layout_width="match_parent"
        android:layout_height="100dp" />
    <LinearLayout
        android:orientation="horizontal"
        android:layout_width="match_parent"
        android:layout_height="wrap_content">

        <Button
            android:text="顯示"
            android:id="@+id/btn_show"
            android:layout_weight="1"
            android:layout_width="0dp"
            android:layout_height="wrap_content" />

        <Button
            android:text="隱藏"
            android:id="@+id/btn_hide"
            android:layout_weight="1"
            android:layout_width="0dp"
            android:layout_height="wrap_content" />

        <Button
            android:text="操作父布局控件"
            android:id="@+id/btn_control"
            android:layout_width="wrap_content"
            android:layout_height="wrap_content" />
    </LinearLayout>
</LinearLayout>
        viewStub.setOnInflateListener(new ViewStub.OnInflateListener() {
            @Override
            public void onInflate(ViewStub viewStub, View view) {
                Toast.makeText(ViewOptimizationActivity.this, "ViewStub加載了", Toast.LENGTH_SHORT).show();
            }
        });
    @Override
    public void onClick(View view) {
        switch (view.getId()) {
            case R.id.btn_show:
                viewStub.inflate();
                break;
            case R.id.btn_hide:
                viewStub.setVisibility(View.GONE);
                break;
            default:
                break;
        }
    }
java.lang.IllegalStateException: ViewStub must have a non-null ViewGroup viewParent
    public View inflate() {
        final ViewParent viewParent = getParent();

        if (viewParent != null && viewParent instanceof ViewGroup) {
            if (mLayoutResource != 0) {
                final ViewGroup parent = (ViewGroup) viewParent;
                final View view = inflateViewNoAdd(parent);
                replaceSelfWithView(view, parent);

                mInflatedViewRef = new WeakReference<>(view);
                if (mInflateListener != null) {
                    mInflateListener.onInflate(this, view);
                }

                return view;
            } else {
                throw new IllegalArgumentException("ViewStub must have a valid layoutResource");
            }
        } else {
            throw new IllegalStateException("ViewStub must have a non-null ViewGroup viewParent");
        }
    }
    private void replaceSelfWithView(View view, ViewGroup parent) {
        final int index = parent.indexOfChild(this);
        parent.removeViewInLayout(this);

        final ViewGroup.LayoutParams layoutParams = getLayoutParams();
        if (layoutParams != null) {
            parent.addView(view, index, layoutParams);
        } else {
            parent.addView(view, index);
        }
    }
3.1.1 捕獲異常
                try {
                    viewStub.inflate();
                } catch (IllegalStateException e) {
                    Log.e("Tag",e.toString());
                    view.setVisibility(View.VISIBLE);
                }
3.1.2 通過(guò)監(jiān)聽ViewStub的填充事件
                if (isViewStubShow){
                    viewStub.setVisibility(View.VISIBLE);
                }else {
                    viewStub.inflate();
                }
3.1.3 直接調(diào)用setVisibility()方法
    public void setVisibility(int visibility) {
        if (mInflatedViewRef != null) {
            View view = mInflatedViewRef.get();
            if (view != null) {
                view.setVisibility(visibility);
            } else {
                throw new IllegalStateException("setVisibility called on un-referenced view");
            }
        } else {
            super.setVisibility(visibility);
            if (visibility == VISIBLE || visibility == INVISIBLE) {
                inflate();
            }
        }
    }
3.2 viewStub.getVisibility()為何總是等于0?
                if (viewStub.getVisibility() == View.GONE){
                    viewStub.setVisibility(View.VISIBLE);
                }else {
                    viewStub.setVisibility(View.GONE);
                }
3.3 操作布局控件
                //1、初始化被inflate的布局后再初始化其中的控件,
                FrameLayout frameLayout = findViewById(R.id.view_inflate);//android:inflatedId設(shè)置的id
                Switch sw = frameLayout.findViewById(R.id.sw);
                sw.toggle();
                //2、直接初始化控件
                Switch sw = findViewById(R.id.sw);
                sw.toggle();
后記