
基于OpenCV進(jìn)行車牌檢測(cè)!
轉(zhuǎn)自:小白學(xué)視覺
1.車牌檢測(cè):第一步是從車上檢測(cè)車牌。我們將使用OpenCV中的輪廓選項(xiàng)來檢測(cè)矩形對(duì)象以查找車牌。如果我們知道車牌的確切尺寸、顏色和大致位置,可以提高準(zhǔn)確度。通常,檢測(cè)算法是根據(jù)特定國(guó)家使用的攝像機(jī)位置和車牌類型進(jìn)行訓(xùn)練的。如果圖像中甚至沒有汽車,這將變得更加棘手,在這種情況下,我們將執(zhí)行額外的步驟來檢測(cè)汽車,然后是車牌。
2.字符分割:一旦我們檢測(cè)到車牌,我們必須將其裁剪出來并保存為新圖像。同樣,使用OpenCV也可以輕松地完成此操作。
3.字符識(shí)別:現(xiàn)在,我們?cè)谏弦徊街蝎@得的新圖像肯定會(huì)有一些字符(數(shù)字/字母)寫在上面。因此,我們可以對(duì)其執(zhí)行OCR(光學(xué)字符識(shí)別)來檢測(cè)數(shù)字。
OpenCV:OpenCV是一個(gè)主要針對(duì)實(shí)時(shí)計(jì)算機(jī)視覺的編程函數(shù)庫(kù),本項(xiàng)目使用的是4.1.0版。
Python:使用3.6.7版。
IDE:我將在這里使用Jupyter。
Haar cascade:這是一種機(jī)器學(xué)習(xí)對(duì)象檢測(cè)算法,用于識(shí)別圖像或視頻中的對(duì)象。
Keras:易于使用并得到廣泛支持,Keras使深度學(xué)習(xí)盡可能簡(jiǎn)單。
Scikit學(xué)習(xí):它是一個(gè)用于Python編程語言的自由軟件機(jī)器學(xué)習(xí)庫(kù)。
installing OpenCVpip install opencv-python==4.1.0Installing Keraspip install kerasInstalling Jupyterpip install jupyterInstalling Scikit-Learnpip install scikit-learn
我們將從運(yùn)行jupyter筆記本開始,然后在我們的案例OpenCV、Keras和sklearn中導(dǎo)入必要的庫(kù)。
#importing openCV>import cv2#importing numpy>import numpy as np#importing pandas to read the CSV file containing our data>import pandas as pd#importing keras and sub-libraries>from keras.models import Sequential>from keras.layers import Dense>from keras.layers import Dropout>from keras.layers import Flatten, MaxPool2D>from keras.layers.convolutional import Conv2D>from keras.layers.convolutional import MaxPooling2D>from keras import backend as K>from keras.utils import np_utils>from sklearn.model_selection import train_test_split
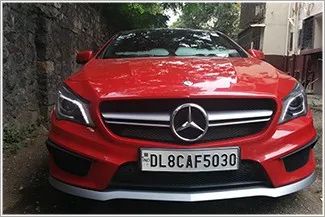
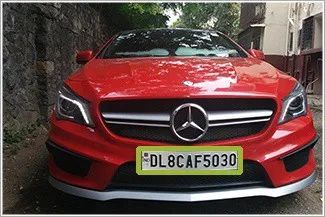
讓我們從導(dǎo)入帶牌照汽車的示例圖像開始,并定義一些函數(shù):
def extract_plate(img): # the function detects and perfors blurring on the number plate.plate_img = img.copy()#Loads the data required for detecting the license plates from cascade classifier.plate_cascade = cv2.CascadeClassifier('./indian_license_plate.xml')# detects numberplates and returns the coordinates and dimensions of detected license plate's contours.plate_rect = plate_cascade.detectMultiScale(plate_img, scaleFactor = 1.3, minNeighbors = 7)for (x,y,w,h) in plate_rect:a,b = (int(0.02*img.shape[0]), int(0.025*img.shape[1])) #parameter tuningplate = plate_img[y+a:y+h-a, x+b:x+w-b, :]# finally representing the detected contours by drawing rectangles around the edges.cv2.rectangle(plate_img, (x,y), (x+w, y+h), (51,51,255), 3)return plate_img, plate # returning the processed image
上述函數(shù)的工作原理是將圖像作為輸入,然后應(yīng)用“haar cascade”(經(jīng)過預(yù)訓(xùn)練以檢測(cè)印度車牌),這里的參數(shù)scaleFactor表示一個(gè)值,通過該值可以縮放輸入圖像以更好地檢測(cè)車牌。minNeighbors只是一個(gè)減少誤報(bào)的參數(shù),如果該值較低,算法可能更容易給出錯(cuò)誤識(shí)別的輸出。
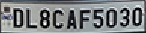
現(xiàn)在,讓我們進(jìn)一步處理此圖像,以簡(jiǎn)化角色提取過程。我們將首先為此定義更多函數(shù)。
# Find characters in the resulting imagesdef segment_characters(image) :# Preprocess cropped license plate imageimg = cv2.resize(image, (333, 75))img_gray = cv2.cvtColor(img, cv2.COLOR_BGR2GRAY)img_binary = cv2.threshold(img_gray, 200, 255, cv2.THRESH_BINARY+cv2.THRESH_OTSU)img_erode = cv2.erode(img_binary, (3,3))img_dilate = cv2.dilate(img_erode, (3,3))LP_WIDTH = img_dilate.shape[0]LP_HEIGHT = img_dilate.shape[1]# Make borders white:3,:] = 255:,0:3] = 255:75,:] = 255:,330:333] = 255# Estimations of character contours sizes of cropped license platesdimensions = [LP_WIDTH/6, LP_WIDTH/2, LP_HEIGHT/10, 2*LP_HEIGHT/3]# Get contours within cropped license platechar_list = find_contours(dimensions, img_dilate)return char_list
上述函數(shù)接收?qǐng)D像作為輸入,并對(duì)其執(zhí)行以下操作:
將其調(diào)整為一個(gè)維度,使所有字符看起來清晰明了。
將彩色圖像轉(zhuǎn)換為灰度圖像,即代替3個(gè)通道(BGR),圖像只有一個(gè)8位通道,其值范圍為0–255,其中0對(duì)應(yīng)于黑色,255對(duì)應(yīng)于白色。我們這樣做是為了為下一個(gè)過程準(zhǔn)備圖像。
該圖像現(xiàn)在是二進(jìn)制形式,并準(zhǔn)備好進(jìn)行下一個(gè)進(jìn)程侵蝕。
侵蝕是一個(gè)簡(jiǎn)單的過程,用于從對(duì)象邊界移除不需要的像素,這意味著像素的值應(yīng)為0,但其值為1。
下一步是使圖像的邊界變白。
我們已將圖像還原為經(jīng)過處理的二值圖像,并準(zhǔn)備將此圖像傳遞給字符提取。
import numpy as npimport cv2# Match contours to license plate or character templatedef find_contours(dimensions, img) :# Find all contours in the imagecntrs, _ = cv2.findContours(img.copy(), cv2.RETR_TREE, cv2.CHAIN_APPROX_SIMPLE)# Retrieve potential dimensionslower_width = dimensions[0]upper_width = dimensions[1]lower_height = dimensions[2]upper_height = dimensions[3]# Check largest 5 or 15 contours for license plate or character respectivelycntrs = sorted(cntrs, key=cv2.contourArea, reverse=True)[:15]x_cntr_list = []target_contours = []img_res = []for cntr in cntrs :#detects contour in binary image and returns the coordinates of rectangle enclosing itintX, intY, intWidth, intHeight = cv2.boundingRect(cntr)#checking the dimensions of the contour to filter out the characters by contour's sizeif intWidth > lower_width and intWidth < upper_width and intHeight > lower_height and intHeight < upper_height :x_cntr_list.append(intX) #stores the x coordinate of the character's contour, to used later for indexing the contourschar_copy = np.zeros((44,24))#extracting each character using the enclosing rectangle's coordinates.char = img[intY:intY+intHeight, intX:intX+intWidth]char = cv2.resize(char, (20, 40))# Make result formatted for classification: invert colorschar = cv2.subtract(255, char)# Resize the image to 24x44 with black borderchar_copy[2:42, 2:22] = charchar_copy[0:2, :] = 0char_copy[:, 0:2] = 0char_copy[42:44, :] = 0char_copy[:, 22:24] = 0img_res.append(char_copy) #List that stores the character's binary image (unsorted)#Return characters on ascending order with respect to the x-coordinate (most-left character first)#arbitrary function that stores sorted list of character indecesindices = sorted(range(len(x_cntr_list)), key=lambda k: x_cntr_list[k])img_res_copy = []for idx in indices:img_res_copy.append(img_res[idx])# stores character images according to their indeximg_res = np.array(img_res_copy)return img_res
在第4步之后,我們應(yīng)該有一個(gè)干凈的二進(jìn)制圖像來處理。在這一步中,我們將應(yīng)用更多的圖像處理來從車牌中提取單個(gè)字符。
數(shù)據(jù)是干凈和準(zhǔn)備好的,現(xiàn)在是時(shí)候創(chuàng)建一個(gè)神經(jīng)網(wǎng)絡(luò),它將足夠智能,在訓(xùn)練后識(shí)別字符。
對(duì)于建模,我們將使用具有3層的卷積神經(jīng)網(wǎng)絡(luò)。
# create modelmodel = Sequential()model.add(Conv2D(filters=32, kernel_size=(5,5), input_shape=(28, 28, 1), activation='relu'))model.add(MaxPooling2D(pool_size=(2, 2)))model.add(Dropout(rate=0.4))model.add(Flatten())model.add(Dense(units=128, activation='relu'))model.add(Dense(units=36, activation='softmax'))
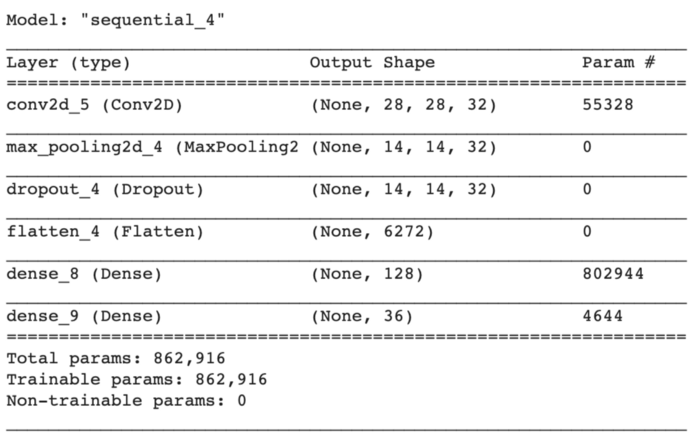
為了保持模型簡(jiǎn)單,我們將從創(chuàng)建一個(gè)順序?qū)ο箝_始。
第一層是卷積層,具有32個(gè)輸出濾波器、大小為(5,5)的卷積窗口和“Relu”作為激活函數(shù)。
接下來,我們將添加一個(gè)窗口大小為(2,2)的最大池層。
最大池是一個(gè)基于樣本的離散化過程。目標(biāo)是對(duì)輸入表示(圖像、隱藏層輸出矩陣等)進(jìn)行下采樣,降低其維數(shù),并允許對(duì)包含在分塊子區(qū)域中的特征進(jìn)行假設(shè)。
Dropout是一個(gè)正則化超參數(shù),用于初始化以防止神經(jīng)網(wǎng)絡(luò)過度擬合。輟學(xué)是一種在訓(xùn)練過程中忽略隨機(jī)選擇的神經(jīng)元的技術(shù)。他們是隨機(jī)“退出”的。
現(xiàn)在是展平節(jié)點(diǎn)數(shù)據(jù)的時(shí)候了,所以我們添加了一個(gè)展平層。展平層從上一層獲取數(shù)據(jù),并以單個(gè)維度表示。
最后,我們將添加兩個(gè)密集層,一個(gè)是輸出空間的維數(shù)為128,激活函數(shù)為'relu',另一個(gè)是我們的最后一個(gè)層,有36個(gè)輸出,用于對(duì)26個(gè)字母(A-Z)+10個(gè)數(shù)字(0-9)進(jìn)行分類,激活函數(shù)為'softmax'
我們將使用的數(shù)據(jù)包含大小為28x28的字母(A-Z)和數(shù)字(0-9)的圖像,而且數(shù)據(jù)是平衡的,因此我們不必在這里進(jìn)行任何類型的數(shù)據(jù)調(diào)整。
我們將使用“分類交叉熵”作為損失函數(shù),“Adam”作為優(yōu)化函數(shù),“精度”作為誤差矩陣。
import datetimeclass stop_training_callback(tf.keras.callbacks.Callback):def on_epoch_end(self, epoch, logs={}):if(logs.get('val_acc') > 0.992):self.model.stop_training = Truelog_dir="logs/fit/" + datetime.datetime.now().strftime("%Y%m%d-%H%M%S")tensorboard_callback = tf.keras.callbacks.TensorBoard(log_dir=log_dir, histogram_freq=1)batch_size = 1callbacks = [tensorboard_callback, stop_training_callback()]model.fit_generator(train_generator,steps_per_epoch = train_generator.samples // batch_size,validation_data = validation_generator,validation_steps = validation_generator.samples // batch_size,epochs = 80, callbacks=callbacks)
經(jīng)過23個(gè)階段的訓(xùn)練,模型的準(zhǔn)確率達(dá)到99.54%。
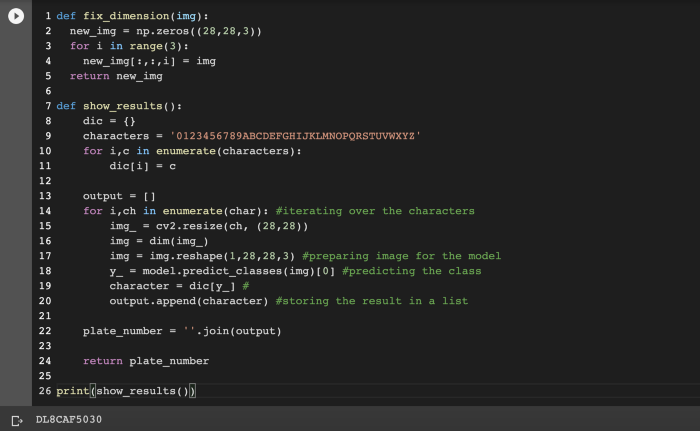
最后,讓我們將圖像輸入到我們的模型中。
往期精彩:
?時(shí)隔一年!深度學(xué)習(xí)語義分割理論與代碼實(shí)踐指南.pdf第二版來了!
?基于 docker 和 Flask 的深度學(xué)習(xí)模型部署!
?新書預(yù)告 | 《機(jī)器學(xué)習(xí)公式推導(dǎo)與代碼實(shí)現(xiàn)》出版在即!