
Drawable 使用詳解

和你一起終身學習,這里是程序員Android
經典好文推薦,通過閱讀本文,您將收獲以下知識點:
一、Drawable 簡介
二、Bitmap 位圖 BitmapDrawable
三、可拉伸圖(*.9.png) NinePatchDrawable。
四、圖層 LayerDrawable
五、 不同狀態(tài)圖(選擇器) StateListDrawable
六、級別列表 LevelListDrawable
七、轉換圖像 TransitionDrawable
八、插入可繪制對象
九、 剪裁可繪制對象 ClipDrawable
十、 縮放可繪制對象 ScaleDrawable
十一、形狀可繪制對象 ShapeDrawable
一、Drawable 簡介
Drawable?是Android?中圖像顯示的常用方法。
概念:Drawable是指可在屏幕上繪制的圖形,已經通過getDrawable(int)等API檢索或者應用到具有?android:drawable?和?android:icon?等屬性的其他XML?資源的圖形。
1.繼承關系如下:
[java.lang.Object]
   ?
     android.graphics.drawable.Drawable
2.Drawable 分類如下:
1.Bitmap 位圖?BitmapDrawable
2.可拉伸圖(*.9.png)?NinePatchDrawable。
3.圖層LayerDrawable
4.不同狀態(tài)圖(選擇器)?StateListDrawable
5.級別列表LevelListDrawable
6.轉換圖像?TransitionDrawable
7.插入可繪制對象
8.剪裁可繪制對象?ClipDrawable
9.縮放可繪制對象?ScaleDrawable
10.形狀可繪制對象?ShapeDrawable
3. 資源引用:
在?Java中:R.drawable.filename
在XML?中:@[package:]drawable/filename
二、Bitmap 位圖 BitmapDrawable
位圖圖像。Android支持以下三種格式的位圖文件:.png(首選)、.jpg(可接受)、.gif(不建議)。這些文件保存到?res/drawable/目錄中
在構建過程中,可通過aapt工具自動優(yōu)化位圖文件,對圖像進行無損壓縮。例如,不需要超過?256色的真彩色PNG?可通過調色板轉換為?8位?PNG。這樣產生的圖像質量相同,但所需內存更少。因此請注意,此目錄中的圖像二進制文件在構建時可能會發(fā)生變化。如果您計劃將圖像解讀為比特流以將其轉換為位圖,請改為將圖像放在res/raw/文件夾中,在那里它們不會進行優(yōu)化
使用方法如下:
1.常規(guī)位圖
XML 布局中使用方法
        <ImageView
            android:id="@+id/img_round"
            android:layout_width="80dp"
            android:layout_height="80dp"
            android:src="@drawable/gril" />
Java 代碼中使用方法
getResources().getDrawable(R.drawable.xml_bitmap)
2.XML 位圖
在XML中創(chuàng)建位圖資源文件
注意一下屬性使用方法:
antialias?
啟用、停用抗鋸齒dither
當位圖的像素配置與屏幕不同時(例如:RGB 8888位圖和?RGB 565屏幕),啟用或停用位圖抖動。filter
啟用或停用位圖過濾。當位圖收縮或拉伸以使其外觀平滑時使用過濾。mipmap
啟用或停用mipmap提示
5.tileMode
定義平鋪模式。當平鋪模式啟用時,位圖會重復。重力在平鋪模式啟用時將被忽略xml_bitmap?位圖實現
<bitmap xmlns:android="http://schemas.android.com/apk/res/android"
    android:antialias="true"
    android:dither="true"
    android:filter="false"
    android:gravity="center_vertical|clip_vertical"
    android:mipMap="true"
    android:src="@drawable/gril"
    android:tileMode="repeat" >


bitmap>
引用XML位圖資源方法
        <ImageView
            android:id="@+id/img_drawable_bitmap"
            android:layout_width="match_parent"
            android:layout_height="50dp"
            android:src="@drawable/xml_bitmap" />
java 代碼實現方法

java 代碼使用位圖的方法
三、可拉伸圖(*.9.png) NinePatchDrawable。
NinePatch是一種?PNG?圖像,在其中可定義當視圖中的內容超出正常圖像邊界時?Android?縮放的可拉伸區(qū)域。此類圖像通常指定為至少有一個尺寸設置為?"wrap_content"?的視圖的背景,而且當視圖擴展以適應內容時,九宮格圖像也會擴展以匹配視圖的大小。Android?的標準?Button小部件使用的背景就是典型的九宮格圖像,其必須拉伸以適應按鈕內的文本(或圖像)。
1. 常規(guī)使用方法同其他圖片引用方式
    android:src="@drawable/main_bg_green"
    android:dither="false">
四、 圖層 LayerDrawable
LayerDrawable?是管理其他可繪制對象陣列的可繪制對象。列表中的每個可繪制對象按照列表的順序繪制,列表中的最后一個可繪制對象繪于頂部。每個可繪制對象由單一?
<layer-list xmlns:android="http://schemas.android.com/apk/res/android" >

    <item
        android:id="@+id/bird001"
        android:drawable="@drawable/bird0001_risk">
    item>
    <item
        android:id="@+id/bird002"
        android:drawable="@drawable/bird0002_risk"
        android:left="50dp"
        android:top="50dp">
    item>
    <item
        android:id="@+id/bird003"
        android:drawable="@drawable/bird0003_risk"
        android:left="100dp"
        android:top="100dp">
    item>

layer-list>
五、 不同狀態(tài)圖(選擇器) StateListDrawable
StateListDrawable是在?XML中定義的可繪制對象,它根據對象的狀態(tài),使用多個不同的圖像來表示同一個圖形。例如,Button?小部件可以是多種不同狀態(tài)(按下、聚焦或這兩種狀態(tài)都不是)中的其中一種,而且可以利用狀態(tài)列表可繪制對象為每種狀態(tài)提供不同的背景圖片。
您可以在?XML?文件中描述狀態(tài)列表。每個圖形由單一?
在每個狀態(tài)變更期間,將從上到下遍歷狀態(tài)列表,并使用第一個與當前狀態(tài)匹配的項目 —此選擇并非基于“最佳匹配”,而是選擇符合狀態(tài)最低條件的第一個項目。
此方法非常常用,比如狀態(tài)選擇器
常規(guī)使用方法同其他圖片引用方式
選擇器 XML的使用方式
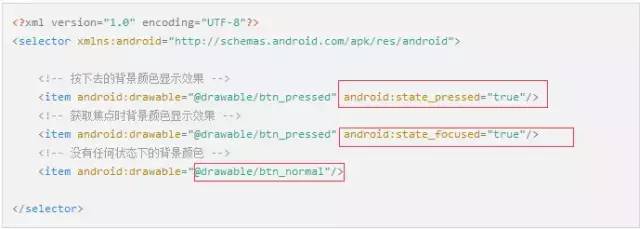
狀態(tài)選擇器
六、 級別列表 LevelListDrawable
管理大量備選可繪制對象的可繪制對象,每個可繪制對象都分配有最大的備選數量。使用setLevel()設置可繪制對象的級別值會加載級別列表中android:maxLevel?值大于或等于傳遞到方法的值的可繪制對象資源。
資源引用:
在 Java 中:R.drawable.filename
在 XML 中:@[package:]drawable/filename
<level-list xmlns:android="http://schemas.android.com/apk/res/android" >

    <item
        android:drawable="@drawable/gril"
        android:maxLevel="100"
        android:minLevel="10"/>

level-list>
可通過?setLevel()或?setImageLevel()?更改級別。
七、 轉換圖像 TransitionDrawable
TransitionDrawable?是可在兩種可繪制對象資源之間交錯淡出的可繪制對象。
每個可繪制對象由單一startTransition()。要向后轉換,則調用?reverseTransition()。
1. xml 布局聲明
<transition xmlns:android="http://schemas.android.com/apk/res/android">
    <item android:drawable="@drawable/bird0001_risk" />
    <item android:drawable="@drawable/bird0002_risk" />
transition>
2.java 代碼中使用

java代碼中TransitionDrawable使用方法
八、插入可繪制對象
在?XML文件中定義的以指定距離插入其他可繪制對象的可繪制對象。當視圖需要小于視圖實際邊界的背景時,此類可繪制對象很有用。
<inset xmlns:android="http://schemas.android.com/apk/res/android"
    android:drawable="@drawable/gril"
    android:insetBottom="10dp"
    android:insetLeft="10dp"
    android:insetRight="10dp"
    android:insetTop="10dp"
    android:visible="true" >

inset>
九、 剪裁可繪制對象 ClipDrawable
在?XML文件中定義的對其他可繪制對象進行裁剪(根據其當前級別)的可繪制對象。您可以根據級別以及用于控制其在整個容器中位置的重力,來控制子可繪制對象的裁剪寬度和高度。通常用于實現進度欄之類的項目。
1. xml 初始化剪裁樣式
<clip xmlns:android="http://schemas.android.com/apk/res/android"
    android:clipOrientation="vertical"
    android:drawable="@drawable/gril"
    android:gravity="center" >

clip>
2. java 代碼中使用

ClipDrawable java 代碼中使用方法
十、 縮放可繪制對象 ScaleDrawable
在?XML文件中定義的更改其他可繪制對象大小
<scale xmlns:android="http://schemas.android.com/apk/res/android"
    android:drawable="@drawable/gril"
    android:scaleGravity="center"
    android:scaleHeight="10%"
    android:scaleWidth="10%" >

scale>
十一、形狀可繪制對象 ShapeDrawable
在?XML?中定義的一般形狀。
1. 繪制直線
<shape xmlns:android="http://schemas.android.com/apk/res/android"
    android:shape="line" >
    <gradient
        android:angle="45"
        android:centerX="0.5"
        android:centerY="0.5"
        android:centerColor="@android:color/holo_green_dark"
        android:endColor="@android:color/holo_orange_light"
        android:gradientRadius="5dp"
        android:startColor="@android:color/holo_purple"
        android:type="linear"
        android:useLevel="true"/>"
    <padding
        android:left="5dp"
        android:top="5dp"
        android:right="5dp"
        android:bottom="5dp" />
    <size
        android:width="1dp"
        android:height="1dp" />
    <solid
        android:color="@android:color/holo_orange_light" />
    <stroke
        android:width="5dp"
        android:color="@android:color/darker_gray"
        android:dashWidth="5dp"
        android:dashGap="5dp" />
shape>
2.繪制圓角矩形
<shape xmlns:android="http://schemas.android.com/apk/res/android"
    android:shape="rectangle">


    <corners android:radius="5dp" />

    <stroke
        android:width="1dp"
        android:color="@android:color/holo_blue_light" />

shape>
至此,本篇已結束。轉載網絡的文章,小編覺得很優(yōu)秀,歡迎點擊閱讀原文,支持原創(chuàng)作者,如有侵權,懇請聯(lián)系小編刪除。同時感謝您的閱讀,期待您的關注。