詳解 Python 操作 PPT 的各種騷操作!

作者:黃同學(xué)
1、python-pptx模塊簡介
使用python操作PPT,需要使用的模塊就是python-pptx,下面來對該模塊做一個簡單的介紹。
這里提前做一個說明:python操作PPT,最好是我們提前設(shè)計好自己的一套樣式,然后利用進(jìn)行python進(jìn)行內(nèi)容的獲取和填充(最主要的功能!),最好是不用使用python代碼操作PPT的格式,格式的修改肯定不如我們直接在PPT中修改方便。
可以創(chuàng)建、修改PPT(.pptx)文件 需要單獨(dú)安裝,不包含在Python標(biāo)準(zhǔn)模塊里 python-pptx官網(wǎng)介紹:https://python-pptx.readthedocs.io/en/latest/
2、模塊的安裝與導(dǎo)入
1)模塊的安裝
"Windows用戶命令行下輸入"
pip?install?python-pptx
"Mac用戶命令行下輸入"
pip3?install?python-pptx
2)模塊的導(dǎo)入
這里有一點(diǎn)需要注意的是:安裝的庫是python-pptx,但是導(dǎo)入的時候卻有點(diǎn)不同。
import?pptx
3、python讀取PPT文檔中的內(nèi)容
1)PPT的結(jié)構(gòu)說明
在使用python操作PPT之前,首先應(yīng)該清楚PPT的結(jié)構(gòu),這個對于之后代碼的編寫很有幫助。
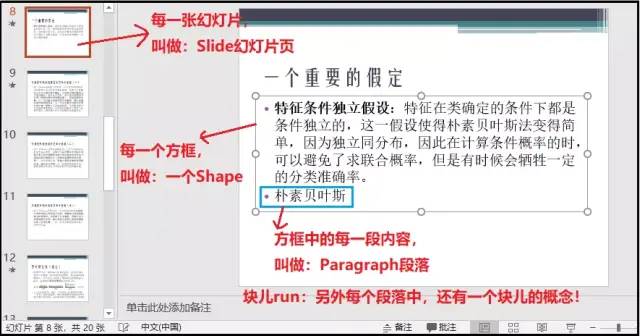
關(guān)于run塊兒的概念,可以參考我的另外一篇文章:https://blog.csdn.net/weixin_41261833/article/details/106028038
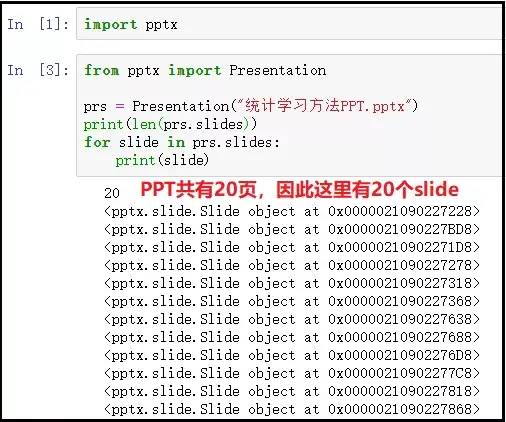
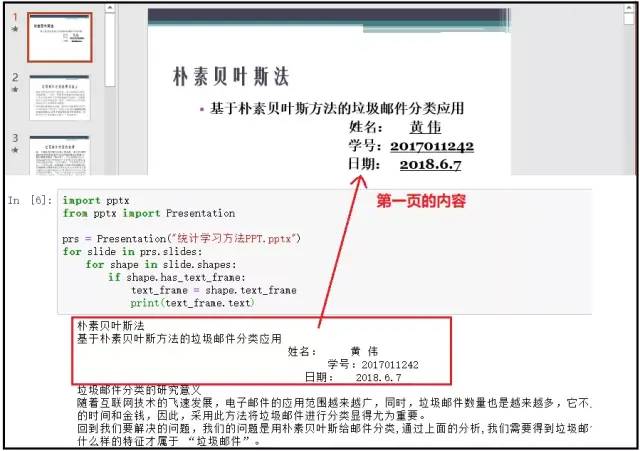
2)獲取Slide
from?pptx?import?Presentation

prs?=?Presentation("統(tǒng)計學(xué)習(xí)方法PPT.pptx")
for?slide?in?prs.slides:
????print(slide)
結(jié)果如下:
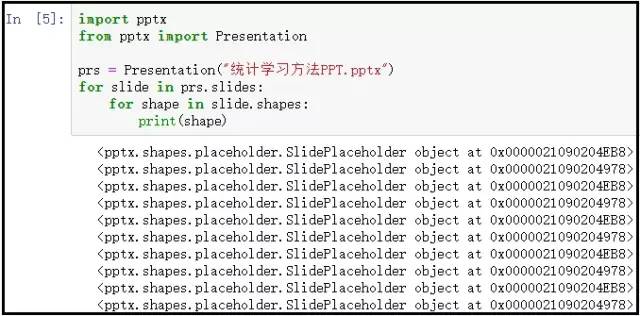
3)獲取Shape形狀
import?pptx
from?pptx?import?Presentation

prs?=?Presentation("統(tǒng)計學(xué)習(xí)方法PPT.pptx")
for?slide?in?prs.slides:
????for?shape?in?slide.shapes:
????????print(shape)
"""
注意:這里得到的Shape對象,并不能看出什么,接著往下看。
"""
結(jié)果如下:
4)判斷每個Shape中是否存在文字
shape.has_text_frame :是否有文字 shape.text_frame :獲取文字框
import?pptx
from?pptx?import?Presentation

prs?=?Presentation("統(tǒng)計學(xué)習(xí)方法PPT.pptx")
for?slide?in?prs.slides:
????for?shape?in?slide.shapes:
????????if?shape.has_text_frame:
????????????text_frame?=?shape.text_frame
????????????print(text_frame.text)
結(jié)果如下:
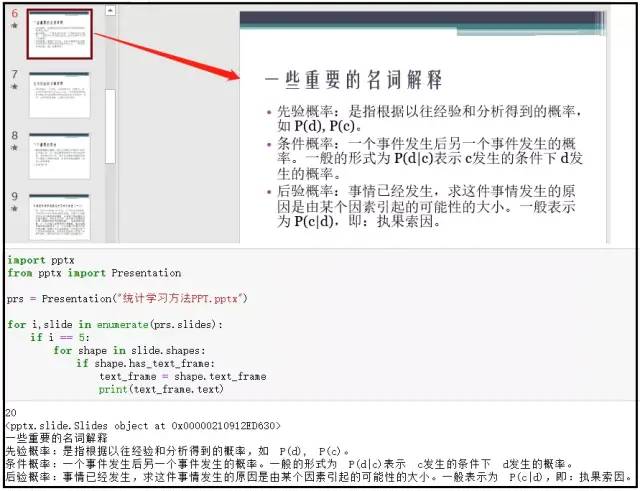
5)獲取某一頁Slide中的內(nèi)容
import?pptx
from?pptx?import?Presentation

prs?=?Presentation("統(tǒng)計學(xué)習(xí)方法PPT.pptx")

for?i,slide?in?enumerate(prs.slides):
????if?i?==?5:
????????for?shape?in?slide.shapes:
????????????if?shape.has_text_frame:
????????????????text_frame?=?shape.text_frame
????????????????print(text_frame.text)
結(jié)果如下:
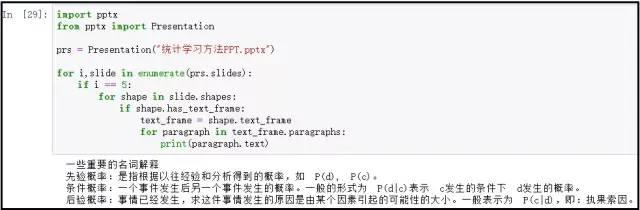
6)獲取Shape中的某個Paragraph
import?pptx
from?pptx?import?Presentation

prs?=?Presentation("統(tǒng)計學(xué)習(xí)方法PPT.pptx")

for?i,slide?in?enumerate(prs.slides):
????if?i?==?5:
????????for?shape?in?slide.shapes:
????????????if?shape.has_text_frame:
????????????????text_frame?=?shape.text_frame
????????????????for?paragraph?in?text_frame.paragraphs:
????????????????????print(paragraph.text)
"""
注意:該方法和上述4)中的方法一摸一樣。上述方法是直接獲取Shpae中的文字內(nèi)容;
下面這個更靈活,先獲取每個Shape,然后在獲取每個Shape中的paragraph;
下面方式更好:因為我們可以針對paragraph,寫一個判斷條件,只獲取第幾個paragraph;
"""
結(jié)果如下:
4、利用python像PPT中寫入內(nèi)容
1)幻燈片模板及占位符的概念

2)怎么自定義母版?
https://jingyan.baidu.com/article/925f8cb8b5dfe7c0dce05671.html
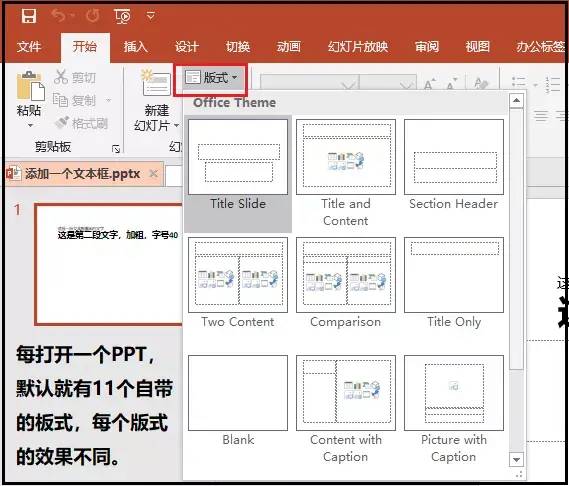
3)什么是版式?
這個概念在下面的效果中,會得以體現(xiàn)。其中prs.slide_layouts[]傳入0表示獲取的是第一個版式,傳入1表示獲取的是第二個版式,以此類推下去。
4)添加Slide和內(nèi)容
這里就需要使用上述的自定義母版。因為畢竟是使用python操作PPT,我們可以定義好自己想要展示的PPT母版,然后借助代碼完成PPT的內(nèi)容寫入操作。
① 占位符id的確認(rèn)
import?pptx
from?pptx?import?Presentation
prs?=?Presentation("空白.pptx")
#?prs.slide_layouts[]表示的是ppt中不同的版式
slide?=?prs.slides.add_slide(prs.slide_layouts[0])
for?shape?in?slide.placeholders:
????phf?=?shape.placeholder_format
????print(f"{phf.idx}--{shape.name}--{phf.type}")
????shape.text?=?f"{phf.idx}--{shape.name}--{phf.type}"
#?注意:做完這個操作,一定要記得保存一下!
prs.save("電子獎狀模板.pptx")
"""
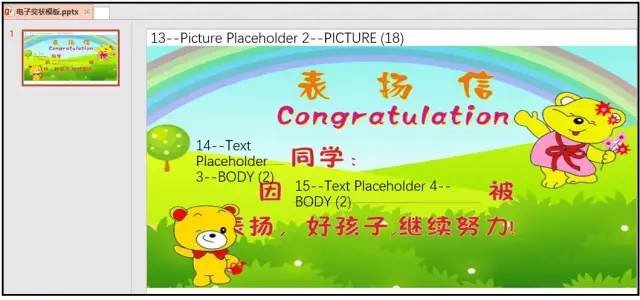
上述打印結(jié)果如下:
0--Title?1--TITLE?(1)??這個表示標(biāo)題占位符,id為0
13--Picture?Placeholder?2--PICTURE?(18)??這個表示圖片占位符,id為13
14--Text?Placeholder?3--BODY?(2)??這個表示正文內(nèi)容占位符,id為14
15--Text?Placeholder?4--BODY?(2)??這個表示正文內(nèi)容占位符,id為15
我們一定要先知道每個空格的占位符id,才可以進(jìn)行下面內(nèi)容的填充。
"""
效果如下:
② PPT內(nèi)容的填寫
import?pptx
from?pptx?import?Presentation

prs?=?Presentation("空白.pptx")
slide?=?prs.slides.add_slide(prs.slide_layouts[0])
name?=?slide.placeholders[14]
why?=?slide.placeholders[15]

name.text?=?"黃同學(xué)"
why.text?=?"學(xué)習(xí)太積極"
prs.save("內(nèi)容填充.pptx")
效果如下:

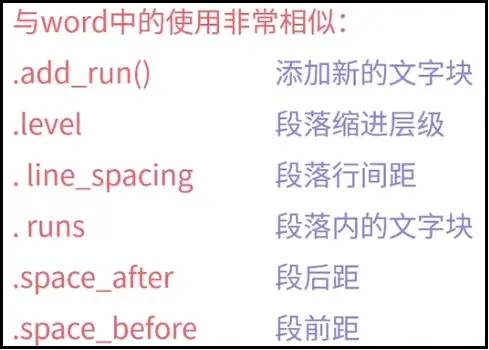
5)添加段落
① 占位符id的確認(rèn)
import?pptx
from?pptx?import?Presentation
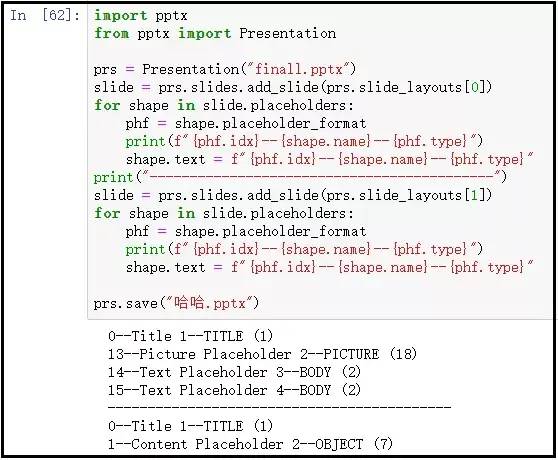
prs?=?Presentation("finall.pptx")
slide?=?prs.slides.add_slide(prs.slide_layouts[0])
for?shape?in?slide.placeholders:
????phf?=?shape.placeholder_format
????print(f"{phf.idx}--{shape.name}--{phf.type}")
????shape.text?=?f"{phf.idx}--{shape.name}--{phf.type}"
print("-------------------------------------------")
slide?=?prs.slides.add_slide(prs.slide_layouts[1])
for?shape?in?slide.placeholders:
????phf?=?shape.placeholder_format
????print(f"{phf.idx}--{shape.name}--{phf.type}")
????shape.text?=?f"{phf.idx}--{shape.name}--{phf.type}"
prs.save("哈哈.pptx")
效果如下:
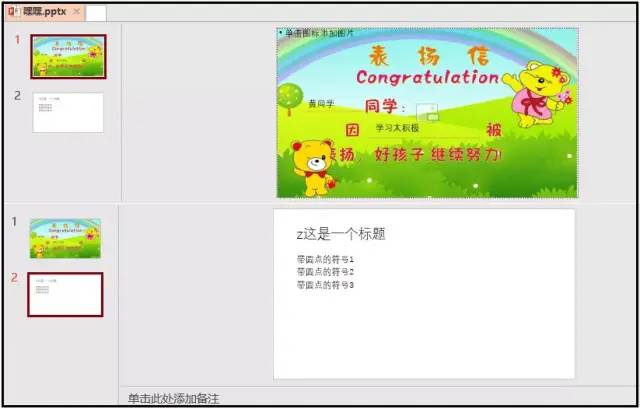
② 段落的添加
import?pptx
from?pptx?import?Presentation

prs?=?Presentation("finall.pptx")
slide?=?prs.slides.add_slide(prs.slide_layouts[0])
name?=?slide.placeholders[14]
why?=?slide.placeholders[15]
name.text?=?"黃同學(xué)"
why.text?=?"學(xué)習(xí)太積極"
#?---------------------------------------------------?#
prs1?=?Presentation("finall.pptx")
slide1?=?prs.slides.add_slide(prs.slide_layouts[1])
shapes?=?slide1.shapes
title_shape?=?shapes.title??#?這句代碼可以改為title_shape?=?shapes.placeholders[0]
body_shape?=?shapes.placeholders[1]

title_shape.text?=?"這是一個標(biāo)題"

tf?=?body_shape.text_frame
#?這句代碼就是給body占位符添加內(nèi)容!
tf.text?=?"帶圓點(diǎn)的符號1"

p?=?tf.add_paragraph()
#?這個代碼表示在原來的基礎(chǔ)上,添加第一個段落!
p.text?=?"帶圓點(diǎn)的符號2"

p?=?tf.add_paragraph()
#?這個代碼表示在原來的基礎(chǔ)上,添加第二個段落!
p.text?=?"帶圓點(diǎn)的符號3"

prs.save("嘿嘿.pptx")
效果如下:
③ 給段落設(shè)定層級關(guān)系
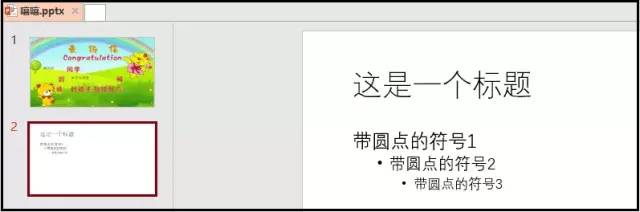
import?pptx
from?pptx?import?Presentation

prs?=?Presentation("finall.pptx")
slide?=?prs.slides.add_slide(prs.slide_layouts[0])
name?=?slide.placeholders[14]
why?=?slide.placeholders[15]
name.text?=?"黃同學(xué)"
why.text?=?"學(xué)習(xí)太積極"
#?---------------------------------------------------?#
prs1?=?Presentation("finall.pptx")
slide1?=?prs.slides.add_slide(prs.slide_layouts[1])
shapes?=?slide1.shapes
title_shape?=?shapes.title??#?這句代碼可以改為title_shape?=?shapes.placeholders[0]
body_shape?=?shapes.placeholders[1]

title_shape.text?=?"這是一個標(biāo)題"

tf?=?body_shape.text_frame
tf.text?=?"帶圓點(diǎn)的符號1"

p?=?tf.add_paragraph()
p.text?=?"帶圓點(diǎn)的符號2"
#?原始內(nèi)容的層級相當(dāng)于是0,因此這個段落我設(shè)置為層級1,下面的段落設(shè)置為層級2
p.level?=?1

p?=?tf.add_paragraph()
p.text?=?"帶圓點(diǎn)的符號3"
p.level?=?2

prs.save("嘻嘻.pptx")
效果如下:
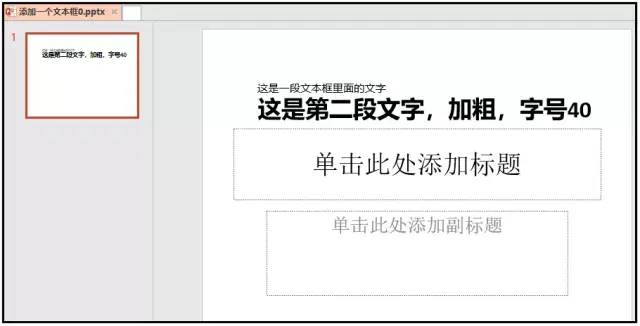
④ 添加一個文本框
slide.shapes.add_textbox(left, top, width, height)
from?pptx?import?Presentation
from?pptx.util?import?Cm,?Pt

prs?=?Presentation()
#?使用第一個版式
black_slide_layout?=?prs.slide_layouts[0]
slide?=?prs.slides.add_slide(black_slide_layout)

left?=?top?=?width?=?height?=?Cm(3)
text_box?=?slide.shapes.add_textbox(left,?top,?width,?height)
tf?=?text_box.text_frame
tf.text?=?"這是一段文本框里面的文字"

p?=?tf.add_paragraph()
p.text?=?"這是第二段文字,加粗,字號40"
p.font.bold?=?True
p.font.size?=?Pt(40)

prs.save("添加一個文本框0.pptx")
效果如下:
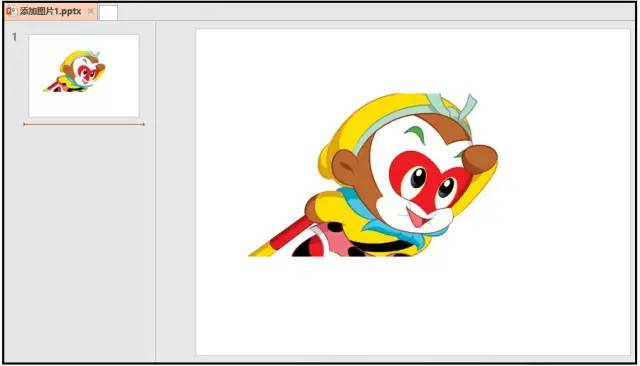
⑤ 添加一個圖片
slide.shapes.add_picture(圖片路徑, 距離左邊, 距離頂端, 寬度, 高度)
第一種展示:
from?pptx?import?Presentation
from?pptx.util?import?Cm

prs?=?Presentation()
#?使用第七個版式
black_slide_layout?=?prs.slide_layouts[6]
slide?=?prs.slides.add_slide(black_slide_layout)

left?=?top?=?Cm(3)
pic?=?slide.shapes.add_picture("孫悟空.png",?left,?top)

prs.save("添加圖片1.pptx")
效果如下:
第二種展示:
from?pptx?import?Presentation
from?pptx.util?import?Cm

prs?=?Presentation()
#?使用第七個版式
black_slide_layout?=?prs.slide_layouts[6]
slide?=?prs.slides.add_slide(black_slide_layout)

left?=?top?=?Cm(3)
height?=?Cm(5.5)
pic?=?slide.shapes.add_picture("孫悟空.png",?left,?top,?height=height)

prs.save("添加圖片2.pptx")
效果如下:

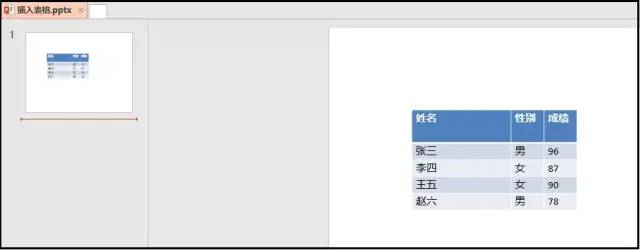
⑥ 添加表格
shapes.add_table(rows, cols, left, top, width, height)
from?pptx?import?Presentation
from?pptx.util?import?Cm,?Pt

prs?=?Presentation()
#?使用第七個版式
black_slide_layout?=?prs.slide_layouts[6]
slide?=?prs.slides.add_slide(black_slide_layout)
shapes?=?slide.shapes

rows,?cols?=?5,?3
left?=?top?=?Cm(5)
width?=?Cm(18)
height?=?Cm(3)

table?=?shapes.add_table(rows,?cols,?left,?top,?width,?height).table
table.columns[0].width?=?Cm(6)
table.columns[1].width?=?Cm(2)
table.columns[2].width?=?Cm(2)
table.rows[0].height?=?Cm(2)

data?=?[
????["姓名","性別","成績"],
????["張三","男",96],
????["李四","女",87],
????["王五","女",90],
????["趙六","男",78]
]

for?row?in?range(rows):
????for?col?in?range(cols):
????????table.cell(row,col).text?=?str(data[row][col])
prs.save("插入表格.pptx")??
結(jié)果如下:
5、PPT文檔內(nèi)容樣式批量調(diào)整
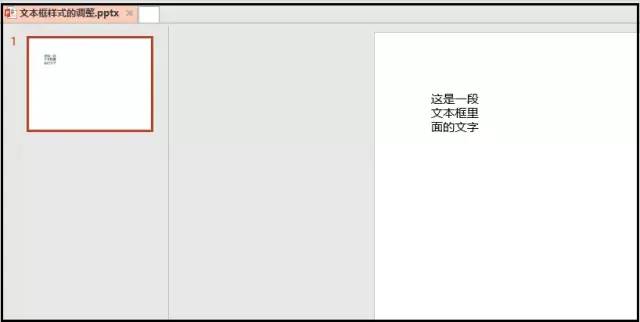
1)文本框位置的調(diào)整
上面我們已經(jīng)知道怎么添加文本框,現(xiàn)在我們需要做的就是,怎么調(diào)整文本框的位置。
from?pptx?import?Presentation
from?pptx.util?import?Cm,?Pt
from?pptx.enum.text?import?MSO_ANCHOR,?MSO_AUTO_SIZE

prs?=?Presentation()
#?使用第七個版式
black_slide_layout?=?prs.slide_layouts[6]
slide?=?prs.slides.add_slide(black_slide_layout)

left?=?top?=?width?=?height?=?Cm(3)
text_box?=?slide.shapes.add_textbox(left,?top,?width,?height)
tf?=?text_box.text_frame
tf.text?=?"這是一段文本框里面的文字"
#?-----------------------------------------?#
tf.margin_bottom?=?Cm(0.1)?#?下邊距
tf.margin_left?=?0?#?下邊距
#?一定要導(dǎo)入MSO_ANCHOR這個庫
tf.vertical_anchor?=?MSO_ANCHOR.BOTTOM?#?對齊文本方式:底端對齊
tf.word_wrap?=?True?#?框中的文字自動換行

prs.save("文本框樣式的調(diào)整.pptx")??
結(jié)果如下:
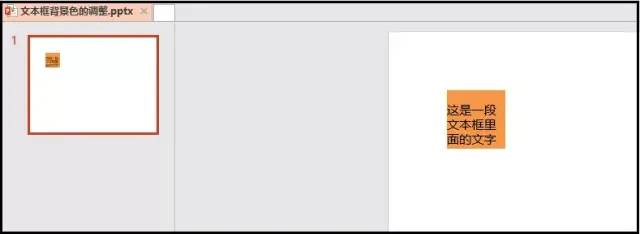
2)文本框背景顏色調(diào)整
from?pptx?import?Presentation
from?pptx.util?import?Cm,?Pt
from?pptx.enum.text?import?MSO_ANCHOR,?MSO_AUTO_SIZE
from?pptx.dml.color?import?RGBColor

prs?=?Presentation()
#?使用第七個版式
black_slide_layout?=?prs.slide_layouts[6]
slide?=?prs.slides.add_slide(black_slide_layout)

left?=?top?=?width?=?height?=?Cm(3)
text_box?=?slide.shapes.add_textbox(left,?top,?width,?height)
tf?=?text_box.text_frame
tf.text?=?"這是一段文本框里面的文字"
#?--------------------------------------?#
tf.margin_bottom?=?Cm(0.1)?#?下邊距
tf.margin_left?=?0?#?下邊距
tf.vertical_anchor?=?MSO_ANCHOR.BOTTOM??
tf.word_wrap?=?True?#?框中的文字自動換行
#?--------------------------------------?#
fill?=?text_box.fill
fill.solid()
#?使用之前一定要導(dǎo)入RGBColor這個庫
fill.fore_color.rgb?=?RGBColor(247,?150,?70)

prs.save("文本框背景色的調(diào)整.pptx")??
結(jié)果如下:
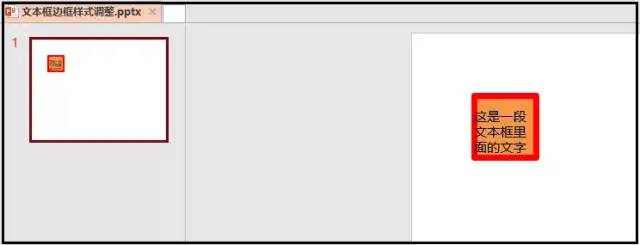
3)文本框邊框樣式調(diào)整
from?pptx?import?Presentation
from?pptx.util?import?Cm,?Pt
from?pptx.enum.text?import?MSO_ANCHOR,?MSO_AUTO_SIZE
from?pptx.dml.color?import?RGBColor

prs?=?Presentation()
#?使用第七個版式
black_slide_layout?=?prs.slide_layouts[6]
slide?=?prs.slides.add_slide(black_slide_layout)

left?=?top?=?width?=?height?=?Cm(3)
text_box?=?slide.shapes.add_textbox(left,?top,?width,?height)
tf?=?text_box.text_frame
tf.text?=?"這是一段文本框里面的文字"
#?--------------------------------------?#
tf.margin_bottom?=?Cm(0.1)?#?下邊距
tf.margin_left?=?0?#?下邊距
tf.vertical_anchor?=?MSO_ANCHOR.BOTTOM??
tf.word_wrap?=?True?#?框中的文字自動換行
#?--------------------------------------?#
fill?=?text_box.fill
fill.solid()
#?使用之前一定要導(dǎo)入RGBColor這個庫
fill.fore_color.rgb?=?RGBColor(247,?150,?70)
#?--------------------------------------?#
line?=?text_box.line
line.color.rgb?=?RGBColor(255,?0,?0)
line.width?=?Cm(0.3)

prs.save("文本框邊框樣式調(diào)整.pptx")??
結(jié)果如下:
4)段落對其調(diào)整
from?pptx?import?Presentation
from?pptx.enum.text?import?PP_ALIGN

prs?=?Presentation()
#?使用第七個版式
black_slide_layout?=?prs.slide_layouts[6]
slide?=?prs.slides.add_slide(black_slide_layout)

left?=?top?=?width?=?height?=?Cm(3)
text_box?=?slide.shapes.add_textbox(left,?top,?width,?height)
tf?=?text_box.text_frame
#?----------------------------?#
p?=?tf.add_paragraph()
p.text?=?"這是第二段文字"
p.alignment?=?PP_ALIGN.LEFT

prs.save("段落對其調(diào)整.pptx")??
當(dāng)然這里還有一些其他樣式的調(diào)整,和word很類似,就不一一敘述了。
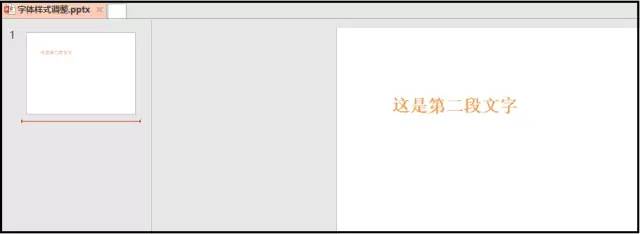
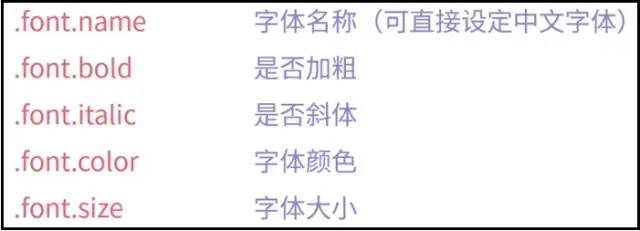
5)字體樣式調(diào)整
代碼如下:
from?pptx?import?Presentation
from?pptx.util?import?Cm,?Pt
from?pptx.enum.text?import?MSO_ANCHOR,?MSO_AUTO_SIZE
from?pptx.dml.color?import?RGBColor
from?pptx.enum.text?import?PP_ALIGN

prs?=?Presentation()
#?使用第七個版式
black_slide_layout?=?prs.slide_layouts[6]
slide?=?prs.slides.add_slide(black_slide_layout)

left?=?top?=?width?=?height?=?Cm(3)
text_box?=?slide.shapes.add_textbox(left,?top,?width,?height)
tf?=?text_box.text_frame
#?----------------------------?#
p?=?tf.add_paragraph()
p.text?=?"這是第二段文字"
p.alignment?=?PP_ALIGN.LEFT
#?-------------------------------------?#
p.font.bold?=?True
p.font.name?=?"宋體"
p.font.color.rgb?=?RGBColor(247,?150,?70)
p.font.size?=?Pt(30)

prs.save("字體樣式調(diào)整.pptx")??
結(jié)果如下: