
用 python-docx 創(chuàng)建浮動圖片

相信大家對python-docx這個常用的操作docx文檔的庫都不陌生,它支持以內(nèi)聯(lián)形狀(Inline Shape)的形式插入圖片,即圖片和文本之間沒有重疊,遵循流動版式(flow layout)。但是,截至最新的0.8.10版本,python-docx尚不支持插入浮動圖片(floating picture)。這顯然不能滿足豐富多彩的文檔樣式的需要,因此本文探究基于python-docx插入浮動圖片——剖析xml、追蹤源碼,最后得到完整代碼。
問題提出
作者在嘗試實現(xiàn)PDF文檔轉(zhuǎn)docx(pdf2docx:https://github.com/dothinking/pdf2docx,開發(fā)中)的過程中遇到一個需求:根據(jù)背景圖片在PDF頁面的具體位置(例如左上角坐標和圖片區(qū)域的長寬),將其重現(xiàn)到docx頁面的相應(yīng)位置。考慮到背景圖片與文本的重疊,這就需要實現(xiàn)精確定位的浮動圖片,參考下圖示例。

Word中的設(shè)置
我們先嘗試在Office Word中,手動解決上述問題。具備基礎(chǔ)的Word使用經(jīng)驗即可知,通過設(shè)置圖片版式來控制圖片的浮動和具體位置。
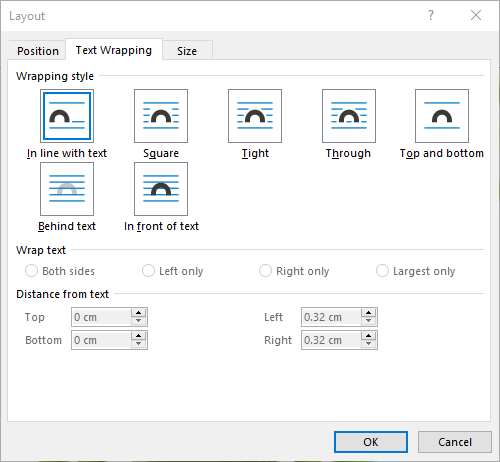
上圖版式設(shè)置中的文本環(huán)繞樣式,大體可以分為三類:
| 分類 | 文本重疊 | 自由定位 | 樣式名稱 |
|---|---|---|---|
| 嵌入型 | 否 | 否 | In line with text |
| 環(huán)繞型 | 否 | 是 | Square, Tight, Through, Top and bottom |
| 完全浮動 | 是 | 是 | behind text, In front of text |
例如最常見的嵌入型圖片,它占據(jù)了整行區(qū)域,我們既不能將其與文字重疊,也不能自由放置它的位置,而是由頁面排版自動確定。對于環(huán)繞型圖片,文本可以進入圖片所在行,但是無法與之重疊;并且,我們可以用鼠標自由拖動其位置。完全浮動型圖片則可以浮于文本上方或者襯于文本下方,同時支持隨意放置其位置。
如果需要精確定位,則可在圖片版式的位置(Position)選項卡進行設(shè)置。它提供了多種定位方式,例如絕對定位——根據(jù)圖片左上角點距離水平和豎直參考的坐標值來定位。至于參考對象,可以是頁面(Page)本身,這樣(0, 0)就是頁面左上角;也可以是邊距(Margin),此時(0, 0)即為正文區(qū)域的左上角。
綜上,我們需要實現(xiàn)精確定位的襯于文本下方的圖片版式。
docx背后的xml
我們還知道,docx文檔的背后是xml格式的數(shù)據(jù),python-docx正是通過處理xml的方式來讀寫word文檔。所以,接下來先手工創(chuàng)建word文檔,然后查看圖片部分的xml內(nèi)容。
作為對比,首先分別創(chuàng)建一個普通嵌入型圖片文件和一個襯于文本下方的浮動型圖片文件。然后執(zhí)行查看步驟:右鍵docx文件 | 7-zip打開壓縮包 | word | document.xml,復制文件內(nèi)容并格式化xml,得到如下的關(guān)于圖片部分的片段。為了便于對比分析,刪除了一些節(jié)點屬性。
內(nèi)聯(lián)圖片片段:
<w:drawing>
????<wp:inline>
????????<wp:extent?cx="3297600"?cy="2782800"/>
????????<wp:effectExtent?l="0"?t="0"?r="0"?b="0"/>
????????<wp:docPr?id="1"?name="Picture?1"/>
????????<wp:cNvGraphicFramePr>
????????????<a:graphicFrameLocks/>
????????wp:cNvGraphicFramePr>
????????<a:graphic>
????????????<a:graphicData>
????????????????<pic:pic>
????????????????????
????????????????pic:pic>
????????????a:graphicData>
????????a:graphic>
????wp:inline>
w:drawing>
浮動圖片片段:
<w:drawing>
????<wp:anchor?behindDoc="1"?locked="0"?layoutInCell="1"?allowOverlap="1">
????????<wp:simplePos?x="0"?y="0"/>
????????<wp:positionH?relativeFrom="page">
????????????<wp:posOffset>285750wp:posOffset>
????????wp:positionH>
????????<wp:positionV?relativeFrom="page">
????????????<wp:posOffset>457200wp:posOffset>
????????wp:positionV>
????????<wp:extent?cx="3297600"?cy="2782800"/>
????????<wp:effectExtent?l="0"?t="0"?r="0"?b="0"/>
????????<wp:wrapNone/>
????????<wp:docPr?id="1"?name="Picture?1"/>
????????<wp:cNvGraphicFramePr>
????????????<a:graphicFrameLocks/>
????????wp:cNvGraphicFramePr>
????????<a:graphic>
????????????<a:graphicData>
????????????????<pic:pic>
????????????????????
????????????????pic:pic>
????????????a:graphicData>
????????a:graphic>
????wp:anchor>
w:drawing>
對比發(fā)現(xiàn)以下相同/相似點:
兩類圖片都放在 具備相同的內(nèi)容節(jié)點:
除此之外,浮動圖片還有一些獨有特征,并且我們可以從命名上猜測和解讀:
behindDoc屬性表明圖片版式為襯于文本下方relativeFrom屬性指定用于定位的參考對象子節(jié)點
從內(nèi)聯(lián)圖片開始
從xml的結(jié)構(gòu)對比來看,我們完全可以根據(jù)python-docx對內(nèi)聯(lián)圖片的實現(xiàn)來插入浮動圖片。于是,從插入內(nèi)聯(lián)圖片的代碼入手:
from?docx?import?Document
from?docx.shared?import?Pt

document?=?Document()
document.add_picture('image.jpg',?width=Pt(200))
document.save('output.docx')
從python-docx安裝文件夾site-packages/docx進行內(nèi)容搜索add_picture,得到docx.text.run.add_picture原始定義處:
def?add_picture(self,?image_path_or_stream,?width=None,?height=None):
????inline?=?self.part.new_pic_inline(image_path_or_stream,?width,?height)
????self._r.add_drawing(inline)
????return?InlineShape(inline)
繼續(xù)搜索new_pic_inline得到docx.parts.story.BaseStoryPart.new_pic_inline。從注釋可知這是利用CT_Inline類創(chuàng)建
def?new_pic_inline(self,?image_descriptor,?width,?height):
????"""Return?a?newly-created?`w:inline`?element.

????The?element?contains?the?image?specified?by?*image_descriptor*?and?is?scaled
????based?on?the?values?of?*width*?and?*height*.
????"""
????rId,?image?=?self.get_or_add_image(image_descriptor)
????cx,?cy?=?image.scaled_dimensions(width,?height)
????shape_id,?filename?=?self.next_id,?image.filename
????return?CT_Inline.new_pic_inline(shape_id,?rId,?filename,?cx,?cy)
于是進入CT_Inline類(限于篇幅,刪除了前兩個類方法new和new_pic_inline的具體代碼)——終于見到了一開始探索的xml代碼:
class?CT_Inline(BaseOxmlElement):
????"""
????````?element,?container?for?an?inline?shape.
????"""
????@classmethod
????def?new(cls,?cx,?cy,?shape_id,?pic):
????????pass
????@classmethod
????def?new_pic_inline(cls,?shape_id,?rId,?filename,?cx,?cy):
????????pass
????@classmethod
????def?_inline_xml(cls):
????????return?(
????????????'\n'
????????????'??
????????????'??
????????????'??\n'
????????????'????
????????????'??\n'
????????????'??\n'
????????????'????
????????????'??\n'
????????????''?%?nsdecls('wp',?'a',?'pic',?'r')
????????)
簡單掃一下CT_Inline類的三個方法,即可將它們聯(lián)系上:
_inline_xml()方法給出內(nèi)聯(lián)圖片new()方法調(diào)用_inline_xml(),并為其中的子節(jié)點例如new_pic_inline()調(diào)用new(),同時拼接CT_Picture類的結(jié)果(節(jié)點
綜上,實現(xiàn)了內(nèi)聯(lián)圖片的完整xml結(jié)構(gòu)。
插入浮動圖片
從xml結(jié)構(gòu)的對比及上述python-docx對內(nèi)聯(lián)圖片的實現(xiàn),得到創(chuàng)建浮動圖片的思路:
初始化 behindDoc="1"指定圖片版式為襯于文本下方使用類似的代碼填充 填充
具體實踐中發(fā)現(xiàn)還有關(guān)鍵的一步——注冊xml標簽名稱到對應(yīng)的類,例如CT_Inline:
#?docx.oxml.__init__.py
register_element_cls('wp:inline',?CT_Inline)
綜上,利用python-docx插入浮動圖片(襯于文本下方、頁面定位)的完整代碼如下:
#?-*-?coding:?utf-8?-*-
#?filename:?add_float_picture.py
'''
Implement?floating?image?based?on?python-docx.
-?Text?wrapping?style:?BEHIND?TEXT?
-?Picture?position:?top-left?corner?of?PAGE?``.
Create?a?docx?sample?(Layout?|?Positions?|?More?Layout?Options)?and?explore?the?
source?xml?(Open?as?a?zip?|?word?|?document.xml)?to?implement?other?text?wrapping
styles?and?position?modes?per?`CT_Anchor._anchor_xml()`.
'''
from?docx.oxml?import?parse_xml,?register_element_cls
from?docx.oxml.ns?import?nsdecls
from?docx.oxml.shape?import?CT_Picture
from?docx.oxml.xmlchemy?import?BaseOxmlElement,?OneAndOnlyOne
#?refer?to?docx.oxml.shape.CT_Inline
class?CT_Anchor(BaseOxmlElement):
????"""
????````?element,?container?for?a?floating?image.
????"""
????extent?=?OneAndOnlyOne('wp:extent')
????docPr?=?OneAndOnlyOne('wp:docPr')
????graphic?=?OneAndOnlyOne('a:graphic')
????@classmethod
????def?new(cls,?cx,?cy,?shape_id,?pic,?pos_x,?pos_y):
????????"""
????????Return?a?new?````?element?populated?with?the?values?passed
????????as?parameters.
????????"""
????????anchor?=?parse_xml(cls._anchor_xml(pos_x,?pos_y))
????????anchor.extent.cx?=?cx
????????anchor.extent.cy?=?cy
????????anchor.docPr.id?=?shape_id
????????anchor.docPr.name?=?'Picture?%d'?%?shape_id
????????anchor.graphic.graphicData.uri?=?(
????????????'http://schemas.openxmlformats.org/drawingml/2006/picture'
????????)
????????anchor.graphic.graphicData._insert_pic(pic)
????????return?anchor
????@classmethod
????def?new_pic_anchor(cls,?shape_id,?rId,?filename,?cx,?cy,?pos_x,?pos_y):
????????"""
????????Return?a?new?`wp:anchor`?element?containing?the?`pic:pic`?element
????????specified?by?the?argument?values.
????????"""
????????pic_id?=?0??#?Word?doesn't?seem?to?use?this,?but?does?not?omit?it
????????pic?=?CT_Picture.new(pic_id,?filename,?rId,?cx,?cy)
????????anchor?=?cls.new(cx,?cy,?shape_id,?pic,?pos_x,?pos_y)
????????anchor.graphic.graphicData._insert_pic(pic)
????????return?anchor
????@classmethod
????def?_anchor_xml(cls,?pos_x,?pos_y):
????????return?(
????????????'
????????????'???????????behindDoc="1"?locked="0"?layoutInCell="1"?allowOverlap="1"?\n'
????????????'???????????%s>\n'
????????????'??
????????????'??\n'
????????????'????%d \n'
????????????'??\n'
????????????'??\n'
????????????'????%d \n'
????????????'??\n'????????????????????
????????????'??
????????????'??
????????????'??
????????????'??\n'
????????????'????
????????????'??\n'
????????????'??\n'
????????????'????
????????????'??\n'
????????????''?%?(?nsdecls('wp',?'a',?'pic',?'r'),?int(pos_x),?int(pos_y)?)
????????)
#?refer?to?docx.parts.story.BaseStoryPart.new_pic_inline
def?new_pic_anchor(part,?image_descriptor,?width,?height,?pos_x,?pos_y):
????"""Return?a?newly-created?`w:anchor`?element.
????The?element?contains?the?image?specified?by?*image_descriptor*?and?is?scaled
????based?on?the?values?of?*width*?and?*height*.
????"""
????rId,?image?=?part.get_or_add_image(image_descriptor)
????cx,?cy?=?image.scaled_dimensions(width,?height)
????shape_id,?filename?=?part.next_id,?image.filename????
????return?CT_Anchor.new_pic_anchor(shape_id,?rId,?filename,?cx,?cy,?pos_x,?pos_y)
#?refer?to?docx.text.run.add_picture
def?add_float_picture(p,?image_path_or_stream,?width=None,?height=None,?pos_x=0,?pos_y=0):
????"""Add?float?picture?at?fixed?position?`pos_x`?and?`pos_y`?to?the?top-left?point?of?page.
????"""
????run?=?p.add_run()
????anchor?=?new_pic_anchor(run.part,?image_path_or_stream,?width,?height,?pos_x,?pos_y)
????run._r.add_drawing(anchor)
#?refer?to?docx.oxml.__init__.py
register_element_cls('wp:anchor',?CT_Anchor)
示例
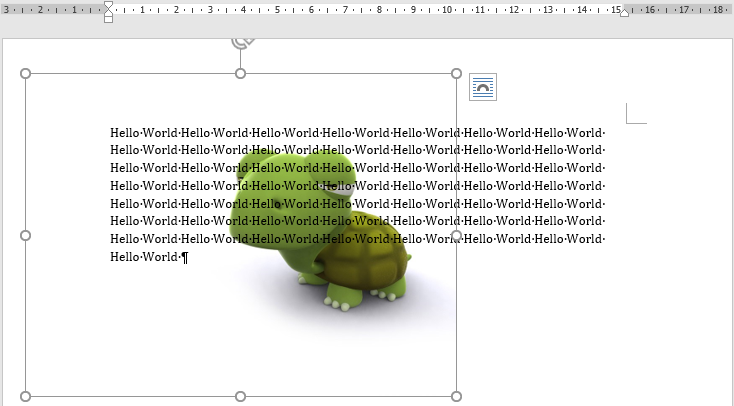
最后,來一個例子看看結(jié)果吧:
from?docx?import?Document
from?docx.shared?import?Inches,?Pt
from?add_float_picture?import?add_float_picture

if?__name__?==?'__main__':

????document?=?Document()

????#?add?a?floating?picture
????p?=?document.add_paragraph()
????add_float_picture(p,?'test.png',?width=Inches(5.0),?pos_x=Pt(20),?pos_y=Pt(30))

????#?add?text
????p.add_run('Hello?World?'*50)

????document.save('output.docx')
作者:crazyhat,Python及科學計算愛好者

更多閱讀
特別推薦

點擊下方閱讀原文加入社區(qū)會員