
rmateRemote TextMate 2 implemented as shell script
rmate
Description
TextMate 2 adds a nice feature, where it is possible to edit files on a remote server using a helper script. The original helper script provided with TM2 is implemented in ruby. Here is my attempt to replace this ruby script with a shell script, because in some cases a ruby installation might just be too much overhead for just editing remote files.
This script can be used with some other editors (e.g. Sublime Text) via available plug-ins.
The shell script needs to be copied to the server, you want to remote edit files, on. After that, you should set-up your editor to communicate with rmate.
Quick install
sudo wget -O /usr/local/bin/rmate https://raw.githubusercontent.com/aurora/rmate/master/rmate
sudo chmod a+x /usr/local/bin/rmate
or with bpkg
bpkg install aurora/rmate
Set-up editor
TextMate 2
Open your TM2 preferences and enable "Allow rmate connections" setting in the "Terminal" settings and adjust the setting "Access for" according to your needs:
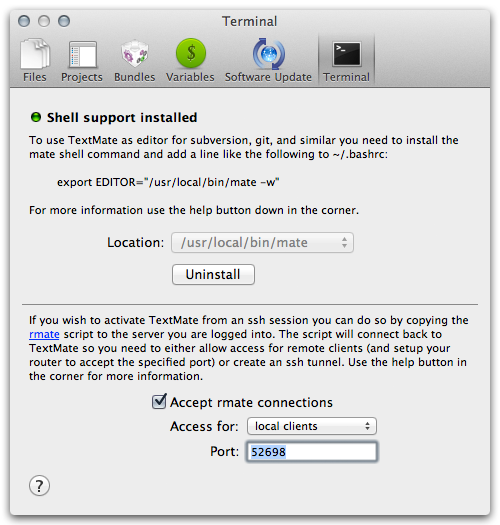
Local clients
It's a good idea to allow access only for local clients. In this case you need to open a SSH connection to the system you want to edit a file on and specify a remote tunnel in addition:
ssh -R 52698:localhost:52698 [email protected]
Or put the following lines in your local ~/.ssh/config:
Host example.com
    RemoteForward 52698 127.0.0.1:52698
If you are logged in on the remote system, you can now just execute
rmate test.txt
Remote clients
On some machines, where port forwarding is not possible, for example due to a missing ssh daemon, you can allow access for "remote clients". Just ssh or telnet to the remote machine and execute:
rmate -H textmate-host test.txt
Sublime Text
To use rmate with Sublime Text, you need to install a plug-in, e.g. rsub or RemoteSubl.
You can install plug-ins via Package Control. Install Package Control, press Cmd + Shift + P for Mac and Ctrl + Shift + P for Linux/Windows, select Package Control: Install Package, and, finally, select rsub for rsub or RemoteSubl for RemoteSubl.
Also, you can install plug-ins manually.
- Linux
git clone https://github.com/henrikpersson/rsub ~/.config/sublime-text-3/Packages/rsub
git clone https://github.com/randy3k/RemoteSubl ~/.config/sublime-text-3/Packages/RemoteSubl
- Windows
git clone https://github.com/henrikpersson/rsub %APPDATA%/Sublime\ Text\ 3/Packages/rsub
git clone https://github.com/randy3k/RemoteSubl %APPDATA%/Sublime\ Text\ 3/Packages/RemoteSubl
- OS X
git clone https://github.com/henrikpersson/rsub ~/Library/Application\ Support/Sublime\ Text\ 3/Packages/rsub
git clone https://github.com/randy3k/RemoteSubl ~/Library/Application\ Support/Sublime\ Text\ 3/Packages/RemoteSubl
Then do the same things as described in Local clients part of this document.
VS Code
To use rmate with VS Code, you need to install an extension, e.g. Remote VSCode
//-------- Remote VSCode configuration --------

// Port number to use for connection.
"remote.port": 52698

// Launch the server on start up.
"remote.onstartup": true

// Address to listen on.
"remote.host": "127.0.0.1"

// If set to true, error for remote.port already in use won't be shown anymore.
"remote.dontShowPortAlreadyInUseError": false
Then do the same things as described in Local clients part of this document.
Example
Example session: Editing html file located on an SGI o2: https://github.com/aurora/rmate/wiki/Screens
Requirements
A bash with compiled support for /dev/tcp is required. This is not the case on some older linux distributions, like Ubuntu 9.x.
Usage
Edit specified file
$ ./rmate [arguments] [--] file-path
Read text from stdin
$ echo "hello TextMate" | ./rmate [arguments] -
Arguments
-H, --host HOST  Connect to HOST. Use 'auto' to detect the host from SSH.
-p, --port PORT  Port number to use for connection.
-w, --[no-]wait  Wait for file to be closed by TextMate.
-l, --line LINE  Place caret on line number after loading file.
+N               Alias for --line, if N is a number (eg.: +5).
-m, --name NAME  The display name shown in TextMate.
-t, --type TYPE  Treat file as having specified type.
-n, --new        Open in a new window (Sublime Text).
-f, --force      Open even if file is not writable.
-v, --verbose    Verbose logging messages.
-h, --help       Display this usage information.
    --version    Show version and exit.
Default parameter configuration
Some default parameters (host and port) can be configured by defining them as the environment variables RMATE_HOST and RMATE_PORT or by putting them in a configuration file. The configuration files loaded are /etc/rmate.rc and ~/.rmate.rc, e.g.:
host: auto  # prefer host from SSH_CONNECTION over localhost
port: 52698
Alternative notation for configuration file is:
host=auto
port=52698
The precedence for setting the configuration is (higher precedence counts):
- default (
localhost,52698) /etc/rmate.rc~/.rmate/rmate.rc~/.rmate.rc- environment variables (
RMATE\_HOST,RMATE\_PORT)
Disclaimer
Use with caution. This software may contain serious bugs. I can not be made responsible for any damage the software may cause to your system or files.
License
rmate
Copyright (C) 2011-present by Harald Lapp [email protected]
This program is free software: you can redistribute it and/or modify it under the terms of the GNU General Public License as published by the Free Software Foundation, either version 3 of the License, or (at your option) any later version.
This program is distributed in the hope that it will be useful, but WITHOUT ANY WARRANTY; without even the implied warranty of MERCHANTABILITY or FITNESS FOR A PARTICULAR PURPOSE. See the GNU General Public License for more details.
You should have received a copy of the GNU General Public License along with this program. If not, see http://www.gnu.org/licenses/.