
Spring boot進階回顧,然后我悟了……

原本今天是要分享ConversionService相關(guān)內(nèi)容的,結(jié)果下班走的急,忘記將之前寫好的內(nèi)容push到倉庫里了,所以今天就暫時先不分享相關(guān)內(nèi)容了,不過可以回顧一些和ConversionService相關(guān)的內(nèi)容。
今天的內(nèi)容,原本之前已經(jīng)分享過了,但是今天看了下,發(fā)現(xiàn)很多內(nèi)容都比較粗糙,我自己看了都有點懵逼,所以就對相關(guān)內(nèi)容做了一些補充,各位小伙伴就權(quán)當回顧復習了
1、SpringBoot啟動banner設(shè)置
對spring boot來說,容器配置一直是特別基本,但是又特別重要的內(nèi)容,所以學好spring boot是一定要學好容器的相關(guān)配置的,下面是關(guān)于banner的簡單配置過程,其中有兩個需要注意的地方,一個是關(guān)于banner內(nèi)容替換,可以根據(jù)自己的需要替換成自己喜歡的banner文件,另一個是關(guān)于是否啟用banner的設(shè)置,設(shè)置為關(guān)閉后,啟動時將不再打印banner信息:
package io.github.syske.springboot31;

import org.springframework.boot.Banner;
import org.springframework.boot.SpringApplication;
import org.springframework.boot.autoconfigure.SpringBootApplication;
import org.springframework.context.annotation.Configuration;

@Configuration
@SpringBootApplication
public class SpringBoot31Application {

    public static void main(String[] args) {

        //SpringApplication.run(SpringBoot31Application.class, args);
        SpringApplication application = new SpringApplication(SpringBoot31Application.class);
        //關(guān)閉banner,也可以通過在resouces文件夾下添加banner.txt替換banner,banner生成網(wǎng)站
        // http://patorjk.com/software/taag/#p=testall&h=0&f=Chiseled&t=syske
        application.setBannerMode(Banner.Mode.OFF);
        application.run(args);
    }
}
2、創(chuàng)建配置類
配置類也是spring boot中特別重要,特別核心的內(nèi)容,下面是一個簡單的配置類演示,主要包括幾個常用的配置項,比如頁面映射配置、攔截器配置、轉(zhuǎn)換器配置,其中的配置項后面會有詳細說明
package io.github.syske.springboot31.config;

import io.github.syske.springboot31.formatter.DateFomaters;
import io.github.syske.springboot31.interceptor.SessionInterceptor;
import org.springframework.context.annotation.Configuration;
import org.springframework.format.FormatterRegistry;
import org.springframework.web.servlet.config.annotation.InterceptorRegistry;
import org.springframework.web.servlet.config.annotation.ViewControllerRegistry;
import org.springframework.web.servlet.config.annotation.WebMvcConfigurer;

@Configuration
public class Webconfig implements WebMvcConfigurer {
    @Override
    public void addViewControllers(ViewControllerRegistry registry) {
        registry.addViewController("/user/login.html").setViewName("login");
    }


    @Override
    public void addInterceptors(InterceptorRegistry registry) {
        registry.addInterceptor(new SessionInterceptor())
                .addPathPatterns("/**")
                .excludePathPatterns("/login","/user/login.html","/bootsrap/**");
    }

    @Override
    public void addFormatters(FormatterRegistry registry) {
        //給當前的Spring容器中添加自定義格式轉(zhuǎn)換器.
        registry.addConverter(new DateConverter());
    }
}
3、配置頁面與url映射
主要是針對一些僅需要返回頁面的 url地址,如果需要返回model及視圖則不適用
 @Override
    public void addViewControllers(ViewControllerRegistry registry) {
        registry.addViewController("/user/login").setViewName("login");
    }
通過 addViewController方法添加前端訪問的url,后面setViewName設(shè)置的是前面url對應的視圖名稱,如配置的url對應的訪問地址如下:
http://localhost:8080/user/login.html
方法內(nèi)可以配置多個視圖模型
4、配置DateFomatters
自定義的convertor,這里其實注冊的就是我們本來今天打算要分享的ConversionService家族的主角。配置方式很簡單,只需要將自定義的轉(zhuǎn)換器添加到Spring boot配置中即可:
  @Override
    public void addFormatters(FormatterRegistry registry) {
        //給當前的Spring容器中添加自定義格式轉(zhuǎn)換器.
        registry.addConverter(new DateConverter());
    }
轉(zhuǎn)換器具體實現(xiàn)如下:
import org.springframework.core.convert.converter.Converter;
import org.springframework.util.StringUtils;

import java.text.ParseException;
import java.text.SimpleDateFormat;
import java.util.Date;

public class DateFomaters implements Converter<String, Date> {


    @Override
    public Date convert(String source) {
        SimpleDateFormat dateFormat = new SimpleDateFormat("yyyy-MM-dd");
        Date date = null;
        if(!StringUtils.isEmpty(source)) {
            try {
                date = dateFormat.parse(source);
            } catch (ParseException e) {
                e.printStackTrace();
            }
        }
        return date;
    }
}
之前在寫這塊內(nèi)容的時候,忘記寫用法了,今天我在看這塊內(nèi)容的時候都有點懵逼,所以今天補充下。
完成配置類實現(xiàn)和相關(guān)配置之后,我們只需要在用到轉(zhuǎn)換器的地方通過Autowired引入ConversionService,然后就可以直接調(diào)用它的convert方法進行類型轉(zhuǎn)換,就像下面這樣:
    @Autowired
    private ConversionService conversionService;

    @RequestMapping("/converter")
    public Object testConverter() {
        Date date = conversionService.convert("2021-09-16", Date.class);
        System.out.println(date);
        return date;
    }
根據(jù)官方說法,這種方式是線程安全的,而且很靈活,具體等我們分享完ConversionService相關(guān)內(nèi)容,大家就清楚了
最終返回結(jié)果如下: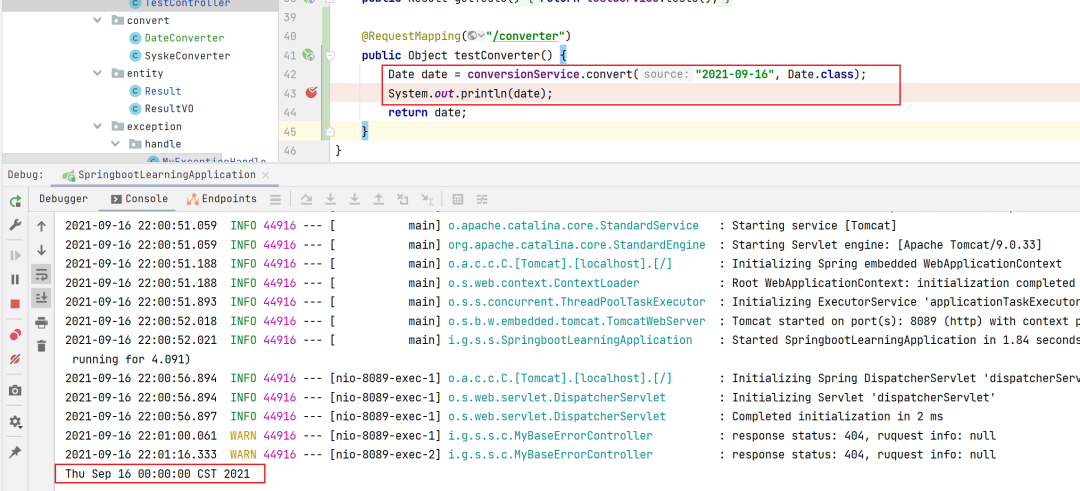
5、配置攔截器
自定義攔截(Interceptor)
package io.github.syske.springboot31.interceptor;

import org.springframework.web.servlet.mvc.WebContentInterceptor;

import javax.servlet.ServletException;
import javax.servlet.http.HttpServletRequest;
import javax.servlet.http.HttpServletResponse;
import java.io.IOException;

public class SessionInterceptor extends WebContentInterceptor {
    @Override
    public boolean preHandle(HttpServletRequest request, HttpServletResponse response, Object handler) throws ServletException {
        Object username = request.getSession().getAttribute("username");
        if(username != null) {
            return true;
        } else {
            try {
                request.getRequestDispatcher("/user/login.html").forward(request,response);
            } catch (IOException e) {
                e.printStackTrace();
            }
            return false;
        }
    }
}
將自定義的攔截器添加到Spring boot配置中
 @Override
    public void addInterceptors(InterceptorRegistry registry) {
        registry.addInterceptor(new SessionInterceptor())
                .addPathPatterns("/**")
                .excludePathPatterns("/login","/user/login.html","/bootsrap/**");
    }
6、攔截器測試
登錄攔截測試,以及格式化打印
package io.github.syske.springboot31.controller;
import org.springframework.stereotype.Controller;
import org.springframework.util.StringUtils;
import org.springframework.web.bind.annotation.RequestMapping;
import javax.servlet.http.HttpSession;
import java.util.Date;
@Controller
public class LoginController {
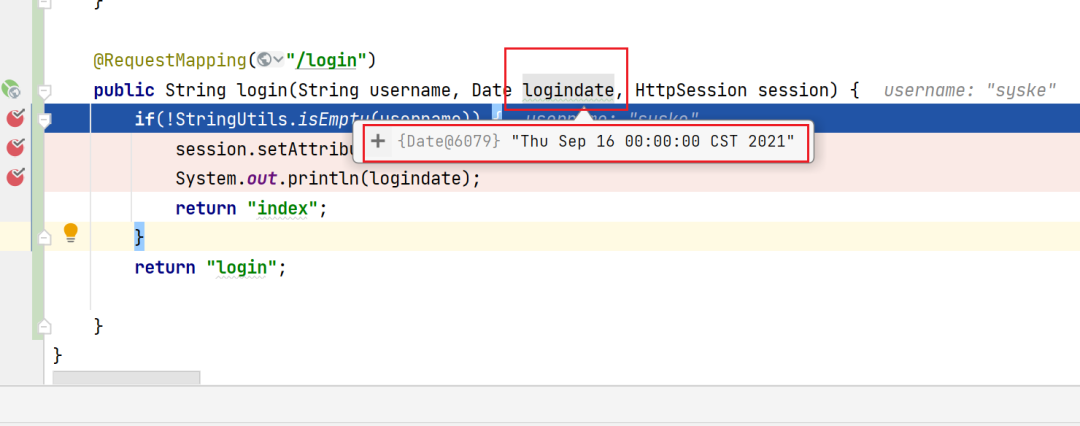
@RequestMapping("/login")
public String login(String username, Date logindate, HttpSession session) {
if(!StringUtils.isEmpty(username)) {
session.setAttribute("username", username);
System.out.println(logindate);
return "index";
}
return "login";
}
}
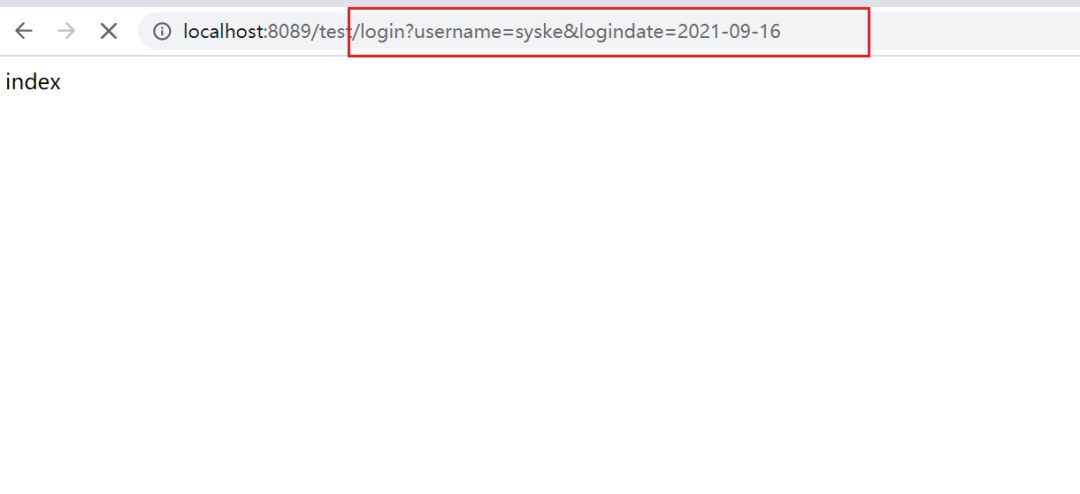
關(guān)于converter的用法,除了我們前面演示的那種直接用法,在前后端進行參數(shù)傳遞的時候,也可以使用,我想這應該才是它真正的用武之地。比如下面這個測試,我在前端調(diào)用login接口,傳了兩個參數(shù)——username和logindate,這里我的logindate是String,但是到后臺直接變成了Date,而這一步就是spring boot的ConversionService幫我們完成的:
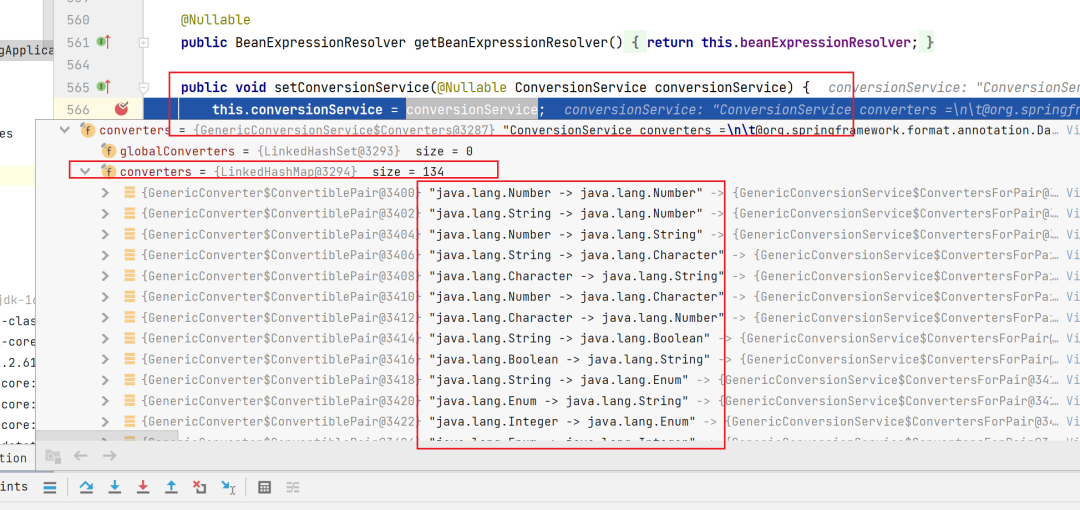
看到這我突然感覺自己捂了,明白為啥默認啟動的時候,spring boot默認為我們提供了好幾種轉(zhuǎn)換器,原來就是為了前后端進行數(shù)據(jù)轉(zhuǎn)換的,呀,我可真是個小機靈鬼!!!
可以看到,spring boot啟動的時候,已經(jīng)為我們提供了134種類型轉(zhuǎn)換器了,而且種類特別豐富,忽然直接感覺早上的疑問都解開了,有時候搞清楚一個東西可能就是在這一瞬間:
好了,今天的內(nèi)容就先到這里吧!
- END -