
【工具】手把手教你用 Github Actions 部署前端項(xiàng)目
本文首發(fā)于政采云前端團(tuán)隊(duì)博客:手把手教你用 Github Actions 部署前端項(xiàng)目終稿
https://www.zoo.team/article/use-git-actions

為什么使用 Github Actions ?
眾所周知,前端部署無非就是把打包之后的代碼丟到 nginx html 目錄下就完事了,但是每逢產(chǎn)品頻繁改需求,甚至只是讓你改線上一個字的時候,你總要重復(fù)一遍以下動作:修改,打包,登錄服務(wù)器,上傳代碼,重啟服務(wù)器。久而久之,別說是你受不了了,擱我旁邊看著都受不了。這個時候,有沒有想過有個機(jī)器人,能幫我們完成以上這些重復(fù)又沒技術(shù)含量的活。沒錯,你猜對了,Github Actions 就是我們需要的那個機(jī)器人。
Github Actions 是什么?
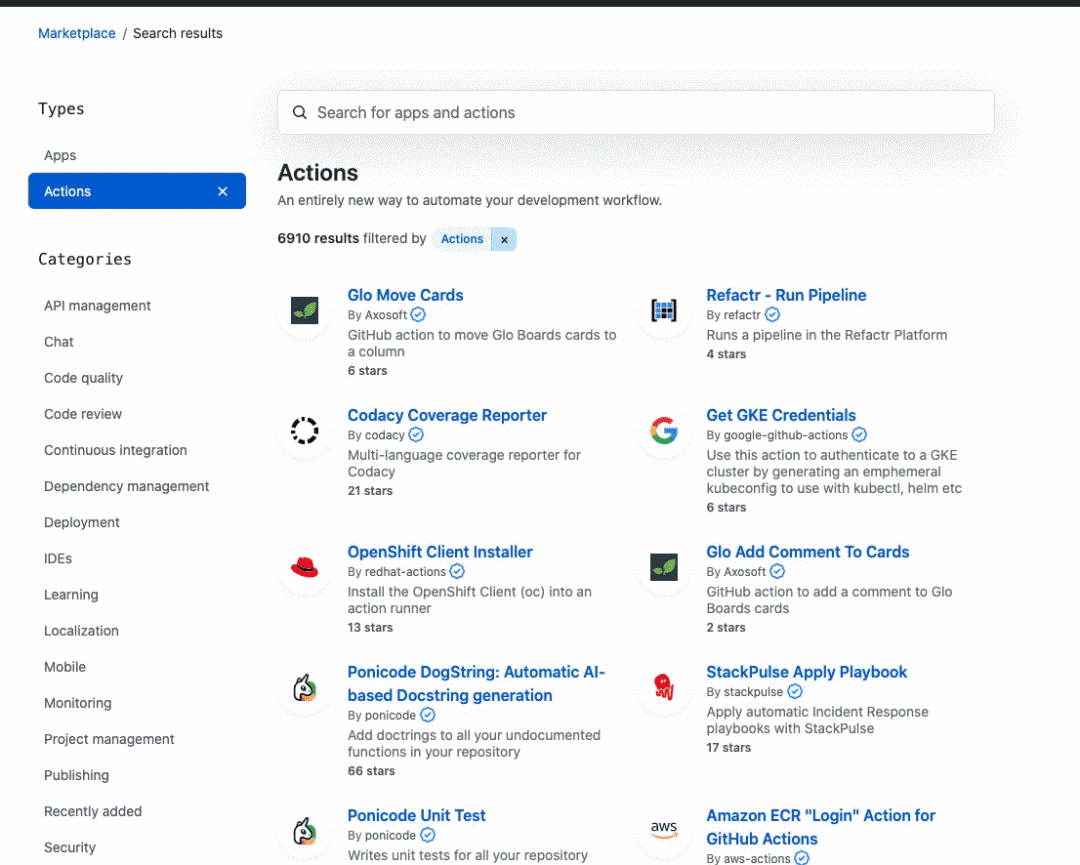
大家知道,持續(xù)集成 (https://www.ruanyifeng.com/blog/2015/09/continuous-integration.html?fileGuid=1PWJAvQBtLA5IGh3) 由很多操作組成,比如拉取最新代碼、運(yùn)行測試、登錄服務(wù)器、部署服務(wù)器等,GitHub 把這些操作統(tǒng)一稱為 Actions。

我們再梳理下正常需求的開發(fā)流程(如上圖),以上操作是可重復(fù)利用的,利用這一概念,Github 集成了 Actions 市場,允許開發(fā)者把操作寫成獨(dú)立的腳本,發(fā)布到 Actions 市場,允許所有開發(fā)者使用,這里有點(diǎn)像 Npm 和 VSCode 中的插件。
Github 給我們提供了一個以下配置的服務(wù)器來運(yùn)行我們配置對應(yīng)的 Actions:
2-core CPU 7 GB of RAM memory 14 GB of SSD disk space
這個配置足夠我們使用了,當(dāng)然,如果你有網(wǎng)絡(luò)時延的需求,(比如推送及拉取鏡像時產(chǎn)生的網(wǎng)絡(luò)時延),你也可以自建服務(wù)器 (https://docs.github.com/cn/actions/hosting-your-own-runners?fileGuid=1PWJAvQBtLA5IGh3)。
部署自己的前端項(xiàng)目
1、選擇 Github 項(xiàng)目倉庫
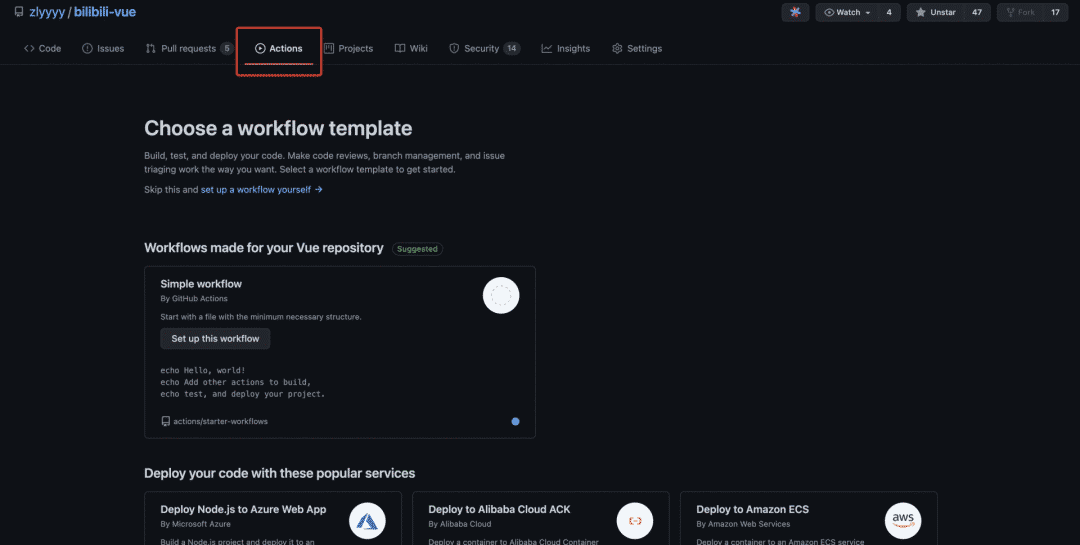
這里我選擇了很久以前剛開始學(xué)習(xí) Vue 時模仿 bilibili 做的項(xiàng)目 bilibili-vue (https://github.com/zlyyyy/bilibili-vue?fileGuid=1PWJAvQBtLA5IGh3),進(jìn)入項(xiàng)目倉庫,可以看到對應(yīng)的 Actions 標(biāo)簽,點(diǎn)擊進(jìn)入。
2、新建工作流,配置 Actions
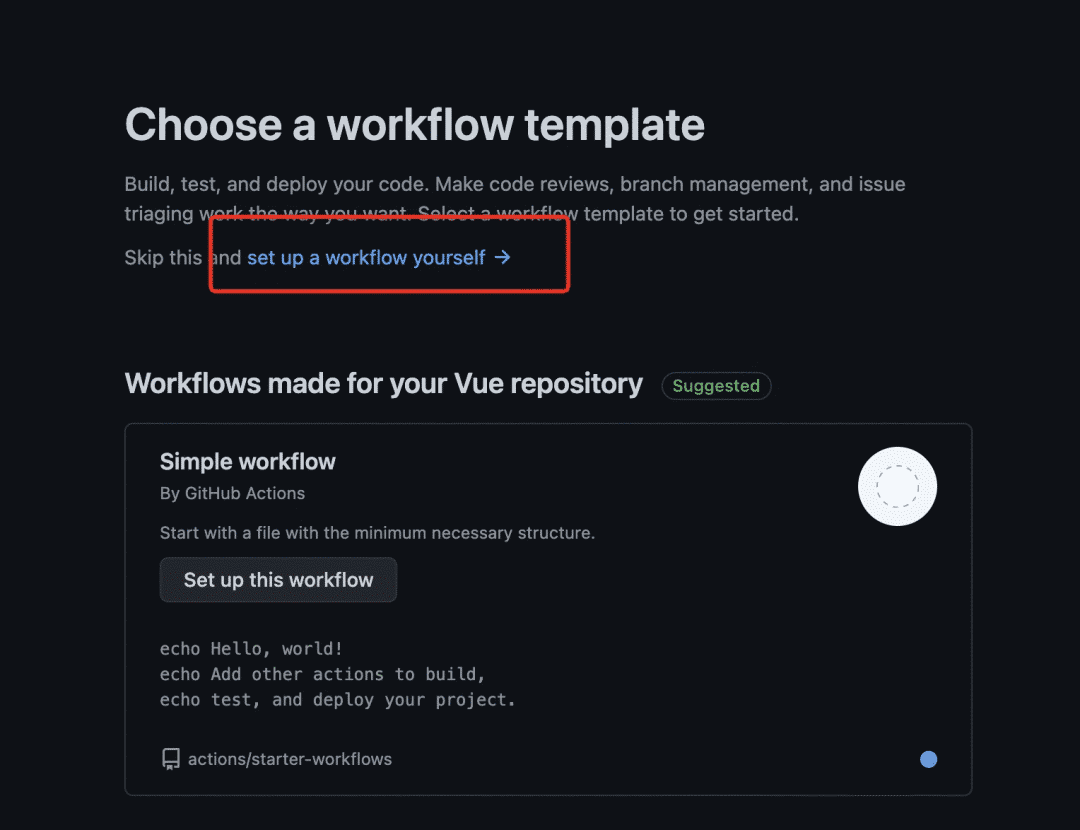
進(jìn)入 Actions 后可以看到很多推薦的工作流模版,這里可以根據(jù)需要自行選擇的模版,或者跳過模版,自行設(shè)置。
這里因?yàn)槲沂羌兦岸隧?xiàng)目,所以我選擇 Node.js 模版。
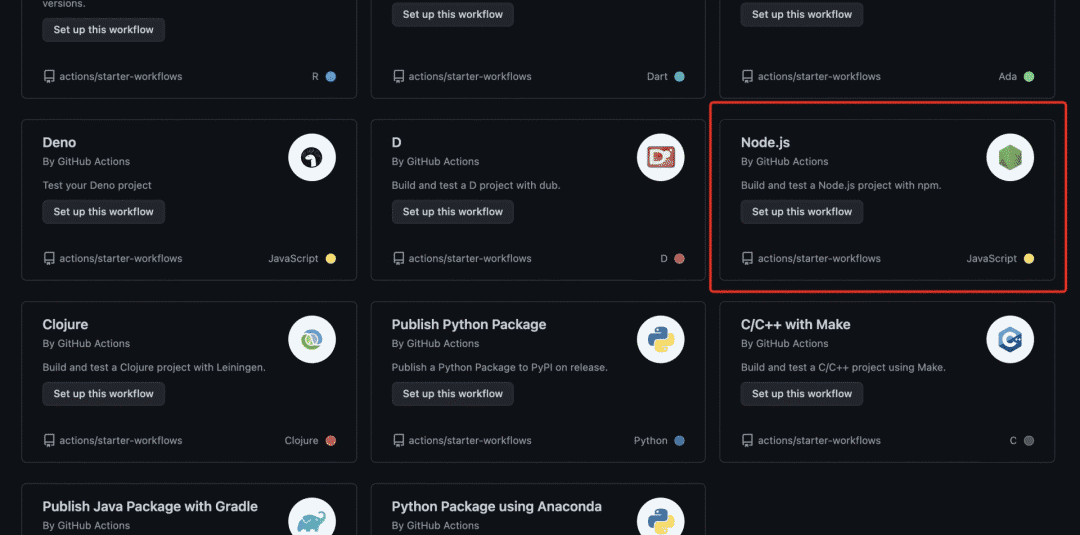
點(diǎn)擊 Node.js 模版,會自動在項(xiàng)目 .github/workflows 目錄下生成 node.js.yml 文件,我們可以把文件名字改成我們工作流的名稱。當(dāng)然,這里可以設(shè)置并存在很多工作流 yml 文件,例如 deploy.yml、test.yml、gh-page.yml 等。
# workflow名稱。省略的話,默認(rèn)為當(dāng)前workflow文件名
name: Node.js CI
# 觸發(fā)workflow的條件,
on:
push:
# 只有master分支發(fā)生push事件時,才會觸發(fā)workflow
branches: [ master ]
pull_request:
branches: [ master ]
# jobs表示執(zhí)行的一項(xiàng)或多項(xiàng)任務(wù)
jobs:
# 任務(wù)的job_id,具體名稱自定義,這里build代表打包
build:

# runs-on字段指定運(yùn)行所需要的虛擬機(jī)環(huán)境。注意:這個是必填字段
runs-on: ubuntu-latest
# 用于配置當(dāng)前workflow的參數(shù)
strategy:
matrix:
node-version: [10.x, 12.x, 14.x, 15.x]
# See supported Node.js release schedule at https://nodejs.org/en/about/releases/
# steps字段指定每個job的運(yùn)行步驟,可以包含一個或多個步驟,每個步驟都可以配置指定字段
steps:
# 切代碼到 runner
- uses: actions/checkout@v2
# 在當(dāng)前操作系統(tǒng)安裝node
- name: Use Node.js ${{ matrix.node-version }}
uses: actions/setup-node@v1
with:
node-version: ${{ matrix.node-version }}
# 該運(yùn)行的命令或者action
# 安裝依賴、運(yùn)行測試、打包
    - run: npm install
    - run: npm test
    - run: npm run build
3、常見的 Actions 配置
打版本標(biāo)簽 Create Tag Release
這里使用 Actions 市場中的 Create Tag Release (https://github.com/marketplace/actions/create-tag-release?fileGuid=1PWJAvQBtLA5IGh3) 插件
on:
  push:
    # Sequence of patterns matched against refs/tags
    tags:
      - 'v*' # Push events to matching v*, i.e. v1.0, v20.15.10
name: Create Release
jobs:
  build:
    name: Create Release
    runs-on: ubuntu-latest
    steps:
      - name: Checkout code
        uses: actions/checkout@master
      - name: Create Release
        id: create_release
        uses: actions/create-release@latest
        env:
          GITHUB_TOKEN: ${{ secrets.GITHUB_TOKEN }} # This token is provided by Actions, you do not need to create your own token
        with:
          tag_name: ${{ github.ref }}
          release_name: Release ${{ github.ref }}
          body: |
            Changes in this Release
            - First Change
            - Second Change
          draft: false
          prerelease: false
創(chuàng)建 Github Pages 站點(diǎn)
這里使用 Actions 市場中的 GitHub Pages v3 (https://github.com/marketplace/actions/github-pages-v3?fileGuid=1PWJAvQBtLA5IGh3) 插件
name: github pages
 on:
   push:
     branches:
       - master # default branch
 jobs:
   deploy:
     runs-on: ubuntu-18.04
     steps:
       - uses: actions/checkout@v2
       - run: npm install
       - run: npm run docs:build
       - name: Deploy
         uses: peaceiris/actions-gh-pages@v3
         with:
           github_token: ${{ secrets.GITHUB_TOKEN }}
           publish_dir: ./docs-dist
多人協(xié)作開發(fā),云端代碼檢測
name: Test

 on: [push, pull_request]

 jobs:
   lint:
     runs-on: ubuntu-latest
     steps:
     - uses: actions/checkout@v2
     - uses: actions/setup-node@v1
       with:
         node-version: '12.x'

     - name: Install dependencies
       uses: bahmutov/npm-install@v1

     - name: Run linter
       run: npm run lint

   test:
     runs-on: ubuntu-latest
     steps:
     - uses: actions/checkout@v2
     - uses: actions/setup-node@v1
       with:
         node-version: '12.x'

     - name: Install dependencies
       uses: bahmutov/npm-install@v1

     - name: Run test
       run: npm test

   build:
     runs-on: ubuntu-latest
     steps:
     - uses: actions/checkout@v2
     - uses: actions/setup-node@v1
       with:
         node-version: '12.x'

     - name: Install dependencies
       uses: bahmutov/npm-install@v1

     - name: Build
       run: npm run build
以上是 Github 中常見的一些配置,更多 Actions 配置(https://docs.github.com/en/actions/reference/context-and-expression-syntax-for-github-actions?fileGuid=1PWJAvQBtLA5IGh3) 可以參考官網(wǎng)。
4、搭配 Docker
為什么要使用 Docker ?
沒有 Docker 之前,我是使用 Webhook 實(shí)現(xiàn)自動部署,但后面遇到了服務(wù)器到期更換服務(wù)器的時候,就只能一個個重復(fù)操作來做遷移,而且文件目錄管理混亂,項(xiàng)目變多時,維護(hù)成本也會越來越高。再看 Docker 五大優(yōu)勢:持續(xù)集成、版本控制、可移植性、隔離性和安全性,是不是就是用來解決我們上述遇到的問題的。舉例:bilibili-vue (https://github.com/zlyyyy/bilibili-vue?fileGuid=1PWJAvQBtLA5IGh3),不明白的同學(xué)可以參考我的配置。
4.1 項(xiàng)目根目錄新建 Nginx 配置
項(xiàng)目根目錄新建 Nginx 配置文件命名 vhost.nginx.conf(名字隨便定,跟后面 Dockerfile 中引用一致即可)供后續(xù)使用,例:
server {
listen 80;
server_name localhost;
location / {
  root /usr/share/nginx/html;
  index index.html index.htm;
  proxy_set_header Host $host;
  if (!-f $request_filename) {
    rewrite ^.*$ /index.html break;
  }
}
error_page 500 502 503 504 /50x.html;
location = /50x.html {
    root /usr/share/nginx/html;
  }
}
4.2 項(xiàng)目根目錄新建 Dockerfile 文件
項(xiàng)目根目錄新建 Dockerfile 文件,構(gòu)建鏡像包使用,例:
FROM nginx
COPY ./dist/ /usr/share/nginx/html/
# 第一步nginx配置文件名稱
  COPY ./vhost.nginx.conf /etc/nginx/conf.d/bilibili-vue.conf
EXPOSE 80
4.3 配置容器鏡像服務(wù)
這里我選擇了阿里云的容器鏡像服務(wù) (https://www.aliyun.com/product/acr?fileGuid=1PWJAvQBtLA5IGh3),為什么不使用國外的 dockhub (https://hub.docker.com/?fileGuid=1PWJAvQBtLA5IGh3) 呢,因?yàn)檫@樣使用起來速度快一點(diǎn),而且有免費(fèi)的個人版足夠我們使用。
4.3.1 第一步
初次打開需要開通服務(wù),配置登錄密碼(記下來,后面要用)。
4.3.2 第二步
然后創(chuàng)建命名空間,再創(chuàng)建我們的鏡像倉庫,這里如果不想別人下載你的鏡像的話就可以選擇私有。然后點(diǎn)擊下一步配置代碼源,這里我選擇了本地倉庫,一方面是為了日志統(tǒng)一,可以在 Github Actions 看到所有日志,一方面是可以通過命令行直接推送鏡像到鏡像倉庫,自由度比較高。
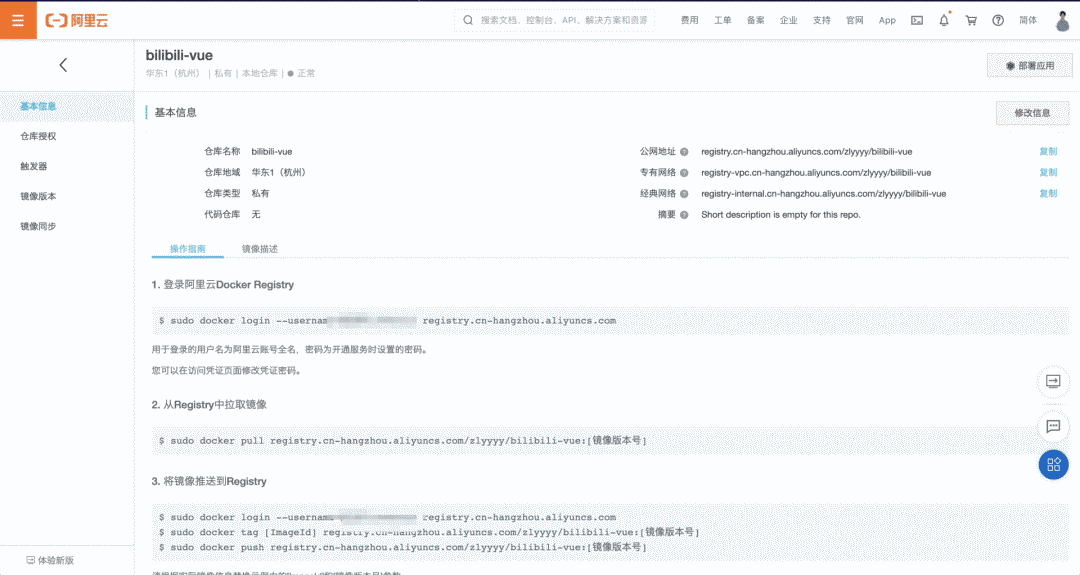
4.3.3 第三步
之后就可以在頁面看到我們創(chuàng)建的倉庫,點(diǎn)擊倉庫名稱進(jìn)入,可以看到倉庫的基本信息和操作指南,這個時候一個鏡像倉庫就完全創(chuàng)建成功了。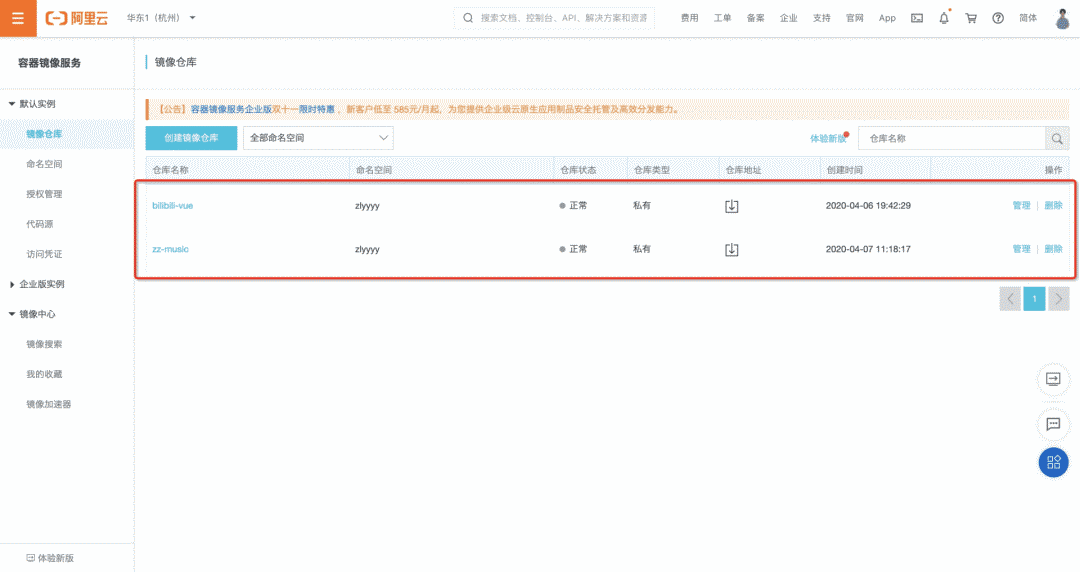
4.4 如何跟 Actions 聯(lián)動
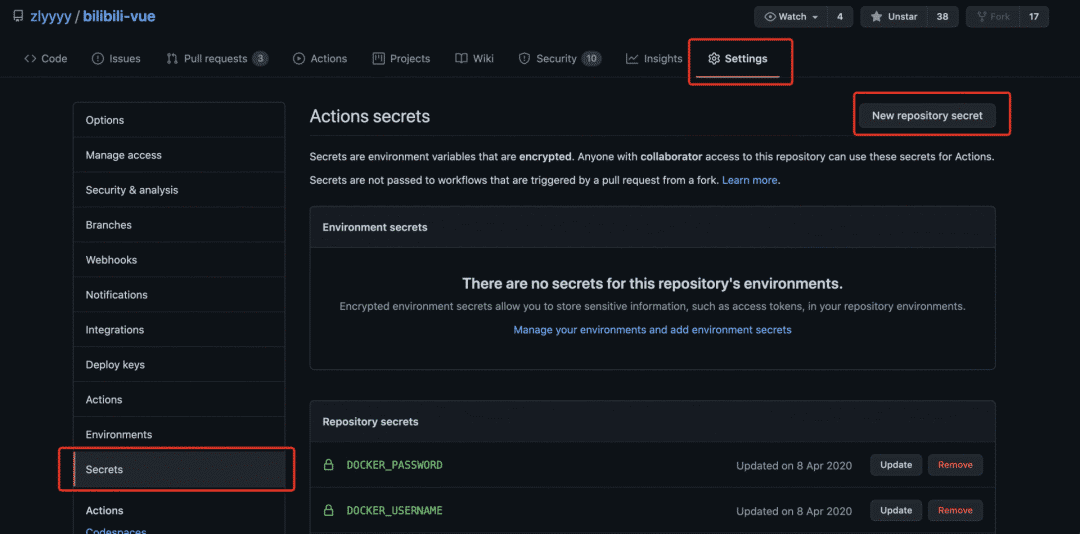
我們只用在 Actions 中 build 鏡像后登錄阿里云 Registry 實(shí)例就好了,但是這個時候如果明文直接寫在 yml 中肯定是不行的,Github 早就幫我們考慮到了這點(diǎn),回到 Github 項(xiàng)目中,依次點(diǎn)擊 Settings => Secrets => New repository secret ,設(shè)置 secret,配置上述容器鏡像賬號的用戶名(阿里云用戶名)和密碼(上述配置容器鏡像服務(wù)時設(shè)置的登錄密碼)。
5、完整的 Actions
name: Docker Image CI # Actions名稱
on: [push] # 執(zhí)行時機(jī)
jobs:

# 這里我使用的是yarn,想用npm的同學(xué)將yarn命令修改為npm命令即可
build:
runs-on: ubuntu-latest
steps:
- name: checkout
uses: actions/checkout@master
# 安裝依賴
- name: install
run: yarn
# 打包
- name: build project
run: yarn run build

# 打包鏡像推送到阿里云容器鏡像服務(wù)
- name: Build the Docker image
run: |
docker login --username=${{ secrets.DOCKER_USERNAME }} registry.cn-hangzhou.aliyuncs.com --password=${{ secrets.DOCKER_PASSWORD }}
docker build -t bilibili-vue:latest .
docker tag bilibili-vue registry.cn-hangzhou.aliyuncs.com/zlyyyy/bilibili-vue:latest
docker push registry.cn-hangzhou.aliyuncs.com/zlyyyy/bilibili-vue:latest # 推送
- name: ssh docker login # 使用appleboy/ssh-action@master登錄服務(wù)器執(zhí)行拉取鏡像腳本,服務(wù)器ip、用戶名、密碼配置方式同容器鏡像服務(wù)配置方式一樣
uses: appleboy/ssh-action@master
with:
        host: ${{ secrets.SSH_HOST }}
username: ${{ secrets.SSH_USERNAME }}
password: ${{ secrets.SSH_PASSWORD }}
script: cd ~ && sh bilibili-vue-deploy.sh ${{ secrets.DOCKER_USERNAME }} ${{ secrets.DOCKER_PASSWORD }}
最后一步登錄服務(wù)器后,我執(zhí)行了一個腳本來拉取云端最新鏡像,并刪除舊鏡像,啟動新鏡像。腳本內(nèi)容如下。
echo -e "---------docker Login--------"
docker login --username=$1 registry.cn-hangzhou.aliyuncs.com --password=$2
echo -e "---------docker Stop--------"
docker stop bilibili-vue
echo -e "---------docker Rm--------"
docker rm bilibili-vue
docker rmi registry.cn-hangzhou.aliyuncs.com/zlyyyy/bilibili-vue:latest
echo -e "---------docker Pull--------"
docker pull registry.cn-hangzhou.aliyuncs.com/zlyyyy/bilibili-vue:latest
echo -e "---------docker Create and Start--------"
docker run --rm -d -p 8081:80 --name bilibili-vue registry.cn-hangzhou.aliyuncs.com/zlyyyy/bilibili-vue:latest
echo -e "---------deploy Success--------"
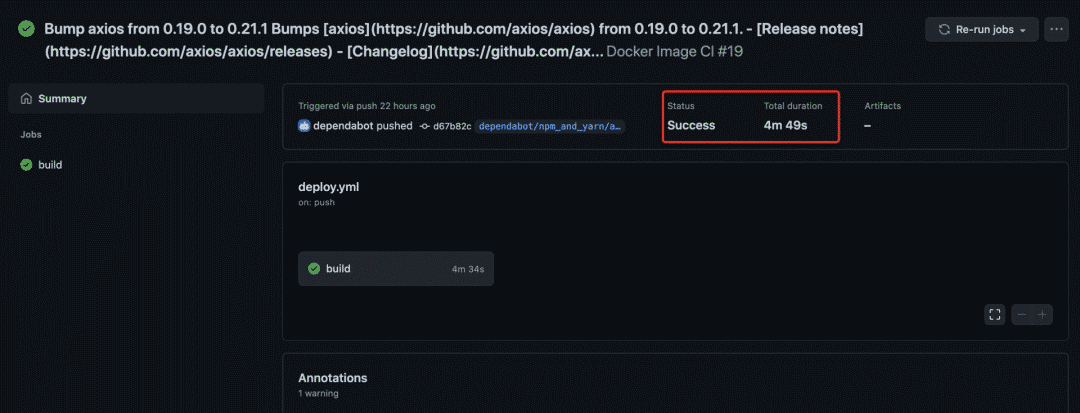
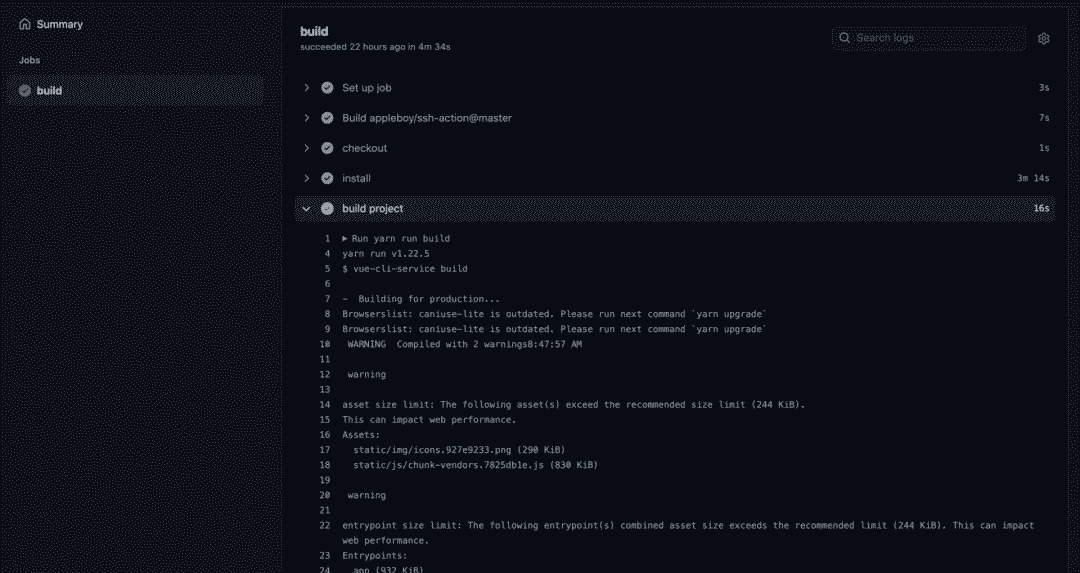
6、測試流程,查看日志
我們推送一次代碼測試,打開 Actions 后可以看到自動運(yùn)行的實(shí)時 workflow 結(jié)果,以及每步的日志信息。
總結(jié)
到此我們自動化部署成功,再也不要每次修改代碼,手動更新線上了,后面遷移也會更方便,當(dāng)然還有更多的自動化部署方式,比如直接使用 Github + 阿里云鏡像倉庫的觸發(fā)器一樣可以做到,容器服務(wù)也不僅限于阿里云,騰訊云等其他云服務(wù)廠商同樣也是一樣的使用方式。以上是我個人使用 Actions 的一些總結(jié),如有錯誤,勞煩指正修改。當(dāng)然對更多 Actions 玩法感興趣的同學(xué)歡迎一起交流學(xué)習(xí)。當(dāng)然這個僅限于個人的項(xiàng)目玩法,公司內(nèi)部的項(xiàng)目有更加成熟完善的自動化方案,比如我們內(nèi)部所使用的云長系統(tǒng),就是解決此類問題的,具體云長做了些什么,后續(xù)會有詳細(xì)文章輸出,敬請期待。
參考文獻(xiàn)
GitHub Actions 入門教程 (http://www.ruanyifeng.com/blog/2019/09/getting-started-with-github-actions.html?fileGuid=1PWJAvQBtLA5IGh3)
持續(xù)集成是什么?(https://www.ruanyifeng.com/blog/2015/09/continuous-integration.html?fileGuid=1PWJAvQBtLA5IGh3)