
使用Python和OpenCV檢測圖像中的多個亮點
本文轉(zhuǎn)自|AI算法與圖像處理

本文來自光頭哥哥的博客【Detecting multiple bright spots in an image with Python and OpenCV】,僅做學習分享。
原文鏈接:https://www.pyimagesearch.com/2016/10/31/detecting-multiple-bright-spots-in-an-image-with-python-and-opencv/
今天的博客文章是我?guī)啄昵白龅囊粋€關于尋找圖像中最亮點的教程的后續(xù)。
我之前的教程假設在圖像中只有一個亮點你想要檢測...
但如果有多個亮點呢?
如果您想在圖像中檢測多個亮點,代碼會稍微復雜一點,但不會太復雜。不過不用擔心:我將詳細解釋每一個步驟。
看看下面的圖片:

在這幅圖中,我們有五個燈泡。
我們的目標是檢測圖像中的這五個燈泡,并對它們進行唯一的標記。
首先,打開一個新文件并將其命名為detect_bright_spot .py。然后,插入以下代碼:
# import the necessary packagesfrom imutils import contoursfrom skimage import measureimport numpy as npimport argparseimport imutilsimport cv2# construct the argument parse and parse the argumentsap = argparse.ArgumentParser()ap.add_argument("-i", "--image", required=True,help="path to the image file")args = vars(ap.parse_args())
導入一些必要的包和命令行參數(shù)。
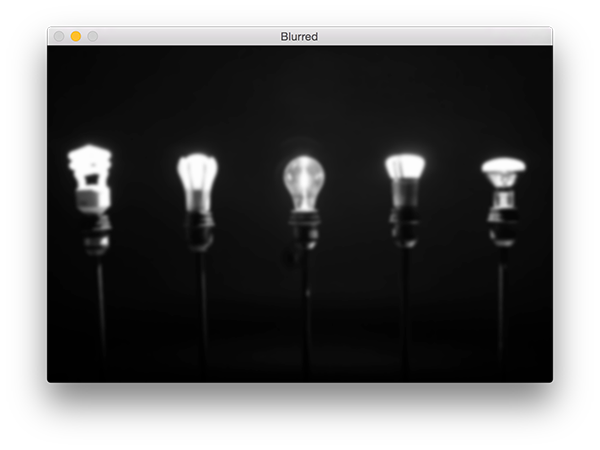
要開始檢測圖像中最亮的區(qū)域,我們首先需要從磁盤加載我們的圖像,然后將其轉(zhuǎn)換為灰度圖并進行平滑濾波,以減少高頻噪聲:
# load the image, convert it to grayscale, and blur itimage = cv2.imread(args["image"])gray = cv2.cvtColor(image, cv2.COLOR_BGR2GRAY)blurred = cv2.GaussianBlur(gray, (11, 11), 0)
這些操作的輸出如下:
為了顯示模糊圖像中最亮的區(qū)域,我們需要應用閾值化:
# threshold the image to reveal light regions in the# blurred imagethresh = cv2.threshold(blurred, 200, 255, cv2.THRESH_BINARY)[1]
操作取任意像素值p >= 200,并將其設置為255(白色)。像素值< 200被設置為0(黑色)。
閾值化后,我們得到如下圖像:
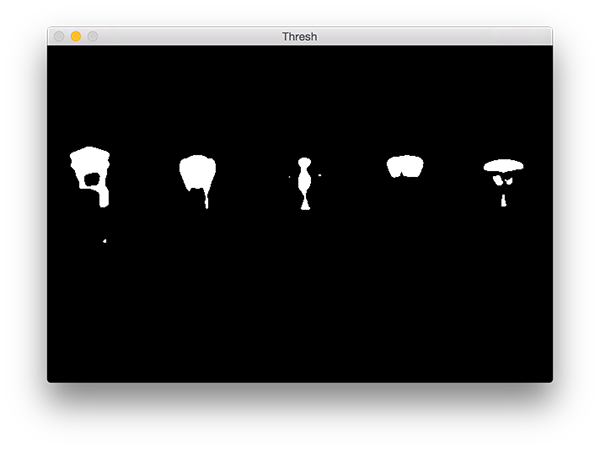
注意圖像的明亮區(qū)域現(xiàn)在都是白色的,而其余的圖像被設置為黑色。
然而,在這幅圖像中有一點噪聲(即,小斑點),所以讓我們通過執(zhí)行一系列的腐蝕和膨脹操作來清除它:
# perform a series of erosions and dilations to remove# any small blobs of noise from the thresholded imagethresh = cv2.erode(thresh, None, iterations=2)thresh = cv2.dilate(thresh, None, iterations=4)
在應用這些操作之后,你可以看到我們的thresh圖像變得更加“干凈”,但是仍然有一些我們想要移除的斑點。

本項目的關鍵步驟是對上圖中的每個區(qū)域進行標記,然而,即使在應用了腐蝕和膨脹后,我們?nèi)匀幌胍^濾掉剩余的小塊兒區(qū)域。
一個很好的方法是執(zhí)行連接組件分析:
# perform a connected component analysis on the thresholded# image, then initialize a mask to store only the "large"# componentslabels = measure.label(thresh, neighbors=8, background=0)mask = np.zeros(thresh.shape, dtype="uint8")# loop over the unique componentsfor label in np.unique(labels):# if this is the background label, ignore itif label == 0:continue# otherwise, construct the label mask and count the# number of pixelslabelMask = np.zeros(thresh.shape, dtype="uint8")== label] = 255numPixels = cv2.countNonZero(labelMask)# if the number of pixels in the component is sufficiently# large, then add it to our mask of "large blobs"if numPixels > 300:mask = cv2.add(mask, labelMask)
第4行使用scikit-image庫執(zhí)行實際的連接組件分析。measure.lable返回的label和我們的閾值圖像有相同的大小,唯一的區(qū)別就是label存儲的為閾值圖像每一斑點對應的正整數(shù)。
然后我們在第5行初始化一個掩膜來存儲大的斑點。
第7行我們開始循環(huán)遍歷每個label中的正整數(shù)標簽,如果標簽為零,則表示我們正在檢測背景并可以安全的忽略它(9,10行)。
否則,我們?yōu)楫斍皡^(qū)域構建一個掩碼。
下面我提供了一個GIF動畫,它可視化地構建了每個標簽的labelMask。使用這個動畫來幫助你了解如何訪問和顯示每個單獨的組件:

然后第15行對labelMask中的非零像素進行計數(shù)。如果numPixels超過了一個預先定義的閾值(在本例中,總數(shù)為300像素),那么我們認為這個斑點“足夠大”,并將其添加到掩膜中。
輸出掩模如下圖:
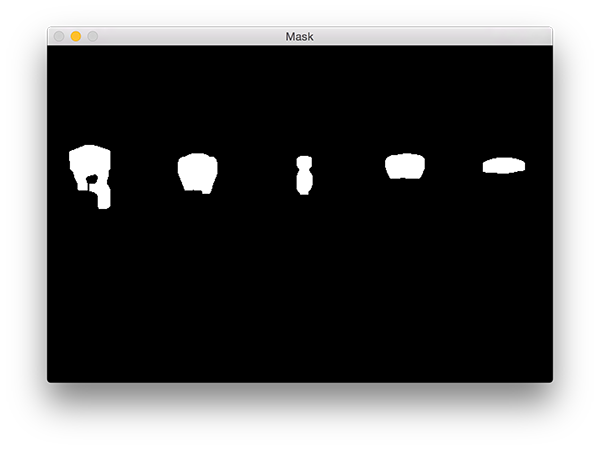
注意,所有小的斑點都被過濾掉了,只有大的斑點被保留了下來。
最后一步是在我們的圖像上繪制標記的斑點:
# find the contours in the mask, then sort them from left to# rightcnts = cv2.findContours(mask.copy(), cv2.RETR_EXTERNAL,cv2.CHAIN_APPROX_SIMPLE)cnts = imutils.grab_contours(cnts)cnts = contours.sort_contours(cnts)[0]# loop over the contoursfor (i, c) in enumerate(cnts):# draw the bright spot on the image(x, y, w, h) = cv2.boundingRect(c)((cX, cY), radius) = cv2.minEnclosingCircle(c)cv2.circle(image, (int(cX), int(cY)), int(radius),(0, 0, 255), 3)cv2.putText(image, "#{}".format(i + 1), (x, y - 15),cv2.FONT_HERSHEY_SIMPLEX, 0.45, (0, 0, 255), 2)# show the output imagecv2.imshow("Image", image)cv2.waitKey(0)
首先,我們需要檢測掩模圖像中的輪廓,然后按從左到右排序(3-7行)。
一旦我們的輪廓已經(jīng)排序,我們可以對它們進行單獨的循環(huán)處理(第8行)。
對于這些輪廓線,我們將計算出代表明亮區(qū)域的最小包圍圓(第12行)。
然后,我們唯一地標記該區(qū)域并在圖像上繪制它(第12-15行)。
最后,第17行和第18行顯示了輸出結(jié)果。
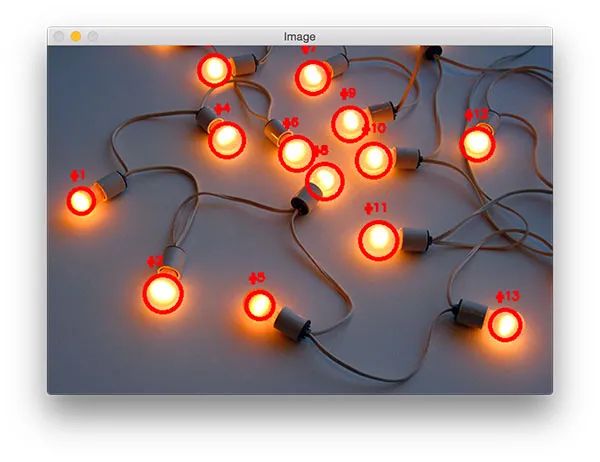
運行程序,你應該會看到以下輸出圖像:
請注意,每個燈泡都被獨特地標上了圓圈,圓圈圍繞著每個單獨的明亮區(qū)域。
 End
End
聲明:部分內(nèi)容來源于網(wǎng)絡,僅供讀者學術交流之目的。文章版權歸原作者所有。如有不妥,請聯(lián)系刪除。