
5 分鐘快速上手 pytest 測試框架
為什么要做單元測試
print() 函數(shù)將其打印輸出到控制臺(tái)上。def myfunc(*args, **kwargs):
do_something()
data = ...
print(data)
print() 函數(shù)來確保結(jié)果的準(zhǔn)確性,但同時(shí),也由于要測試的模塊或者函數(shù)變多,代碼中也會(huì)逐漸遺留著各種未被去掉或注釋的 print() 調(diào)用,讓整個(gè)代碼變得不是那么簡潔得體。print() 進(jìn)行測試的步驟統(tǒng)一地放到單元測試中來進(jìn)行。unittest。但對(duì)于新手來說,unittest 在學(xué)習(xí)曲線上是稍微有點(diǎn)難度的,因?yàn)槭切枰ㄟ^繼承測試用例類(TestCase)來進(jìn)行封裝,所以需要對(duì)面向?qū)ο蟮闹R(shí)有足夠多的了解;而和類綁定在一起就意味著如果想要實(shí)現(xiàn)定制化或者模塊解耦,可能就需要多花一些時(shí)間在設(shè)計(jì)劃分上。
TestCase 來實(shí)現(xiàn)我們的測試,我們只需要簡單到保持我們?cè)械拇a邏輯不變,外加一個(gè) assert 關(guān)鍵字來斷言結(jié)果,剩下的部分 pytest 會(huì)幫我們處理。# main.py
import pytest
raw_data = read_data(...)
def test_myfunc(*args, **kwargs):
do_something()
data = ...
assert data == raw_data
if __name__ == '__main__':
pytest.main()
main.py 文件,就能在終端控制臺(tái)上看到 pytest 為我們測試得到的結(jié)果。如果結(jié)果通過,則不會(huì)有過多的信息顯示,如果測試失敗,則會(huì)拋出錯(cuò)誤信息并告知運(yùn)行時(shí) data 里的內(nèi)容是什么。快速實(shí)現(xiàn)你的第一個(gè) Pytest 測試
pip install pytest 安裝 pytest 之后,我們就可以快速實(shí)現(xiàn)我們的第一個(gè)測試。test_main.py 命名,然后當(dāng)中留存如下內(nèi)容:from typing import Union
import pytest
def add(
x: Union[int, float],
y: Union[int, float],
) -> Union[int, float]:
return x + y
@pytest.mark.parametrize(
argnames="x,y,result",
argvalues=[
(1,1,2),
(2,4,6),
(3.3,3,6.3),
]
)
def test_add(
x: Union[int, float],
y: Union[int, float],
result: Union[int, float],
):
assert add(x, y) == result
pytest -v,就會(huì)看到 pytest 已經(jīng)幫我們將待測試的參數(shù)傳入到測試函數(shù)中,并實(shí)現(xiàn)對(duì)應(yīng)的結(jié)果: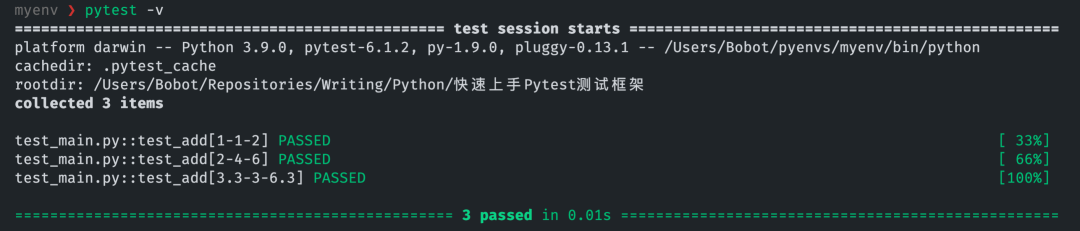
for 循環(huán)傳參,并且還能直觀地從結(jié)果中看到每次測試中傳入?yún)?shù)的具體數(shù)值是怎樣。這里我們只通過 pytest 提供的 mark.parametrize 裝飾器就搞定了。也說明 pytest 的上手程度是比較容易的,只不過我們需要稍微了解一下這個(gè)框架中的一些概念。Pytest 概念與用法
命名
test_* 開頭或是以 *_test 結(jié)尾,這是為了遵守標(biāo)準(zhǔn)的測試約定。如果我們將前面快速上手的例子文件名中的 test_ 去掉,就會(huì)發(fā)現(xiàn) pytest 沒有收集到對(duì)應(yīng)的測試用例。# content of pytest.ini
# Example 1: have pytest look for "check" instead of "test"
[pytest]
python_files = check_*.py
python_classes = Check
python_functions = *_check
pytest test.py::test_demo
pytest test.py::TestDemo::test_demo
標(biāo)記(mark)
mark 標(biāo)記是一個(gè)十分好用的功能,通過標(biāo)記的裝飾器來裝飾我們的待測試對(duì)象,讓 pytest 在測試時(shí)會(huì)根據(jù) mark 的功能對(duì)我們的函數(shù)進(jìn)行相應(yīng)的操作。mark 功能,我們只挑常用的說。參數(shù)測試:pytest.parametrize
mark.parametrize 主要就是用于我們想傳遞不同參數(shù)或不同組合的參數(shù)到一個(gè)待測試對(duì)象上的這種場景。test_add() 示例一樣,分別測試了:當(dāng) x=1且y=1時(shí),結(jié)果是否為result=2的情況當(dāng) x=2且y=4時(shí),結(jié)果是否為result=6的情況當(dāng) x=3.3且y=3時(shí),結(jié)果是否為result=6.3的情況……
import pytest

@pytest.mark.parametrize("x", [0, 1])
@pytest.mark.parametrize("y", [2, 3])
@pytest.mark.parametrize("result", [2, 4])
def test_add(x, y, result):
    assert add(x,y) == result
parametrize 中,pytest 依舊能幫我們把所有情況都給測試一遍。這樣我們就再也不用寫多余的代碼。parametrize 和我們后面將要講到的一個(gè)重要的概念 fixture 會(huì)有一些差異:前者主要是模擬不同參數(shù)下時(shí)待測對(duì)象會(huì)輸出怎樣的結(jié)果,而后者是在固定參數(shù)或數(shù)據(jù)的情況下,去測試會(huì)得到怎樣的結(jié)果。跳過測試
add(),但當(dāng)版本大于 Python 3.3 時(shí)使用必然會(huì)出現(xiàn)問題。mark.skip 和 mark.skipif 兩個(gè)標(biāo)記,當(dāng)然后者用的更多一些。import pytest
import sys
@pytest.mark.skipif(sys.version_info >= (3,3))
def test_add(x, y, result):
assert add(x,y) == result
sys 模塊判斷 Python 解釋器的版本是否大于 3.3,大于則會(huì)自動(dòng)跳過。預(yù)期異常
def div(x, y):
    return x / y
y=0 時(shí),必然會(huì)引發(fā) ZeroDivisionError 異常。所以通常的做法要么就用 try...exception 來捕獲異常,并且拋出對(duì)應(yīng)的報(bào)錯(cuò)信息(我們也可以使用 if 語句進(jìn)行條件判斷,最后也同樣是拋出報(bào)錯(cuò)):def div(x, y):
try:
return x/y
except ZeroDivisionError:
raise ValueError("y 不能為 0")
raises() 方法:import pytest
@pytest.mark.parametrize("x", [1])
@pytest.mark.parametrize("y", [0])
def test_div(x, y):
with pytest.raises(ValueError):
div(x, y)
ZeroDivisionError 后我們自己指定拋出的 ValueError,而非前者。當(dāng)然我們可以使用另外一個(gè)標(biāo)記化的方法(pytest.mark.xfail)來和 pytest.mark.parametrize 相結(jié)合:
@pytest.mark.parametrize(
    "x,y,result",
    [
        pytest.param(1,0, None, marks=pytest.mark.xfail(raises=(ValueError))),
    ]
)
def test_div_with_xfail(x, y, result):
    assert div(x,y) == result
Fixture
fixture。關(guān)于 fixture 的翻譯大部分人都直接將其直譯為了「夾具」一詞,但如果你有了解過 Java Spring 框架的 那么你在實(shí)際使用中你就會(huì)更容易將其理解為 IoC 容器類似的東西,但我自己認(rèn)為它叫「載具」或許更合適。fixture 的作用往往就是為我們的測試用例提供一個(gè)固定的、可被自由拆裝的通用對(duì)象,本身就像容器一樣承載了一些東西在里面;讓我們使用它進(jìn)行我們的單元測試時(shí),pytest 會(huì)自動(dòng)向載具中注入對(duì)應(yīng)的對(duì)象。connect(),接著進(jìn)行操作,最后使用完之后斷開連接 close() 以釋放資源。# test_fixture.py
import pytest
class Database(object):
def __init__(self, database):
self.database = database
def connect(self):
print(f"\n{self.database} database has been connected\n")
def close(self):
print(f"\n{self.database} database has been closed\n")
def add(self, data):
print(f"`{data}` has been add to database.")
return True
@pytest.fixture
def myclient():
db = Database("mysql")
db.connect()
yield db
db.close()
def test_foo(myclient):
assert myclient.add(1) == True
@pytest.fixture 這一行裝飾器代碼,通過該裝飾器我們可以直接使用一個(gè)帶有資源的函數(shù)將其作為我們的載具,在使用時(shí)將函數(shù)的簽名(即命名)作為參數(shù)傳入到我們的測試用例中,在運(yùn)行測試時(shí) pytest 則會(huì)自動(dòng)幫助我們進(jìn)行注入。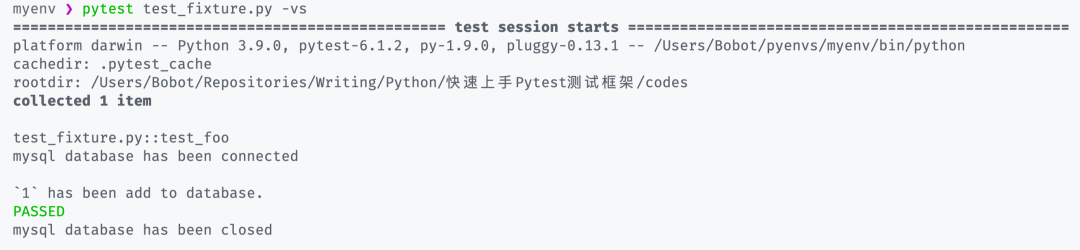
myclient() 中 db 對(duì)象的 connect() 方法調(diào)用模擬數(shù)據(jù)庫連接的方法,在測試完成之后會(huì)再次幫我們調(diào)用 close() 方法釋放資源。fixture 機(jī)制是一個(gè)讓我們能實(shí)現(xiàn)復(fù)雜測試的關(guān)鍵,試想我們以后只需要寫好一個(gè)帶有測試數(shù)據(jù)的 fixture,就可以在不同的模塊、函數(shù)或者方法中多次使用,真正做到「一次生成,處處使用」。function:函數(shù)作用域(默認(rèn))class:類作用域module:模塊作用域package:包作用域session:會(huì)話作用域
@pytest.fixture() 中多增加一個(gè) scope 參數(shù),從而提升載具作用的范圍。conftest.py 文件中進(jìn)行統(tǒng)一管理:# conftest.py
import pytest
class Database:
def __init__(self, database):
self.database:str = database
def connect(self):
print(f"\n{self.database} database has been connected\n")
def close(self):
print(f"\n{self.database} database has been closed\n")
def add(self, data):
print(f"\n`{data}` has been add to database.")
return True
@pytest.fixture(scope="package")
def myclient():
db = Database("mysql")
db.connect()
yield db
db.close()
test_add() 測試部分稍微修改一下,無需顯式導(dǎo)入 myclient 載具就可以直接注入并使用:from typing import Union
import pytest
def add(
x: Union[int, float],
y: Union[int, float],
) -> Union[int, float]:
return x + y
@pytest.mark.parametrize(
argnames="x,y,result",
argvalues=[
(1,1,2),
(2,4,6),
]
)
def test_add(
x: Union[int, float],
y: Union[int, float],
result: Union[int, float],
myclient
):
assert myclient.add(x) == True
assert add(x, y) == result
pytest -vs 即可看到輸出的結(jié)果: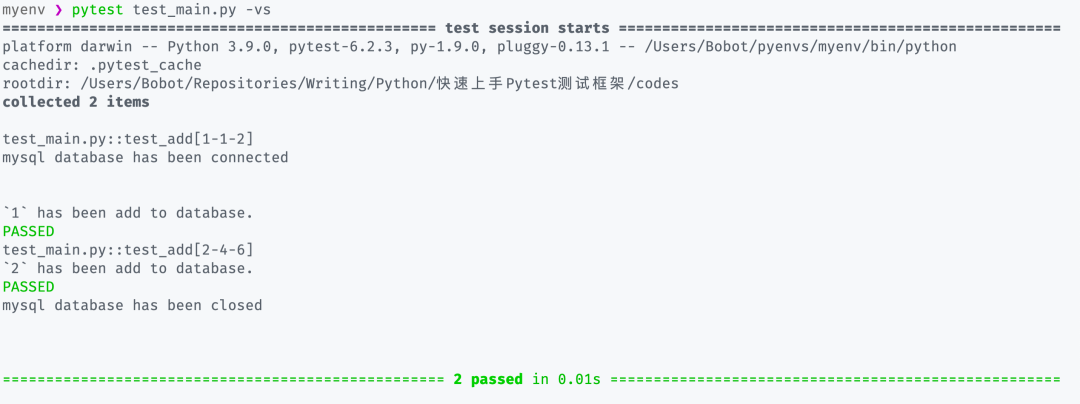
Pytest 擴(kuò)展
pip 命令安裝即可,最后使用只需要簡單的參照插件的使用文檔編寫相應(yīng)的部分,最后啟動(dòng) pytest 測試即可。pytest-xdist
-n <CPU_NUMBER> 參數(shù)即可,其中的 CPU 數(shù)量可以直接用 auto 代替,它會(huì)自動(dòng)幫你調(diào)整 pytest 測試所使用的 CPU 核心數(shù):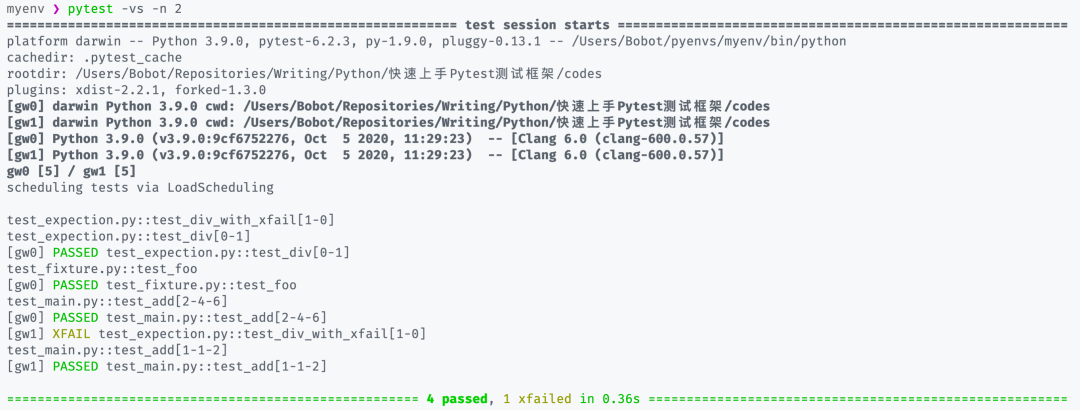
pytest-asyncio
@pytest.mark.asyncio 標(biāo)記裝飾異步函數(shù)或方法,然后進(jìn)行測試即可:import asyncio
import pytest
async def foo():
await asyncio.sleep(1)
return 1
@pytest.mark.asyncio
async def test_foo():
r = await foo()
assert r == 1
結(jié)語
作者:100gle,練習(xí)時(shí)長不到兩年的非正經(jīng)文科生一枚,喜歡敲代碼、寫寫文章、搗鼓搗鼓各種新事物;現(xiàn)從事有關(guān)大數(shù)據(jù)分析與挖掘的相關(guān)工作。
贊 賞 作 者

更多閱讀
特別推薦
點(diǎn)擊下方閱讀原文加入社區(qū)會(huì)員
評(píng)論
圖片
表情