
使用 IdentityServer 保護(hù) Web 應(yīng)用(AntD Pro 前端 + SpringBoot 后端)
需求背景
使用前后端分離開發(fā)的 Web 應(yīng)用,想通過 IdentityServer 作為授權(quán)服務(wù)器將它保護(hù)起來,只允許登錄后的用戶使用。不管是前端頁面,還是后端 API,都希望在登錄前不可使用,而在登錄后,都可以使用。即沒有復(fù)雜的權(quán)限管理,只有登錄和未登錄的區(qū)別。
技術(shù)棧
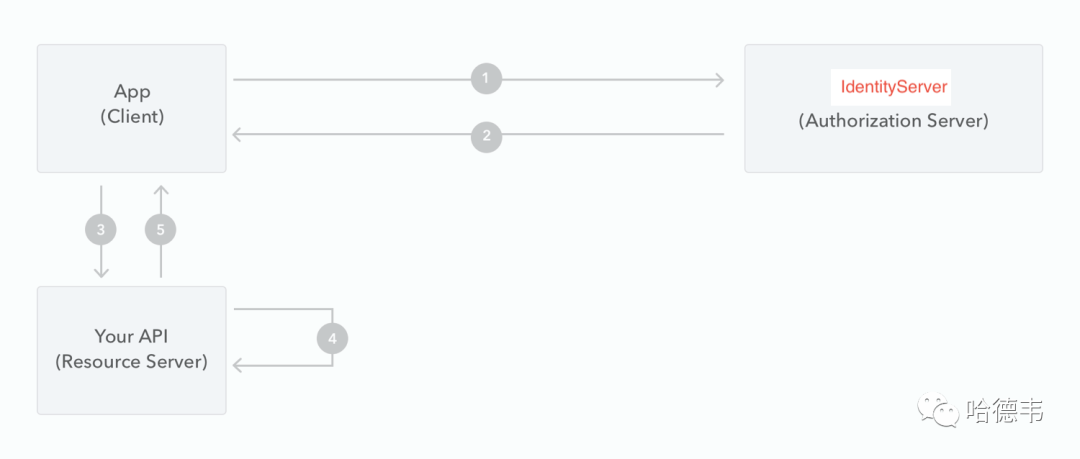
這個(gè) Web 應(yīng)用的前端項(xiàng)目基于 AntD Pro,而后端 API 項(xiàng)目基于 Java SpringBoot;同時(shí),授權(quán)服務(wù)器是基于 ASP.NET Core 的 IdentityServer。保護(hù)的方式是 OAuth 2 的授權(quán)碼流程,即在打開頁面時(shí),如果沒有登錄,會(huì)自動(dòng)跳轉(zhuǎn)到 IdentityServer 做統(tǒng)一登錄,登錄完成后,跳轉(zhuǎn)回 Web 應(yīng)用的頁面,這時(shí)頁面已經(jīng)拿到了訪問令牌,同時(shí)頁面開始向后端發(fā)送 ajax 請(qǐng)求,并帶上這個(gè)訪問令牌。也就是說,無論前端頁面還是后端 API,都對(duì)同樣的訪問令牌做校驗(yàn),通過則頁面與 API 都能訪問,否則,都不能訪問。
關(guān)于如何部署一個(gè) IdentityServer,可以參考:
身份驗(yàn)證哪家強(qiáng)?Identity Server 初體驗(yàn)
流程示意
前端接入
前端使用了 AntD Pro 框架,而 AntD Pro 又是基于 UmiJs,在網(wǎng)上找到了一個(gè) UmiJs 對(duì)接 OAuth 2 Server 的示例:https://github.com/io84team/umi-plugin-oauth2-client,除了它沒有將插件發(fā)布的嘈點(diǎn)外,其他都很好。這里列一下在 AntD Pro 項(xiàng)目中利用 umi-plugin-oauth2-client 接入 IdentityServer 的詳細(xì)步驟:
引入 umi-plugin-oauth2-client
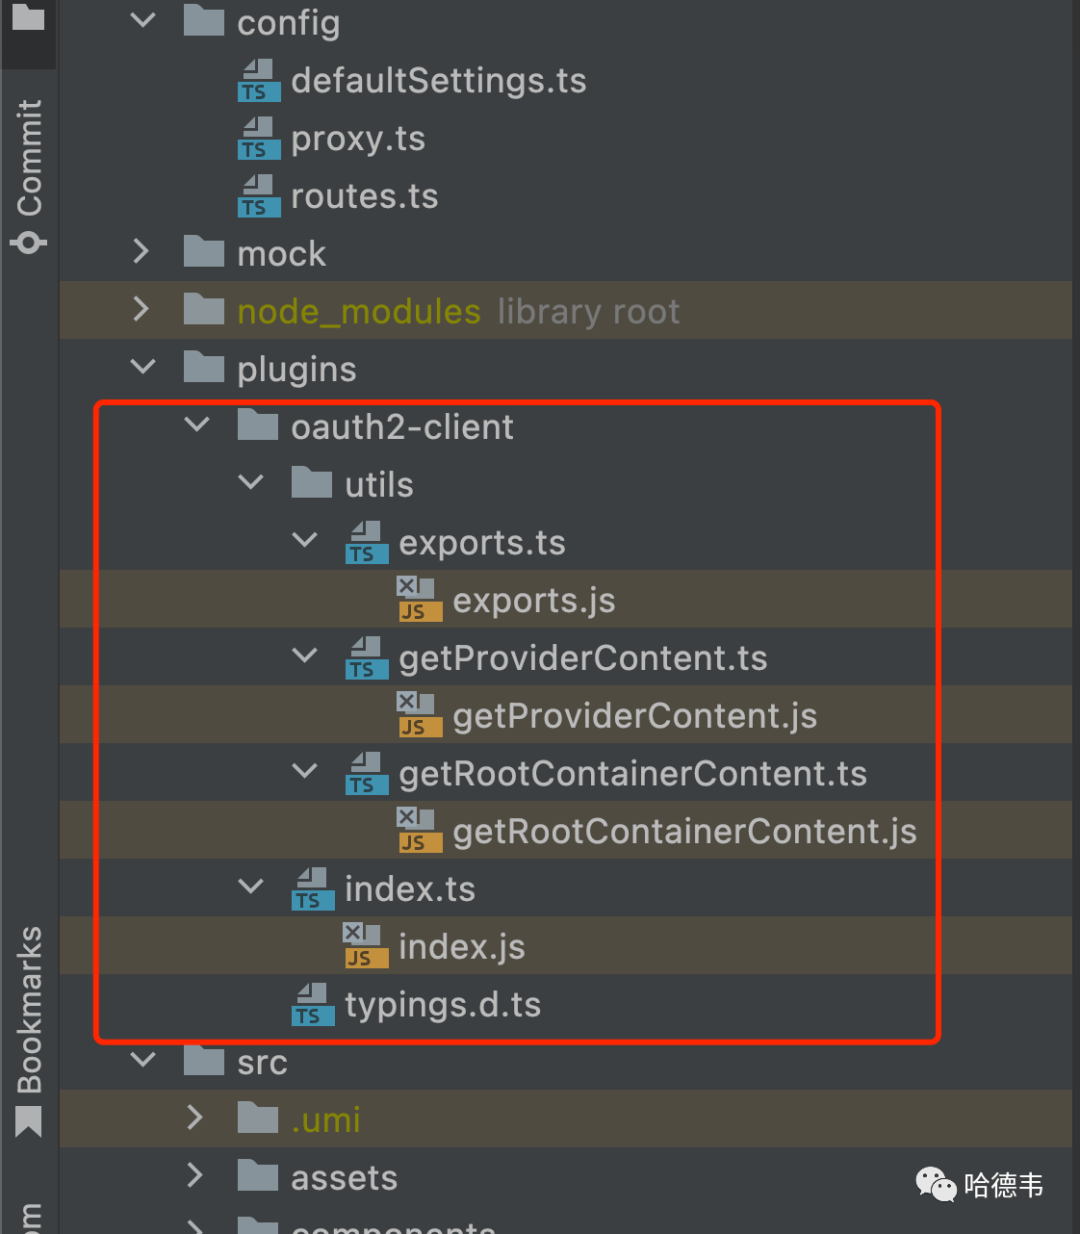
由于上面提到的那個(gè)示例,作者似乎沒有發(fā)布成 npm 包,因此引入的方式不太優(yōu)雅,但能工作!拷貝相應(yīng)的源碼到 plugins 目錄,如下圖所示:
然后再在配置文件里,增加這個(gè)插件的引用:
// .umirc...plugins: [...require.resolve('./plugins/oauth2-client'),],...
接入 IdentityServer 配置
IdentityServer 增加一個(gè)客戶端
首先,給這個(gè) Web App 起個(gè)名字,比如叫 CoolApp,然后,在 IdentityServer 里增加該客戶端,相當(dāng)于備一個(gè)案:
// src/IdentityServer/Config.csusing Duende.IdentityServer;using Duende.IdentityServer.Models;namespace IdentityServer;public static class Config{...public static IEnumerable<Client> Clients =>new[]{new(){ClientId = "CoolApp",ClientSecrets ={new Secret("CoolApp".Sha256())},ClientName = "CoolApp",AllowedGrantTypes = GrantTypes.CodeAndClientCredentials,RequireClientSecret = false,RedirectUris ={"http://localhost:8000/oauth2/callback","https://your.cool.app/oauth2/callback"},AllowedScopes ={IdentityServerConstants.StandardScopes.OpenId,IdentityServerConstants.StandardScopes.Profile,IdentityServerConstants.StandardScopes.Email,}},...};...
然后要將客戶端添加到 IdentityServer 數(shù)據(jù)存儲(chǔ)中,這里以內(nèi)存為例:
// src/IdentityServer/HostingExtensions.csnamespace IdentityServer;internal static class HostingExtensions{public static WebApplication ConfigureServices(this WebApplicationBuilder builder){// uncomment if you want to add a UIbuilder.Services.AddRazorPages();builder.Services.AddIdentityServer().AddInMemoryIdentityResources(Config.IdentityResources).AddInMemoryApiScopes(Config.ApiScopes).AddInMemoryClients(Config.Clients).AddTestUsers(TestUsers.Users);...
在前端配置該 IdentityServer 元數(shù)據(jù)
// .umirc...oauth2Client: {clientId: 'CoolApp',accessTokenUri: 'https://your.identity.server/connect/token',authorizationUri: 'https://your.identity.server/connect/authorize',redirectUri:'http://localhost:8000/oauth2/callback',scopes: ['openid', 'email', 'profile'],userInfoUri: 'https://your.identity.server/connect/userinfo',userSignOutUri: 'https://your.identity.server/connect/endsession',homePagePath: '/',},...
路由修改
由于是保護(hù)所有的頁面,因此將原來的父級(jí)路由增加一個(gè) wrappers(參考官網(wǎng)文檔),同時(shí)增加一個(gè)登錄的路由,如下:
// .umirc.tsconst routes: IRoute[] = [{path: '/login', // 非必須,可以留作后續(xù)擴(kuò)展使用component: 'login',layout: false,},{path: '/',wrappers: ['@/wrappers/auth'],component: '../layouts/BlankLayout',flatMenu: true,routes: [{name: 'xxx'path: '/yyy',component: './zzz',},...]}]
實(shí)現(xiàn) auth wrapper
// src/wrappers/auth.tsximport React from 'react';import { useEffect } from 'react';import type { IRouteComponentProps } from 'umi';// @ts-ignoreimport { useOAuth2User } from 'umi';const Auth: React.FC<IRouteComponentProps> = (props) => {const { children } = props;// const { token, user, signIn, getSignUri } = useOAuth2User();const { token, user, signIn } = useOAuth2User();useEffect(() => {if (token === undefined && user === undefined) {// token 和 user 都是 undefined 時(shí)才需要請(qǐng)求。// const uri = getSignUri();// return <a href={uri}>Goto SSO</a>;// 顯示登錄鏈接,或者自動(dòng)跳轉(zhuǎn)登錄,或者跳轉(zhuǎn)到自己的登錄頁面。debugger;signIn();}},// 注銷時(shí)不會(huì)重復(fù)登錄// eslint-disable-next-line react-hooks/exhaustive-deps[],);if (token !== undefined && user !== undefined) {return children;}return <span>Loading...</span>;};export default Auth;
實(shí)現(xiàn) login 組件
這不是必須的,但是建議增加一個(gè)簡(jiǎn)單的組件,展示一下登錄態(tài),如果已登錄,就展示用戶信息,并且提供一個(gè)退出的按鈕(鏈接)。
// src/pages/login.tsximport { Link } from 'react-router-dom';import { OAuth2UserContext } from 'umi';export default () => {return (<OAuth2UserContext.Consumer>{({ user, token, signOut }) => {const userContent = token && user && (<div>{user.name}<br /><Link to="/" onClick={signOut}>SignOut</Link></div>);return (<div><div>Login Page</div><div>User: {JSON.stringify(user)}</div><div>Token: {JSON.stringify(token)}</div>{userContent}<Link to="/">Home</Link></div>);}}</OAuth2UserContext.Consumer>);};
效果
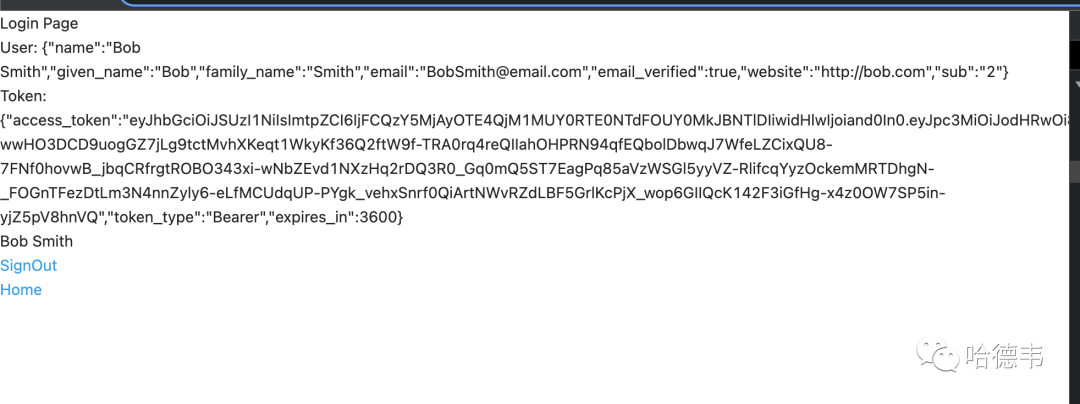
打開任意頁面(除了 /login 外),只要是非登錄態(tài),就會(huì)跳轉(zhuǎn)到 IdentityServer 服務(wù)器,登錄后跳回。如果打開 /login 頁面,可以查看已登錄用戶信息:
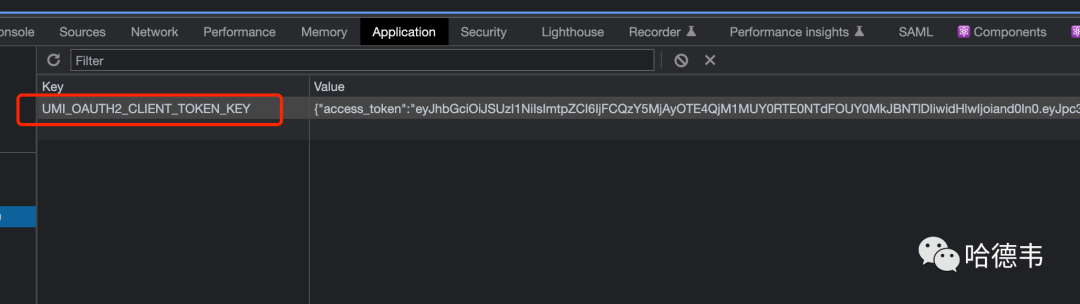
同時(shí),發(fā)現(xiàn) Local Storage 里有了訪問令牌信息:
該令牌是一個(gè) JWT,結(jié)構(gòu)如下:
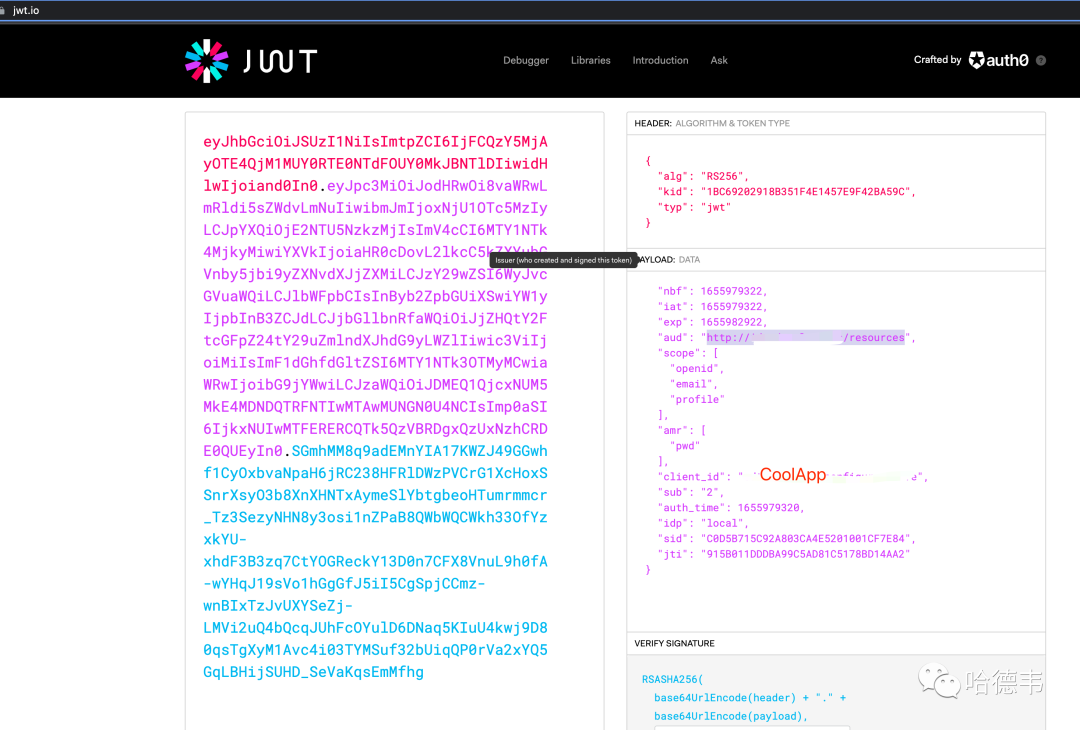
注意其中的 aud 字段,在后面保護(hù) API 時(shí)需要用到。另外,注意 typ 字段,如果是 at+jwt,則需要對(duì) IdentityServer 做相應(yīng)配置,改成 jwt,以便讓 SpringBoot 項(xiàng)目識(shí)別該令牌。
后端接入
雖然前端頁面已經(jīng)被保護(hù)起來了,但是,其后端 API 仍然可以使用 Postman 等方式直接訪問,繞過了被保護(hù)起來的 UI。所以 API 也得保護(hù)起來,以 SpringBoot 項(xiàng)目為例,詳解接入 IdentityServer 的步驟。
IdentityServer 做個(gè)小修改
IdentityServer 頒發(fā)的令牌,其 typ 字段默認(rèn)是 at+jwt,這不被 springboot 項(xiàng)目識(shí)別,需要修改為 jwt:
// src/IdentityServer/HostingExtensions.csnamespace IdentityServer;internal static class HostingExtensions{public static WebApplication ConfigureServices(this WebApplicationBuilder builder){// uncomment if you want to add a UIbuilder.Services.AddRazorPages();builder.Services.AddIdentityServer(options =>{// https://docs.duendesoftware.com/identityserver/v6/fundamentals/resources/api_scopes#authorization-based-on-scopesoptions.EmitStaticAudienceClaim = true;// 將默認(rèn)的 at+jwt 修改為 jwtoptions.AccessTokenJwtType = "jwt";})...
在 SpringBoot 項(xiàng)目中增加必要的依賴
// pom.xml...<dependency><groupId>org.springframework.security.oauth.boot</groupId><artifactId>spring-security-oauth2-autoconfigure</artifactId><version>2.1.4.RELEASE</version></dependency><dependency><groupId>org.springframework.security.oauth</groupId><artifactId>spring-security-oauth2</artifactId><version>2.3.5.RELEASE</version></dependency><dependency><groupId>com.sun.xml.bind</groupId><artifactId>jaxb-impl</artifactId><version>2.3.1</version></dependency><dependency><groupId>com.sun.xml.messaging.saaj</groupId><artifactId>saaj-impl</artifactId><version>1.5.1</version></dependency>...
增加資源服務(wù)器配置
增加一個(gè)資源服務(wù)器配置 ResourcesServerConfiguration 類,將前面的 JWT 令牌中的 aud 字段配置為該項(xiàng)目的 resourceId:
// src/main/java/com/.../application/ResourcesServerConfiguration.javapackage com.xxx.application;import org.springframework.context.annotation.Configuration;import org.springframework.security.oauth2.config.annotation.web.configuration.EnableResourceServer;import org.springframework.security.oauth2.config.annotation.web.configuration.ResourceServerConfigurerAdapter;import org.springframework.security.oauth2.config.annotation.web.configurers.ResourceServerSecurityConfigurer;public class ResourcesServerConfiguration extends ResourceServerConfigurerAdapter {public void configure(ResourceServerSecurityConfigurer resources) throws Exception {resources.resourceId("前面的 jwt 令牌中的 aud 字段");}}
對(duì)需要保護(hù)的接口增加 @EnableWebSecurity 注解
// xxxx controllerimport org.springframework.security.config.annotation.web.configuration.EnableWebSecurity;......public class XxxController {
效果
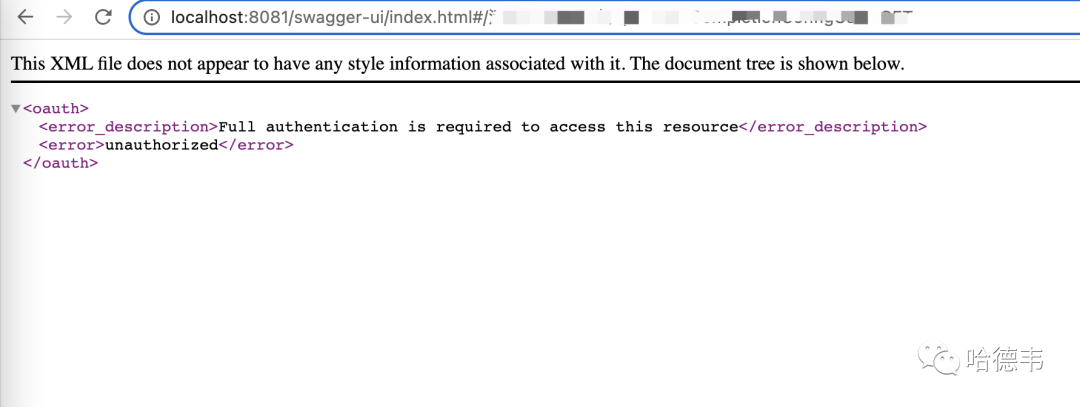
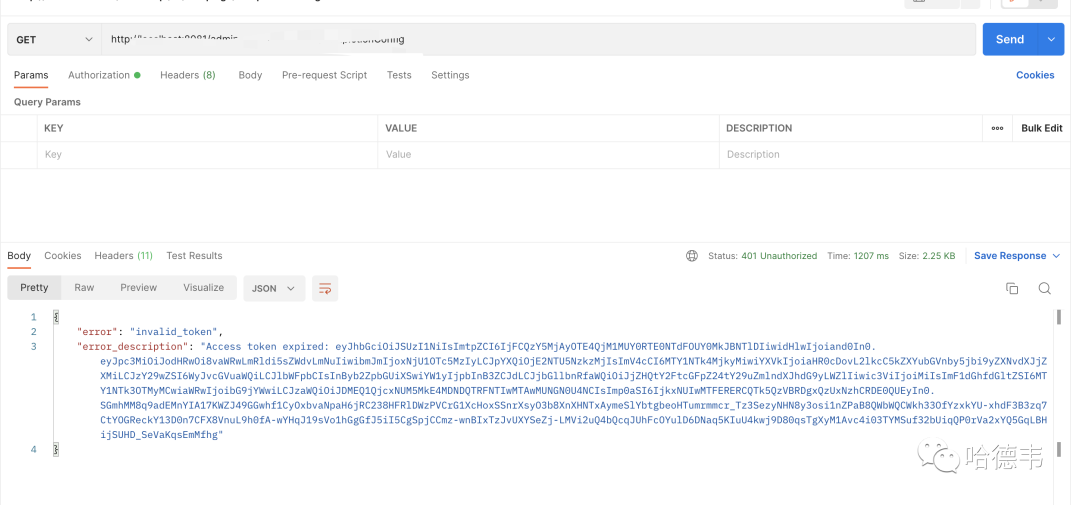
如果不帶 token 直接訪問 API,或者帶上了錯(cuò)誤的過期的 token,會(huì)得到?jīng)]有權(quán)限的錯(cuò)誤:
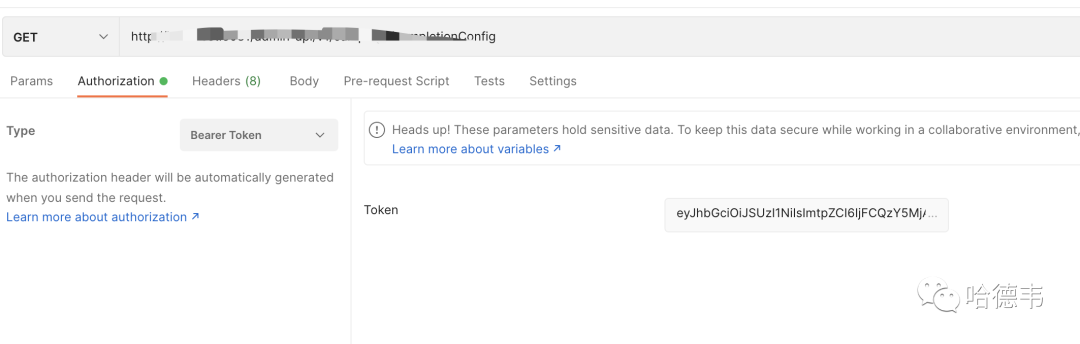
而當(dāng)帶上正確有效的的 token 時(shí),就可以得到預(yù)期的結(jié)果:
總結(jié)
本文以具體的例子,詳解(手把手教)了如何保護(hù)前端頁面和后端 API。這個(gè)方式其實(shí)可以舉一反三,推廣到更多的應(yīng)用場(chǎng)景中。比如 IdentityServer 可以換成 Keycloak 等等任何支持 OAuth 2 的認(rèn)證授權(quán)服務(wù)器;前端除了 Umi 技術(shù)棧外,也可以是其他技術(shù)棧,比如 Next Js,這時(shí)就可以使用 NextAuth(我做了一個(gè)示例:https://notion.inversify.cn/sign-in,歡迎體驗(yàn)) 。后端也可以是任何的技術(shù)棧,但是需要不同的接入方法。
nodejs 項(xiàng)目、springboot 項(xiàng)目和 ASP.NET Core 項(xiàng)目都是以前獨(dú)立開發(fā)的,今天終于通過登錄保護(hù)這條線,把它們串在一起了,爽!