
極致舒適的 Vue 彈窗使用方案
一個(gè)Hook讓你體驗(yàn)極致舒適的Dialog使用方式!

Dialog地獄
為啥是地獄?
因?yàn)榉彩怯?code style="padding: 2px 4px;border-radius: 4px;margin-right: 2px;margin-left: 2px;background-color: rgba(27, 31, 35, 0.05);font-family: "Operator Mono", Consolas, Monaco, Menlo, monospace;word-break: break-all;">Dialog出現(xiàn)的頁(yè)面,其代碼絕對(duì)優(yōu)雅不起來!因?yàn)橐坏┠阍谝矀€(gè)組件中引入Dialog,就最少需要額外維護(hù)一個(gè)visible變量。如果只是額外維護(hù)一個(gè)變量這也不是不能接受,可是當(dāng)同樣的Dialog組件,即需要在父組件控制它的展示與隱藏,又需要在子組件中控制。
為了演示我們先實(shí)現(xiàn)一個(gè)MyDialog組件,代碼來自ElementPlus的Dialog示例
<script setup lang="ts">
import { computed } from 'vue';
import { ElDialog } from 'element-plus';

const props = defineProps<{
  visible: boolean;
  title?: string;
}>();

const emits = defineEmits<{
  (event: 'update:visible', visible: boolean): void;
  (event: 'close'): void;
}>();

const dialogVisible = computed<boolean>({
  get() {
    return props.visible;
  },
  set(visible) {
    emits('update:visible', visible);
    if (!visible) {
      emits('close');
    }
  },
});
</script>

<template>
  <ElDialog v-model="dialogVisible" :title="title" width="30%">
    <span>This is a message</span>
    <template #footer>
      <span>
        <el-button @click="dialogVisible = false">Cancel</el-button>
        <el-button type="primary" @click="dialogVisible = false"> Confirm </el-button>
      </span>
    </template>
  </ElDialog>
</template>
演示場(chǎng)景
就像下面這樣:

示例代碼如下:
<script setup lang="ts">
import { ref } from 'vue';
import { ElButton } from 'element-plus';

import Comp from './components/Comp.vue';
import MyDialog from './components/MyDialog.vue';

const dialogVisible = ref<boolean>(false);
const dialogTitle = ref<string>('');

const handleOpenDialog = () => {
  dialogVisible.value = true;
  dialogTitle.value = '父組件彈窗';
};

const handleComp1Dialog = () => {
  dialogVisible.value = true;
  dialogTitle.value = '子組件1彈窗';
};

const handleComp2Dialog = () => {
  dialogVisible.value = true;
  dialogTitle.value = '子組件2彈窗';
};
</script>

<template>
  <div>
    <ElButton @click="handleOpenDialog"> 打開彈窗 </ElButton>
    <Comp text="子組件1" @submit="handleComp1Dialog"></Comp>
    <Comp text="子組件2" @submit="handleComp2Dialog"></Comp>
    <MyDialog v-model:visible="dialogVisible" :title="dialogTitle"></MyDialog>
  </div>
</template>
這里的MyDialog會(huì)被父組件和兩個(gè)Comp組件都會(huì)觸發(fā),如果父組件并不關(guān)心子組件的onSubmit事件,那么這里的submit在父組件里唯一的作用就是處理Dialog的展示!!!??這樣真的好嗎?不好!
來分析一下,到底哪里不好!
「MyDialog本來是submit動(dòng)作的后續(xù)動(dòng)作,所以理論上應(yīng)該將MyDialog寫在Comp組件中。但是這里為了管理方便,將MyDialog掛在父組件上,子組件通過事件來控制MyDialog。」
「再者,這里的handleComp1Dialog和handleComp2Dialog函數(shù)除了處理MyDialog外,對(duì)于父組件完全沒有意義卻寫在父組件里。」
如果這里的Dialog多的情況下,簡(jiǎn)直就是Dialog地獄啊!??
理想的父組件代碼應(yīng)該是這樣:
<script setup lang="ts">
import { ElButton } from 'element-plus';

import Comp from './components/Comp.vue';
import MyDialog from './components/MyDialog.vue';

const handleOpenDialog = () => {
  // 處理 MyDialog
};
</script>

<template>
  <div>
    <ElButton @click="handleOpenDialog"> 打開彈窗 </ElButton>
    <Comp text="子組件1"></Comp>
    <Comp text="子組件2"></Comp>
  </div>
</template>
在函數(shù)中處理彈窗的相關(guān)邏輯才更合理。
解決之道
??朕觀之,是書之文或不雅,致使人之心有所厭,何得無妙方可解決?
依史記之辭曰:“天下苦Dialog久矣,苦楚深深,望有解脫之道。”于是,諸位賢哲紛紛舉起討伐Dialog之旌旗,終“命令式Dialog”逐漸突破困境之境地。

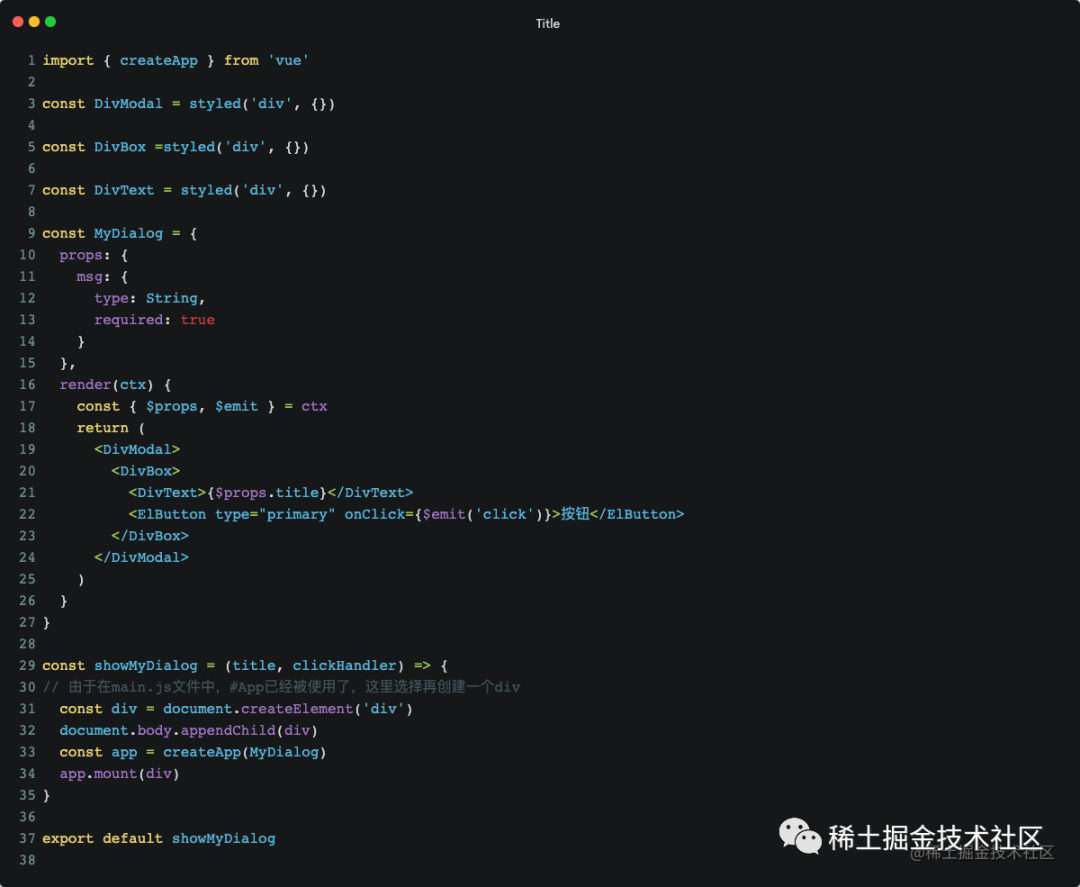
沒錯(cuò)現(xiàn)在網(wǎng)上對(duì)于Dialog的困境,給出的解決方案基本上就“命令式Dialog”看起來比較優(yōu)雅!這里給出幾個(gè)網(wǎng)上現(xiàn)有的命令式Dialog實(shí)現(xiàn)。
命令式一

吐槽一下~,這種是能在函數(shù)中處理彈窗邏輯,但是缺點(diǎn)是MyDialog組件與showMyDialog是兩個(gè)文件,增加了維護(hù)的成本。
命令式二
基于第一種實(shí)現(xiàn)的問題,不就是想讓MyDialog.vue和.js文件合體嗎?于是諸位賢者想到了JSX。于是進(jìn)一步的實(shí)現(xiàn)是這樣:
嗯,這下完美了!??

完美?還是要吐槽一下~
-
如果我的系統(tǒng)中有很多彈窗,難道要給每個(gè)彈窗都寫成這樣嗎? -
這種兼容 JSX的方式,需要引入支持JSX的依賴! -
如果工程中不想即用 template又用JSX呢? -
如果已經(jīng)存在使用 template的彈窗了,難道推翻重寫嗎? -
...
思考
首先承認(rèn)一點(diǎn)命令式的封裝的確可以解決問題,但是現(xiàn)在的封裝都存一定的槽點(diǎn)。
如果有一種方式,「即保持原來對(duì)話框的編寫方式不變,又不需要關(guān)心JSX和template的問題,還保存了命令式封裝的特點(diǎn)」。這樣是不是就完美了?
那真的可以同時(shí)做到這些嗎?

如果存在一個(gè)這樣的Hook可以將狀態(tài)驅(qū)動(dòng)的Dialog,轉(zhuǎn)換為命令式的Dialog嗎,那不就行了?
它來了:useCommandComponent

父組件這樣寫:
<script setup lang="ts">
import { ElButton } from 'element-plus';

import { useCommandComponent } from '../../hooks/useCommandComponent';

import Comp from './components/Comp.vue';
import MyDialog from './components/MyDialog.vue';

const myDialog = useCommandComponent(MyDialog);
</script>

<template>
  <div>
    <ElButton @click="myDialog({ title: '父組件彈窗' })"> 打開彈窗 </ElButton>
    <Comp text="子組件1"></Comp>
    <Comp text="子組件2"></Comp>
  </div>
</template>
Comp組件這樣寫:
<script setup lang="ts">
import { ElButton } from 'element-plus';

import { useCommandComponent } from '../../../hooks/useCommandComponent';

import MyDialog from './MyDialog.vue';

const myDialog = useCommandComponent(MyDialog);

const props = defineProps<{
  text: string;
}>();
</script>

<template>
  <div>
    <span>{{ props.text }}</span>
    <ElButton @click="myDialog({ title: props.text })">提交(需確認(rèn))</ElButton>
  </div>
</template>
對(duì)于MyDialog無需任何改變,保持原來的樣子就可以了!
useCommandComponent真的做到了,「即保持原來組件的編寫方式,又可以實(shí)現(xiàn)命令式調(diào)用」!
使用效果:
是不是感受到了莫名的舒適???
不過別急??,要想體驗(yàn)這種極致的舒適,你的Dialog還需要遵循兩個(gè)約定!
兩個(gè)約定
如果想要極致舒適的使用useCommandComponent,那么彈窗組件的編寫就需要遵循一些約定(「其實(shí)這些約定應(yīng)該是彈窗組件的最佳實(shí)踐」)。
約定如下:
-
「彈窗組件的 props需要有一個(gè)名為visible的屬性」,用于驅(qū)動(dòng)彈窗的打開和關(guān)閉。 -
「彈窗組件需要 emit一個(gè)close事件」,用于彈窗關(guān)閉時(shí)處理命令式彈窗。
如果你的彈窗組件滿足上面兩個(gè)約定,那么就可以通過useCommandComponent極致舒適的使用了!!
?這兩項(xiàng)約定雖然不是強(qiáng)制的,但是這確實(shí)是最佳實(shí)踐!不信你去翻所有的UI框看看他們的實(shí)現(xiàn)。我一直認(rèn)為學(xué)習(xí)和生產(chǎn)中多學(xué)習(xí)優(yōu)秀框架的實(shí)現(xiàn)思路很重要!
?
如果不遵循約定
這時(shí)候有的同學(xué)可能會(huì)說:「哎嘿,我就不遵循這兩項(xiàng)約定呢?我的彈窗就是要標(biāo)新立異的不用visible屬性來控制打開和關(guān)閉,我起名為dialogVisible呢?我的彈窗就是沒有close事件呢?我的事件是具有業(yè)務(wù)意義的submit、cancel呢?」...

得得得,如果真的沒有遵循上面的兩個(gè)約定,依然可以舒適的使用useCommandComponent,只不過在我看來沒那么極致舒適!雖然不是極致舒適,但也要比其他方案舒適的多!
如果你的彈窗真的沒有遵循“「兩個(gè)約定」”,那么你可以試試這樣做:
<script setup lang="ts">
// ...
const myDialog = useCommandComponent(MyDialog);

const handleDialog = () => {
  myDialog({
    title: '父組件彈窗',
    dialogVisible: true,
    onSubmit: () => myDialog.close(),
    onCancel: () => myDialog.close(),
  });
};
</script>

<template>
  <div>
    <ElButton @click="handleDialog"> 打開彈窗 </ElButton>
    <!--...-->
  </div>
</template>
如上,只需要在調(diào)用myDialog函數(shù)時(shí)在props中將驅(qū)動(dòng)彈窗的狀態(tài)設(shè)置為true,在需要關(guān)閉彈窗的事件中調(diào)用myDialog.close()即可!
這樣是不是看著雖然沒有上面的極致舒適,但是也還是挺舒適的?
源碼與實(shí)現(xiàn)
實(shí)現(xiàn)思路
對(duì)于useCommandComponent的實(shí)現(xiàn)思路,依然是「命令式封裝」。相比于上面的那兩個(gè)實(shí)現(xiàn)方式,useCommandComponent是將組件作為參數(shù)傳入,這樣「保持組件的編寫習(xí)慣不變」。并且useCommandComponent「遵循單一職責(zé)原則」,只做好組件的掛載和卸載工作,提供「足夠的兼容性」。
?其實(shí)
?useCommandComponent有點(diǎn)像React中的高階組件的概念
源碼
Github源碼地址
源碼不長(zhǎng),也很好理解!在實(shí)現(xiàn)useCommandComponent的時(shí)候參考了ElementPlus的MessageBox。
源碼如下:
import { AppContext, Component, ComponentPublicInstance, createVNode, getCurrentInstance, render, VNode } from 'vue';

export interface Options {
  visible?: boolean;
  onClose?: () => void;
  appendTo?: HTMLElement | string;
  [key: string]: unknown;
}

export interface CommandComponent {
  (options: Options): VNode;
  close: () => void;
}

const getAppendToElement = (props: Options): HTMLElement => {
  let appendTo: HTMLElement | null = document.body;
  if (props.appendTo) {
    if (typeof props.appendTo === 'string') {
      appendTo = document.querySelector<HTMLElement>(props.appendTo);
    }
    if (props.appendTo instanceof HTMLElement) {
      appendTo = props.appendTo;
    }
    if (!(appendTo instanceof HTMLElement)) {
      appendTo = document.body;
    }
  }
  return appendTo;
};

const initInstance = <T extends Component>(
  Component: T,
  props: Options,
  container: HTMLElement,
  appContext: AppContext | null = null
) => {
  const vNode = createVNode(Component, props);
  vNode.appContext = appContext;
  render(vNode, container);

  getAppendToElement(props).appendChild(container);
  return vNode;
};

export const useCommandComponent = <T extends Component>(Component: T): CommandComponent => {
  const appContext = getCurrentInstance()?.appContext;
  // 補(bǔ)丁:Component中獲取當(dāng)前組件樹的provides
  if (appContext) {
    const currentProvides = (getCurrentInstance() as any)?.provides;
    Reflect.set(appContext, 'provides', {...appContext.provides, ...currentProvides});
  }

  const container = document.createElement('div');

  const close = () => {
    render(null, container);
    container.parentNode?.removeChild(container);
  };

  const CommandComponent = (options: Options): VNode => {
    if (!Reflect.has(options, 'visible')) {
      options.visible = true;
    }
    if (typeof options.onClose !== 'function') {
      options.onClose = close;
    } else {
      const originOnClose = options.onClose;
      options.onClose = () => {
        originOnClose();
        close();
      };
    }
    const vNode = initInstance<T>(Component, options, container, appContext);
    const vm = vNode.component?.proxy as ComponentPublicInstance<Options>;
    for (const prop in options) {
      if (Reflect.has(options, prop) && !Reflect.has(vm.$props, prop)) {
        vm[prop as keyof ComponentPublicInstance] = options[prop];
      }
    }
    return vNode;
  };

  CommandComponent.close = close;

  return CommandComponent;
};

export default useCommandComponent;
除了命令式的封裝外,我加入了const appContext = getCurrentInstance()?.appContext;。這樣做的目的是,傳入的組件在這里其實(shí)已經(jīng)獨(dú)立于應(yīng)用的Vue上下文了。為了讓組件依然保持和調(diào)用方相同的Vue上下文,我這里加入了獲取上下文的操作!
基于這個(gè)情況,在使用useCommandComponent時(shí)需要保證它在setup中被調(diào)用,而不是在某個(gè)點(diǎn)擊事件的處理函數(shù)中哦~
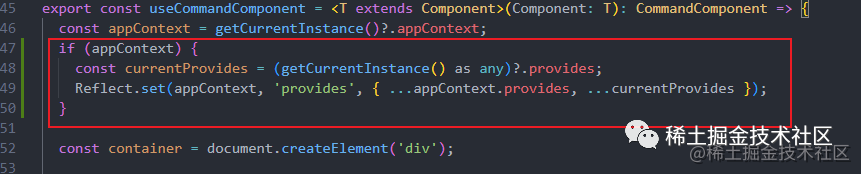
源碼補(bǔ)丁
非常感謝@bluryar關(guān)于命令式組件無法獲取當(dāng)前組件樹的 injection 的指出!!????
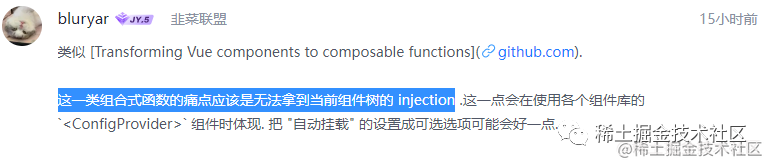
趁著熱乎,我想到一個(gè)解決獲取當(dāng)前injection的解決辦法。那就是將當(dāng)前組件樹的provides與appContext.provides合并,這樣傳入的彈窗組件就可以順利的獲取到app和當(dāng)前組件樹的provides了!
最后
如果你覺得useCommandComponent對(duì)你在開發(fā)中有所幫助,麻煩多點(diǎn)贊轉(zhuǎn)發(fā)??