
從 Element UI 源碼中學(xué)到的 5 個(gè)技巧

導(dǎo)語:Element UI[1] 是世界級(jí)最優(yōu)秀的UI框架之一。這個(gè)優(yōu)秀的框架有哪些我們能學(xué)習(xí)的優(yōu)點(diǎn)呢?這篇文章將分享作者在查看這個(gè)框架倉庫源碼中認(rèn)為值得參考的技巧,建議配合element[2]源碼食用更佳。
技巧一:組件腳手架
腳手架在創(chuàng)建新組件的應(yīng)用:規(guī)范代碼目錄,減少搬磚工作量 ,腳手架源碼實(shí)現(xiàn):build/bin/new.js[3]
 # 執(zhí)行命令,參數(shù)說明
 # componentname 組件名 必填
 # chineseName 組將中文名 選填 ,不填默認(rèn)取值componentname
 # node build/bin/new.js componentname [chineseName] 命令說明

 # 在element項(xiàng)目下執(zhí)行
 node build/bin/new.js helloworld 示例
腳手架處理結(jié)果:
1、組件樣式處理:
1.1 生成組件樣式 packages/theme-chalk/src/${componentname}.scss
1.2 樣式入口文件packages/theme-chalk/src/index.scss 導(dǎo)入改組件樣式
2、組件代碼處理:
2.1 生成組件代碼文件 :packages/componentname/index.js和packages/{componentname}/index.js和packages/componentname/index.js和packages/{componentname}/src/main.vue
2.2 新增組件的路徑信息導(dǎo)入到 components.json ,該文件是json對(duì)象,存放了組件的名字和組件入口路徑
3、生成組件文檔:
3.1 生成examlpes/docs/{i18n}/component.md, 其中,i18n=['en-US','es','fr-FR','zh-CN']
3.2 將新增的組件文檔的標(biāo)題和路徑添加到 examples/nav.config.json,該文件是Element UI的組件文檔的目錄,保存了組件文檔的標(biāo)題和路由
4、生成單元測(cè)試:
4.1 生成單元測(cè)試文件:test/unit/specs/component.spec.js
5、生成組件接口定義:
5.1 生成組件的描述文件:types/component.d.ts
5.2在types/element-ui.d.ts新增新組件的接口定義
一個(gè)優(yōu)秀的組件,除了需要要把組件的代碼寫好,還有有單元測(cè)試、文檔說明,最好,也有有接口定義(這編譯器就有友好的使用提示),Element的組件起步就已經(jīng)配齊了??
技巧二:用代碼來生成代碼
源碼入口文件生成:Element UI 目前一共有80個(gè)組件,如果要導(dǎo)出這80個(gè)組件,那么引入、導(dǎo)出和聲明Vue組件的代碼都要寫240次,而且,組件的增刪都要去修改入口文件。為了減少這部分工作量,基于components.json[4]來生成入口文件的組件引入和導(dǎo)出。
components.json內(nèi)容如下:
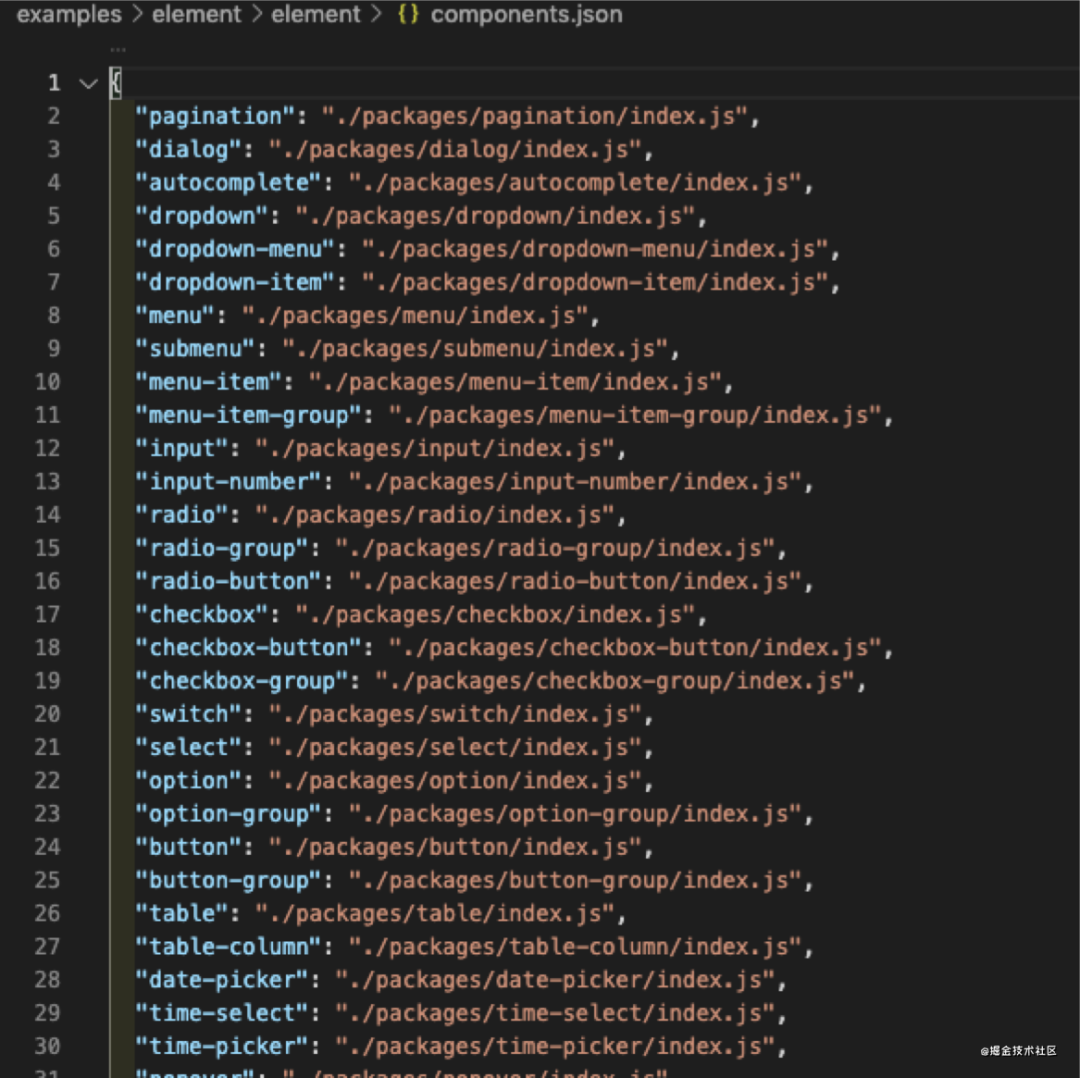
入口文件有三處代碼(引入,導(dǎo)出和聲名組件)都要重復(fù)了80次,下面以引入代碼語句作為說明示例:
引入代碼示例:
/* Automatically generated by './build/bin/build-entry.js' */

import Pagination from '../packages/pagination/index.js';
import Dialog from '../packages/dialog/index.js';
import Autocomplete from '../packages/autocomplete/index.js';
import Dropdown from '../packages/dropdown/index.js';
import DropdownMenu from '../packages/dropdown-menu/index.js';
import DropdownItem from '../packages/dropdown-item/index.js';
import Menu from '../packages/menu/index.js';
/**省略 70多個(gè)組件導(dǎo)入**/
import CollapseTransition from 'element-ui/src/transitions/collapse-transition';
生成上述代碼,主要邏輯:讀入components.json作為數(shù)據(jù),然后模版拼接起來,具體實(shí)現(xiàn)如下:
var Components = require('../../components.json');
var render = require('json-templater/string');
var uppercamelcase = require('uppercamelcase');
var endOfLine = require('os').EOL;

// import 語句語法模版
var IMPORT_TEMPLATE = 'import {{name}} from \'../packages/{{package}}/index.js\';';

var ComponentNames = Object.keys(Components);
var includeComponentTemplate = [];

ComponentNames.forEach(name => {
  var componentName = uppercamelcase(name);
  includeComponentTemplate.push(
      // 單條import生成語句
      render(IMPORT_TEMPLATE, {
        name: componentName,
        package: name
      })
  );
});

console.info(includeComponentTemplate.join(endOfLine))
生成代碼的實(shí)現(xiàn):build/bin/build-entry.js[5]
代碼位置:src/index.js[6]
技巧三:用md去寫組件文檔和示例
十分優(yōu)雅的文檔和示例書寫方式:文檔和示例統(tǒng)一寫到markdown文件中,在通過編寫md-loader,先轉(zhuǎn)成html文件,再轉(zhuǎn)成vue的組件,再渲染,這種做法筆者認(rèn)為是太有意思。
先看一下 Element UI 的文檔頁面的框架:
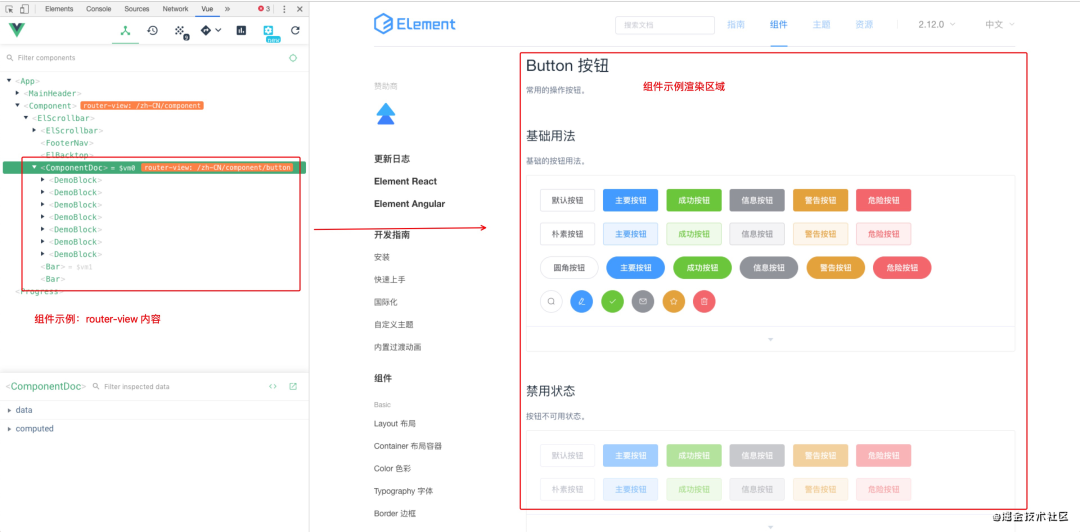
路由組件邏輯(詳細(xì)代碼[7]):
// 截取組件文檔的路由代碼片段
const LOAD_DOCS_MAP = {
  'zh-CN': path => {
    return r => require.ensure([], () =>
      r(require(`./docs/zh-CN${path}.md`)),
    'zh-CN');
  },
  'en-US': path => {
    return r => require.ensure([], () =>
      r(require(`./docs/en-US${path}.md`)),
    'en-US');
  },
  'es': path => {
    return r => require.ensure([], () =>
      r(require(`./docs/es${path}.md`)),
    'es');
  },
  'fr-FR': path => {
    return r => require.ensure([], () =>
      r(require(`./docs/fr-FR${path}.md`)),
    'fr-FR');
  }
};
注意到,路由加載的組件不 vue 組件,而是,一個(gè) markdown 文件。這個(gè)過程,是在 webpack 打包過程中自定義一個(gè) loader 來實(shí)現(xiàn):markdown 轉(zhuǎn)成 vue 來實(shí)現(xiàn)的。
詳細(xì)實(shí)現(xiàn):build/md-loader/index.js[8]
接下來,將詳細(xì)分享文檔如何實(shí)現(xiàn)組件演示的效果:
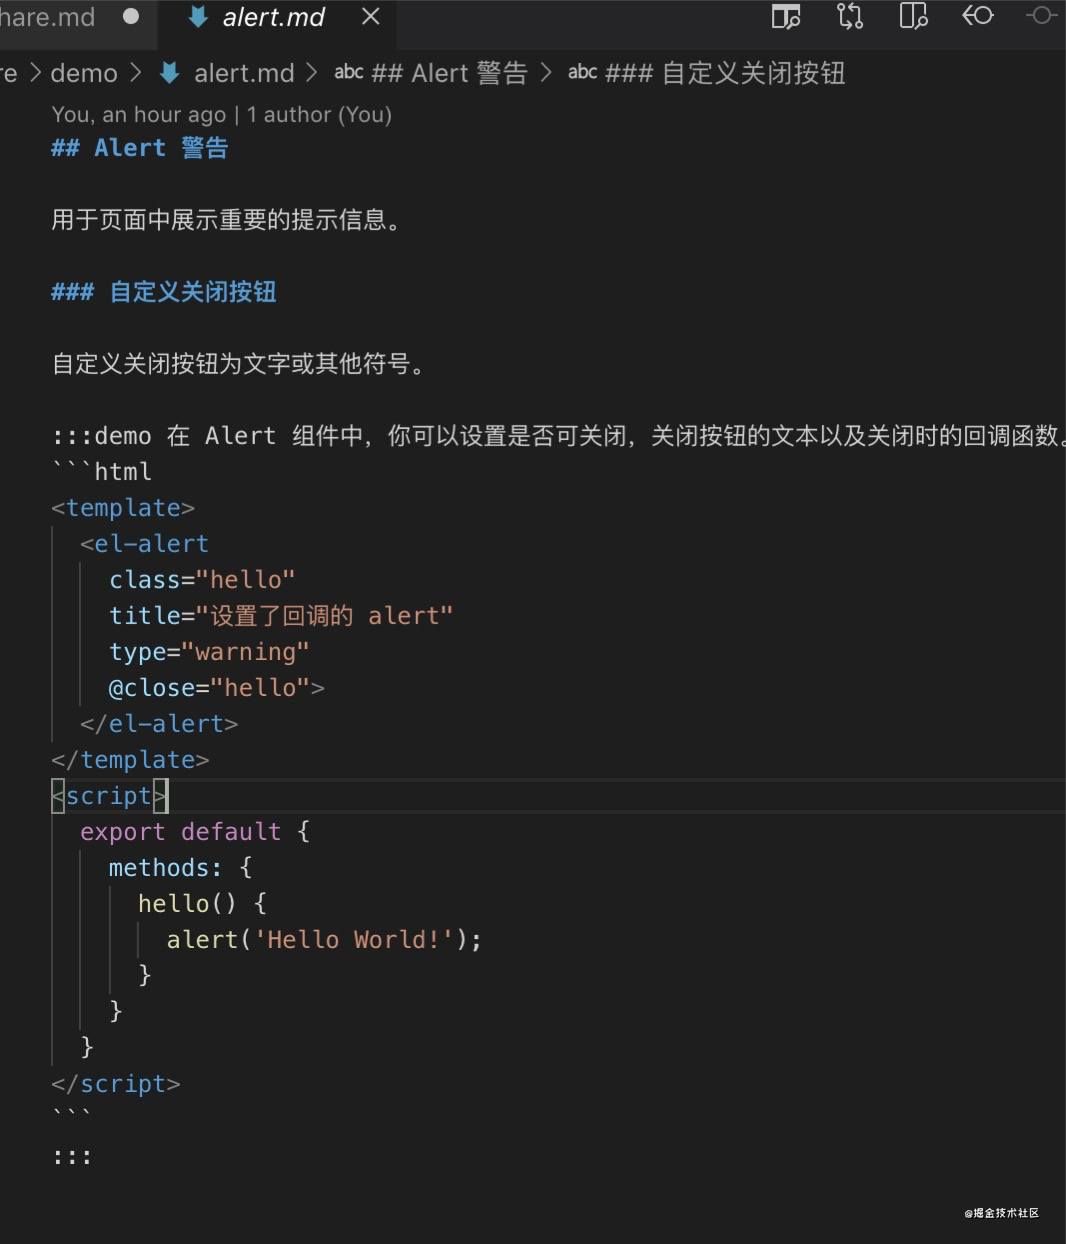
第一步:擴(kuò)展了markdown的container格式:demo
:::demo ${content}:::
實(shí)現(xiàn)代碼:
const md = require('markdown-it')();
const fs = require('fs');
const path = require('path');
const mdContainer = require('markdown-it-container');
module.exports = md => {
md.use(mdContainer, 'demo', {
validate(params) {
return params.trim().match(/^demo\s*(.*)$/);
},
render(tokens, idx) {
const m = tokens[idx].info.trim().match(/^demo\s*(.*)$/);
if (tokens[idx].nesting === 1) {
const description = m && m.length > 1 ? m[1] : '';
const content = tokens[idx + 1].type === 'fence' ? tokens[idx + 1].content : '';
return `<demo-block>
${description ? `<div>${md.render(description)}</div>` : ''}
<!--element-demo: ${content}:element-demo-->
`;
}
return '</demo-block>';
}
});
md.use(mdContainer, 'tip');
md.use(mdContainer, 'warning');
};
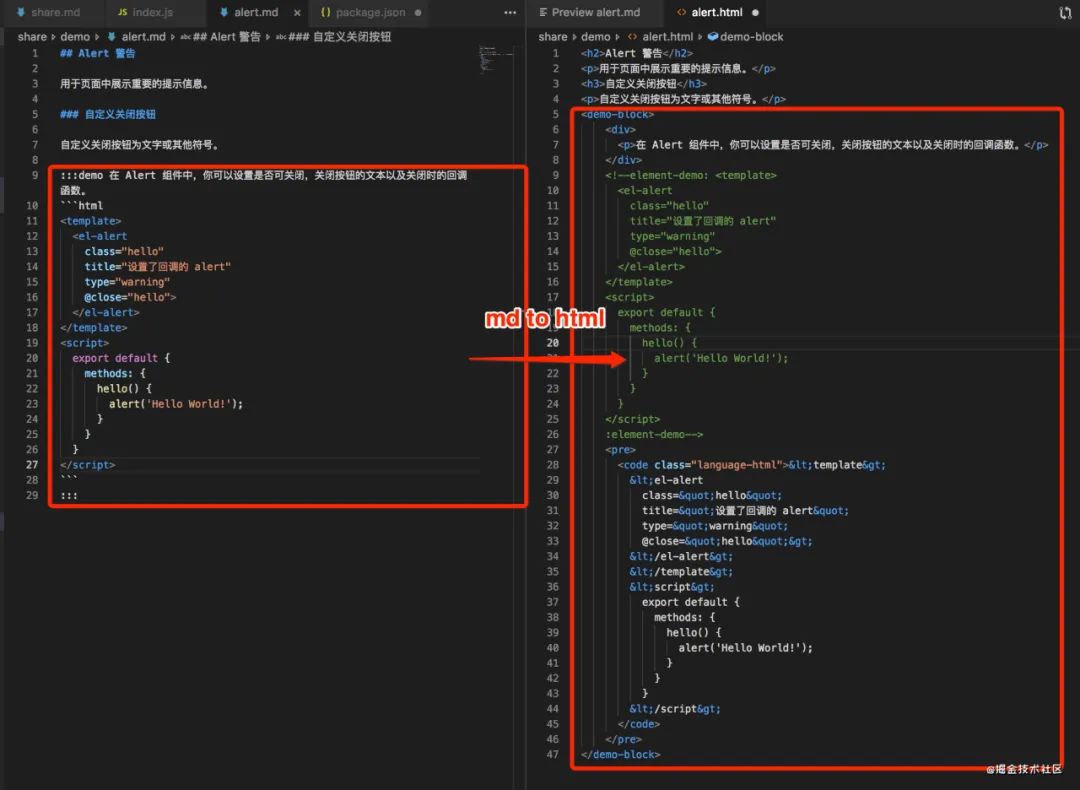
const inputPath = path.resolve(__dirname, './alert.md');
const outputPath = path.resolve(__dirname, './alert.html');
const input = fs.readFileSync(inputPath, {encoding: 'utf8'});
const ounput = md.render(input);
fs.writeFileSync(outputPath, ounput, {encoding: 'utf8'});}
執(zhí)行結(jié)果:
提取注釋內(nèi)容轉(zhuǎn)成組件的實(shí)例實(shí)現(xiàn)
第二步:將html轉(zhuǎn)成ComponentDoc.vue
 <template>
   <section class="content element-doc">
    <h2>Alert 警告</h2>
    <p>用于頁面中展示重要的提示信息。</p>
    <h3>自定義關(guān)閉按鈕</h3>
    <p>自定義關(guān)閉按鈕為文字或其他符號(hào)。</p>

    <!--示例展示 這個(gè)步是最關(guān)鍵-->
    <demo-block>
        <template name="source">
        <element-demo0 />
        </template>
        <template name="default"></template>
        <slot name="highlight"></slot>
    </demo-block>

  </section>
 </template>
組件:<demo-block>,源碼位置:examples/components/demo-block.vue[9]
DemoBlockComponent效果展示如下圖:
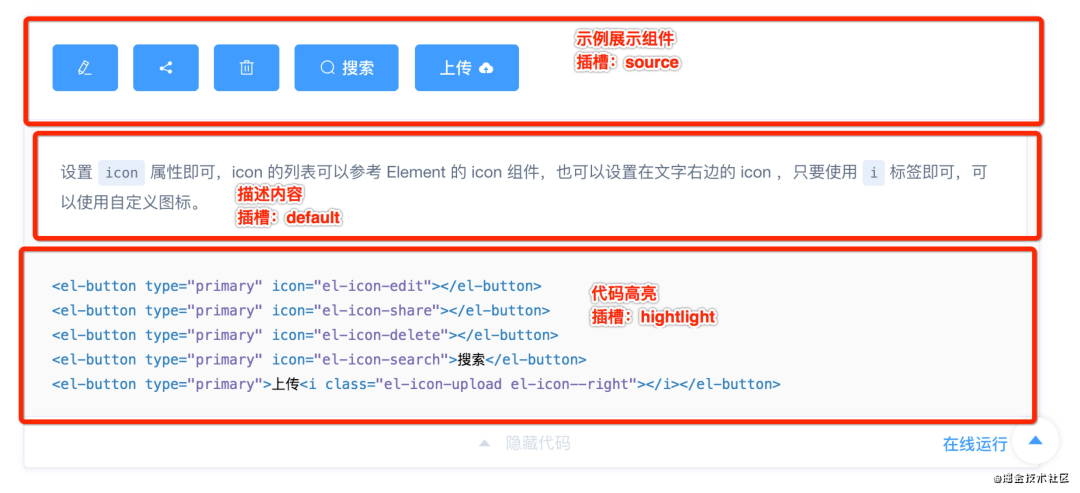
第三步:示例效果展示
第一種,組件僅僅只有模板,沒有其他屬性,就跟描述內(nèi)容插槽一樣,直接以插槽透傳就行; 第二種,是組件有script內(nèi)容,怎么處理呢?如下圖
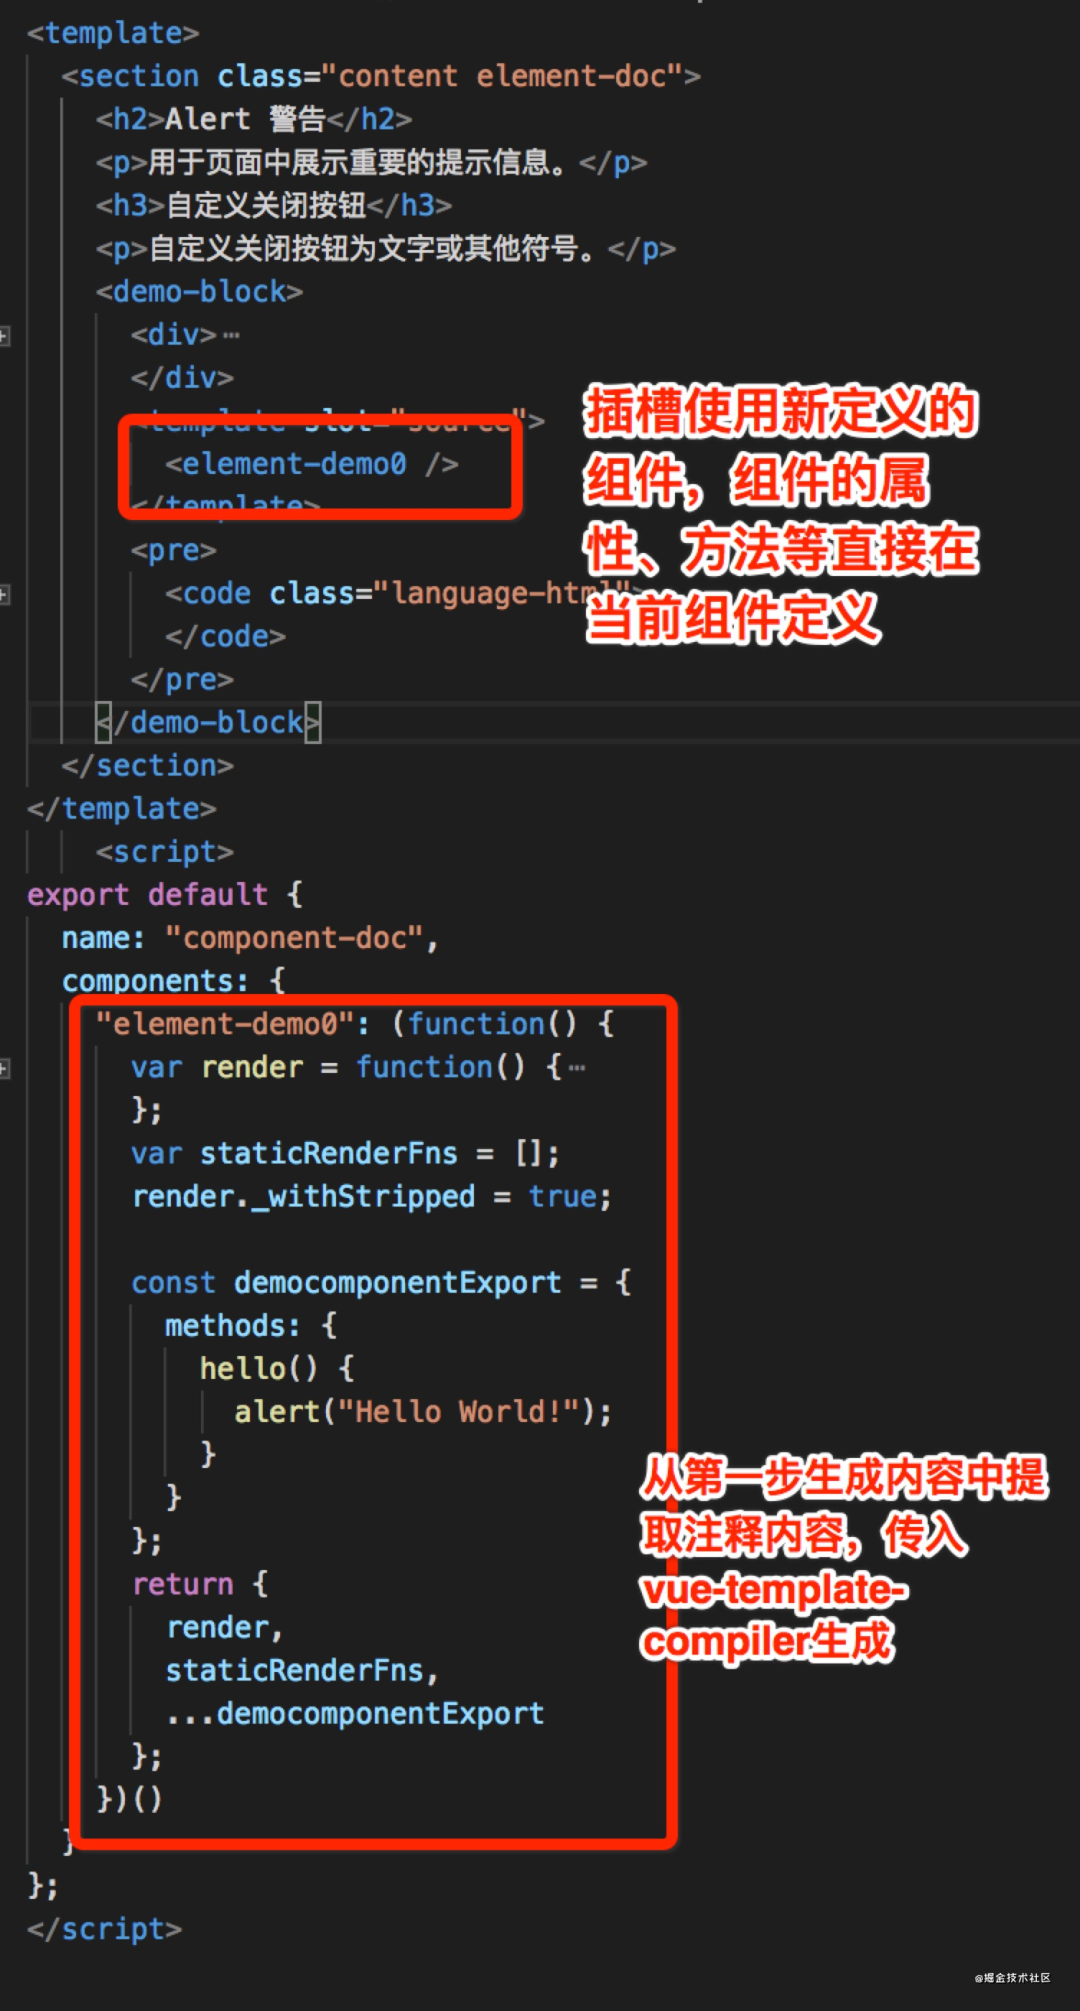
組件代碼是調(diào)用vue-template-compiler模塊生成的,參照:build/md-loader/util.js:L30[10]
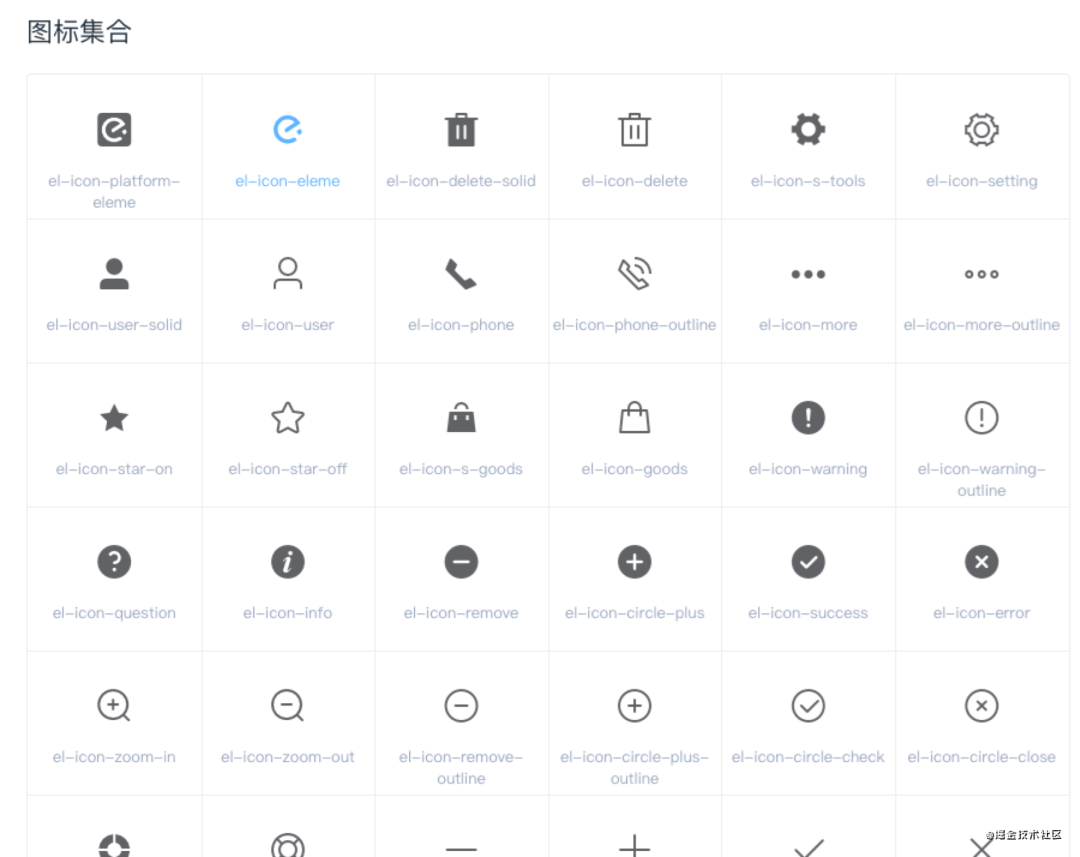
技巧四:icon組件示例
Element UI 提供了280個(gè)icon,人工搬磚,寫文檔,又得加不少班呀。對(duì)于有追求的程序員,當(dāng)然要有想法了。處理技巧:使用postcss模塊解析icons的樣式文件,提取出el-icon-XXX的className,將所有icon的className組裝成數(shù)組中,保存到examples/icon.json[11]
通過樣式class提取icon名字,代碼實(shí)現(xiàn)如下:
'use strict';
var postcss = require('postcss');
var fs = require('fs');
var path = require('path');
var fontFile = fs.readFileSync(path.resolve(__dirname, '../../packages/theme-chalk/src/icon.scss'), 'utf8');
// 借助postcss解析css文件
var nodes = postcss.parse(fontFile).nodes;
var classList = [];

// 通過正則獲取icon的name
nodes.forEach((node) => {
    var selector = node.selector || '';
    var reg = new RegExp(/\.el-icon-([^:]+):before/);
    var arr = selector.match(reg);
    if (arr && arr[1]) {
    classList.push(arr[1]);
}});
classList.reverse();
// 希望按 css 文件順序倒序排列
console.info(classList.length);

fs.writeFile(
     path.resolve(__dirname, '../../examples/icon.json'),
     JSON.stringify(classList)
 );
技巧三種中是將icons的icons.md生成的ComponentDoc.vue組件,無法編寫代碼來傳入icons數(shù)組,那就直接注入 Vue中原型鏈中
 // 文檔入口引入
 import Vue from 'vue'
 import icon from './icon.json';
 Vue.prototype.$icon = icon;
icon文檔書寫
圖標(biāo)集合
<ul class="icon-list">
  <!--直接從原型鏈獲取全部icon名字-->
  <li v-for="name in $icon" :key="name">
    <span>
      <i :class="'el-icon-' + name"></i>
      <span class="icon-name">{{'el-icon-' + name}}</span>
    </span>
  </li>
</ul>
效果:element.eleme.io/#/zh-CN/com…[12]
一下子解決這么多的重復(fù)工作??
技巧五:文檔多語言
文檔多語言,使用腳本生成每中語言,都單獨(dú)生成一個(gè)vue模板,和技巧二類似,詳細(xì)參考:build/bin/i18n.js[13]
參考資料
https://element.eleme.io/: https://link.juejin.cn/?target=https%3A%2F%2Felement.eleme.io%2F
[2]https://github.com/ElemeFE/element: https://link.juejin.cn/?target=https%3A%2F%2Fgithub.com%2FElemeFE%2Felement
[3]https://github.com/ElemeFE/element/blob/45c0ef46f298cc9dfbe72d20039795184a8ddab0/build/bin/new.js: https://link.juejin.cn/?target=https%3A%2F%2Fgithub.com%2FElemeFE%2Felement%2Fblob%2F45c0ef46f298cc9dfbe72d20039795184a8ddab0%2Fbuild%2Fbin%2Fnew.js
[4]https://github.com/ElemeFE/element/blob/45c0ef46f298cc9dfbe72d20039795184a8ddab0/components.json: https://link.juejin.cn/?target=https%3A%2F%2Fgithub.com%2FElemeFE%2Felement%2Fblob%2F45c0ef46f298cc9dfbe72d20039795184a8ddab0%2Fcomponents.json
[5]https://github.com/ElemeFE/element/blob/45c0ef46f298cc9dfbe72d20039795184a8ddab0/build/bin/build-entry.js: https://link.juejin.cn/?target=https%3A%2F%2Fgithub.com%2FElemeFE%2Felement%2Fblob%2F45c0ef46f298cc9dfbe72d20039795184a8ddab0%2Fbuild%2Fbin%2Fbuild-entry.js
[6]https://github.com/ElemeFE/element/blob/45c0ef46f298cc9dfbe72d20039795184a8ddab0/src/index.js: https://link.juejin.cn/?target=https%3A%2F%2Fgithub.com%2FElemeFE%2Felement%2Fblob%2F45c0ef46f298cc9dfbe72d20039795184a8ddab0%2Fsrc%2Findex.js
[7]https://github.com/ElemeFE/element/blob/dev/examples/route.config.js: https://link.juejin.cn/?target=https%3A%2F%2Fgithub.com%2FElemeFE%2Felement%2Fblob%2Fdev%2Fexamples%2Froute.config.js
[8]https://github.com/ElemeFE/element/blob/45c0ef46f298cc9dfbe72d20039795184a8ddab0/build/md-loader/index.js: https://link.juejin.cn/?target=https%3A%2F%2Fgithub.com%2FElemeFE%2Felement%2Fblob%2F45c0ef46f298cc9dfbe72d20039795184a8ddab0%2Fbuild%2Fmd-loader%2Findex.js
[9]https://github.com/ElemeFE/element/blob/45c0ef46f298cc9dfbe72d20039795184a8ddab0/examples/components/demo-block.vue: https://link.juejin.cn/?target=https%3A%2F%2Fgithub.com%2FElemeFE%2Felement%2Fblob%2F45c0ef46f298cc9dfbe72d20039795184a8ddab0%2Fexamples%2Fcomponents%2Fdemo-block.vue
[10]https://github.com/ElemeFE/element/blob/45c0ef46f298cc9dfbe72d20039795184a8ddab0/build/md-loader/util.js#L30: https://link.juejin.cn/?target=https%3A%2F%2Fgithub.com%2FElemeFE%2Felement%2Fblob%2F45c0ef46f298cc9dfbe72d20039795184a8ddab0%2Fbuild%2Fmd-loader%2Futil.js%23L30
[11]https://github.com/ElemeFE/element/blob/45c0ef46f298cc9dfbe72d20039795184a8ddab0/examples/icon.json: https://link.juejin.cn/?target=https%3A%2F%2Fgithub.com%2FElemeFE%2Felement%2Fblob%2F45c0ef46f298cc9dfbe72d20039795184a8ddab0%2Fexamples%2Ficon.json
[12]https://element.eleme.io/#/zh-CN/component/icon#tu-biao-ji-he: https://link.juejin.cn/?target=https%3A%2F%2Felement.eleme.io%2F%23%2Fzh-CN%2Fcomponent%2Ficon%23tu-biao-ji-he
[13]https://github.com/ElemeFE/element/blob/45c0ef46f298cc9dfbe72d20039795184a8ddab0/build/bin/i18n.js: https://link.juejin.cn/?target=https%3A%2F%2Fgithub.com%2FElemeFE%2Felement%2Fblob%2F45c0ef46f298cc9dfbe72d20039795184a8ddab0%2Fbuild%2Fbin%2Fi18n.js
轉(zhuǎn)自:azuo
https://juejin.cn/post/6966491047257964575