
Springboot 集成 Shiro 和 CAS 實(shí)現(xiàn)單點(diǎn)登錄(服務(wù)端篇CAS5)
什么是單點(diǎn)登錄?
先說(shuō)一個(gè)需求場(chǎng)景,比如:一個(gè)企業(yè)的內(nèi)部有N多個(gè)子系統(tǒng),每個(gè)子系統(tǒng)都有一套自己的用戶(hù)名和密碼,那么企業(yè)的員工要登錄N個(gè)子系統(tǒng),這樣一個(gè)員工 就要記住N個(gè)用戶(hù)名和密碼,就算各個(gè)子系統(tǒng)的用戶(hù)名和密碼都是統(tǒng)一的,登錄每個(gè)子系統(tǒng)都要輸入用戶(hù)名和密碼進(jìn)行登錄也是一個(gè)繁瑣的操作過(guò)程,那么單點(diǎn)登錄功能由此便應(yīng)運(yùn)而生了。
單點(diǎn)登錄(Single Sign On),簡(jiǎn)稱(chēng)為 SSO,是目前比較流行的企業(yè)業(yè)務(wù)整合的解決方案之一。SSO的定義是在多個(gè)應(yīng)用系統(tǒng)中,用戶(hù)只需要登錄一次就可以訪問(wèn)所有相互信任的應(yīng)用系統(tǒng)。
CAS架構(gòu)圖
這里直接說(shuō)CAS整體架構(gòu)是因?yàn)檫@不是一個(gè)入門(mén)教程,我已經(jīng)默認(rèn)你知道什么是SSO、什么是CAS,以及你已經(jīng)裝好了開(kāi)發(fā)工具IDEA和Java環(huán)境Jdk1.8,并且你也知道什么是Web容器,知道Tomcat8.5+該從哪下載并啟動(dòng)部署,你也知道什么是Maven項(xiàng)目該怎么引入相關(guān)的jar包等等,所以如果你不具備以上這些知識(shí),那么CAS服務(wù)端的學(xué)習(xí)我建議你還是先不要開(kāi)始,弄清楚前面的知識(shí)點(diǎn),才能暢通無(wú)阻的學(xué)習(xí)CAS服務(wù)端。
好了,這里先放架構(gòu)圖:
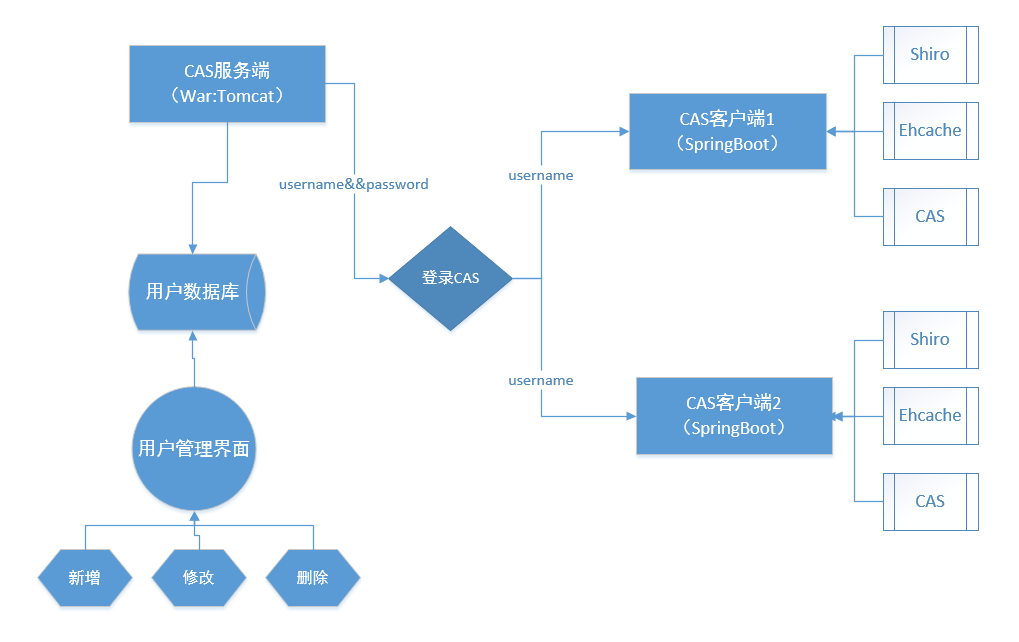
現(xiàn)在來(lái)講解這個(gè)架構(gòu)圖:
首先搭建好CAS服務(wù)端后,服務(wù)端會(huì)自定義一個(gè)數(shù)據(jù)庫(kù)和用戶(hù)表,用戶(hù)表中存放的是用戶(hù)名和密碼,通過(guò)訪問(wèn)子系統(tǒng)的URL地址,如果CAS系統(tǒng)判定你沒(méi)有登錄,就會(huì)將URL重定向到CAS的服務(wù)端登錄界面,用戶(hù)通過(guò)輸入用戶(hù)數(shù)據(jù)庫(kù)的用戶(hù)名和密碼來(lái)進(jìn)行登錄,待登錄成功后,CAS服務(wù)端會(huì)給CAS客戶(hù)端(子系統(tǒng))發(fā)送登錄的用戶(hù)名,CAS客戶(hù)端接到用戶(hù)名后,會(huì)從CAS客戶(hù)端的用戶(hù)表中尋找對(duì)應(yīng)用戶(hù)名的userid,并通過(guò)該userid獲取到該名用戶(hù)在CAS客戶(hù)端的相關(guān)權(quán)限。
我們還可以基于CAS服務(wù)端配置的用戶(hù)數(shù)據(jù)庫(kù)做一個(gè)用戶(hù)管理界面,該界面可以對(duì)CAS服務(wù)端的用戶(hù)進(jìn)行一些基本的業(yè)務(wù)操作,比如新增、修改、刪除等,新增用戶(hù)的時(shí)候,需要同時(shí)在各個(gè)子系統(tǒng)的用戶(hù)表中插入該用戶(hù)的相關(guān)信息,然后各個(gè)子系統(tǒng)的管理員就可以通過(guò)子系統(tǒng)的角色權(quán)限設(shè)置,給該用戶(hù)配置相關(guān)的角色權(quán)限了。
安裝CAS服務(wù)端
講了這么多,現(xiàn)在開(kāi)始進(jìn)入正題,我們要實(shí)現(xiàn)我們的目的首先要做的就是安裝CAS服務(wù)端,現(xiàn)在網(wǎng)上的很多Springboot整合CAS的教程基本上都是只講客戶(hù)端的配置,看完之后云里霧里的,所以我這個(gè)教程要從CAS的服務(wù)端開(kāi)始講起,如果你們公司有人專(zhuān)門(mén)搭建CAS服務(wù)端,那就可以跳過(guò)本篇教程繼續(xù)下一篇了。
下載Overlay
通過(guò)閱讀官網(wǎng)文檔(https://apereo.github.io/cas/5.1.x/planning/Getting-Started.html)了解到官方建議我們:
通過(guò)使用一個(gè)名叫Overlay的項(xiàng)目來(lái)生成一個(gè)可以直接用的war包,來(lái)部署服務(wù)端,于是我們先下載這個(gè)項(xiàng)
目,我這里使用Maven的,下載地址:https://github.com/apereo/cas-overlay-template。搭建Overlay項(xiàng)目
將項(xiàng)目下好后解壓縮并放入我們的工作空間,然后打開(kāi)IDEA,然后選擇File–Open打開(kāi)我們項(xiàng)目所在路徑,然后我們只要靜靜的等待Maven將項(xiàng)目構(gòu)筑好就可以了。這時(shí)你看到的項(xiàng)目是這個(gè)樣子的:
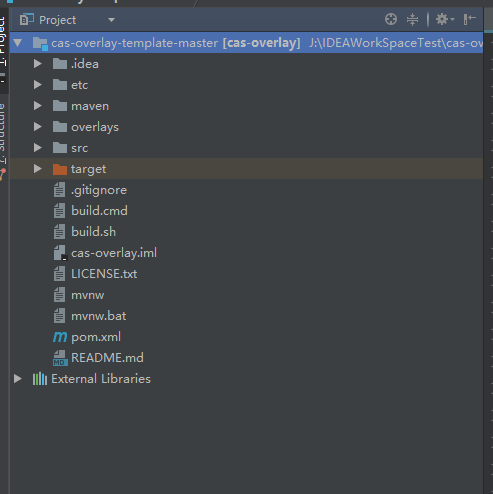
這是我的項(xiàng)目,你的項(xiàng)目中并沒(méi)有src目錄和target目錄,src目錄是用戶(hù)自己建立的,至于為什么后邊會(huì)講,target目錄是導(dǎo)出war時(shí)才出現(xiàn)的,新導(dǎo)入的項(xiàng)目是沒(méi)有的。
制成可用的CAS服務(wù)端
現(xiàn)在的CAS服務(wù)端基本上是不可用的,為什么說(shuō)基本上呢?因?yàn)槿绻悻F(xiàn)在講項(xiàng)目打成war包,并將它部署到Tomcat中去后是可以啟動(dòng)服務(wù)的,并且訪問(wèn)本地地址:http://localhost:8080/cas/login還可以看到如下界面:

使用 默認(rèn)賬號(hào):casuser 默認(rèn)密碼:Mellon還可以登錄成功,不過(guò)這個(gè)CAS服務(wù)端目前并沒(méi)有什么卵用,只是可以看看而已。
這兩個(gè)紅色警告,一個(gè)是說(shuō)沒(méi)有使用Https,另一個(gè)是說(shuō)你只有一個(gè)靜態(tài)的權(quán)限,一個(gè)寫(xiě)死的用戶(hù),其實(shí)就是告訴你現(xiàn)在的服務(wù)端是不安全的。
第一個(gè)問(wèn)題:關(guān)于https請(qǐng)求
服務(wù)端是http的其實(shí)也可以使用,我在這個(gè)教程中不會(huì)講解如何搭建https請(qǐng)求的服務(wù)端,因?yàn)槲覀兊淖禹?xiàng)目都是http請(qǐng)求的,所以服務(wù)端我也不打算用https請(qǐng)求了,如果你想學(xué)習(xí)https請(qǐng)求,請(qǐng)參看別人的參考教程,這里不做講解。第二個(gè)問(wèn)題:關(guān)于靜態(tài)用戶(hù)
我們先打開(kāi)項(xiàng)目的pom.xml文件,引入相關(guān)的jar包,注釋掉用不到的jar包,我的數(shù)據(jù)庫(kù)是mysql的,如果你的數(shù)據(jù)庫(kù)不是,請(qǐng)找到對(duì)應(yīng)的jar包進(jìn)行引入即可:
  1<?xml version="1.0" encoding="UTF-8"?>
  2<project xmlns="http://maven.apache.org/POM/4.0.0" xmlns:xsi="http://www.w3.org/2001/XMLSchema-instance" xsi:schemaLocation="http://maven.apache.org/POM/4.0.0 http://maven.apache.org/xsd/maven-4.0.0.xsd ">
  3    <modelVersion>4.0.0</modelVersion>
  4    <groupId>org.apereo.cas</groupId>
  5    <artifactId>cas-overlay</artifactId>
  6    <packaging>war</packaging>
  7    <version>1.0</version>
  8
  9    <build>
 10        <plugins>
 11            <!--第一步:注釋無(wú)用組件
 12             <plugin>
 13                <groupId>com.rimerosolutions.maven.plugins</groupId>
 14                <artifactId>wrapper-maven-plugin</artifactId>
 15                <version>0.0.4</version>
 16                <configuration>
 17                    <verifyDownload>true</verifyDownload>
 18                    <checksumAlgorithm>MD5</checksumAlgorithm>
 19                </configuration>
 20            </plugin>-->
 21            <plugin>
 22                <groupId>org.springframework.boot</groupId>
 23                <artifactId>spring-boot-maven-plugin</artifactId>
 24                <version>${springboot.version}</version>
 25                <configuration>
 26                    <mainClass>org.springframework.boot.loader.WarLauncher</mainClass>
 27                    <addResources>true</addResources>
 28                </configuration>
 29            </plugin>
 30            <plugin>
 31                <groupId>org.apache.maven.plugins</groupId>
 32                <artifactId>maven-war-plugin</artifactId>
 33                <version>2.6</version>
 34                <configuration>
 35                    <warName>cas</warName>
 36                    <failOnMissingWebXml>false</failOnMissingWebXml>
 37                    <recompressZippedFiles>false</recompressZippedFiles>
 38                    <archive>
 39                        <compress>false</compress>
 40                        <manifestFile>${project.build.directory}/war/work/org.apereo.cas/cas-server-webapp${app.server}/META-INF/MANIFEST.MF
 41                        </manifestFile>
 42                    </archive>
 43                    <overlays>
 44                        <overlay>
 45                            <groupId>org.apereo.cas</groupId>
 46                            <artifactId>cas-server-webapp${app.server}</artifactId>
 47                        </overlay>
 48                    </overlays>
 49                </configuration>
 50            </plugin>
 51            <plugin>
 52                <groupId>org.apache.maven.plugins</groupId>
 53                <artifactId>maven-compiler-plugin</artifactId>
 54                <version>3.3</version>
 55            </plugin>
 56        </plugins>
 57        <finalName>cas</finalName>
 58    </build>
 59
 60    <dependencies>
 61        <dependency>
 62            <groupId>org.apereo.cas</groupId>
 63            <artifactId>cas-server-webapp${app.server}</artifactId>
 64            <version>${cas.version}</version>
 65            <type>war</type>
 66            <scope>runtime</scope>
 67        </dependency>
 68
 69        <!--第二步:引入數(shù)據(jù)庫(kù)認(rèn)證相關(guān) start-->
 70        <dependency>
 71            <groupId>org.apereo.cas</groupId>
 72            <artifactId>cas-server-support-jdbc</artifactId>
 73            <version>${cas.version}</version>
 74        </dependency>
 75        <dependency>
 76            <groupId>org.apereo.cas</groupId>
 77            <artifactId>cas-server-support-jdbc-drivers</artifactId>
 78            <version>${cas.version}</version>
 79        </dependency>
 80        <dependency>
 81            <groupId>mysql</groupId>
 82            <artifactId>mysql-connector-java</artifactId>
 83            <version>5.1.36</version>
 84        </dependency>
 85    </dependencies>
 86
 89    <properties>
 90        <cas.version>5.1.4</cas.version>
 91        <springboot.version>1.5.3.RELEASE</springboot.version>
 92        <!-- app.server could be -jetty, -undertow, -tomcat, or blank if you plan to provide appserver -->
 93        <app.server>-tomcat</app.server>
 94        <maven.compiler.source>1.8</maven.compiler.source>
 95        <maven.compiler.target>1.8</maven.compiler.target>
 96        <project.build.sourceEncoding>UTF-8</project.build.sourceEncoding>
 97    </properties>
 98
 99    <repositories>
100        <repository>
101            <id>sonatype-releases</id>
102            <url>http://oss.sonatype.org/content/repositories/releases/</url>
103            <snapshots>
104                <enabled>false</enabled>
105            </snapshots>
106            <releases>
107                <enabled>true</enabled>
108            </releases>
109        </repository>
110        <repository>
111            <id>sonatype-snapshots</id>
112            <url>https://oss.sonatype.org/content/repositories/snapshots/</url>
113            <snapshots>
114                <enabled>true</enabled>
115            </snapshots>
116            <releases>
117                <enabled>false</enabled>
118            </releases>
119        </repository>
120        <repository>
121            <id>shibboleth-releases</id>
122            <url>https://build.shibboleth.net/nexus/content/repositories/releases</url>
123        </repository>
124        <repository>
125            <id>spring-milestones</id>
126            <url>https://repo.spring.io/milestone</url>
127        </repository>
128    </repositories>
129
130    <!--第三步:注釋掉無(wú)用的組件
131    <profiles>
132        <profile>
133            <activation>
134                <activeByDefault>false</activeByDefault>
135            </activation>
136            <id>pgp</id>
137            <build>
138                <plugins>
139                    <plugin>
140                        <groupId>com.github.s4u.plugins</groupId>
141                        <artifactId>pgpverify-maven-plugin</artifactId>
142                        <version>1.1.0</version>
143                        <executions>
144                            <execution>
145                                <goals>
146                                    <goal>check</goal>
147                                </goals>
148                            </execution>
149                        </executions>
150                        <configuration>
151                            <pgpKeyServer>hkp://pool.sks-keyservers.net</pgpKeyServer>
152                            <pgpKeysCachePath>${settings.localRepository}/pgpkeys-cache</pgpKeysCachePath>
153                            <scope>test</scope>
154                            <verifyPomFiles>true</verifyPomFiles>
155                            <failNoSignature>false</failNoSignature>
156                        </configuration>
157                    </plugin>
158                </plugins>
159            </build>
160        </profile>
161    </profiles>-->
162</project>
修改配置文件
我們?cè)赾as-overly這個(gè)項(xiàng)目的根目錄下新建一個(gè)src目錄,并在src目錄下創(chuàng)建一個(gè)resource目錄,在resource目錄下再新建一個(gè)application.properties文件,該文件中要寫(xiě)的就是我們的配置文件內(nèi)容了:
  1#STEP 3 在TOMCAT8.5中跑一個(gè)模板然后將其war包中解壓出來(lái)的的application.properties復(fù)制出來(lái),放到手動(dòng)創(chuàng)建的src下的resources里面
  2
  3# CAS Server Context Configuration
  4server.context-path=/cas
  5server.port=9092
  6
  7#STEP 5添加認(rèn)證服務(wù)
  8cas.serviceRegistry.initFromJson=true
  9
 10#STEP 4簽發(fā)證書(shū),如果是用spring boot之類(lèi)嵌入式的容器,則需要改這里的配置,如果是直接部在tomcat中,則需要把tomcat改成https的
 11#server.ssl.key-store=file:/etc/cas/thekeystore
 12#server.ssl.key-store-password=changeit
 13#server.ssl.key-password=changeit
 14# server.ssl.ciphers=
 15# server.ssl.client-auth=
 16# server.ssl.enabled=
 17# server.ssl.key-alias=
 18# server.ssl.key-store-provider=
 19# server.ssl.key-store-type=
 20# server.ssl.protocol=
 21# server.ssl.trust-store=
 22# server.ssl.trust-store-password=
 23# server.ssl.trust-store-provider=
 24# server.ssl.trust-store-type=
 25
 26#server.max-http-header-size=2097152
 27#server.use-forward-headers=true
 28#server.connection-timeout=20000
 29#server.error.include-stacktrace=NEVER
 30
 31#server.tomcat.max-http-post-size=2097152
 32#server.tomcat.basedir=build/tomcat
 33#server.tomcat.accesslog.enabled=true
 34#server.tomcat.accesslog.pattern=%t %a "%r" %s (%D ms)
 35#server.tomcat.accesslog.suffix=.log
 36#server.tomcat.max-threads=10
 37#server.tomcat.port-header=X-Forwarded-Port
 38#server.tomcat.protocol-header=X-Forwarded-Proto
 39#server.tomcat.protocol-header-https-value=https
 40#server.tomcat.remote-ip-header=X-FORWARDED-FOR
 41#server.tomcat.uri-encoding=UTF-8
 42
 43spring.http.encoding.charset=UTF-8
 44spring.http.encoding.enabled=true
 45spring.http.encoding.force=true
 46
 47# CAS Cloud Bus Configuration
 48spring.cloud.bus.enabled=false
 49# spring.cloud.bus.refresh.enabled=true
 50# spring.cloud.bus.env.enabled=true
 51# spring.cloud.bus.destination=CasCloudBus
 52# spring.cloud.bus.ack.enabled=true
 53
 54endpoints.enabled=false
 55endpoints.sensitive=true
 56
 57endpoints.restart.enabled=false
 58endpoints.shutdown.enabled=false
 59
 60management.security.enabled=true
 61management.security.roles=ACTUATOR,ADMIN
 62management.security.sessions=if_required
 63management.context-path=/status
 64management.add-application-context-header=false
 65
 66security.basic.authorize-mode=role
 67security.basic.enabled=false
 68security.basic.path=/cas/status/**
 69
 71# CAS Web Application Session Configuration
 73server.session.timeout=300
 74server.session.cookie.http-only=true
 75server.session.tracking-modes=COOKIE
 76
 78# CAS Thymeleaf View Configuration
 80spring.thymeleaf.encoding=UTF-8
 81spring.thymeleaf.cache=false
 82spring.thymeleaf.mode=HTML
 83##
 84# CAS Log4j Configuration
 86# logging.config=file:/etc/cas/log4j2.xml
 87server.context-parameters.isLog4jAutoInitializationDisabled=true
 88
 90# CAS AspectJ Configuration
 92spring.aop.auto=true
 93spring.aop.proxy-target-class=true
 94
 96# CAS Authentication Credentials
 98#STEP4 注釋掉寫(xiě)死的用戶(hù) 改用jdbc的用戶(hù) START
 99#cas.authn.accept.users=casuser::Mellon
100
101cas.authn.jdbc.query[0].sql=select * from s_user where username=?
102cas.authn.jdbc.query[0].healthQuery=
103cas.authn.jdbc.query[0].isolateInternalQueries=false
104cas.authn.jdbc.query[0].url=jdbc:mysql://172.18.18.25:3306/pa_db?useUnicode=true&characterEncoding=UTF-8&autoReconnect=true&useSSL=false
105cas.authn.jdbc.query[0].failFast=true
106cas.authn.jdbc.query[0].isolationLevelName=ISOLATION_READ_COMMITTED
107cas.authn.jdbc.query[0].dialect=org.hibernate.dialect.MySQLDialect
108cas.authn.jdbc.query[0].leakThreshold=10
109cas.authn.jdbc.query[0].propagationBehaviorName=PROPAGATION_REQUIRED
110cas.authn.jdbc.query[0].batchSize=1
111cas.authn.jdbc.query[0].user=root
112#cas.authn.jdbc.query[0].ddlAuto=create-drop
113cas.authn.jdbc.query[0].maxAgeDays=180
114cas.authn.jdbc.query[0].password=dhcc
115cas.authn.jdbc.query[0].autocommit=false
116cas.authn.jdbc.query[0].driverClass=com.mysql.jdbc.Driver
117cas.authn.jdbc.query[0].idleTimeout=5000
118# cas.authn.jdbc.query[0].credentialCriteria=
119# cas.authn.jdbc.query[0].name=
120# cas.authn.jdbc.query[0].order=0
121# cas.authn.jdbc.query[0].dataSourceName=
122# cas.authn.jdbc.query[0].dataSourceProxy=false
123cas.authn.jdbc.query[0].fieldPassword=password
124
125# cas.authn.jdbc.query[0].fieldExpired=
126# cas.authn.jdbc.query[0].fieldDisabled=
127# cas.authn.jdbc.query[0].principalAttributeList=sn,cn:commonName,givenName
128
129#cas.authn.jdbc.query[0].passwordEncoder.type=DEFAULT
130#cas.authn.jdbc.query[0].passwordEncoder.type=com.example.CustomPasswordEncoder
131#cas.authn.jdbc.query[0].passwordEncoder.characterEncoding=UTF-8
132#cas.authn.jdbc.query[0].passwordEncoder.encodingAlgorithm=MD5
133
134#cas.authn.jdbc.query[0].passwordEncoder.secret=
135#cas.authn.jdbc.query[0].passwordEncoder.strength=16
136
137# cas.authn.jdbc.query[0].principalTransformation.suffix=
138# cas.authn.jdbc.query[0].principalTransformation.caseConversion=NONE|UPPERCASE|LOWERCASE
139# cas.authn.jdbc.query[0].principalTransformation.prefix=
140# STEP4 END
141
142
144# CAS Delegated Authentication
146#cas.authn.pac4j.bitbucket.clientName=Bitbucket
147#cas.authn.pac4j.dropbox.clientName=Dropbox
148#cas.authn.pac4j.facebook.clientName=Facebook
149#cas.authn.pac4j.foursquare.clientName=Foursquare
150#cas.authn.pac4j.github.clientName=Github
151#cas.authn.pac4j.google.clientName=Google
152#cas.authn.pac4j.linkedIn.clientName=LinkedIn
153#cas.authn.pac4j.paypal.clientName=PayPal
154#cas.authn.pac4j.twitter.clientName=Twitter
155#cas.authn.pac4j.yahoo.clientName=Yahoo
156#cas.authn.pac4j.windowsLive.clientName=Windows Live
157#cas.authn.pac4j.wordpress.clientName=WordPress
158
159#多屬性
160cas.authn.attributeRepository.jdbc[0].singleRow=true
161cas.authn.attributeRepository.jdbc[0].order=0
162cas.authn.attributeRepository.jdbc[0].url=jdbc:mysql://172.18.18.25:3306/pa_db?useUnicode=true&characterEncoding=UTF-8&autoReconnect=true&useSSL=false
163cas.authn.attributeRepository.jdbc[0].username=username
164cas.authn.attributeRepository.jdbc[0].user=root
165cas.authn.attributeRepository.jdbc[0].password=dhcc
166cas.authn.attributeRepository.jdbc[0].sql=select * from s_user where {0}
167cas.authn.attributeRepository.jdbc[0].dialect=org.hibernate.dialect.MySQLDialect
168cas.authn.attributeRepository.jdbc[0].ddlAuto=none
169cas.authn.attributeRepository.jdbc[0].driverClass=com.mysql.jdbc.Driver
170cas.authn.attributeRepository.jdbc[0].leakThreshold=10
171cas.authn.attributeRepository.jdbc[0].propagationBehaviorName=PROPAGATION_REQUIRED
172cas.authn.attributeRepository.jdbc[0].batchSize=1
173cas.authn.attributeRepository.jdbc[0].healthQuery=SELECT 1
174cas.authn.attributeRepository.jdbc[0].failFast=trueyeshi
175#http訪問(wèn)
176cas.tgc.secure=false
看上面的配置文件你會(huì)發(fā)現(xiàn)我配置了mysql的jdbc連接請(qǐng)求,其實(shí)就是為了給CAS服務(wù)端配置用戶(hù)名和密碼驗(yàn)證的,你自己做的話(huà),需要在你的數(shù)據(jù)庫(kù)中創(chuàng)建一個(gè)數(shù)據(jù)庫(kù)空間和一張用戶(hù)表,并且保證該表中最少有三個(gè)字段:id,username和password,這個(gè)配置文件中寫(xiě)的是我的測(cè)試服務(wù)器的配置,你要改成自己的哦。
這里有幾個(gè)點(diǎn)要注意下:
cas.authn.accept.users=casuser::Mellon這個(gè)配置記得刪掉,這就是那個(gè)寫(xiě)死的用戶(hù)
cas.authn.jdbc.query[0]這些配置就是數(shù)據(jù)庫(kù)驗(yàn)證相關(guān)的內(nèi)容
在cas.authn.jdbc.query[0].sql中,程序會(huì)把你登錄時(shí)輸入的用戶(hù)名作為參數(shù)傳進(jìn)去
cas.authn.jdbc.query[0].fieldPassword則是指明那一列對(duì)應(yīng)的是你輸入的密碼,目前沒(méi)有做MD5
如果使用http訪問(wèn) 必須加入 cas.tgc.secure=false 否則登錄狀態(tài)不能共享。
加入http訪問(wèn)服務(wù)
請(qǐng)?jiān)谙到y(tǒng)的C:\WINDOWS\System32\drivers\etc\hosts 文件中加入:
127.0.0.1 com.dhcc.cas
這么做的目的是將這個(gè)IP地址指向這個(gè)域名,其實(shí)本意是為了https訪問(wèn)做的工作,如果想知道其目的可以查看cas https訪問(wèn)相關(guān)的資料,本教程里就不再細(xì)說(shuō)了。
這里可能不好理解,我先來(lái)講一個(gè)我遇到的問(wèn)題,你就可以理解了:
配置好CAS的客戶(hù)端后,我就開(kāi)始測(cè)試我的客戶(hù)端子系統(tǒng),在瀏覽器中輸入我的子系統(tǒng)項(xiàng)目地址:
http://com.dhcc.cas:9093
后由于我的子系統(tǒng)的配置,訪問(wèn)界面會(huì)重定向到
http://com.dhcc.cas:9092/cas/login?service:http://com.dhcc.cas:9093/
但是這個(gè)界面理論上來(lái)說(shuō)應(yīng)該是跳轉(zhuǎn)到CAS服務(wù)端的登錄界面的,可是我的這個(gè)路徑卻無(wú)法跳轉(zhuǎn),
并展示如下界面:

我百思不得其解,嘗試了各種方法也不行,直到我發(fā)現(xiàn)了將路徑改為:
http://com.dhcc.cas:9092/cas/login?service=https://com.dhcc.cas:9093/
界面會(huì)自動(dòng)跳轉(zhuǎn)到CAS服務(wù)端的登錄界面,這時(shí)我才開(kāi)始回憶起CAS服務(wù)端是不是哪里我沒(méi)有配置對(duì),于是我在網(wǎng)上查資料才知道CAS4.2以上光加入cas.tgc.secure=false 這個(gè)參數(shù)配置是不夠的,還要對(duì)HTTPSandIMAPS-10000001.json這個(gè)文件中進(jìn)行修改,大家可能會(huì)問(wèn)了,我怎么沒(méi)看到這個(gè)文件?
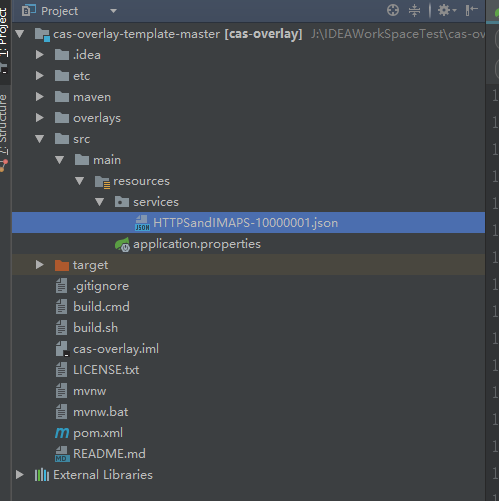
因?yàn)槟J(rèn)的項(xiàng)目架構(gòu)是沒(méi)有這個(gè)文件的,我們要將導(dǎo)出的war包解壓,然后在WEB-INF\classes\services這個(gè)路徑下找到這個(gè)文件,然后在我們的項(xiàng)目中的resources目錄下再新建一個(gè)services目錄,并將該文件拷貝到這個(gè)路徑下即可。
現(xiàn)在你的項(xiàng)目架構(gòu)應(yīng)該是這個(gè)樣子的:
引入這個(gè)文件肯定是為了修改它,我們可以看到這個(gè)json中有行代碼,其實(shí)是個(gè)正則表達(dá)式:
1"serviceId" : "^(https|imaps)://.*"了解json的都知道,這里其實(shí)是說(shuō)serviceId的值是所有帶https和imaps的url請(qǐng)求都會(huì)被當(dāng)成已經(jīng)注冊(cè)的服務(wù),我們只要將它改成下面這樣就可以了:
1"serviceId" : "^(https|imaps|http)://.*"
這樣我們就可以安心的使用CAS的http請(qǐng)求服務(wù)了。
結(jié)語(yǔ)
至此,我們的CAS服務(wù)端基本上就搭建好了,只要將它打成war包,并放到tomcat中啟動(dòng)起來(lái),便可以作為們的單點(diǎn)登錄的服務(wù)端使用了。
這里需要注意一下幾點(diǎn):
注意自定義的配置文件是否寫(xiě)對(duì)了,尤其是數(shù)據(jù)庫(kù)的配置。
一定要加入并修改HTTPSandIMAPS-10000001.json文件,否則后期你的CAS客戶(hù)端肯定不會(huì)自動(dòng)跳轉(zhuǎn)到登錄界面。
只要你的服務(wù)端可以正常啟用,你就成功了一半了,下一篇我們就開(kāi)始講解CAS客戶(hù)端的配置了。
1source: //jasoncool.github.io/2017/11/29/Springboot集成Shiro和Cas實(shí)現(xiàn)單點(diǎn)登錄-服務(wù)端篇CAS5

喜歡,在看