
基于OpenCV的區(qū)域分割、輪廓檢測(cè)和閾值處理
點(diǎn)擊下方卡片,關(guān)注“新機(jī)器視覺”公眾號(hào)
重磅干貨,第一時(shí)間送達(dá)
本文轉(zhuǎn)載自小白學(xué)視覺,作者努比。文章僅用于學(xué)術(shù)分享。
OpenCV是一個(gè)巨大的開源庫(kù),廣泛用于計(jì)算機(jī)視覺,人工智能和圖像處理領(lǐng)域。它在現(xiàn)實(shí)世界中的典型應(yīng)用是人臉識(shí)別,物體檢測(cè),人類活動(dòng)識(shí)別,物體跟蹤等。
現(xiàn)在,假設(shè)我們只需要從整個(gè)輸入幀中檢測(cè)到一個(gè)對(duì)象。因此,代替處理整個(gè)框架,如果可以在框架中定義一個(gè)子區(qū)域并將其視為要應(yīng)用處理的新框架,該怎么辦。我們要完成一下三個(gè)步驟:
?定義興趣區(qū)
?在ROI中檢測(cè)輪廓
?閾值檢測(cè)輪廓輪廓線
什么是ROI?
簡(jiǎn)而言之,我們感興趣的對(duì)象所在的幀內(nèi)的子區(qū)域稱為感興趣區(qū)域(ROI)。
我們?nèi)绾味xROI?
在輸入幀中定義ROI的過(guò)程稱為ROI分割。
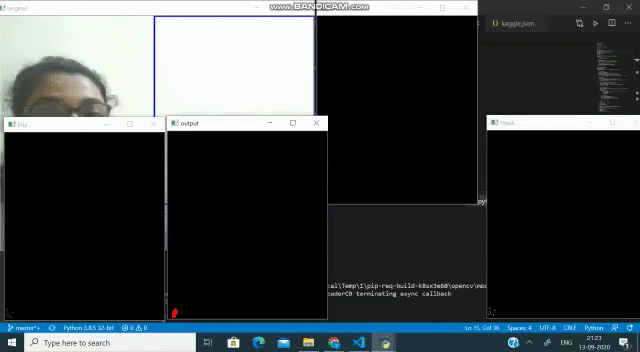
在“ ROI細(xì)分”中,(此處)我們選擇框架中的特定區(qū)域,并以矩形方法提供其尺寸,以便它將在框架上繪制矩形的ROI。
(輸出)藍(lán)色矩形覆蓋的區(qū)域是我們的投資回報(bào)率
現(xiàn)在,如果您也想綁定感興趣的對(duì)象,那么我們可以通過(guò)在ROI中找到輪廓來(lái)實(shí)現(xiàn)。
什么是輪廓?
輪廓線是 表示或說(shuō)是限制對(duì)象形狀的輪廓。
如何在框架中找到輪廓?
對(duì)我而言,在將ROI框架設(shè)為閾值后,找到輪廓效果最佳。因此,要找到輪廓,手上的問(wèn)題是-
什么是閾值?
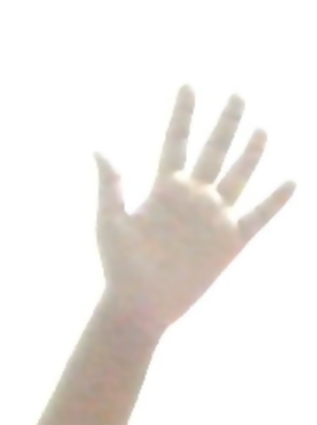
閾值不過(guò)是圖像分割的一種簡(jiǎn)單形式。這是將灰度或rgb圖像轉(zhuǎn)換為二進(jìn)制圖像的過(guò)程。例如
(這是RGB幀)
(這是二進(jìn)制閾值幀)
因此,在對(duì)rgb幀進(jìn)行閾值處理后,程序很容易找到輪廓,因?yàn)橛捎赗OI中感興趣對(duì)象的顏色將是黑色(在簡(jiǎn)單的二進(jìn)制脫粒中)或白色(在如上所述的反向二進(jìn)制脫粒中),因此分割(將背景與前景即我們的對(duì)象分開)將很容易完成。
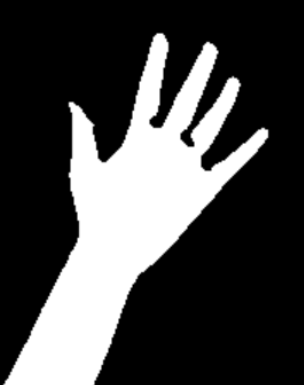
在對(duì)框架進(jìn)行閾值處理并檢測(cè)到輪廓之后,我們應(yīng)用凸包技術(shù)對(duì)圍繞對(duì)象點(diǎn)的緊密擬合凸邊界進(jìn)行設(shè)置。實(shí)施此步驟后,框架應(yīng)如下所示-
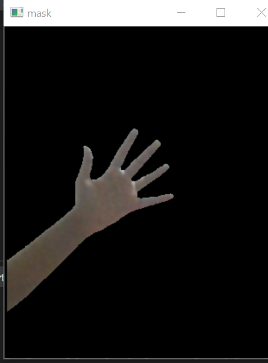
我們可以做的另一件事是,我們可以遮蓋ROI以僅顯示被檢測(cè)到的輪廓本身覆蓋的對(duì)象。再次-
什么是圖像MASK?
圖像MASK是隱藏圖像的某些部分并顯示某些部分的過(guò)程。這是圖像編輯的非破壞性過(guò)程。在大多數(shù)情況下,它使您可以在以后根據(jù)需要調(diào)整和調(diào)整遮罩。通常,它是一種有效且更具創(chuàng)意的圖像處理方式。
因此,基本上在這里我們將掩蓋ROI的背景。為此,首先我們將修復(fù)ROI的背景。然后,在固定背景之后,我們將從框架中減去背景,并用wewant背景(這里是一個(gè)簡(jiǎn)單的黑色框架)替換它。
實(shí)施上述技術(shù),我們應(yīng)該得到如下輸出:
(背景被遮罩以僅捕獲對(duì)象)
這是所說(shuō)明技術(shù)的理想實(shí)現(xiàn)的完整代碼。
import cv2import numpy as npimport copyimport mathx=0.5 # start point/total widthy=0.8 # start point/total widththreshold = 60 # BINARY thresholdblurValue = 7 # GaussianBlur parameterbgSubThreshold = 50learningRate = 0# variablesisBgCaptured = 0 # whether the background captureddef removeBG(frame): #Subtracting the backgroundfgmask = bgModel.apply(frame,learningRate=learningRate)kernel = np.ones((3, 3), np.uint8)fgmask = cv2.erode(fgmask, kernel, iterations=1)res = cv2.bitwise_and(frame, frame, mask=fgmask)return res# Cameracamera = cv2.VideoCapture(0)camera.set(10,200)while camera.isOpened():ret, frame = camera.read()frame = cv2.bilateralFilter(frame, 5, 50, 100) # smoothening filterframe = cv2.flip(frame, 1) # flip the frame horizontallycv2.rectangle(frame, (int(x * frame.shape[1]), 0),(frame.shape[1], int(y * frame.shape[0])), (255, 0, 0), 2) #drawing ROIcv2.imshow('original', frame)# Main operationif isBgCaptured == 1: # this part wont run until background capturedimg = removeBG(frame)img = img[0:int(y * frame.shape[0]),int(x * frame.shape[1]):frame.shape[1]] # clip the ROIcv2.imshow('mask', img)# convert the image into binary imagegray = cv2.cvtColor(img, cv2.COLOR_BGR2GRAY)blur = cv2.GaussianBlur(gray, (blurValue, blurValue), 0)cv2.imshow('blur', blur)ret, thresh = cv2.threshold(blur, threshold, 255, cv2.THRESH_BINARY) #thresholding the framecv2.imshow('ori', thresh)# get the coutoursthresh1 = copy.deepcopy(thresh)contours, hierarchy = cv2.findContours(thresh1, cv2.RETR_TREE, cv2.CHAIN_APPROX_SIMPLE) #detecting contourslength = len(contours)maxArea = -1if length > 0:for i in range(length): # find the biggest contour (according to area)temp = contours[i]area = cv2.contourArea(temp)if area > maxArea:maxArea = areaci = ires = contours[ci]hull = cv2.convexHull(res) #applying convex hull techniquedrawing = np.zeros(img.shape, np.uint8)cv2.drawContours(drawing, [res], 0, (0, 255, 0), 2) #drawing contourscv2.drawContours(drawing, [hull], 0, (0, 0, 255), 3) #drawing convex hullcv2.imshow('output', drawing)# Keyboard OPk = cv2.waitKey(10)if k == 27:camera.release()cv2.destroyAllWindows()breakelif k == ord('b'): # press 'b' to capture the backgroundbgModel = cv2.createBackgroundSubtractorMOG2(0, bgSubThreshold)isBgCaptured = 1print( 'Background Captured')elif k == ord('r'): # press 'r' to reset the backgroundbgModel = NoneisBgCaptured = 0print ('Reset BackGround')

本文僅做學(xué)術(shù)分享,如有侵權(quán),請(qǐng)聯(lián)系刪文。