
干貨 | YOLOV5 訓(xùn)練自動(dòng)駕駛數(shù)據(jù)集,并轉(zhuǎn)Tensorrt,收藏!
點(diǎn)擊上方“小白學(xué)視覺”,選擇加"星標(biāo)"或“置頂”
重磅干貨,第一時(shí)間送達(dá)

本文轉(zhuǎn)自|AI算法與圖像處理

準(zhǔn)備數(shù)據(jù)集
環(huán)境配置
配置文件修改
訓(xùn)練
推理
轉(zhuǎn)Tensorrt
1
準(zhǔn)備數(shù)據(jù)集
1.1 BDD數(shù)據(jù)集
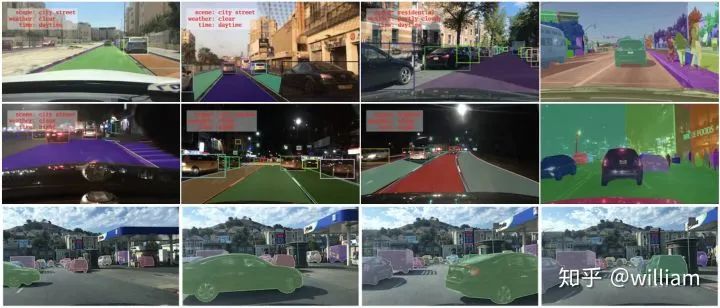
BDD100K是最大的開放式駕駛視頻數(shù)據(jù)集之一,其中包含10萬個(gè)視頻和10個(gè)任務(wù),目的是方便評估自動(dòng)駕駛圖像識別算法的的進(jìn)展。每個(gè)高分辨率視頻一共40秒。該數(shù)據(jù)集包括超過1000個(gè)小時(shí)的駕駛數(shù)據(jù),總共超過1億幀。這些視頻帶有GPU / IMU數(shù)據(jù)以獲取軌跡信息。該數(shù)據(jù)集具有地理,環(huán)境和天氣多樣性,從而能讓模型能夠識別多種場景,具備更多的泛化能力。這些豐富的戶外場景和復(fù)雜的車輛運(yùn)動(dòng)使感知任務(wù)更具挑戰(zhàn)性。該數(shù)據(jù)集上的任務(wù)包括圖像標(biāo)記,車道檢測,可駕駛區(qū)域分割,道路對象檢測,語義分割,實(shí)例分割,多對象檢測跟蹤,多對象分割跟蹤,領(lǐng)域自適應(yīng)和模仿學(xué)習(xí)。我們可以在BDD100K數(shù)據(jù)網(wǎng)站上下載數(shù)據(jù)。
Bdd100k的標(biāo)簽是由Scalabel生成的JSON格式。- labels [ ]:- id: int32- category: string (classification)- manualShape: boolean (whether the shape of the label is created or modified manually)- manualAttributes: boolean (whether the attribute of the label is created or modified manually)- score: float (the confidence or some other ways of measuring the quality of the label.)- attributes:- occluded: boolean- truncated: boolean- trafficLightColor: "red|green|yellow|none"- areaType: "direct | alternative" (for driving area)- laneDirection: "parallel|vertical" (for lanes)- laneStyle: "solid | dashed" (for lanes)- laneTypes: (for lanes)- box2d:- x1: float- y1: float- x2: float- y2: float
道路對象類別包括以下幾類:
["bike","bus","car","motor","person","rider","traffic light","traffic sign","train","truck"]
1.2 YOLO數(shù)據(jù)格式
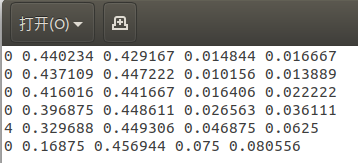
每個(gè)圖片文件.jpg,都有同一命名的標(biāo)簽文件.txt。
標(biāo)簽文件中每個(gè)對象獨(dú)占一行,格式為<object-class> <x> <y> <width> <height>。
其中:
<object-class>-表示對象的類別序號:從0 到 (classes-1)<x> <y> <width> <height>-參照圖片寬度和高度的相對比例(浮點(diǎn)數(shù)值),從0.0到1.0例如:
<x> = <absolute_x> / <image_width>或<height> = <absolute_height> / <image_height>注意:
<x> <y>是矩形的中心,而不是左上角位置。
如下圖所示:
YOLO V5的標(biāo)簽文件和圖像文件應(yīng)位于同一目錄下。
1.3 BDD數(shù)據(jù)轉(zhuǎn)YOLO格式
Berkerley 提供了Bdd100k數(shù)據(jù)集的標(biāo)簽查看及標(biāo)簽格式轉(zhuǎn)化工具。由于沒有直接從bdd100k轉(zhuǎn)換成YOLO的工具,因此我們首先得使用將bdd100k的標(biāo)簽轉(zhuǎn)換為coco格式,然后再將coco格式轉(zhuǎn)換為yolo格式。
bdd to coco
我的目的是識別包括不同顏色交通燈在內(nèi)的所有交通對象,因此我們需要對原版的bdd2coco.py進(jìn)行一些修改,以獲取交通燈顏色并產(chǎn)生新的類別。
這是修改完的核心代碼:
for label in i['labels']:annotation = dict()category=label['category']if (category == "traffic light"):color = label['attributes']['trafficLightColor']category = "tl_" + colorif category in id_dict.keys():empty_image = Falseannotation["iscrowd"] = 0annotation["image_id"] = image['id']x1 = label['box2d']['x1']y1 = label['box2d']['y1']x2 = label['box2d']['x2']y2 = label['box2d']['y2']annotation['bbox'] = [x1, y1, x2-x1, y2-y1]annotation['area'] = float((x2 - x1) * (y2 - y1))annotation['category_id'] = id_dict[category]annotation['ignore'] = 0annotation['id'] = label['id']annotation['segmentation'] = [[x1, y1, x1, y2, x2, y2, x2, y1]]annotations.append(annotation)
在完成bdd100k格式到y(tǒng)olo格式的轉(zhuǎn)換后,會獲得bdd100k_labels_images_det_coco_train.json和bdd100k_labels_images_det_coco_val.json兩個(gè)文件。
Coco to yolo
在完成先前的轉(zhuǎn)換之后,我們需要將訓(xùn)練集和驗(yàn)證集的coco格式標(biāo)簽轉(zhuǎn)換為yolo格式。注意需要分別指定訓(xùn)練集和驗(yàn)證集圖片位置,對應(yīng)的coco標(biāo)簽文件位置,及生成yolo標(biāo)簽的目標(biāo)位置。
config_train ={"datasets": "COCO","img_path": "bdd100k_images/bdd100k/images/100k/train","label": "labels/bdd100k_labels_images_det_coco_train.json","img_type": ".jpg","manipast_path": "./","output_path": "labels/trains/","cls_list": "bdd100k.names",}config_valid ={"datasets": "COCO","img_path": "bdd100k_images/bdd100k/images/100k/val","label": "labels/bdd100k_labels_images_det_coco_val.json","img_type": ".jpg","manipast_path": "./","output_path": "labels/valids/","cls_list": "bdd100k.names",}
除此之外,我們還得將所有的類別寫入bdd100k.names文件。
personridercarbustruckbikemotortl_greentl_redtl_yellowtl_nonetraffic signtraintl_green
運(yùn)行Bdd_preprocessing中的完整代碼可以完成Bdd100k格式標(biāo)簽到Y(jié)OLO標(biāo)簽格式的轉(zhuǎn)換。
Bdd2coco以及coco2yolo的詳細(xì)說明可以參看bdd100k代碼庫和convert2Yolo代碼庫。
2
環(huán)境配置
2.1 官方代碼
https://github.com/ultralytics/yolov5/tree/v3.0
由于后面轉(zhuǎn)tensorrt版本支持yolov5到3.0版本,所以以3.0版本進(jìn)行實(shí)驗(yàn)。
環(huán)境配置可通過下面命令進(jìn)行一鍵配置。
# pip install -r requirements.txt# base ----------------------------------------Cython=3.2.2=1.18.5=4.1.2pillow=5.3=1.4.1=2.2=1.6.0=0.7.0=4.41.0# coco ----------------------------------------pycocotools>=2.0# export --------------------------------------packaging # for coremltoolscoremltools==4.0b4onnx>=1.7.0scikit-learn==0.19.2 # for coreml quantization# extras --------------------------------------thop # FLOPS computationseaborn # plotting
3
配置文件修改
3.1 修改 ./data/coco.yaml
修改./data/coco.yaml--》存為bdd.yaml
修改內(nèi)容:
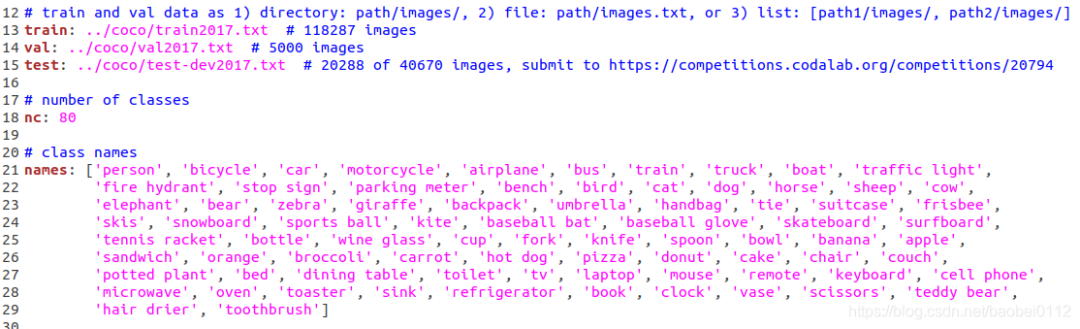
(1)train/val/test 路徑
其中的txt內(nèi)容均為各集合圖像實(shí)際絕對路徑。
(2)nc:number class 類別數(shù)量,BDD數(shù)據(jù)類別為10
(3)names:前面bdd數(shù)據(jù)集介紹時(shí)候已經(jīng)列出
3.2 修改 ./model/yolov5.yaml

修改:nc為BDD數(shù)據(jù)類別數(shù):10
3.3 修改./train.py
修改:
(1)--weights,這里s/m/l/x四個(gè)型號可以選擇
(2)--cfg,這里s/m/l/x四個(gè)型號可以選擇
(3)--data,選擇根據(jù)coco.yaml修改后的bdd.yaml
(4)--batch-size 和 --img-size 可以再這里修改也可以默認(rèn)不動(dòng),再訓(xùn)練命令行里設(shè)定
4
訓(xùn)練
預(yù)訓(xùn)練模型
python train.py --img 640 --batch 32 --epochs 300 --data './data/bdd.yaml' --cfg ./models/custom_yolov5x.yaml --weights "./weights/yolov5x.pt" --name yolov5x_bdd_prew --cache從頭訓(xùn)練
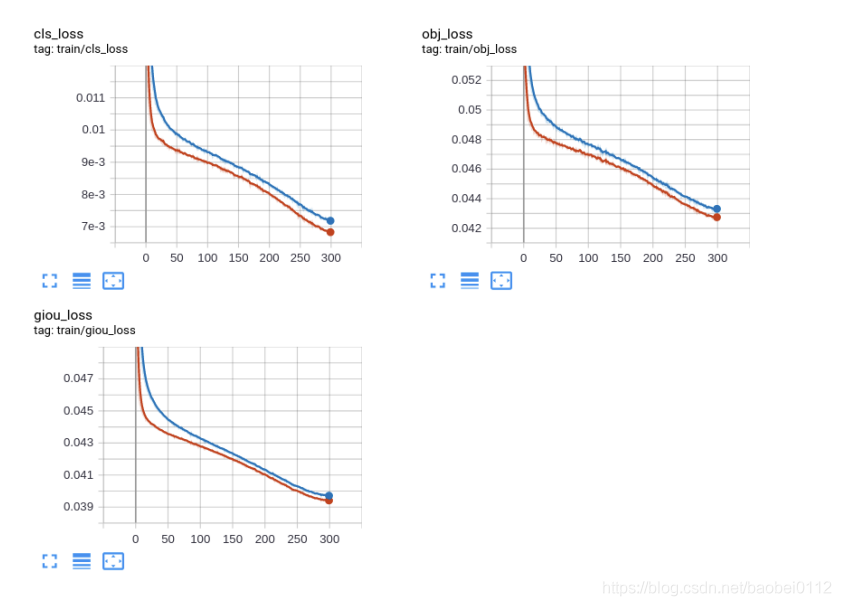
python train.py --img 640 --batch 32 --epochs 300 --data './data/bdd.yaml' --cfg ./models/custom_yolov5x.yaml --weights "" --name yolov5x_bdd --cachetrain_loss:
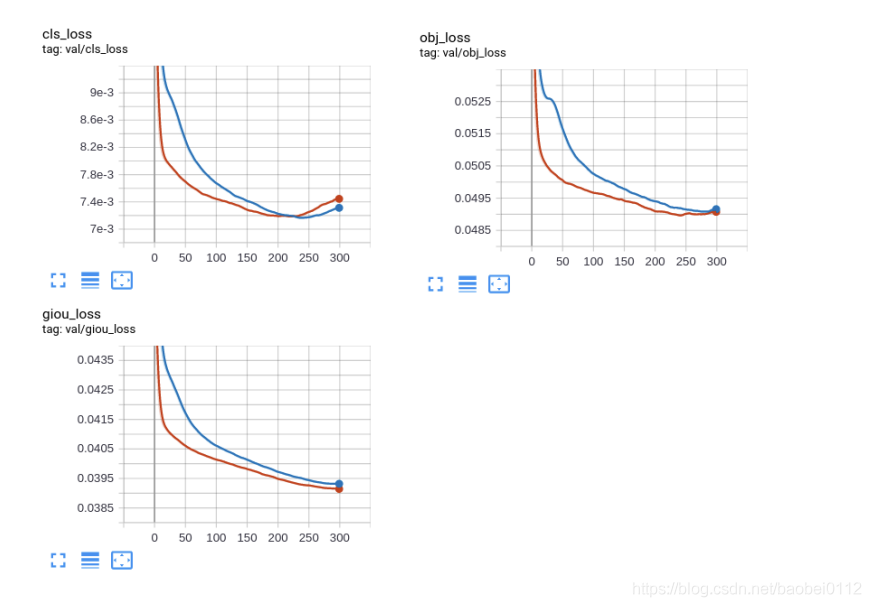
val_loss:
5
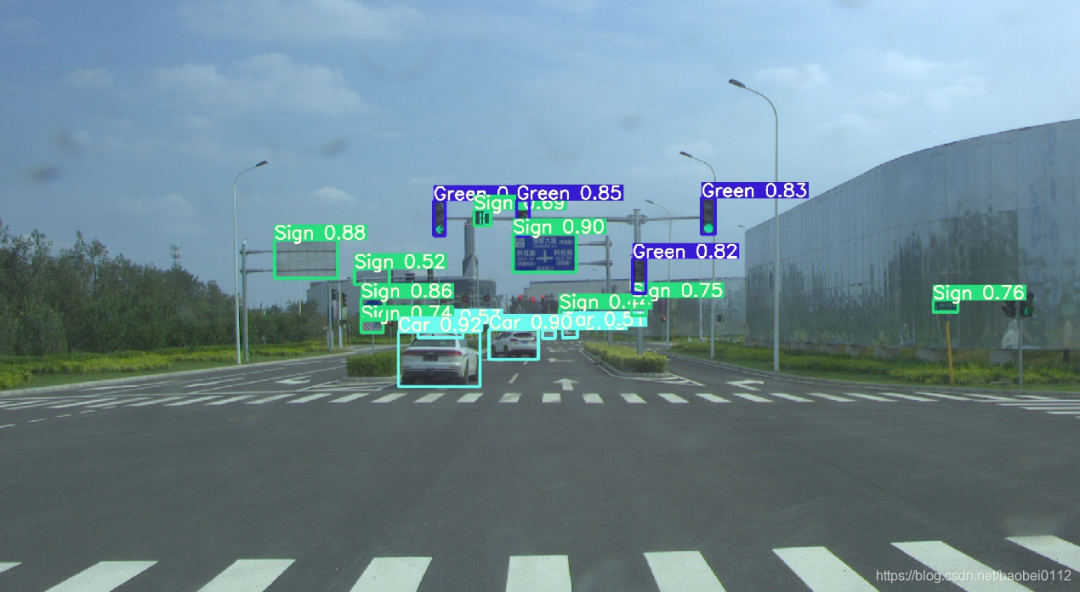
推斷
可選參數(shù):
— weights: 訓(xùn)練權(quán)重的路徑
— source:推理目標(biāo)的路徑,可以是圖片,視頻,網(wǎng)絡(luò)攝像頭等
— source:推理結(jié)果的輸出路徑
— img-size:推理圖片的大小
— conf-thres:對象置信閾值,默認(rèn)0.4
— iou-thres:NMS的IOU閾值,可以根據(jù)實(shí)際對象的重疊度調(diào)節(jié),默認(rèn)0.5
— device: 選擇使用CUDA或者CPU
— view-img:顯示所有推理結(jié)果
— save-txt:將每一幀的推理結(jié)果及邊界框的位置,存入*.txt文件
— classes:類別過濾,意思是只推理目標(biāo)類別
— agnostic-nms:使用agnostic-nms NMS
python detect.py --source 0 # webcamfile.jpg # imagefile.mp4 # videopath/ # directorypath/*.jpg # globrtsp://170.93.143.139/rtplive/470011e600ef003a004ee33696235daa # rtsp streamrtmp://192.168.1.105/live/test # rtmp streamhttp://112.50.243.8/PLTV/88888888/224/3221225900/1.m3u8 # http stream
5
轉(zhuǎn)Tensorrt
6.1 工程配置
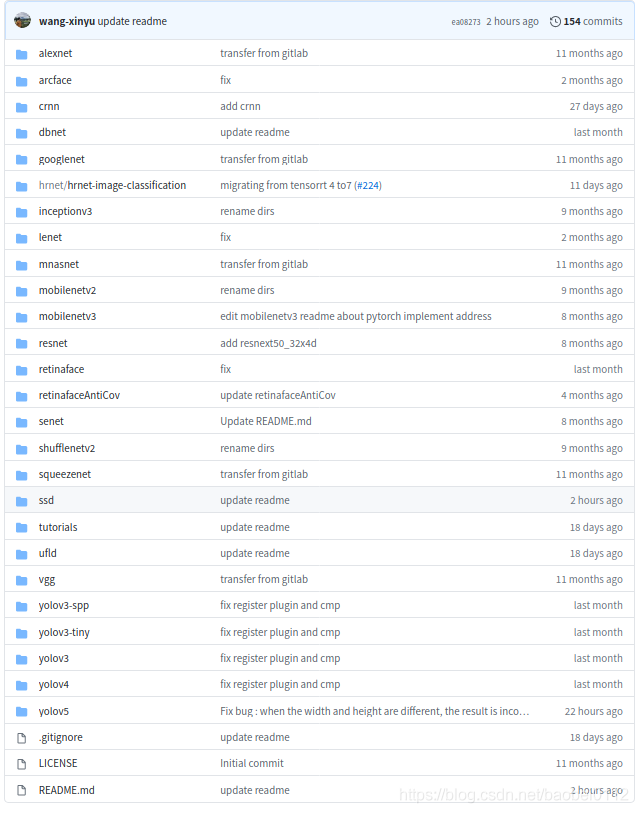
https://github.com/wang-xinyu/tensorrtx/tree/master/yolov5,
該項(xiàng)目提供了一大批常見模型的轉(zhuǎn)Tensorrt方法。
環(huán)境要求:
GTX1080 / Ubuntu16.04 / cuda10.0 / cudnn7.6.5 / tensorrt7.0.0 / nvinfer7.0.0 / opencv3.3
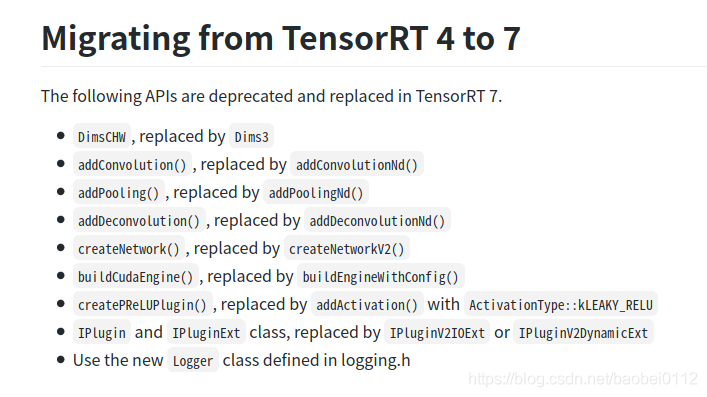
高版本tensorrt7的變化如下:
6.2 生成轉(zhuǎn)tensorrt的中間文件 yolov5.wts
拷貝 ./tensorrt/yolov5/gen_wts.py文件到./yolov5 工程下,修改其中加載模型路徑,執(zhí)行該python文件,得到y(tǒng)olov5.wts,并將其拷貝回 ./tensorrt/yolov5/下。
1. generate yolov5s.wts from pytorch with yolov5s.ptgit clone https://github.com/wang-xinyu/tensorrtx.gitgit clone https://github.com/ultralytics/yolov5.git// download its weights 'yolov5s.pt'// copy tensorrtx/yolov5/gen_wts.py into ultralytics/yolov5// ensure the file name is yolov5s.pt and yolov5s.wts in gen_wts.py// go to ultralytics/yolov5python gen_wts.py// a file 'yolov5s.wts' will be generated.
6.3 編譯yolov5并生成tensorrt模型yolov5.engine
編譯之前需要修改:
(1)選模型

(2)CMakeLists.txt
如果tensorrt是通過tar包解壓安裝的,還需要在CMakeList.txt中對tensorrt路徑進(jìn)行指定,不然會報(bào)錯(cuò)找不到nvinfer

(3)另外,如果系統(tǒng)是Ubuntu18.04的話還會存在opencv的問題,找不到libpng12.so和libjasper.so.
這個(gè)問題可通過https://blog.csdn.net/baobei0112/article/details/108991915 該博客內(nèi)容找到答案。
(4)./tensorrt/yolov5/下新建個(gè)samples文件夾,把需要測試的圖片放進(jìn)去。
做好準(zhǔn)備工作,下面就可以進(jìn)行YOLOV5的engine編譯工作。
build tensorrtx/yolov5 and run// put yolov5s.wts into tensorrtx/yolov5// go to tensorrtx/yolov5// ensure the macro NET in yolov5.cpp is smkdir buildcd buildcmake ..makesudo ./yolov5 -s // serialize model to plan file i.e. 'yolov5s.engine'sudo ./yolov5 -d ../samples // deserialize plan file and run inference, the images in samples will be processed.
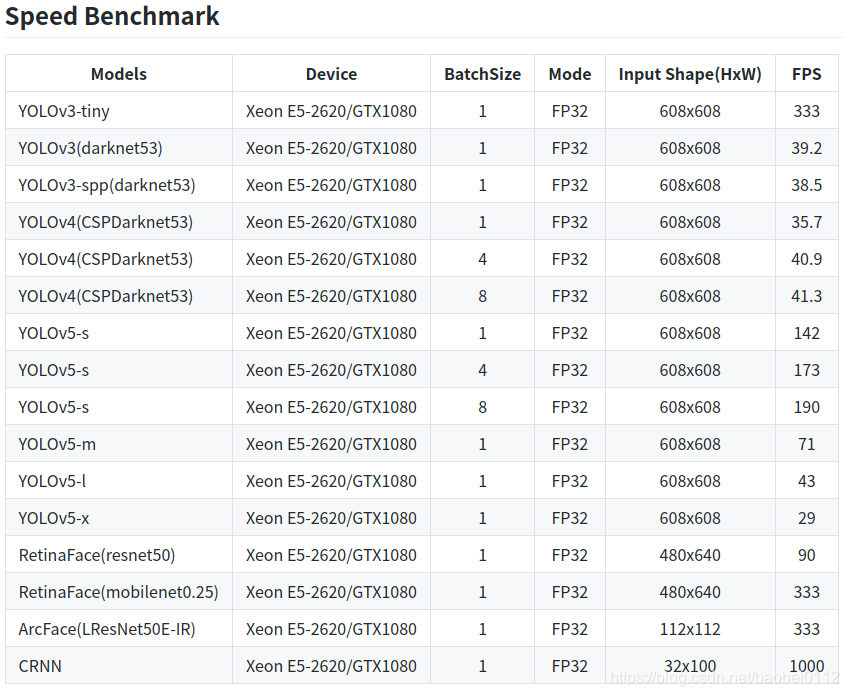
6.4 Tensorrt各yolo模型對比
交流群
歡迎加入公眾號讀者群一起和同行交流,目前有SLAM、三維視覺、傳感器、自動(dòng)駕駛、計(jì)算攝影、檢測、分割、識別、醫(yī)學(xué)影像、GAN、算法競賽等微信群(以后會逐漸細(xì)分),請掃描下面微信號加群,備注:”昵稱+學(xué)校/公司+研究方向“,例如:”張三 + 上海交大 + 視覺SLAM“。請按照格式備注,否則不予通過。添加成功后會根據(jù)研究方向邀請進(jìn)入相關(guān)微信群。請勿在群內(nèi)發(fā)送廣告,否則會請出群,謝謝理解~