手把手教你使用yolov5訓(xùn)練自己的數(shù)據(jù)集并用TensorRT加速

極市導(dǎo)讀
本文主要介紹目標(biāo)檢測YOLOV5算法來訓(xùn)練自己的數(shù)據(jù)集,并且使用TensorRT來對訓(xùn)練好的模型進(jìn)行加速推理。 >>加入極市CV技術(shù)交流群,走在計算機(jī)視覺的最前沿
環(huán)境配置
ubuntu 18.04 64bit nvidia gtx 2080Ti cuda 11.0 torch 1.7 pip install requirements.txt (手動狗頭)
我用的是nvidia官方的docker鏡像,下載下來直接就可以用。不想裝環(huán)境的戳這里:https://hub.docker.com/r/ultralytics/yolov5
訓(xùn)練COCO
我們下載的預(yù)訓(xùn)練模型就是使用COCO數(shù)據(jù)集訓(xùn)練出來的模型。下載COCO,運(yùn)行下面的命令。YOLOv5s/m/l/x的訓(xùn)練時間在單臺V100上是2/4/6/8天(多GPU時間更快)。使用你的GPU允許的最大的--batch-size(16 GB設(shè)備的batch大小顯示)。
$ python train.py --data coco.yaml --cfg yolov5s.yaml --weights '' --batch-size 64yolov5m 40yolov5l 24yolov5x16
COCO的數(shù)據(jù)集可以通過data文件夾下get_coco2017.sh腳本進(jìn)行下載,包含圖片和lable文件。整個數(shù)據(jù)集的壓縮包有18G。
訓(xùn)練自己的數(shù)據(jù)集
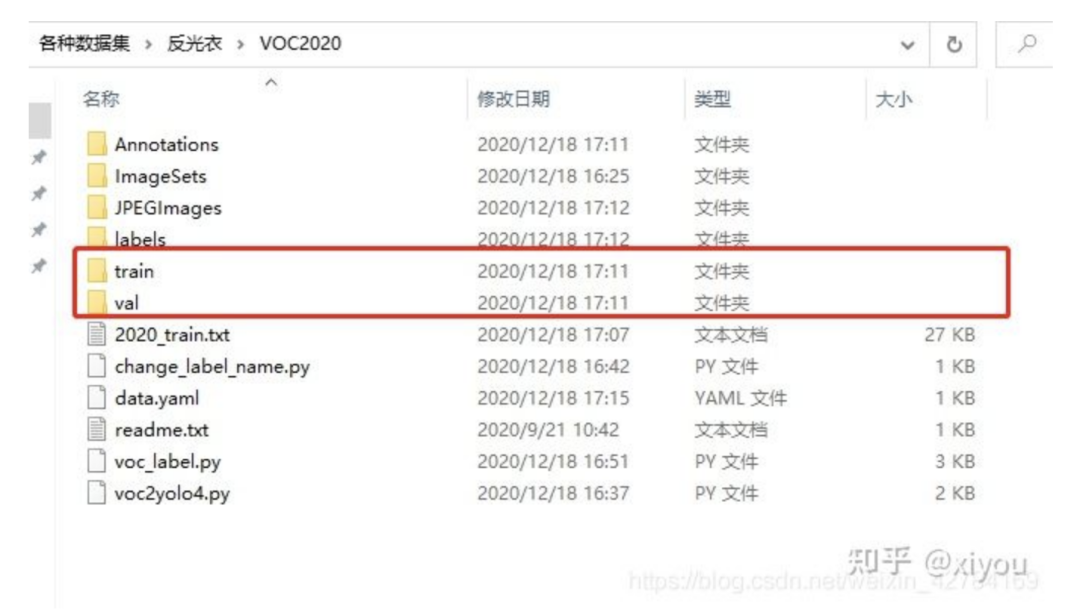
首先是收集數(shù)據(jù),可以找開源數(shù)據(jù)集,也可以自己爬蟲。我訓(xùn)練的是反光衣模型,用的是磊哥開源的數(shù)據(jù)(反光衣數(shù)據(jù))。這個數(shù)據(jù)集用的labelimg標(biāo)注的voc格式的數(shù)據(jù),需要轉(zhuǎn)換成yolo格式的數(shù)據(jù)(class x_center y_center width height)。labelImg支持YOLO和PascalVOC 2種格式,前者標(biāo)簽信息是存儲在txt文件中,而后者是存儲在xml中。
整個數(shù)據(jù)集以下列格式組織,其中train和val是用來訓(xùn)練和驗證的數(shù)據(jù)集。
其中train文件夾
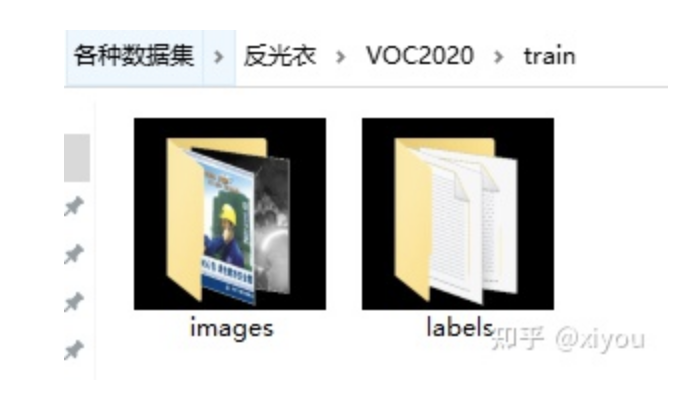
labels文件夾下的yolo格式文件

labels文件下的txt文件和images下面的jpg文件是一一對應(yīng)的。簡單解釋一下txt格式的意思。
格式為:class_id class x_center y_center width height
txt文件中一行表示一個bbox,也就是一個對象。class_id 為類別id,計數(shù)從0開始到(classes-1),我現(xiàn)在用的反光衣數(shù)據(jù)集有兩類分別為 reflective_clothes、other_clothes,該txt的class_id 為1,表示images下000000.jpg這張照片有一個bbox,bbox的類別為other_clothes。 后面x_center y_center width height參照圖片寬度和高度的相對比例(浮點(diǎn)數(shù)值),從0.0到1.0。 注意:x_center y_center 表示的是矩形的中心,而不是左上角的位置。
其中的voc_label.py腳本的作用是將voc格式的xml文件轉(zhuǎn)成上面yolo格式需要的txt文件。附上代碼。
#該腳本的作用是將xml格式的文件轉(zhuǎn)換成yolo需要的格式import xml.etree.ElementTree as ETimport pickleimport osfrom collections import OrderedDictfrom os import listdir, getcwdfrom os.path import join'''fire-detect:VOC2020 to yolo format code'''sets = [('2020', 'train')]classes = ['reflective_clothes', 'other_clothes']# VOC2020 folder root#data_root = r'/home/fire_data/'# voc的訓(xùn)練txt 驗證txt 必須在VOC*** 以及目錄下 不能在Main目錄下面;它是在統(tǒng)計目錄下def convert(size, box):dw = 1./(size[0])dh = 1./(size[1])x = (box[0] + box[1])/2.0 - 1y = (box[2] + box[3])/2.0 - 1w = box[1] - box[0]h = box[3] - box[2]x = x*dww = w*dwy = y*dhh = h*dhreturn (x,y,w,h)def convert_annotation(year, image_id):global data_rootin_file = open('Annotations/%s.xml'%(image_id), encoding='utf-8')out_file = open('labels/%s.txt'%(image_id), 'w')tree=ET.parse(in_file)root = tree.getroot()size = root.find('size')w = int(size.find('width').text)h = int(size.find('height').text)for obj in root.iter('object'):difficult = obj.find('difficult').textcls = obj.find('name').textif cls not in classes: # or int(difficult)==1 不關(guān)心difficultcontinuecls_id = classes.index(cls)xmlbox = obj.find('bndbox')b = (float(xmlbox.find('xmin').text), float(xmlbox.find('xmax').text), float(xmlbox.find('ymin').text), float(xmlbox.find('ymax').text))bb = convert((w,h), b)out_file.write(str(cls_id) + " " + " ".join([str(a) for a in bb]) + '\n')# wd = getcwd()for year, image_set in sets:# if not os.path.exists(data_root + 'VOC%s/labels/'%(year)):# os.makedirs(data_root + 'VOC%s/labels/'%(year))image_ids = open('ImageSets/Main/%s.txt'%(image_set)).read().strip().split()#有空格的就不行了list_file = open('%s_%s.txt'%(year, image_set), 'w')for image_id in image_ids:print(image_id)list_file.write('JPEGImages/%s.jpg\n'%(image_id))convert_annotation(year, image_id)list_file.close()'''fire-detect:train.txttest.txt'''root = r'./JPEGImages/'f = open(r'./2020_train.txt', 'w')names = os.listdir(root)for name in names:print(name)f.write(os.path.join(root, name)+'\n')f.close()# 6:4 -> train.txt test.txt
制作好yolo格式的數(shù)據(jù)集之后,還需要創(chuàng)建一個data.yaml文件,我的data.yaml文件如下:
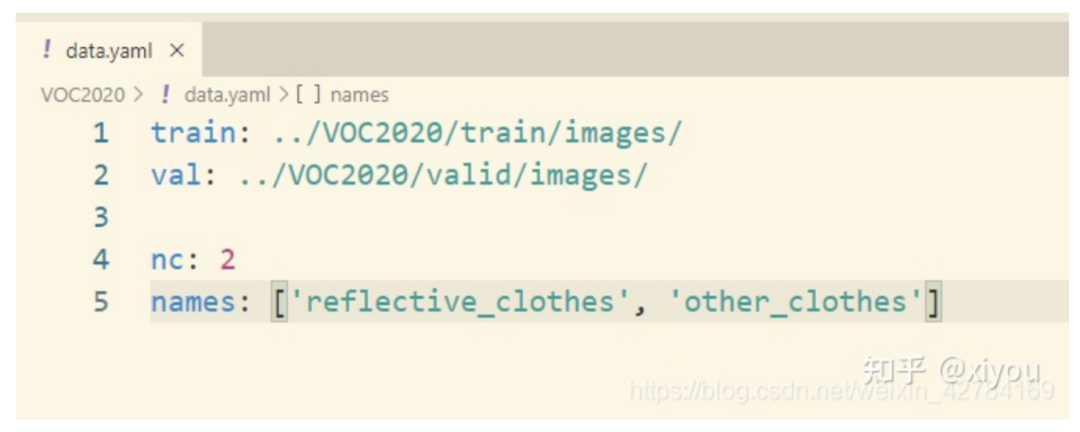
其中:(1)train,val路徑為你的各個集合圖像實(shí)際路徑; (2)nc:數(shù)據(jù)集的類別數(shù),這里我的數(shù)據(jù)集反光衣只有兩類,為2; (3)names:數(shù)據(jù)集類別名稱。
可以對照我的修改自己的數(shù)據(jù)集就行了。VOC2020就是我們最后制作好的數(shù)據(jù)集,需要和yololv5放在同一級目錄下。(也不是必須要放在同一級目錄下面,其實(shí)你看懂我的data.yaml可以自己修改數(shù)據(jù)集所在路徑。)

最后修改yolov5/models/yolov5s.yaml,將nc = 80修改為nc = 2,因為數(shù)據(jù)集中只有reflective_clothes和other_clothes2個類別。
訓(xùn)練命令
從預(yù)訓(xùn)練模型加載:
cd yolov5python train.py --img 640 --batch 4 --epochs 300 --data ../VOC2020/data.yaml --cfg models/yolov5s.yaml --weights weights/yolov5s.pt
從頭開始訓(xùn)練:
cd yolov5python train.py --img 640 --batch 4 --epochs 300 --data ../VOC2020/data.yaml --cfg models/yolov5s.yaml --weights ""
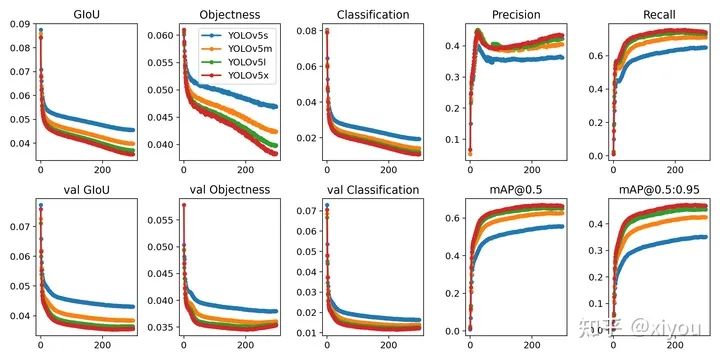
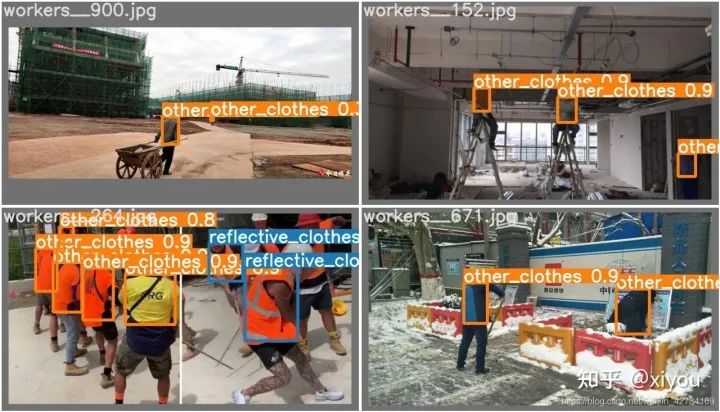
在2080ti上面大概2k張數(shù)據(jù)訓(xùn)練了4個小時左右。訓(xùn)練結(jié)束后,可以在runs/exp1/weights文件夾下面可以找下自己數(shù)據(jù)集的權(quán)重文件,有best.pt和last.pt。然后可以用val文件夾下面的照片測試一下效果。附上我訓(xùn)練出來的反光衣模型效果。
運(yùn)行命令:可以測試自己的數(shù)據(jù)集效果,得到的照片在inference/output文件下。
python detect.py --source ../VOC2020/val/images/workers__112.jpg --weights runs/exp/weights/best.ptdetect.py也對各種圖像來源進(jìn)行推理:
python detect.py --source 0 # webcamfile.jpg # imagefile.mp4 # videopath/ # directorypath/*.jpg # glob'https://youtu.be/NUsoVlDFqZg' # YouTube video'rtsp://example.com/media.mp4' # RTSP, RTMP, HTTP stream
至此,使用yolov5訓(xùn)練自己的數(shù)據(jù)集就完成了。
使用TensorRT對模型進(jìn)行加速
推薦大佬的Repo:https://github.com/wang-xinyu/tensorrtx/tree/master/yolov5
這個repo里面常用的CNN分類網(wǎng)絡(luò),目標(biāo)檢測,人臉識別都有對應(yīng)的實(shí)現(xiàn)。作者用TensorRT api重寫了網(wǎng)絡(luò)結(jié)構(gòu),想直接上手,請看下面步驟。
環(huán)境要求: GTX1080 / Ubuntu16.04 / cuda10.0 / cudnn7.6.5 / tensorrt7.0.0 / nvinfer7.0.0 / opencv3.3
下面介紹怎么使用該repo對模型進(jìn)行加速。
config
注意:配置文件一定要先修改,具體怎么改,看自己訓(xùn)練時候的參數(shù),改成對應(yīng)一致的就ok了
Choose the model s/m/l/x by NET macro in yolov5.cpp Input shape defined in yololayer.h Number of classes defined in yololayer.h, DO NOT FORGET TO ADAPT THIS, If using your own model INT8/FP16/FP32 can be selected by the macro in yolov5.cpp, INT8 need more steps, pls follow How to Run first and then go the INT8 Quantization below GPU id can be selected by the macro in yolov5.cpp NMS thresh in yolov5.cpp BBox confidence thresh in yolov5.cpp Batch size in yolov5.cpp
1. generate yolov5s.wts from pytorch with yolov5s.pt, or download .wts from model zoo //生成.wts文件//git clone https://github.com/wang-xinyu/tensorrtx.git//git clone https://github.com/ultralytics/yolov5.git// download its weights 'yolov5s.pt'//下載與訓(xùn)練模型yolov5s.pt或者用我們自己訓(xùn)練好的best.pt文件// copy tensorrtx/yolov5/gen_wts.py into ultralytics/yolov5//把tensorrtx/yolov5/gen_wts.py 這個腳本復(fù)制到y(tǒng)olov5文件夾下// ensure the file name is yolov5s.pt and yolov5s.wts in gen_wts.py//我們的pt文件不一定非要是yolov5s.pt(具體自己也可以修改,在gen_wts.pt中修改,不想修改的就和作者的命名保持一致),運(yùn)行腳本在訓(xùn)練目錄下會生成一個yolov5s.wts文件// go to ultralytics/yolov5python gen_wts.py// a file 'yolov5s.wts' will be generated.2. build tensorrtx/yolov5 and run //build然后運(yùn)行// put yolov5s.wts into tensorrtx/yolov5//把上面生成的yolov5s.wts文件復(fù)制到tensorrtx/yolov5下// go to tensorrtx/yolov5 進(jìn)入到tensorrtx/yolov5// ensure the macro NET in yolov5.cpp is s//注意:一定要查看yololayer.h和yolov5.cpp文件,主要修改對應(yīng)的參數(shù)和我們訓(xùn)練時候保持一致,不然會報錯// update CLASS_NUM in yololayer.h if your model is trained on custom dataset//剩下的就沒什么好說的了,直接一句句執(zhí)行就ok了mkdir buildcd buildcmake ..makesudo ./yolov5 -s [.wts] [.engine] [s/m/l/x or c gd gw] // serialize model to plan filesudo ./yolov5 -d [.engine] [image folder] // deserialize and run inference, the images in [image folder] will be processed.// For example yolov5ssudo ./yolov5 -s yolov5s.wts yolov5s.engine ssudo ./yolov5 -d yolov5s.engine ../samples// For example Custom model with depth_multiple=0.17, width_multiple=0.25 in yolov5.yamlsudo ./yolov5 -s yolov5_custom.wts yolov5.engine c 0.17 0.25sudo ./yolov5 -d yolov5.engine ../samples3. check the images generated, as follows. _zidane.jpg and _bus.jpg4. optional, load and run the tensorrt model in python// install python-tensorrt, pycuda, etc.// ensure the yolov5s.engine and libmyplugins.so have been built//運(yùn)行yolov5_trt.py對照片進(jìn)行檢測python yolov5_trt.py
如果環(huán)境沒問題,最后一步會在build文件夾下面生成一個.engine文件即為序列化之后的文件,使用時候反序列化就ok了。

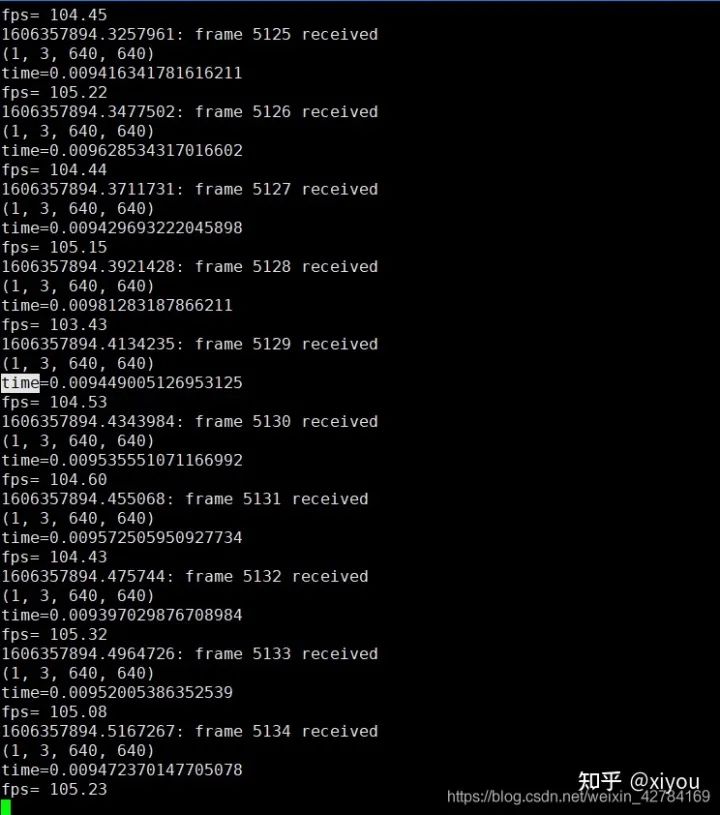
檢測結(jié)果: 我在2080ti上,使用原始的yolov5對640*640大小的圖片進(jìn)行檢測,推理時間大概在20ms左右。下面附上加速之后的效果(用的是fp16),使用fp16加速之后推理一幀的時間在10ms左右,大概加速了一倍。
注意: 不同型號的gpu,不同數(shù)據(jù)用來測試結(jié)果會有區(qū)別。使用不同型號GPU生成的engine文件是不能通用的,比如我在2080ti上面跑出來的engine文件是不能在3080ti上面跑的,想要在3080ti上面跑,必須要重新make。
很多同學(xué)想知道單張照片檢測出來了,怎么使用這個代碼推理視頻呢?其實(shí)很簡單,使用cv2.VideoCapture()就可以從視頻中讀取一幀一幀的照片,然后對一張張照片進(jìn)行處理就ok了。
int8量化
這里先不講int8量化的原理,只是介紹這個repo中使用int8來推理加速的步驟,后面會專門寫一篇文章來講int8量化原理。
1.準(zhǔn)備校準(zhǔn)圖像,你可以從你的訓(xùn)練集中隨機(jī)選擇1000s張圖像。 2.把圖像解壓到y(tǒng)olov5/build文件夾下 3.在 yolov5.cpp 中設(shè)置了宏 USE_INT8 4.序列化模型并進(jìn)行測試。
使用int8推理雖然要比fp32和fp16快很多,但是掉點(diǎn)會很嚴(yán)重,在硬件條件充足情況下還是推薦設(shè)置為fp32。
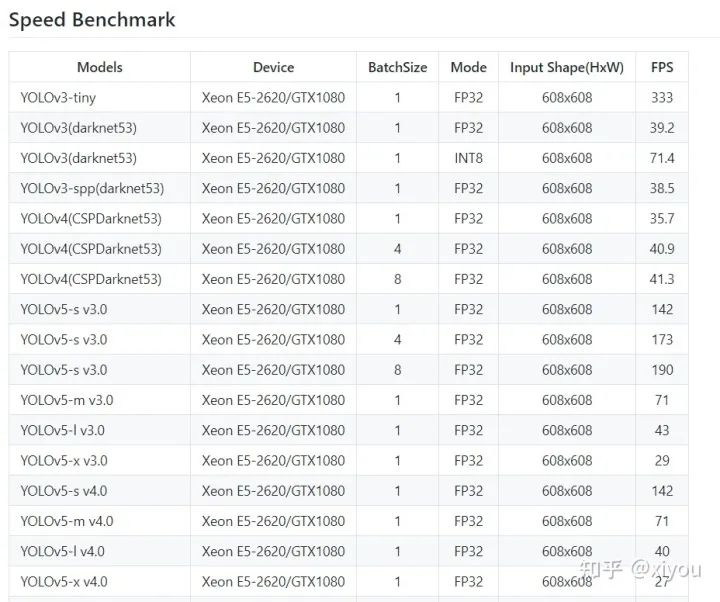
Tensorrt各yolo模型對比
參考:
公眾號后臺回復(fù)“83”獲取朱思語:基于深度學(xué)習(xí)的視覺稠密建圖和定位~

# CV技術(shù)社群邀請函 #
備注:姓名-學(xué)校/公司-研究方向-城市(如:小極-北大-目標(biāo)檢測-深圳)
即可申請加入極市目標(biāo)檢測/圖像分割/工業(yè)檢測/人臉/醫(yī)學(xué)影像/3D/SLAM/自動駕駛/超分辨率/姿態(tài)估計/ReID/GAN/圖像增強(qiáng)/OCR/視頻理解等技術(shù)交流群
每月大咖直播分享、真實(shí)項目需求對接、求職內(nèi)推、算法競賽、干貨資訊匯總、與 10000+來自港科大、北大、清華、中科院、CMU、騰訊、百度等名校名企視覺開發(fā)者互動交流~